
Users Manual - English
Page 1
... quickly if you can use the printer. Please visit us at http://solutions.brother.com/ where you use the Quick Setup Guide to set up the printer. Please read this User's Guide thoroughly before you need to. Brother Color Printer USER'S GUIDE HL-3040CN HL-3070CW For visually-impaired users You can read this manual with Screen Reader 'text-to...
... quickly if you can use the printer. Please visit us at http://solutions.brother.com/ where you use the Quick Setup Guide to set up the printer. Please read this User's Guide thoroughly before you need to. Brother Color Printer USER'S GUIDE HL-3040CN HL-3070CW For visually-impaired users You can read this manual with Screen Reader 'text-to...

Users Manual - English
Page 8
... paper, labels and envelopes 13 Duplex printing...18 Guidelines for printing on both sides of the paper 18 Manual duplex printing ...19 Booklet printing (for Windows® printer driver 22 Printing photos from a digital camera (HL-3070CW only 23 PictBridge requirements ...23 Setting your digital camera ...23 Printing images...24 Connecting a camera as a storage...
... paper, labels and envelopes 13 Duplex printing...18 Guidelines for printing on both sides of the paper 18 Manual duplex printing ...19 Booklet printing (for Windows® printer driver 22 Printing photos from a digital camera (HL-3070CW only 23 PictBridge requirements ...23 Setting your digital camera ...23 Printing images...24 Connecting a camera as a storage...

Users Manual - English
Page 9
button ...76 Back...77 OK ...77 LEDs ...77 LCD ...77 Back light (HL-3070CW only) ...78 LCD messages ...78 Reprinting documents...79 Printing Secure data ...80 Using the control panel LCD menu...82 Menu table...83 Default settings...94 Calibration ...96 Auto Registration ...97 Manual Registration...98 4 Option 99 SO-DI...Tray 1 (Paper jam inside the paper tray 148 Jam Rear (Paper jam behind the back cover 149 Jam Inside (Paper jam inside the printer 151 Improving the print quality...154 Solving print problems ...161 viii 3 Control Panel 75 Control panel ...75 Buttons ...75 Go ...76 Cancel...
button ...76 Back...77 OK ...77 LEDs ...77 LCD ...77 Back light (HL-3070CW only) ...78 LCD messages ...78 Reprinting documents...79 Printing Secure data ...80 Using the control panel LCD menu...82 Menu table...83 Default settings...94 Calibration ...96 Auto Registration ...97 Manual Registration...98 4 Option 99 SO-DI...Tray 1 (Paper jam inside the paper tray 148 Jam Rear (Paper jam behind the back cover 149 Jam Inside (Paper jam inside the printer 151 Improving the print quality...154 Solving print problems ...161 viii 3 Control Panel 75 Control panel ...75 Buttons ...75 Go ...76 Cancel...

Users Manual - English
Page 44
... Copies Media Type Print Quality Color / Mono Multiple Page Manual Duplex / Booklet (Manual Duplex printing 1) Paper Source Scaling Reverse Print Watermark 1 2 Header-Footer Print 1 2 Toner Save Mode Secure Print Administrator 1 2 User Authentication 1 2 4 Color Calibration 1 3 Use Reprint Sleep Time Improve Print Output 1 These settings are not available with the BR-script printer driver for Windows®...
... Copies Media Type Print Quality Color / Mono Multiple Page Manual Duplex / Booklet (Manual Duplex printing 1) Paper Source Scaling Reverse Print Watermark 1 2 Header-Footer Print 1 2 Toner Save Mode Secure Print Administrator 1 2 User Authentication 1 2 4 Color Calibration 1 3 Use Reprint Sleep Time Improve Print Output 1 These settings are not available with the BR-script printer driver for Windows®...
Users Manual - English
Page 84
...HL-3070CW only) 2 This printer has the following manuals: • Adobe Systems Incorporated. The BR-Script interpreter of data it automatically change the interface to select that is turned on which this mode will allocate the entire input buffer to the printer.... This lets it receives. If you to work. ISBN: 0-201-37922-8 • Adobe Systems Incorporated. Automatic interface selection 2 This printer... printer ...printer...printer. Always turn off both your printer...(HL-3070CW only) 2 This printer ...printer supports the PCL6 language of laser printer...
...HL-3070CW only) 2 This printer has the following manuals: • Adobe Systems Incorporated. The BR-Script interpreter of data it automatically change the interface to select that is turned on which this mode will allocate the entire input buffer to the printer.... This lets it receives. If you to work. ISBN: 0-201-37922-8 • Adobe Systems Incorporated. Automatic interface selection 2 This printer... printer ...printer...printer. Always turn off both your printer...(HL-3070CW only) 2 This printer ...printer supports the PCL6 language of laser printer...
Users Manual - English
Page 93
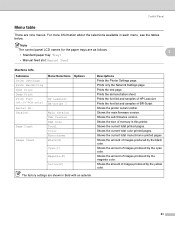
...Shows the current total monochrome printed pages. The factory settings are nine menus. Shows the printer serial number. Shows the amount of images produced by the yellow color. Control Panel Menu table 3 There are shown in Bold with an asterisk. 83 ...Note The control panel LCD names for the paper trays are as follows. 3 • Standard paper tray: Tray1 • Manual feed slot: Manual Feed Machine Info. Submenu Print Settings Print NetSetting Test Print Demo Print Print Font (HL-3070CW...
...Shows the current total monochrome printed pages. The factory settings are nine menus. Shows the printer serial number. Shows the amount of images produced by the yellow color. Control Panel Menu table 3 There are shown in Bold with an asterisk. 83 ...Note The control panel LCD names for the paper trays are as follows. 3 • Standard paper tray: Tray1 • Manual feed slot: Manual Feed Machine Info. Submenu Print Settings Print NetSetting Test Print Demo Print Print Font (HL-3070CW...

Users Manual - English
Page 98
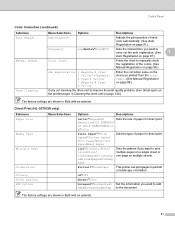
...control panel. 88 If a boot server cannot be found, an APIPA IP address will need to manually enter an IP address from the link-local address range. 1 IPv6 Off*/On Auto*/100B-FD...Bold with an asterisk. 1 On connection to the factory default. If the 'Boot Method' of the internal print server to the network, if the machine's 'Boot Method' is set the IP address and ...a boot server such as 169. 254. [001-254]. [000-255]. Control Panel Network for HL-3040CN users Submenu TCP/IP Ethernet Factory Reset Menu Selections Options Descriptions Boot Method Auto*/Static/RARP/BOOTP...
...control panel. 88 If a boot server cannot be found, an APIPA IP address will need to manually enter an IP address from the link-local address range. 1 IPv6 Off*/On Auto*/100B-FD...Bold with an asterisk. 1 On connection to the factory default. If the 'Boot Method' of the internal print server to the network, if the machine's 'Boot Method' is set the IP address and ...a boot server such as 169. 254. [001-254]. [000-255]. Control Panel Network for HL-3040CN users Submenu TCP/IP Ethernet Factory Reset Menu Selections Options Descriptions Boot Method Auto*/Static/RARP/BOOTP...

Users Manual - English
Page 100
...manually enter an IP address from a boot server such as 169.254.[001-254].[000-255]. The factory settings are shown in ASCII values] Comm. Reset Menu Display Shows Reset Printer Factory Reset Description Resets the printer...HL-3070CW users (continued) Submenu 1 Submenu 2 Menu Selections Options Descriptions WLAN Status (Appears only when WLAN Enable is On.) Status Signal Channel Speed SSID 3 Shows SSID [uses a maximum of the internal.... Color Correction Submenu Menu Selections Color Calibration Calibrate Reset Options Descriptions Carry out calibration to revise the colors. ...
...manually enter an IP address from a boot server such as 169.254.[001-254].[000-255]. The factory settings are shown in ASCII values] Comm. Reset Menu Display Shows Reset Printer Factory Reset Description Resets the printer...HL-3070CW users (continued) Submenu 1 Submenu 2 Menu Selections Options Descriptions WLAN Status (Appears only when WLAN Enable is On.) Status Signal Channel Speed SSID 3 Shows SSID [uses a maximum of the internal.... Color Correction Submenu Menu Selections Color Calibration Calibrate Reset Options Descriptions Carry out calibration to revise the colors. ...
Users Manual - English
Page 101
...Set the information you printed from the Print Chart. (See Manual Registration on page 98.) Carry out cleaning the drum unit to manually check the registration of paper for direct print. Direct Print (HL-3070CW only) Submenu Paper Size Menu Selections Media Type Multiple Page ...printed pages in Bold with an asterisk. 91 Portrait*/Landscape This printer can print pages in Bold with an asterisk. Drum Cleaning Menu Selections Options Descriptions Registration Adjusts the print position of each color automatically. (See Auto Registration on page 97.) Frequency Low/...
...Set the information you printed from the Print Chart. (See Manual Registration on page 98.) Carry out cleaning the drum unit to manually check the registration of paper for direct print. Direct Print (HL-3070CW only) Submenu Paper Size Menu Selections Media Type Multiple Page ...printed pages in Bold with an asterisk. 91 Portrait*/Landscape This printer can print pages in Bold with an asterisk. Drum Cleaning Menu Selections Options Descriptions Registration Adjusts the print position of each color automatically. (See Auto Registration on page 97.) Frequency Low/...

Users Manual - English
Page 153
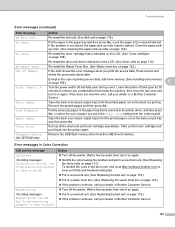
...Error Replace the Drum Unit. Fuser Error Jam XXX Low Temperature Manual Feed A ction The USB device was removed while data was processing. Take out the drum unit and toner cartridge assembly for the toner color that is indicated on again. Note The LCD names for each... printer to be replaced. If you . Close the cover that is cleared from or Brother Customer Service. Wait a few seconds and then turn it in the manual feed slot as follows. • Standard paper tray: Tray 1 6 • Manual feed slot: Manual Feed Error messages Error message Access Error (HL-3070CW only...
...Error Replace the Drum Unit. Fuser Error Jam XXX Low Temperature Manual Feed A ction The USB device was removed while data was processing. Take out the drum unit and toner cartridge assembly for the toner color that is indicated on again. Note The LCD names for each... printer to be replaced. If you . Close the cover that is cleared from or Brother Customer Service. Wait a few seconds and then turn it in the manual feed slot as follows. • Standard paper tray: Tray 1 6 • Manual feed slot: Manual Feed Error messages Error message Access Error (HL-3070CW only...
Users Manual - English
Page 154
... this does not clear the error, call your dealer or Brother Customer Service. Leave the printer off the printer. Open the back cover (back output tray) to remove ...HL-3070CW only) A ction Re-install the belt unit. (See Belt unit on again. Calibration failed. Put in a new belt unit. (See Replacing the belt unit on page 118.) Put in a new drum unit. (See Replacing the drum units on page 113.) To identify the color...your dealer or Brother Customer Service. 144 Take out the toner cartridge and put tray and then press Go. See Troubleshooting chapter in the manual feed slot. ...
... this does not clear the error, call your dealer or Brother Customer Service. Leave the printer off the printer. Open the back cover (back output tray) to remove ...HL-3070CW only) A ction Re-install the belt unit. (See Belt unit on again. Calibration failed. Put in a new belt unit. (See Replacing the belt unit on page 118.) Put in a new drum unit. (See Replacing the drum units on page 113.) To identify the color...your dealer or Brother Customer Service. 144 Take out the toner cartridge and put tray and then press Go. See Troubleshooting chapter in the manual feed slot. ...

Users Manual - English
Page 176
Appendix Control panel A Model LED LCD Button HL-3040CN HL-3070CW 2 LEDs: Data LED, Error LED 1 line, 16 Digits 1 line, 16 Digits, 1 color 7 buttons: Go, Cancel, Secure Print, OK, Back and 2 scroll buttons Paper handling A Model Paper Input 1 Paper Output 1 Duplex Manual Feed Slot Paper tray (Standard) Face-down Face-up 1 Calculated with 80 g/m2 (20 lb) paper Media specifications...
Appendix Control panel A Model LED LCD Button HL-3040CN HL-3070CW 2 LEDs: Data LED, Error LED 1 line, 16 Digits 1 line, 16 Digits, 1 color 7 buttons: Go, Cancel, Secure Print, OK, Back and 2 scroll buttons Paper handling A Model Paper Input 1 Paper Output 1 Duplex Manual Feed Slot Paper tray (Standard) Face-down Face-up 1 Calculated with 80 g/m2 (20 lb) paper Media specifications...
Network Users Manual - English
Page 1
Note: Not all countries. Keep the CD-ROM in all models are available in a convenient place so you can use it quickly if you can get product support, the latest driver updates and utilities, and answers to . Multi-Protocol On-board Ethernet Print Server and Wireless (IEEE 802.11b/g) Ethernet Print Server NETWORK USER'S GUIDE HL-3040CN HL-3070CW Please read this manual thoroughly before using the machine. Version 0 ENG Please visit us at http://solutions.brother.com/ where you need to frequently asked questions (FAQs) and technical questions.
Note: Not all countries. Keep the CD-ROM in all models are available in a convenient place so you can use it quickly if you can get product support, the latest driver updates and utilities, and answers to . Multi-Protocol On-board Ethernet Print Server and Wireless (IEEE 802.11b/g) Ethernet Print Server NETWORK USER'S GUIDE HL-3040CN HL-3070CW Please read this manual thoroughly before using the machine. Version 0 ENG Please visit us at http://solutions.brother.com/ where you need to frequently asked questions (FAQs) and technical questions.
Network Users Manual - English
Page 3
... Ltd., this document represents all editions of Windows Vista®. „ The printer illustration is approved for any damages (including consequential) caused by reliance on HL-3070CW. Brother reserves the right to change without notice in the specifications and materials contained herein and shall not be responsible for use this product outside the ...® 2003 x64 Edition. „ Windows Vista® in the country of this product are subject to make changes without notice. The contents of this manual and the specifications of purchase only. ii
... Ltd., this document represents all editions of Windows Vista®. „ The printer illustration is approved for any damages (including consequential) caused by reliance on HL-3070CW. Brother reserves the right to change without notice in the specifications and materials contained herein and shall not be responsible for use this product outside the ...® 2003 x64 Edition. „ Windows Vista® in the country of this product are subject to make changes without notice. The contents of this manual and the specifications of purchase only. ii

Network Users Manual - English
Page 45
Wireless configuration for Windows® using the Brother automatic installer application (For HL-3070CW) • If your network is not configured for entering the Name(SSID) and then click Next. 4 m If your access point is set to o. 35 To continue configuration, click OK and go to not broadcast the SSID you can manually add it by clicking the Add button. Follow the on-screen instructions for Authentication and Encryption, the following screen will appear.
Wireless configuration for Windows® using the Brother automatic installer application (For HL-3070CW) • If your network is not configured for entering the Name(SSID) and then click Next. 4 m If your access point is set to o. 35 To continue configuration, click OK and go to not broadcast the SSID you can manually add it by clicking the Add button. Follow the on-screen instructions for Authentication and Encryption, the following screen will appear.

Network Users Manual - English
Page 47
The settings will be sent to your machine. 37 The Network Configuration page will be automatically changed to WLAN Enable when the wireless settings are sent to your machine. The settings will be printed. 4 Note • If you click Cancel. Wireless configuration for your network. • The control panel settings will remain unchanged if you want to manually enter the IP address settings of your machine, click Change IP Address and enter the necessary IP address settings for Windows® using the Brother automatic installer application (For HL-3070CW) o Click Next.
The settings will be sent to your machine. 37 The Network Configuration page will be automatically changed to WLAN Enable when the wireless settings are sent to your machine. The settings will be printed. 4 Note • If you click Cancel. Wireless configuration for your network. • The control panel settings will remain unchanged if you want to manually enter the IP address settings of your machine, click Change IP Address and enter the necessary IP address settings for Windows® using the Brother automatic installer application (For HL-3070CW) o Click Next.

Network Users Manual - English
Page 53
to choose WLAN. m Press + or - Press OK. Please refer to the instruction manual that supports SecureEasySetup™, Wi-Fi Protected Setup or AOSS™ for 2 minutes. Press OK. k Press + or - l Press + or - to choose Network. Note If ... you want to choose SES/WPS/AOSS. to configure your machine using the PIN (Personal Identification Number) Method, see Wireless configuration using the Brother automatic installer application (For HL-3070CW) i Confirm the on-screen message and click Next. 4 j Press any of the Menu buttons (+, -, OK or Back) of Wi-Fi Protected Setup ...
to choose WLAN. m Press + or - Press OK. Please refer to the instruction manual that supports SecureEasySetup™, Wi-Fi Protected Setup or AOSS™ for 2 minutes. Press OK. k Press + or - l Press + or - to choose Network. Note If ... you want to choose SES/WPS/AOSS. to configure your machine using the PIN (Personal Identification Number) Method, see Wireless configuration using the Brother automatic installer application (For HL-3070CW) i Confirm the on-screen message and click Next. 4 j Press any of the Menu buttons (+, -, OK or Back) of Wi-Fi Protected Setup ...

Network Users Manual - English
Page 62
Wireless configuration for Windows® using the Brother automatic installer application (For HL-3070CW) o The wizard will appear. Then, click Refresh. • If your target Ad-hoc network does not appear on the list, you wish to r. 52 To ... is no access point., and then enter the Name (SSID) and the Channel number, and then click Next. Choose the Ad-hoc network you can manually add it by clicking the Add button. p If your machine. Check This is an Ad-hoc network and there is not configured for Authentication and...
Wireless configuration for Windows® using the Brother automatic installer application (For HL-3070CW) o The wizard will appear. Then, click Refresh. • If your target Ad-hoc network does not appear on the list, you wish to r. 52 To ... is no access point., and then enter the Name (SSID) and the Channel number, and then click Next. Choose the Ad-hoc network you can manually add it by clicking the Add button. p If your machine. Check This is an Ad-hoc network and there is not configured for Authentication and...

Network Users Manual - English
Page 64
Wireless configuration for your network. 54 The Network Configuration page will be sent to manually enter the IP address settings of your machine. The settings will be printed. 4 Note If you click Cancel. The settings will remain unchanged if you want to your machine, click Change IP Address and enter the necessary IP address settings for Windows® using the Brother automatic installer application (For HL-3070CW) r Click Next.
Wireless configuration for your network. 54 The Network Configuration page will be sent to manually enter the IP address settings of your machine. The settings will be printed. 4 Note If you click Cancel. The settings will remain unchanged if you want to your machine, click Change IP Address and enter the necessary IP address settings for Windows® using the Brother automatic installer application (For HL-3070CW) r Click Next.

Network Users Manual - English
Page 66
... settings shown on this screen are for Windows® using the Brother automatic installer application (For HL-3070CW) u To communicate with the configured wireless device, you chose to install the printer driver in step h, Go to Installing the printer driver on page 57. 56 Manually change the wireless settings on your computer to match the machine...
... settings shown on this screen are for Windows® using the Brother automatic installer application (For HL-3070CW) u To communicate with the configured wireless device, you chose to install the printer driver in step h, Go to Installing the printer driver on page 57. 56 Manually change the wireless settings on your computer to match the machine...


