
Users Manual - English
Page 20
Stacking the printed transparencies may cause a paper jam or the transparency to the printer. You can clear this error indication by pressing Go. 2 • When printing on before you put paper or transparencies in the tray. Printing Methods g Send the print data to curl. 12 Note • The Error LED on the control panel will light up to indicate No paper if the power switch is turned on transparencies, remove each transparency as soon as it has been printed.
Stacking the printed transparencies may cause a paper jam or the transparency to the printer. You can clear this error indication by pressing Go. 2 • When printing on before you put paper or transparencies in the tray. Printing Methods g Send the print data to curl. 12 Note • The Error LED on the control panel will light up to indicate No paper if the power switch is turned on transparencies, remove each transparency as soon as it has been printed.
Users Manual - English
Page 43
... the Use Reprint check box in order (Toner, Drum, Error, Ready), and then release the Go button. Driver and Software „ Job Spooling The printer keeps the last print job sent to it in sleep mode, the Ready LED lights up slightly, but the printer can still receive data. In sleep mode, the...an overlay on for power saving. „ Macro (HL-2150N / HL-2170W only) You can save time and increase printing speed for often used information such as though it down for about 4 seconds until all the LEDs light up the printer to stop the printer going into sleep mode. When you keep sleep mode...
... the Use Reprint check box in order (Toner, Drum, Error, Ready), and then release the Go button. Driver and Software „ Job Spooling The printer keeps the last print job sent to it in sleep mode, the Ready LED lights up slightly, but the printer can still receive data. In sleep mode, the...an overlay on for power saving. „ Macro (HL-2150N / HL-2170W only) You can save time and increase printing speed for often used information such as though it down for about 4 seconds until all the LEDs light up the printer to stop the printer going into sleep mode. When you keep sleep mode...
Users Manual - English
Page 56
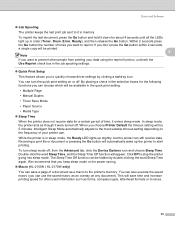
LED is blinking. 48 or or LED is off. 4 Control Panel 4 LEDs (Light Emitting Diodes) 4 This section refers to three LEDs Toner, Drum and Error, and a dual function Ready LED & Go button on the control panel. 1 Toner LED The Toner LED indicates when the Toner is low or at the ...end 4 of its life. 2 Drum LED 1 The Drum LED indicates when the Drum is nearing the end of its life. 2 3 Error LED 3 The Error LED indicates when the printer is dimmed. The LED is in one of the following states: No paper / Paper jam / Cover open 4 Ready LED The Ready LED...
LED is blinking. 48 or or LED is off. 4 Control Panel 4 LEDs (Light Emitting Diodes) 4 This section refers to three LEDs Toner, Drum and Error, and a dual function Ready LED & Go button on the control panel. 1 Toner LED The Toner LED indicates when the Toner is low or at the ...end 4 of its life. 2 Drum LED 1 The Drum LED indicates when the Drum is nearing the end of its life. 2 3 Error LED 3 The Error LED indicates when the printer is dimmed. The LED is in one of the following states: No paper / Paper jam / Cover open 4 Ready LED The Ready LED...
Users Manual - English
Page 61
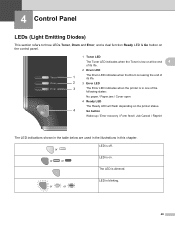
...power on again. If the error occurs again, call your dealer or Brother Customer Service. If the error remains after switching the printer back on, press the Go button and make a note of the LED's that a service call is an error that cannot be cleared by lighting up all the LEDs as shown...to print again. LED indications while pressing the Go button LEDs Toner Main PCB failure Fuser unit failure 1 Laser unit failure Main motor failure High voltage failure Drum Error Ready 1 If this error occurs, turn off the power switch, and then turn it back on and try to your dealer or...
...power on again. If the error occurs again, call your dealer or Brother Customer Service. If the error remains after switching the printer back on, press the Go button and make a note of the LED's that a service call is an error that cannot be cleared by lighting up all the LEDs as shown...to print again. LED indications while pressing the Go button LEDs Toner Main PCB failure Fuser unit failure 1 Laser unit failure Main motor failure High voltage failure Drum Error Ready 1 If this error occurs, turn off the power switch, and then turn it back on and try to your dealer or...
Users Manual - English
Page 63
... for about 4 seconds until all the LEDs light up. If you want to use the printer. „ Form feed If the blue Ready LED blinks for about 4 seconds until all the LEDs light up and then release it . 4 Press the Go button again. The Ready and Error LEDs will flash as the job is... being canceled. „ Wake-up If the printer is being canceled.
... for about 4 seconds until all the LEDs light up. If you want to use the printer. „ Form feed If the blue Ready LED blinks for about 4 seconds until all the LEDs light up and then release it . 4 Press the Go button again. The Ready and Error LEDs will flash as the job is... being canceled. „ Wake-up If the printer is being canceled.
Users Manual - English
Page 64
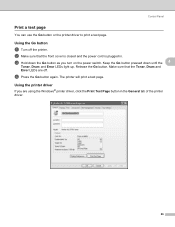
... print a test page. c Hold down until the 4 Toner, Drum and Error LEDs light up. Keep the Go button pressed down the Go button as you are off the printer. Using the Go button 4 a Turn off . d Press the Go button again. Make sure that the front cover is closed and the power ...cord is plugged in the General tab of the printer driver. 56 Using the printer driver 4 If you turn on the power switch. b Make sure that the Toner, Drum and Error LEDs are using the Windows® printer driver, click the Print Test Page button in . Control Panel Print a...
... print a test page. c Hold down until the 4 Toner, Drum and Error LEDs light up. Keep the Go button pressed down the Go button as you are off the printer. Using the Go button 4 a Turn off . d Press the Go button again. Make sure that the front cover is closed and the power ...cord is plugged in the General tab of the printer driver. 56 Using the printer driver 4 If you turn on the power switch. b Make sure that the Toner, Drum and Error LEDs are using the Windows® printer driver, click the Print Test Page button in . Control Panel Print a...
Users Manual - English
Page 66
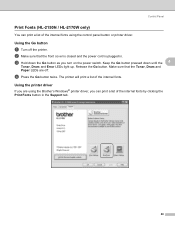
... Fonts (HL-2150N / HL-2170W only) 4 You can print a list of the internal fonts by clicking the Print Fonts button in . d Press the Go button twice. The printer will print a list of the internal fonts using the Brother's Windows® printer driver, you turn on the power switch. c Hold down until the 4 Toner, Drum and Error LEDs light up.
... Fonts (HL-2150N / HL-2170W only) 4 You can print a list of the internal fonts by clicking the Print Fonts button in . d Press the Go button twice. The printer will print a list of the internal fonts using the Brother's Windows® printer driver, you turn on the power switch. c Hold down until the 4 Toner, Drum and Error LEDs light up.
Users Manual - English
Page 67
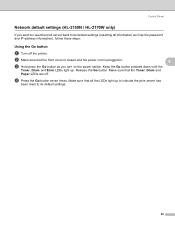
Control Panel Network default settings (HL-2150N / HL-2170W only) 4 If you want to reset the print server back to its default settings (resetting all information such as you turn on the power switch. b Make sure that the Toner, Drum and Paper LEDs are off the printer. Keep the Go button pressed ... Release the Go button. Make sure that all the LEDs light up . d Press the Go button seven times. Make sure that the front cover is closed and the power cord is plugged in. 4 c Hold down until the Toner, Drum and Error LEDs light up to indicate the print server has been reset to...
Control Panel Network default settings (HL-2150N / HL-2170W only) 4 If you want to reset the print server back to its default settings (resetting all information such as you turn on the power switch. b Make sure that the Toner, Drum and Paper LEDs are off the printer. Keep the Go button pressed ... Release the Go button. Make sure that all the LEDs light up . d Press the Go button seven times. Make sure that the front cover is closed and the power cord is plugged in. 4 c Hold down until the Toner, Drum and Error LEDs light up to indicate the print server has been reset to...
Users Manual - English
Page 87
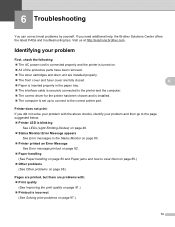
... and is installed. „ The computer is blinking See LEDs (Light Emitting Diodes) on page 48. „ Status Monitor Error Message appears See Error messages in the Status Monitor on page 80. „ Printer printed an Error Message See Error message printout on page 82. „ Paper handling (See Paper ...handling on page 83 and Paper jams and how to the correct printer port. Visit us at http://solutions.brother.com. Printer does not print: If you need ...
... and is installed. „ The computer is blinking See LEDs (Light Emitting Diodes) on page 48. „ Status Monitor Error Message appears See Error messages in the Status Monitor on page 80. „ Printer printed an Error Message See Error message printout on page 82. „ Paper handling (See Paper ...handling on page 83 and Paper jams and how to the correct printer port. Visit us at http://solutions.brother.com. Printer does not print: If you need ...
Users Manual - English
Page 137
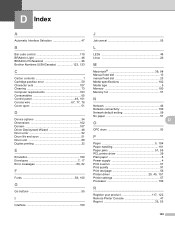
D Index A Automatic Interface Selection 47 B Bar code control 110 BRAdmin Light 46 BRAdmin Professional 46 Brother Numbers (USA/Canada 122, 123 C Carton contents 1 Cartridge position error 50 Character sets 107 Cleaning 73 Computer requirements 103 Consumables 60 Control panel 48, 101 Corona wire 67, 77, 78 Cover open 51 D Device... 46 Network connectivity 100 Network default setting 59 No paper 51 D O OPC drum 93 P Paper 5, 104 Paper handling 101 Paper jams 51, 85 PCL printer driver 29 Plain paper 6 Power supply 4 Print overrun 51 Print quality 91 Print test page 56...
D Index A Automatic Interface Selection 47 B Bar code control 110 BRAdmin Light 46 BRAdmin Professional 46 Brother Numbers (USA/Canada 122, 123 C Carton contents 1 Cartridge position error 50 Character sets 107 Cleaning 73 Computer requirements 103 Consumables 60 Control panel 48, 101 Corona wire 67, 77, 78 Cover open 51 D Device... 46 Network connectivity 100 Network default setting 59 No paper 51 D O OPC drum 93 P Paper 5, 104 Paper handling 101 Paper jams 51, 85 PCL printer driver 29 Plain paper 6 Power supply 4 Print overrun 51 Print quality 91 Print test page 56...


