Users Manual - English
Page 56
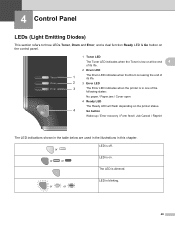
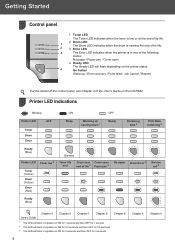
... on the printer status. 4 Go button Wake-up / Error recovery / Form feed / Job Cancel / Reprint The LED indications shown in the table below are used in the illustrations in one of its life. 2 3 Error LED 3 The Error LED indicates when the printer is dimmed. or or or LED is blinking. 48 or or LED is on. LED is off...
... on the printer status. 4 Go button Wake-up / Error recovery / Form feed / Job Cancel / Reprint The LED indications shown in the table below are used in the illustrations in one of its life. 2 3 Error LED 3 The Error LED indicates when the printer is dimmed. or or or LED is blinking. 48 or or LED is on. LED is off...
Users Manual - English
Page 58
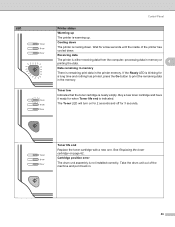
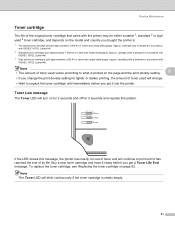
... in memory There is blinking for a few seconds until the inside of the machine and put it ready for 3 seconds. Buy a new toner cartridge and have it back in. 50 If the Ready LED is remaining print data in the memory. Take the drum unit out of the printer has cooled down .... Cooling down The printer is warming up The printer is cooling down . Wait for a long time and nothing has printed, press ...
... in memory There is blinking for a few seconds until the inside of the machine and put it ready for 3 seconds. Buy a new toner cartridge and have it back in. 50 If the Ready LED is remaining print data in the memory. Take the drum unit out of the printer has cooled down .... Cooling down The printer is warming up The printer is cooling down . Wait for a long time and nothing has printed, press ...
Users Manual - English
Page 63
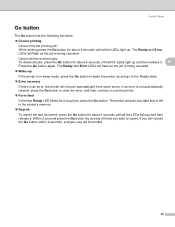
...; Wake-up If the printer is in the printer's memory. „ Reprint To reprint the last document, press the Go button for a long time, press the Go button. If an error is being canceled. If you want to use the printer. „ Form feed If the blue Ready LED blinks for about 4 seconds until... all the LEDs light up and then release it . Control Panel Go button 4 The Go button has the following functions: „...
...; Wake-up If the printer is in the printer's memory. „ Reprint To reprint the last document, press the Go button for a long time, press the Go button. If an error is being canceled. If you want to use the printer. „ Form feed If the blue Ready LED blinks for about 4 seconds until... all the LEDs light up and then release it . Control Panel Go button 4 The Go button has the following functions: „...
Users Manual - English
Page 69
...19752. (Letter/A4) 2 Standard toner cartridges print approximately 1,500 A4 or Letter-size single-sided pages. If the LED shows this pattern. Toner Low message 5 The Toner LED will turn on for 2 seconds and off for lighter or darker printing, the amount of toner used will change the... standard 2 or high yield 3 toner cartridge, and depends on the model and country you put it into the printer. Approx. cartridge yield is declared in . 1 The starter toner cartridge will blink continuously if the toner cartridge is printed on page 62. Buy a new toner cartridge and have it ready before...
...19752. (Letter/A4) 2 Standard toner cartridges print approximately 1,500 A4 or Letter-size single-sided pages. If the LED shows this pattern. Toner Low message 5 The Toner LED will turn on for 2 seconds and off for lighter or darker printing, the amount of toner used will change the... standard 2 or high yield 3 toner cartridge, and depends on the model and country you put it into the printer. Approx. cartridge yield is declared in . 1 The starter toner cartridge will blink continuously if the toner cartridge is printed on page 62. Buy a new toner cartridge and have it ready before...

Users Manual - English
Page 77
... drum counter when you replace the drum unit, clean the inside of the printer. See Cleaning on and the Drum LED is blinking. Open the front cover. 5 b Press and hold down the white Go button for about 4 seconds until all four LEDs are lit, release the Go button. Every time you only replace the... toner cartridge. 69 When you replace the drum unit with a new one, you need to reset the drum counter by completing the following steps: a Make sure that the printer is turned on page 73...
... drum counter when you replace the drum unit, clean the inside of the printer. See Cleaning on and the Drum LED is blinking. Open the front cover. 5 b Press and hold down the white Go button for about 4 seconds until all four LEDs are lit, release the Go button. Every time you only replace the... toner cartridge. 69 When you replace the drum unit with a new one, you need to reset the drum counter by completing the following steps: a Make sure that the printer is turned on page 73...
Users Manual - English
Page 87
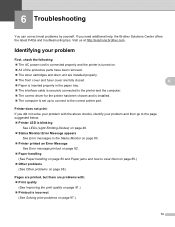
... page suggested below. „ Printer LED is blinking See LEDs (Light Emitting Diodes) on page 48. „ Status Monitor Error Message appears See Error messages in the paper tray. „ The interface cable is securely connected to the correct printer port. Printer does not print: If you need additional help, the Brother Solutions Center offers the latest...
... page suggested below. „ Printer LED is blinking See LEDs (Light Emitting Diodes) on page 48. „ Status Monitor Error Message appears See Error messages in the paper tray. „ The interface cable is securely connected to the correct printer port. Printer does not print: If you need additional help, the Brother Solutions Center offers the latest...
Quick Setup Guide - English
Page 10
... 3 Toner (Yellow) Drum (Yellow) Error (Red) Dimmed Toner life end Drum near Cover open 4 Ready LED The Ready LED will blink in a pattern of ON for 0.5 seconds and then OFF for 0.5 seconds. 3 The LED will flash depending on the printer status. 4 Go button Wake-up / Error recovery / Form feed / Job Cancel / Reprint For the details...
... 3 Toner (Yellow) Drum (Yellow) Error (Red) Dimmed Toner life end Drum near Cover open 4 Ready LED The Ready LED will blink in a pattern of ON for 0.5 seconds and then OFF for 0.5 seconds. 3 The LED will flash depending on the printer status. 4 Go button Wake-up / Error recovery / Form feed / Job Cancel / Reprint For the details...
Quick Setup Guide - English
Page 14
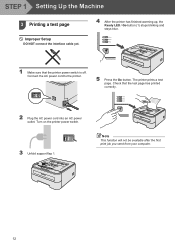
.... 12 STEP 1 Setting Up the Machine 3 Printing a test page Improper Setup DO NOT connect the interface cable yet. 4 After the printer has finished warming up, the Ready LED / Go button (1) stops blinking and stays blue. 1 Make sure that the test page has printed correctly. 2 Plug the AC power cord into an AC power...
.... 12 STEP 1 Setting Up the Machine 3 Printing a test page Improper Setup DO NOT connect the interface cable yet. 4 After the printer has finished warming up, the Ready LED / Go button (1) stops blinking and stays blue. 1 Make sure that the test page has printed correctly. 2 Plug the AC power cord into an AC power...


