

Users Manual - English
Page 2
...have comments or suggestions, please write us at: In USA Printer Customer Support Brother International Corporation 15 Musick Irvine, CA 92618 In CANADA Brother International Corporation (Canada), Ltd. - In USA 1-800-276-7746 In CANADA 1-...800-853-6660 1-514-685-6464 (within Montreal) DEALERS/SERVICE CENTERS (USA only) For the name of fax-back subjects. Marketing Dept. 1, rue Hôtel de Ville Dollard-des-Ormeaux, PQ, Canada H9B 3H6 BROTHER FAX-BACK SYSTEM Brother Customer Service has installed...
...have comments or suggestions, please write us at: In USA Printer Customer Support Brother International Corporation 15 Musick Irvine, CA 92618 In CANADA Brother International Corporation (Canada), Ltd. - In USA 1-800-276-7746 In CANADA 1-...800-853-6660 1-514-685-6464 (within Montreal) DEALERS/SERVICE CENTERS (USA only) For the name of fax-back subjects. Marketing Dept. 1, rue Hôtel de Ville Dollard-des-Ormeaux, PQ, Canada H9B 3H6 BROTHER FAX-BACK SYSTEM Brother Customer Service has installed...
Users Manual - English
Page 16
...;C to 32.5°C (50°F to 90.5°F) • Ambient humidity: 20% to direct sunlight. Environment CHAPTER 1 ABOUT THIS PRINTER • The printer should be installed near a power outlet that contain magnets or generate magnetic fields. • Do not subject the printer to strong physical shocks or vibrations. • Do not...
...;C to 32.5°C (50°F to 90.5°F) • Ambient humidity: 20% to direct sunlight. Environment CHAPTER 1 ABOUT THIS PRINTER • The printer should be installed near a power outlet that contain magnets or generate magnetic fields. • Do not subject the printer to strong physical shocks or vibrations. • Do not...
Users Manual - English
Page 17
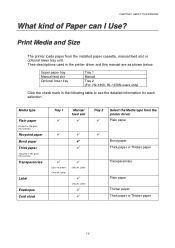
...to 43 lbs.) Transparencies Label Envelopes Card stock Tray 1 ✔ Manual feed slot ✔ Tray 2 ✔ Select the Media type from the installed paper cassette, manual feed slot or optional lower tray unit. Their descriptions used in the following table to 10 sheets Only A4, Letter ✔ Only...Plain paper Thicker paper Thick paper or Thicker paper 1-8 Upper paper tray Manual feed slot Optional lower tray Tray 1 Manual Tray 2 (For HL-1450, HL-1470N users only) Click the check mark in the printer driver and this manual are as shown below. Print Media and Size The printer...
...to 43 lbs.) Transparencies Label Envelopes Card stock Tray 1 ✔ Manual feed slot ✔ Tray 2 ✔ Select the Media type from the installed paper cassette, manual feed slot or optional lower tray unit. Their descriptions used in the following table to 10 sheets Only A4, Letter ✔ Only...Plain paper Thicker paper Thick paper or Thicker paper 1-8 Upper paper tray Manual feed slot Optional lower tray Tray 1 Manual Tray 2 (For HL-1450, HL-1470N users only) Click the check mark in the printer driver and this manual are as shown below. Print Media and Size The printer...
Users Manual - English
Page 22
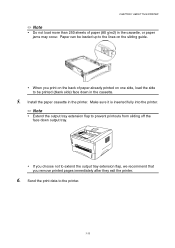
Install the paper cassette in the cassette. 5. Send the print data to the lines on the sliding guide. y When you print on the back of paper (...
Install the paper cassette in the cassette. 5. Send the print data to the lines on the sliding guide. y When you print on the back of paper (...
Users Manual - English
Page 33
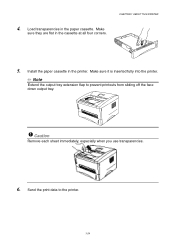
Install the paper cassette in the cassette at all four corners. Make sure they are flat in the printer. Caution Remove each sheet immediately, especially when you use transparencies. 6. Load transparencies in the paper cassette. CHAPTER 1 ABOUT THIS PRINTER 5. Send the print data to prevent printouts from sliding off the face 10 down output tray. 11 ! Make sure it is inserted fully into the printer. ✏ Note Extend the output tray extension flap to the printer. 1-24 4.
Install the paper cassette in the cassette at all four corners. Make sure they are flat in the printer. Caution Remove each sheet immediately, especially when you use transparencies. 6. Load transparencies in the paper cassette. CHAPTER 1 ABOUT THIS PRINTER 5. Send the print data to prevent printouts from sliding off the face 10 down output tray. 11 ! Make sure it is inserted fully into the printer. ✏ Note Extend the output tray extension flap to the printer. 1-24 4.
Users Manual - English
Page 40
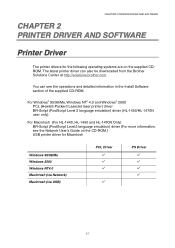
... laser printer) driver BR-Script (PostScript Level 2 language emulation) driver (HL-1450/HL-1470N user only) For Macintosh (For HL-1440, HL-1450 and HL-1470N Only) BR-Script (PostScript Level2 language emulation) driver (For more information, see the operations and detailed information in the Install Software section of the supplied CD-ROM. CHAPTER 2 PRINTER DRIVER AND...'s Guide on the CD-ROM.) USB printer driver for the following operating systems are on the supplied CDROM. You can also be downloaded from the Brother Solutions Center at http://solutions...
... laser printer) driver BR-Script (PostScript Level 2 language emulation) driver (HL-1450/HL-1470N user only) For Macintosh (For HL-1440, HL-1450 and HL-1470N Only) BR-Script (PostScript Level2 language emulation) driver (For more information, see the operations and detailed information in the Install Software section of the supplied CD-ROM. CHAPTER 2 PRINTER DRIVER AND...'s Guide on the CD-ROM.) USB printer driver for the following operating systems are on the supplied CDROM. You can also be downloaded from the Brother Solutions Center at http://solutions...
Users Manual - English
Page 45
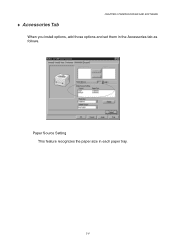
♦ Accessories Tab CHAPTER 2 PRINTER DRIVER AND SOFTWARE When you install options, add those options and set them in each paper tray. 2-6 Paper Source Setting This feature recognizes the paper size in the Accessories tab as follows.
♦ Accessories Tab CHAPTER 2 PRINTER DRIVER AND SOFTWARE When you install options, add those options and set them in each paper tray. 2-6 Paper Source Setting This feature recognizes the paper size in the Accessories tab as follows.

Users Manual - English
Page 47
CHAPTER 2 PRINTER DRIVER AND SOFTWARE ™ Features in the printer driver or visit the Brother Solutions Center at http://solutions.brother.com ♦ Details Tab 1. Select the printer driver that you are using. 2. Select the port where your printer is for HL-1450 and HL-1470N users only. 1 For more detailed information, please see the on-line Help in the PS Printer Driver ✏ Note This section is connected or the path to the network printer you installed. 2-8
CHAPTER 2 PRINTER DRIVER AND SOFTWARE ™ Features in the printer driver or visit the Brother Solutions Center at http://solutions.brother.com ♦ Details Tab 1. Select the printer driver that you are using. 2. Select the port where your printer is for HL-1450 and HL-1470N users only. 1 For more detailed information, please see the on-line Help in the PS Printer Driver ✏ Note This section is connected or the path to the network printer you installed. 2-8
Users Manual - English
Page 50
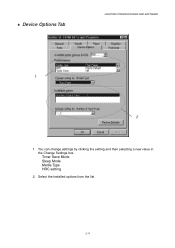
Select the installed options from the list. 2-11 Toner Save Mode Sleep Mode Media Type HRC setting 2. You can change settings by clicking the setting and then selecting a new value in the Change Settings box. ♦ Device Options Tab CHAPTER 2 PRINTER DRIVER AND SOFTWARE 1 2 1.
Select the installed options from the list. 2-11 Toner Save Mode Sleep Mode Media Type HRC setting 2. You can change settings by clicking the setting and then selecting a new value in the Change Settings box. ♦ Device Options Tab CHAPTER 2 PRINTER DRIVER AND SOFTWARE 1 2 1.
Users Manual - English
Page 51
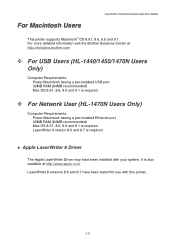
...® OS 8.51, 8.6, 9.0 and 9.1. LaserWriter 8 versions 8.6 and 8.7 have been installed with this printer. 2-12 LaserWriter 8 version 8.6 and 8.7 is required. It is also available at http://solutions.brother.com ™ For USB Users (HL-1440/1450/1470N Users Only) Computer Requirements: Power Macintosh having a pre-installed USB port 32MB RAM (64MB recommended) Mac OS 8.51, 8.6, 9.0 and...
...® OS 8.51, 8.6, 9.0 and 9.1. LaserWriter 8 versions 8.6 and 8.7 have been installed with this printer. 2-12 LaserWriter 8 version 8.6 and 8.7 is required. It is also available at http://solutions.brother.com ™ For USB Users (HL-1440/1450/1470N Users Only) Computer Requirements: Power Macintosh having a pre-installed USB port 32MB RAM (64MB recommended) Mac OS 8.51, 8.6, 9.0 and...

Users Manual - English
Page 54
...; Network Printer Driver Wizard The Network Printer Driver Wizard software can be used to ease the installation of a printer into a peerto-peer environment. ™ Automatic Emulation Selection ✏ Note This section is for HL-1450 and HL-1470N only. 4 This printer has an automatic emulation selection function. It can select from the computer...
...; Network Printer Driver Wizard The Network Printer Driver Wizard software can be used to ease the installation of a printer into a peerto-peer environment. ™ Automatic Emulation Selection ✏ Note This section is for HL-1450 and HL-1470N only. 4 This printer has an automatic emulation selection function. It can select from the computer...
Users Manual - English
Page 65
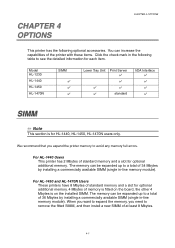
... to expand the memory, you expand the printer memory to remove the fitted SIMM, and then install a new SIMM of memory is fitted on the board, the other 4 Mbytes is on the installed SIMM. Model HL-1230 HL-1440 HL-1450 HL-1470N SIMM ✔ ✔ ✔ Lower Tray Unit ✔ ✔ Print Server ✔ ✔ ✔...
... to expand the memory, you expand the printer memory to remove the fitted SIMM, and then install a new SIMM of memory is fitted on the board, the other 4 Mbytes is on the installed SIMM. Model HL-1230 HL-1440 HL-1450 HL-1470N SIMM ✔ ✔ ✔ Lower Tray Unit ✔ ✔ Print Server ✔ ✔ ✔...
Users Manual - English
Page 67
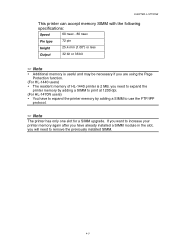
If you want to increase your printer memory again after you have to expand the printer memory by adding a SIMM to remove the previously installed SIMM. 4-3 CHAPTER 4 OPTIONS This printer can accept memory SIMM with the following specifications: Speed 60 nsec - 80 nsec Pin type 72 pin Height ...if you are using the Page Protection function. (For HL-1440 users) y The resident memory of HL-1440 printer is 2 MB, you will need to expand the printer memory by adding a SIMM to print at 1200 dpi. (For HL-1470N users) y You have already installed a SIMM module in the slot, you need to ...
If you want to increase your printer memory again after you have to expand the printer memory by adding a SIMM to remove the previously installed SIMM. 4-3 CHAPTER 4 OPTIONS This printer can accept memory SIMM with the following specifications: Speed 60 nsec - 80 nsec Pin type 72 pin Height ...if you are using the Page Protection function. (For HL-1440 users) y The resident memory of HL-1440 printer is 2 MB, you will need to expand the printer memory by adding a SIMM to print at 1200 dpi. (For HL-1470N users) y You have already installed a SIMM module in the slot, you need to ...

Users Manual - English
Page 68
..., frequently touch the bare metal on the printer. 4-4 Unpack the SIMM and hold it . 3. Caution SIMM boards can be damaged by the edges. ! If you install or remove the board. Installing Additional Memory 1. Turn off the printer before you...
..., frequently touch the bare metal on the printer. 4-4 Unpack the SIMM and hold it . 3. Caution SIMM boards can be damaged by the edges. ! If you install or remove the board. Installing Additional Memory 1. Turn off the printer before you...

Users Manual - English
Page 69
... two screws. 6. CHAPTER 4 OPTIONS 5. Plug the power cord into the AC outlet, and then turn on the power switch. ✏ Note To check that you installed the SIMM correctly, print the configuration sheet by using the selection in Chapter 3. 4-5 Close the rear cover. 7. Reconnect the interface cable (printer cable) to make... it gently toward the vertical until it shows the additional memory. See "Print Configuration and Fonts" in the driver and check it to your computer. Install the SIMM into place. 4.
... two screws. 6. CHAPTER 4 OPTIONS 5. Plug the power cord into the AC outlet, and then turn on the power switch. ✏ Note To check that you installed the SIMM correctly, print the configuration sheet by using the selection in Chapter 3. 4-5 Close the rear cover. 7. Reconnect the interface cable (printer cable) to make... it gently toward the vertical until it shows the additional memory. See "Print Configuration and Fonts" in the driver and check it to your computer. Install the SIMM into place. 4.

Users Manual - English
Page 70
To purchase the optional lower tray unit, please consult the dealer where you purchased the printer. Lower Tray Unit ✏ Note This section is a device that functions as an additional paper source. The lower tray unit is for HL-1450 and HL-1470N users only. For installation details, see the instructions supplied with the lower tray unit. 4-6 It can hold a maximum of 250 sheets of paper (80 g/m2 or 21 lb.).
To purchase the optional lower tray unit, please consult the dealer where you purchased the printer. Lower Tray Unit ✏ Note This section is a device that functions as an additional paper source. The lower tray unit is for HL-1450 and HL-1470N users only. For installation details, see the instructions supplied with the lower tray unit. 4-6 It can hold a maximum of 250 sheets of paper (80 g/m2 or 21 lb.).

Users Manual - English
Page 74
...cartridge until you change the print density setting for lighter or darker printing, toner consumption varies accordingly. Purchase a new toner cartridge and have installed a new toner cartridge. 5-2 Toner Cartridge CHAPTER 5 ROUTINE MAINTENANCE A new toner cartridge contains enough toner to print approximately 3,000 (standard ... toner 0 cartridge is nearly empty. y If you have it in the printer. This blinking will not stop until immediately before you install it ready before you get a Toner Empty message. ✏ Note Both Alarm and Data (Toner) LEDs will soon run out....
...cartridge until you change the print density setting for lighter or darker printing, toner consumption varies accordingly. Purchase a new toner cartridge and have installed a new toner cartridge. 5-2 Toner Cartridge CHAPTER 5 ROUTINE MAINTENANCE A new toner cartridge contains enough toner to print approximately 3,000 (standard ... toner 0 cartridge is nearly empty. y If you have it in the printer. This blinking will not stop until immediately before you install it ready before you get a Toner Empty message. ✏ Note Both Alarm and Data (Toner) LEDs will soon run out....
Users Manual - English
Page 77
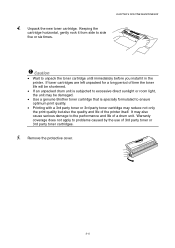
... shortened. • If an unpacked drum unit is subjected to excessive direct sunlight or room light, the unit may be damaged. • Use a genuine Brother toner cartridge that is specially formulated to ensure optimum print quality. • Printing with a 3rd party toner or 3rd party toner cartridge may also cause... toner cartridge. Keeping the cartridge horizontal, gently rock it in the printer. Caution • Wait to unpack the toner cartridge until immediately before you install it from side to problems caused by the use of the printer itself. CHAPTER 5 ROUTINE MAINTENANCE 4.
... shortened. • If an unpacked drum unit is subjected to excessive direct sunlight or room light, the unit may be damaged. • Use a genuine Brother toner cartridge that is specially formulated to ensure optimum print quality. • Printing with a 3rd party toner or 3rd party toner cartridge may also cause... toner cartridge. Keeping the cartridge horizontal, gently rock it in the printer. Caution • Wait to unpack the toner cartridge until immediately before you install it from side to problems caused by the use of the printer itself. CHAPTER 5 ROUTINE MAINTENANCE 4.

Users Manual - English
Page 78
Caution Install the toner cartridge immediately after you install the toner cartridge correctly or it lock into place. CHAPTER 5 ROUTINE MAINTENANCE ! Install the new toner cartridge into the drum unit until you hear it may separate from the drum unit. 5-6 Caution Make sure you remove the protective cover. When the toner cartridge is installed correctly, the lock lever is lifted automatically. ! Do not touch the shaded parts in the illustration to prevent any degradation to the print quality. 6.
Caution Install the toner cartridge immediately after you install the toner cartridge correctly or it lock into place. CHAPTER 5 ROUTINE MAINTENANCE ! Install the new toner cartridge into the drum unit until you hear it may separate from the drum unit. 5-6 Caution Make sure you remove the protective cover. When the toner cartridge is installed correctly, the lock lever is lifted automatically. ! Do not touch the shaded parts in the illustration to prevent any degradation to the print quality. 6.
Users Manual - English
Page 79
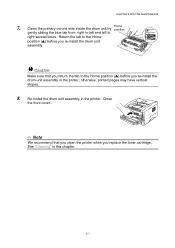
Return the tab to the Home position (L) before you re-install the drum unit assembly in the printer; Re-install the drum unit assembly in this chapter. 5-7 Close the front cover. ✏ Note We recommend that you return the tab to right several times. CHAPTER 5 ... the Home position (L) before you replace the toner cartridge. 2 See "Cleaning" in the printer. Caution Make sure that you clean the printer when you re-install the drum unit assembly. ! otherwise, printed pages may have vertical stripes. 8.
Return the tab to the Home position (L) before you re-install the drum unit assembly in the printer; Re-install the drum unit assembly in this chapter. 5-7 Close the front cover. ✏ Note We recommend that you return the tab to right several times. CHAPTER 5 ... the Home position (L) before you replace the toner cartridge. 2 See "Cleaning" in the printer. Caution Make sure that you clean the printer when you re-install the drum unit assembly. ! otherwise, printed pages may have vertical stripes. 8.


