User Guide
Page 23
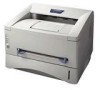
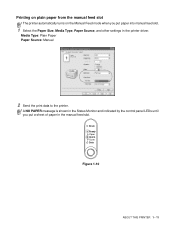
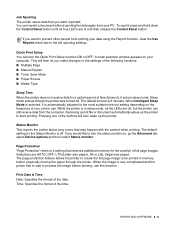
A NO PAPER message is shown in the Status Monitor and indicated by the control panel LEDs until you put a sheet of paper in the printer driver. Drum Ready Paper Alarm Toner Data Figure 1-10 ABOUT THIS PRINTER 1 - 11 Media Type: Plain Paper Paper Source: Manual 2 Send the print data to the printer. Printing on plain paper from the manual feed slot The printer automatically turns on the Manual Feed mode when you put paper into manual feed slot. 1 Select the Paper Size, Media Type, Paper Source, and other settings in the manual feed slot.
A NO PAPER message is shown in the Status Monitor and indicated by the control panel LEDs until you put a sheet of paper in the printer driver. Drum Ready Paper Alarm Toner Data Figure 1-10 ABOUT THIS PRINTER 1 - 11 Media Type: Plain Paper Paper Source: Manual 2 Send the print data to the printer. Printing on plain paper from the manual feed slot The printer automatically turns on the Manual Feed mode when you put paper into manual feed slot. 1 Select the Paper Size, Media Type, Paper Source, and other settings in the manual feed slot.

User Guide
Page 27
... a short distance, and then let go of the paper touches the paper feed roller. Hold the paper in this position until you want to the printer. Figure 1-17 ABOUT THIS PRINTER 1 - 15 3 Send the print data to use. A NO PAPER status is shown by the control panel...
... a short distance, and then let go of the paper touches the paper feed roller. Hold the paper in this position until you want to the printer. Figure 1-17 ABOUT THIS PRINTER 1 - 15 3 Send the print data to use. A NO PAPER status is shown by the control panel...

User Guide
Page 31
Drum Ready Paper Alarm Toner Data Figure 1-21 4 Using both hands put a sheet of the manual feed paper guides to the printer. Figure 1-23 ABOUT THIS PRINTER 1 - 19 3 Send the print data to the envelope width. Figure 1-22 5 Using both hads, set the width of paper in the manual feed slot. A... NO PAPER status is shown by the control panel LEDs until the front edge of the envelope. Hold the envelope in this position until the printer automatically feeds it in the manual feed slot until you put the envelope in for a short distance,...
Drum Ready Paper Alarm Toner Data Figure 1-21 4 Using both hands put a sheet of the manual feed paper guides to the printer. Figure 1-23 ABOUT THIS PRINTER 1 - 19 3 Send the print data to the envelope width. Figure 1-22 5 Using both hads, set the width of paper in the manual feed slot. A... NO PAPER status is shown by the control panel LEDs until the front edge of the envelope. Hold the envelope in this position until the printer automatically feeds it in the manual feed slot until you put the envelope in for a short distance,...

User Guide
Page 37
3 Send the print data to the transparency width. Drum Ready Paper Alarm Toner Data Figure 1-30 4 Using both hands put a transparency in the manual feed slot until the printer automatically feeds it in for a short distance, and then let go of the transparency. Figure 1-31 5 Using both hands, slide the manual feed paper guides to the printer A NO PAPER status is shown by the control panel LEDs until you put the transparency in the manual feed slot. Hold the transparency in this position until its front edge touches the paper feed roller. Figure 1-32 ABOUT THIS PRINTER 1 - 25
3 Send the print data to the transparency width. Drum Ready Paper Alarm Toner Data Figure 1-30 4 Using both hands put a transparency in the manual feed slot until the printer automatically feeds it in for a short distance, and then let go of the transparency. Figure 1-31 5 Using both hands, slide the manual feed paper guides to the printer A NO PAPER status is shown by the control panel LEDs until you put the transparency in the manual feed slot. Hold the transparency in this position until its front edge touches the paper feed roller. Figure 1-32 ABOUT THIS PRINTER 1 - 25
User Guide
Page 49
... (any errors that may happen with the printer) when printing. The default setting for a certain period of time (timeout), it is in sleep mode, all four LED's are AUTO, OFF, LTR (Letter-size paper), A4 or LGL (legal-size-paper). Time: Specifies the format of the date. A small selection ... start printing. DRIVER AND SOFTWARE 2 - 6 To reprint press and hold down the Control Panel button until all the LEDs are off, but the printer can still receive data from printing your data using the Reprint function, clear the Use Reprint check box in memory before printing, use . ...
... (any errors that may happen with the printer) when printing. The default setting for a certain period of time (timeout), it is in sleep mode, all four LED's are AUTO, OFF, LTR (Letter-size paper), A4 or LGL (legal-size-paper). Time: Specifies the format of the date. A small selection ... start printing. DRIVER AND SOFTWARE 2 - 6 To reprint press and hold down the Control Panel button until all the LEDs are off, but the printer can still receive data from printing your data using the Reprint function, clear the Use Reprint check box in memory before printing, use . ...

User Guide
Page 54
LED is off or or LED is in Sleep mode, all the LEDs are used in the illustrations in the table below are off or the printer is on the control panel. CONTROL PANEL 3 - 1 3 Control panel This section refers to the Light Emitting Diodes (LEDs) and Control panel button on or or LED is blinking When the power switch is off . Drum Ready Paper Alarm Toner Data Figure 3-1 The LED indications shown in this chapter.
LED is off or or LED is in Sleep mode, all the LEDs are used in the illustrations in the table below are off or the printer is on the control panel. CONTROL PANEL 3 - 1 3 Control panel This section refers to the Light Emitting Diodes (LEDs) and Control panel button on or or LED is blinking When the power switch is off . Drum Ready Paper Alarm Toner Data Figure 3-1 The LED indications shown in this chapter.

User Guide
Page 55
...Cooling down or stop printing (Blinking at 1 second intervals) The printer is cooling down and stops printing until the internal temperature of the printer lowers. Figure 3-2 Drum Ready Paper Alarm Toner Data Ready to print The printer is in memory or printing the data. Figure 3-3 Drum Ready... at 2 second intervals) The printer is warming up the printer to Ready mode. Pressing the Control panel button wakes up the printer from the computer, processing data in Sleep mode. Figure 3-5 3 - 2 CONTROL PANEL LED Drum Ready Paper Alarm Toner Data Printer status Sleep mode The power switch...
...Cooling down or stop printing (Blinking at 1 second intervals) The printer is cooling down and stops printing until the internal temperature of the printer lowers. Figure 3-2 Drum Ready Paper Alarm Toner Data Ready to print The printer is in memory or printing the data. Figure 3-3 Drum Ready... at 2 second intervals) The printer is warming up the printer to Ready mode. Pressing the Control panel button wakes up the printer from the computer, processing data in Sleep mode. Figure 3-5 3 - 2 CONTROL PANEL LED Drum Ready Paper Alarm Toner Data Printer status Sleep mode The power switch...

User Guide
Page 56
... near the end of life The drum unit is indicated. See Replacing the drum unit on page 5-3. LED Drum Ready Paper Alarm Toner Data Printer status Data remaining in memory Print data remains in the printer memory. Figure 3-9 CONTROL PANEL 3 - 3 Figure 3-6 Drum Ready Paper Alarm Toner Data Toner low Indicates that you buy...
... near the end of life The drum unit is indicated. See Replacing the drum unit on page 5-3. LED Drum Ready Paper Alarm Toner Data Printer status Data remaining in memory Print data remains in the printer memory. Figure 3-9 CONTROL PANEL 3 - 3 Figure 3-6 Drum Ready Paper Alarm Toner Data Toner low Indicates that you buy...

User Guide
Page 57
LED Drum Ready Paper Alarm Toner Data Figure 3-10 Printer status Paper jam Clear the paper jam. If the printer does not start printing again. 3 - 4 CONTROL PANEL Misfeed Put the paper back in the printer. No paper Put paper in properly, and then press the Control panel button. The printer will start printing, press the Control panel button. Then press the Control panel button. See Printing on plain paper on page 6-5. See Paper jams and how to clear them on page 1-8.
LED Drum Ready Paper Alarm Toner Data Figure 3-10 Printer status Paper jam Clear the paper jam. If the printer does not start printing again. 3 - 4 CONTROL PANEL Misfeed Put the paper back in the printer. No paper Put paper in properly, and then press the Control panel button. The printer will start printing, press the Control panel button. Then press the Control panel button. See Printing on plain paper on page 6-5. See Paper jams and how to clear them on page 1-8.

User Guide
Page 58
... error that cannot be corrected, the printer will show that a service call is needed by lighting up all the LEDs and then alternating the following combination as shown in Table 1: LED indications when the service error occurs on , call your dealer or a Brother authorized service center. If you cannot ...clear the error and see the service call indication above, turn off the power switch, wait a few seconds, and then turn it back on and try to print again. For example, the LED indication below shows a Fuser ...
... error that cannot be corrected, the printer will show that a service call is needed by lighting up all the LEDs and then alternating the following combination as shown in Table 1: LED indications when the service error occurs on , call your dealer or a Brother authorized service center. If you cannot ...clear the error and see the service call indication above, turn off the power switch, wait a few seconds, and then turn it back on and try to print again. For example, the LED indication below shows a Fuser ...
User Guide
Page 59
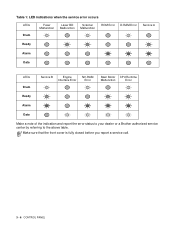
Table 1: LED indications when the service error occurs LEDs Drum Fuser Malfunction Laser BD Malfunction Scanner Malfunction ROM Error D-RAM Error Service A Ready Alarm Data LEDs Drum Service B Engine NV-RAM Interface Error Error Main Motor CPU Runtime Malfunction Error Ready Alarm Data Make a note of the indication and report the error status to your dealer or a Brother authorized service center by referring to the above table. Make sure that the front cover is fully closed before you report a service call. 3 - 6 CONTROL PANEL
Table 1: LED indications when the service error occurs LEDs Drum Fuser Malfunction Laser BD Malfunction Scanner Malfunction ROM Error D-RAM Error Service A Ready Alarm Data LEDs Drum Service B Engine NV-RAM Interface Error Error Main Motor CPU Runtime Malfunction Error Ready Alarm Data Make a note of the indication and report the error status to your dealer or a Brother authorized service center by referring to the above table. Make sure that the front cover is fully closed before you report a service call. 3 - 6 CONTROL PANEL

User Guide
Page 60
... cleared, press the Control panel button to clear the error, and then continue to the Ready state. Form feed If the orange Data LED is an error, the printer will print any data that has just been printed, you can do this by pressing and holding down the Control panel button until... all four LEDs are lit and then release the Control panel button. The printer will recover automatically from some errors. CONTROL PANEL 3 - 7 Reprint If you want to reach the Ready state. Control panel ...
... cleared, press the Control panel button to clear the error, and then continue to the Ready state. Form feed If the orange Data LED is an error, the printer will print any data that has just been printed, you can do this by pressing and holding down the Control panel button until... all four LEDs are lit and then release the Control panel button. The printer will recover automatically from some errors. CONTROL PANEL 3 - 7 Reprint If you want to reach the Ready state. Control panel ...

User Guide
Page 61
... cover is closed and the power cord is usually in . 3 Hold down until the Drum LED comes on. The printer will print a test page. It is plugged in the General tab of the Windows® printer driver. 3 - 8 CONTROL PANEL Using Control panel button 1 Turn off again. Print a ...test page You can use the Control panel button or the printer driver to print a test page. Keep the Control panel button pressed down the Control panel button as you are using Brother's Windows® printer driver, click the Print Test Page button.
... cover is closed and the power cord is usually in . 3 Hold down until the Drum LED comes on. The printer will print a test page. It is plugged in the General tab of the Windows® printer driver. 3 - 8 CONTROL PANEL Using Control panel button 1 Turn off again. Print a ...test page You can use the Control panel button or the printer driver to print a test page. Keep the Control panel button pressed down the Control panel button as you are using Brother's Windows® printer driver, click the Print Test Page button.

User Guide
Page 64
...coverage. ■ The amount of toner used varies according to what is printed on page 5-3 Both Alarm and Data (Toner) LEDs will blink continuously to indicate that is used . ■ If you change the print density setting for lighter or darker printing..., the amount of toner. Figure 5-1 If the LED shows this message, the toner cartridge has nearly run out of toner that the toner cartridge is printed, the more that... will change. ■ Wait to unpack the toner cartridge until you have it in the printer.
...coverage. ■ The amount of toner used varies according to what is printed on page 5-3 Both Alarm and Data (Toner) LEDs will blink continuously to indicate that is used . ■ If you change the print density setting for lighter or darker printing..., the amount of toner. Figure 5-1 If the LED shows this message, the toner cartridge has nearly run out of toner that the toner cartridge is printed, the more that... will change. ■ Wait to unpack the toner cartridge until you have it in the printer.

User Guide
Page 65
Toner Empty message If the LED shows the message below, the printer has run out of the printer. 2 Pull out the drum unit assembly. see Cleaning on the supplied CD-ROM: 1 Open the front ... or the toner is not evenly distributed inside the cartridge. Figure 5-3 5 - 3 ROUTINE MAINTENANCE We recommend that you clean the printer when you get high quality print, use quality toner cartridges. You can also view the toner cartridge replacement method in the instructional video... the toner cartridge. Follow these steps to buy toner cartridges, call the dealer you bought the printer from.
Toner Empty message If the LED shows the message below, the printer has run out of the printer. 2 Pull out the drum unit assembly. see Cleaning on the supplied CD-ROM: 1 Open the front ... or the toner is not evenly distributed inside the cartridge. Figure 5-3 5 - 3 ROUTINE MAINTENANCE We recommend that you clean the printer when you get high quality print, use quality toner cartridges. You can also view the toner cartridge replacement method in the instructional video... the toner cartridge. Follow these steps to buy toner cartridges, call the dealer you bought the printer from.

User Guide
Page 70
... of paper, type of toner used only in the print quality. Warranty coverage does not apply to 20,000 pages. Change Drum message If the LED shows the message below, it may reduce not only the print quality but also the quality and life of print job and paper. ■ There... a minimum number of pages that you should be printed by the use only genuine Brother drum and toner. The actual number of printed pages will print may be significantly less than this estimate. Drum unit This printer can print up to 20,000 pages* with one before there is estimated at up...
... of paper, type of toner used only in the print quality. Warranty coverage does not apply to 20,000 pages. Change Drum message If the LED shows the message below, it may reduce not only the print quality but also the quality and life of print job and paper. ■ There... a minimum number of pages that you should be printed by the use only genuine Brother drum and toner. The actual number of printed pages will print may be significantly less than this estimate. Drum unit This printer can print up to 20,000 pages* with one before there is estimated at up...

User Guide
Page 73
See the instructions supplied with the new drum unit. Caution ■ The Drum LED indication does not disappear until you reset the drum counter. ■ Do not reset the drum counter when you replace only the toner cartridge. 8 Close the front cover. 9 Make sure that the printer is turned on, the front cover is now off. 5 - 11 ROUTINE MAINTENANCE 6 Put the drum unit assembly in the printer. Figure 5-18 7 Reset the drum counter. Make sure that the Drum LED is open and the Drum and Alarm LED are lit.
See the instructions supplied with the new drum unit. Caution ■ The Drum LED indication does not disappear until you reset the drum counter. ■ Do not reset the drum counter when you replace only the toner cartridge. 8 Close the front cover. 9 Make sure that the printer is turned on, the front cover is now off. 5 - 11 ROUTINE MAINTENANCE 6 Put the drum unit assembly in the printer. Figure 5-18 7 Reset the drum counter. Make sure that the Drum LED is open and the Drum and Alarm LED are lit.
User Guide
Page 76
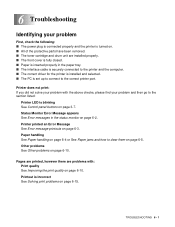
...in the status monitor on page 6-2. 6 Troubleshooting Identifying your problem First, check the following: ■ The power plug is connected properly and the printer is turned on. ■ All of the protective parts have been removed. ■ The toner cartridge and drum unit are problems with the ...above checks, please find your problem and then go to the section listed: Printer LED is incorrect See Solving print problems on page 6-15. Printer does not print: If you did not solve your problem with : Print quality See Improving the print quality on...
...in the status monitor on page 6-2. 6 Troubleshooting Identifying your problem First, check the following: ■ The power plug is connected properly and the printer is turned on. ■ All of the protective parts have been removed. ■ The toner cartridge and drum unit are problems with the ...above checks, please find your problem and then go to the section listed: Printer LED is incorrect See Solving print problems on page 6-15. Printer does not print: If you did not solve your problem with : Print quality See Improving the print quality on...

User Guide
Page 80
...shown in the following steps, you have just used the printer, some parts inside the printer are extremely hot. Figure 6-2 If the jammed paper is removed completely by lighting the control panel LEDs as follows. If the printer still does not start printing automatically, press the Control panel... button. Paper jams and how to clear them When a paper jam occurs, the printer indicates it by using the information in Figure 6-2....
...shown in the following steps, you have just used the printer, some parts inside the printer are extremely hot. Figure 6-2 If the jammed paper is removed completely by lighting the control panel LEDs as follows. If the printer still does not start printing automatically, press the Control panel... button. Paper jams and how to clear them When a paper jam occurs, the printer indicates it by using the information in Figure 6-2....
User Guide
Page 91
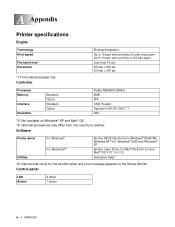
... Utilities For Windows® For Macintosh® Brother GDI Printer Driver for Windows® 95/98 /Me, Windows NT® 4.0, Windows® 2000 and Windows® XP Brother Laser Driver for Mac® OS 8.6 to 9.2 and Mac® OS X 10.1 to 10.2 Interactive Help*4 *4) Instructional ... MB86833 66MHz 4MB N/A USB, Parallel Optional Ir-DA (IR-1000)*2 *3 GDI *2) Not available on the Status Monitor. A Appendix Printer specifications Engine Technology Print speed First print time*1 Resolution *1 From standard paper tray Controller Electrophotographic Up to 15 ppm when printing on Letter...
... Utilities For Windows® For Macintosh® Brother GDI Printer Driver for Windows® 95/98 /Me, Windows NT® 4.0, Windows® 2000 and Windows® XP Brother Laser Driver for Mac® OS 8.6 to 9.2 and Mac® OS X 10.1 to 10.2 Interactive Help*4 *4) Instructional ... MB86833 66MHz 4MB N/A USB, Parallel Optional Ir-DA (IR-1000)*2 *3 GDI *2) Not available on the Status Monitor. A Appendix Printer specifications Engine Technology Print speed First print time*1 Resolution *1 From standard paper tray Controller Electrophotographic Up to 15 ppm when printing on Letter...

