
Users Manual - English
Page 65
...is a noticeable deterioration in the output print quality even before the Drum LED lights, then the drum unit should only be replaced. Under ideal conditions, the ... contain toner. • You should clean the printer when you use only genuine Brother toner. The product should be used in this estimate. How ...printer uses a drum unit to create the print images on , you obtain a new drum unit to replace the current one. Because we cannot guarantee a minimum number of pages that you replace the drum unit. Even if the Drum LED is on paper. Drum Ready Paper Alarm...
...is a noticeable deterioration in the output print quality even before the Drum LED lights, then the drum unit should only be replaced. Under ideal conditions, the ... contain toner. • You should clean the printer when you use only genuine Brother toner. The product should be used in this estimate. How ...printer uses a drum unit to create the print images on , you obtain a new drum unit to replace the current one. Because we cannot guarantee a minimum number of pages that you replace the drum unit. Even if the Drum LED is on paper. Drum Ready Paper Alarm...

Users Manual - English
Page 85
High temperature Front view Fig 4-4 Inside the printer High temperature Rear view 4-11 CHAPTER 4 TROUBLESHOOTING PAPER JAMS and how to clear them When a paper jam occurs, the printer indicates by a paper jam Warning After you open the front or rear cover of the printer are extremely hot. When you have just used the printer, some internal parts of the printer, never touch the shaded parts shown in the following diagram. Drum Ready Paper Alarm Toner Data Fig. 4-3 LED indication caused by lighting the LEDs as shown below.
High temperature Front view Fig 4-4 Inside the printer High temperature Rear view 4-11 CHAPTER 4 TROUBLESHOOTING PAPER JAMS and how to clear them When a paper jam occurs, the printer indicates by a paper jam Warning After you open the front or rear cover of the printer are extremely hot. When you have just used the printer, some internal parts of the printer, never touch the shaded parts shown in the following diagram. Drum Ready Paper Alarm Toner Data Fig. 4-3 LED indication caused by lighting the LEDs as shown below.
Quick Setup Guide - English
Page 14
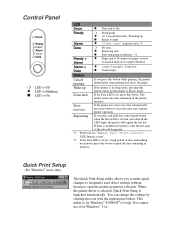
...in memory. *2 Q Paper jam or No paper (in the printer memory. Form feed If the Data LED is on for a long period of life Ready Alarm r Sleep mode Q (at 1 second intervals): Warming up q Ready to open " or printer error.*1 Data Ready + Alarm Alarm + Data r No data. You cannot use it for Windows... in sleep mode, pressing this control panel button when the Data LED is off and wait until all the LEDs light, the printer will be printed. *1 Printer errors: "Memory full", "Print overrun", XXX Interface error". *2 If the Data LED is insufficient memory, only the last page of the ...
...in memory. *2 Q Paper jam or No paper (in the printer memory. Form feed If the Data LED is on for a long period of life Ready Alarm r Sleep mode Q (at 1 second intervals): Warming up q Ready to open " or printer error.*1 Data Ready + Alarm Alarm + Data r No data. You cannot use it for Windows... in sleep mode, pressing this control panel button when the Data LED is off and wait until all the LEDs light, the printer will be printed. *1 Printer errors: "Memory full", "Print overrun", XXX Interface error". *2 If the Data LED is insufficient memory, only the last page of the ...
Service Manual
Page 104
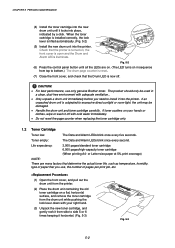
... need to install it into the printer. Handle the drum unit and toner cartridge carefully. When the toner cartridge is installed correctly, the lock lever is open and the Drum and Alarm LEDs illuminate. Only unpack a drum unit immediately before you use only genuine Brother toner. or Letter-size paper at... that the printer is turned on your right hand. (3) Unpack the new toner cartridge, and gently rock it from top to bottom.) The drum page counter is reset. (7) Close the front cover, and check that the Drum LED is subjected to excessive direct sunlight or room light, the unit...
... need to install it into the printer. Handle the drum unit and toner cartridge carefully. When the toner cartridge is installed correctly, the lock lever is open and the Drum and Alarm LEDs illuminate. Only unpack a drum unit immediately before you use only genuine Brother toner. or Letter-size paper at... that the printer is turned on your right hand. (3) Unpack the new toner cartridge, and gently rock it from top to bottom.) The drum page counter is reset. (7) Close the front cover, and check that the Drum LED is subjected to excessive direct sunlight or room light, the unit...
Service Manual
Page 121
... CHAPTER 6 TROUBLESHOOTING 4.2.2 Causes & countermeasures The causes for paper jam problems vary depending on . Alarm LED is ON = Front registration sensor is ejected. When a paper jam occurs inside the printer. Jam caused by incorrect paper pick up roller. Bottom of actuator or hardware noise. If the... jam. The Drum LED comes ON. 3) Lightly press the panel button again. Check front registration sensor motion referring to NOTE. The front registration sensor was not fed in Subsection 9.2. 6-11 Remove the paper inside the printer, you have to find the location of the...
... CHAPTER 6 TROUBLESHOOTING 4.2.2 Causes & countermeasures The causes for paper jam problems vary depending on . Alarm LED is ON = Front registration sensor is ejected. When a paper jam occurs inside the printer. Jam caused by incorrect paper pick up roller. Bottom of actuator or hardware noise. If the... jam. The Drum LED comes ON. 3) Lightly press the panel button again. Check front registration sensor motion referring to NOTE. The front registration sensor was not fed in Subsection 9.2. 6-11 Remove the paper inside the printer, you have to find the location of the...

Service Manual
Page 158
... back to the Ready status after the toner sensor does not detect the drum unit, the printer starts to the Ready status. The Drum LED comes ON. (3) Lightly press the panel button again. (4) Check that all the LEDs except the Ready LED are OFF. ✒ If the toner sensor is ON, the... Drum LED stays ON (error). ✒ If the front registration sensor is ON, the Alarm LED stays ON (error). ✒ If the upper paper cassette sensor is ON, the Data LED stays ON. (error) (HL-1250 only) NOTE: The lower paper cassette solenoid is turned ON/OFF even if the panel...
... back to the Ready status after the toner sensor does not detect the drum unit, the printer starts to the Ready status. The Drum LED comes ON. (3) Lightly press the panel button again. (4) Check that all the LEDs except the Ready LED are OFF. ✒ If the toner sensor is ON, the... Drum LED stays ON (error). ✒ If the front registration sensor is ON, the Alarm LED stays ON (error). ✒ If the upper paper cassette sensor is ON, the Data LED stays ON. (error) (HL-1250 only) NOTE: The lower paper cassette solenoid is turned ON/OFF even if the panel...

Service Manual
Page 275
... even before the Drum LED lights, then the drum unit should be replaced. See "How to clean the printer" in this estimate. The ...replace the Drum Unit CHAPTER 3 MAINTENANCE The printer uses a drum unit to create the print images on , you use only genuine Brother toner. Because we cannot guarantee a minimum number...printer when you obtain a new drum unit to replace the current one. Caution • When removing the drum unit, handle it may contain toner. • You should only be able to continue to print without replacing the drum unit for a while. Drum Ready Paper Alarm...
... even before the Drum LED lights, then the drum unit should be replaced. See "How to clean the printer" in this estimate. The ...replace the Drum Unit CHAPTER 3 MAINTENANCE The printer uses a drum unit to create the print images on , you use only genuine Brother toner. Because we cannot guarantee a minimum number...printer when you obtain a new drum unit to replace the current one. Caution • When removing the drum unit, handle it may contain toner. • You should only be able to continue to print without replacing the drum unit for a while. Drum Ready Paper Alarm...

Service Manual
Page 295
Drum Ready Paper Alarm Toner Data Fig. 4-3 LED indication caused by lighting the LEDs as shown below. High temperature Front view Fig 4-4 Inside the printer High temperature Rear view 4-11 CHAPTER 4 TROUBLESHOOTING PAPER JAMS and how to clear them When a paper jam occurs, the printer indicates by a paper jam Warning After you open the front or rear cover of the printer are extremely hot. When you have just used the printer, some internal parts of the printer, never touch the shaded parts shown in the following diagram.
Drum Ready Paper Alarm Toner Data Fig. 4-3 LED indication caused by lighting the LEDs as shown below. High temperature Front view Fig 4-4 Inside the printer High temperature Rear view 4-11 CHAPTER 4 TROUBLESHOOTING PAPER JAMS and how to clear them When a paper jam occurs, the printer indicates by a paper jam Warning After you open the front or rear cover of the printer are extremely hot. When you have just used the printer, some internal parts of the printer, never touch the shaded parts shown in the following diagram.

