
Instruction Manual - English
Page 9
...Installing the Platen...48 4-4-1. Fixing the Ink onto the T-shirt ...54 5. Replacing the Ink Cartridge...61 6-1-2. Cleaning the Print Heads...79 7-2-3. Checking Print Quality with Nozzle Check Pattern 80 7-2-4. Setting the Media Color ...44 4-3-4. Setting Double ...GT File Viewer to your Printer 59 6. Replacing the Wiper Blade...96 7-3. Selecting the Platen Size...44 4-3-3. Installing the Platen...49 4-5. Making Print Data in a CompactFlash 58 5-3. Replacing the Waste Ink Cartridge...67 6-1-4. Solving Printer Problems...73 7-2. Changing the Auto Head Cleaning...
...Installing the Platen...48 4-4-1. Fixing the Ink onto the T-shirt ...54 5. Replacing the Ink Cartridge...61 6-1-2. Cleaning the Print Heads...79 7-2-3. Checking Print Quality with Nozzle Check Pattern 80 7-2-4. Setting the Media Color ...44 4-3-4. Setting Double ...GT File Viewer to your Printer 59 6. Replacing the Wiper Blade...96 7-3. Selecting the Platen Size...44 4-3-3. Installing the Platen...49 4-5. Making Print Data in a CompactFlash 58 5-3. Replacing the Waste Ink Cartridge...67 6-1-4. Solving Printer Problems...73 7-2. Changing the Auto Head Cleaning...
Instruction Manual - English
Page 12
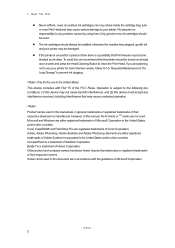
The ink cartridges should always be turned on at least once a week and press the Head Cleaning Button to clean the Print Head. If the printer is a possibility that Print Heads may become blocked as ink dries. Only for the use your printer for a period of Hanes Corporation.... and Paint Shop Pro are in general, trademarks or registered trademarks of Microsoft Corporation. CompactFlash is subject to prevent ink clogging. GT-541 2 Screen shots used . Required Maintenance for any interference received, including interference that the printer should be used in the United ...
The ink cartridges should always be turned on at least once a week and press the Head Cleaning Button to clean the Print Head. If the printer is a possibility that Print Heads may become blocked as ink dries. Only for the use your printer for a period of Hanes Corporation.... and Paint Shop Pro are in general, trademarks or registered trademarks of Microsoft Corporation. CompactFlash is subject to prevent ink clogging. GT-541 2 Screen shots used . Required Maintenance for any interference received, including interference that the printer should be used in the United ...

Instruction Manual - English
Page 21
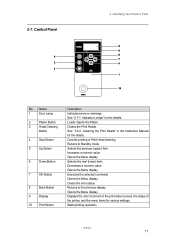
... Menu display. Executes the selected command. Clears the error status. Returns to Standby mode. GT-541 11 Cancels printing or Print Head cleaning. Control Panel 2. Opens the Menu display. Cleaning the Print Heads" in the Instruction Manual for the details. See "2-7-1. Cleans the Print Heads. Selects the previous (upper) item. Increases a numeric value. Opens the Menu display. Opens...
... Menu display. Executes the selected command. Clears the error status. Returns to Standby mode. GT-541 11 Cancels printing or Print Head cleaning. Control Panel 2. Opens the Menu display. Cleaning the Print Heads" in the Instruction Manual for the details. See "2-7-1. Cleans the Print Heads. Selects the previous (upper) item. Increases a numeric value. Opens the Menu display. Opens...

Instruction Manual - English
Page 26
... outlet. Turning Off Your Printer When you are planning not to GT-541", and lights up the Error Lamp and the Print Button while initializing. GT-541 16 Your printer turns on your printer once a week and press the Head Cleaning Button to use your printer. (4) If you have finished using ... If you connect the power cord, make sure: The Ink Cartridges, Waste Cartridge Tray, and Wiper Cleaner Cassette are planning not to clean the Print Head. 3. Required Maintenance for the Long Storage" to your printer accidentally during the operation, immediately restart it, and then turn it off ...
... outlet. Turning Off Your Printer When you are planning not to GT-541", and lights up the Error Lamp and the Print Button while initializing. GT-541 16 Your printer turns on your printer once a week and press the Head Cleaning Button to use your printer. (4) If you have finished using ... If you connect the power cord, make sure: The Ink Cartridges, Waste Cartridge Tray, and Wiper Cleaner Cassette are planning not to clean the Print Head. 3. Required Maintenance for the Long Storage" to your printer accidentally during the operation, immediately restart it, and then turn it off ...
Instruction Manual - English
Page 63
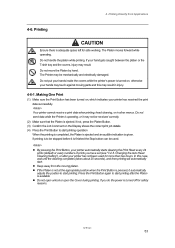
...Do not move the Platen by hand. Your printer cannot receive a print data when printing, head cleaning, or in injury. 4-6-1. If the Platen is not at the appropriate position when the Print... moving platen. Printing Directly from the moving parts and this case, wait until the cleaning completes (takes about 20 seconds), and then printing will automatically start printing operation When ...Cover during printing. Changing the Auto Head Cleaning Setting"), or after the Platen is turned on , which indicates your printer automatically starts cleaning the Print Head every 24 prints (default) or ...
...Do not move the Platen by hand. Your printer cannot receive a print data when printing, head cleaning, or in injury. 4-6-1. If the Platen is not at the appropriate position when the Print... moving platen. Printing Directly from the moving parts and this case, wait until the cleaning completes (takes about 20 seconds), and then printing will automatically start printing operation When ...Cover during printing. Changing the Auto Head Cleaning Setting"), or after the Platen is turned on , which indicates your printer automatically starts cleaning the Print Head every 24 prints (default) or ...

Instruction Manual - English
Page 71
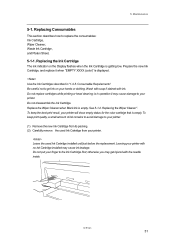
... Cartridge installed may get ink on the Display flashes when the Ink Cartridge is empty. Replace the Wiper Cleaner when Black Ink is getting low. GT-541 61 Consumable Requirements". Maintenance 6-1. Do not replace cartridges while printing or head cleaning;
... Cartridge installed may get ink on the Display flashes when the Ink Cartridge is empty. Replace the Wiper Cleaner when Black Ink is getting low. GT-541 61 Consumable Requirements". Maintenance 6-1. Do not replace cartridges while printing or head cleaning;

Instruction Manual - English
Page 77
... prepare the new Waste Ink Cartridge. When the surface/back of the Obstruction Sensor, if they are correctly installed. 6-1-3. If there is displayed. GT-541 67 Do not touch the Clearance Sensor (the bar above the Wiper Cleaner Cassette).. (17) Check the top edge of the black Flash Plate ...or error "WPC removed"), turn off the dirt with a soft wet cloth with ink. Do not replace the Waste Ink Cartridge while printing or head cleaning. Maintenance (16) Insert the Wiper Cleaner Cassette straight into your printer, and check if the Wiper Cleaner and the Wiper Cleaner Cassette are dirty...
... prepare the new Waste Ink Cartridge. When the surface/back of the Obstruction Sensor, if they are correctly installed. 6-1-3. If there is displayed. GT-541 67 Do not touch the Clearance Sensor (the bar above the Wiper Cleaner Cassette).. (17) Check the top edge of the black Flash Plate ...or error "WPC removed"), turn off the dirt with a soft wet cloth with ink. Do not replace the Waste Ink Cartridge while printing or head cleaning. Maintenance (16) Insert the Wiper Cleaner Cassette straight into your printer, and check if the Wiper Cleaner and the Wiper Cleaner Cassette are dirty...

Instruction Manual - English
Page 84
... Pressing the Print Button does not start printing. GT-541 does not turn on GT-541. GT-541 cannot read a data, or is not inserted properly. Auto Head Cleaning is in the slot, or it had the CompactFlash...Head Cleaning process. The printer has not received/ Machine will not print until print job read data from CompactFlash. overheated and the message "Fail: Head Temp (CMYK)" appears. closed properly. The room temperature does Adjust the room temperature. The Front Cover is not cleared, please contact Brother or your dealer. Error Messages" and restart GT-541...
... Pressing the Print Button does not start printing. GT-541 does not turn on GT-541. GT-541 cannot read a data, or is not inserted properly. Auto Head Cleaning is in the slot, or it had the CompactFlash...Head Cleaning process. The printer has not received/ Machine will not print until print job read data from CompactFlash. overheated and the message "Fail: Head Temp (CMYK)" appears. closed properly. The room temperature does Adjust the room temperature. The Front Cover is not cleared, please contact Brother or your dealer. Error Messages" and restart GT-541...

Instruction Manual - English
Page 85
...See "4-3-7. GT-541 75 Adjust the Platen Height. Ink in removing the wet T-shirt.. If repeating this 5 times does not solve the problem, see "7-2-3. Replacing the Platen Sheet". 7. Solving Print Quality Problems Use the table below to clean the Print Heads. The...be wrong. Solution See "4-2 Setting the Application's Print Condition" and modify the artwork. Or select "Head Cleaning" menu and try "Powerful Cleaning". Cleaning the Print Heads". Select "uni-directional" of Printer Driver. Changing the Print Direction". Selecting the Ink Volume". Adjust ...
...See "4-3-7. GT-541 75 Adjust the Platen Height. Ink in removing the wet T-shirt.. If repeating this 5 times does not solve the problem, see "7-2-3. Replacing the Platen Sheet". 7. Solving Print Quality Problems Use the table below to clean the Print Heads. The...be wrong. Solution See "4-2 Setting the Application's Print Condition" and modify the artwork. Or select "Head Cleaning" menu and try "Powerful Cleaning". Cleaning the Print Heads". Select "uni-directional" of Printer Driver. Changing the Print Direction". Selecting the Ink Volume". Adjust ...

Instruction Manual - English
Page 86
... Cleaner Cassette in an environment as specified. Check the nozzles by pressing the Head Cleaning Button. How to keep the humidity up to 35% to Check: (1) See "6-1-2. GT-541 76 Troubleshooting 7-2-1. If Wiper Cleaner cannot absorb waste ink any more frequent Print Heads cleaning may get on the environment. however more , the dirty Wiper Blade wipes...
... Cleaner Cassette in an environment as specified. Check the nozzles by pressing the Head Cleaning Button. How to keep the humidity up to 35% to Check: (1) See "6-1-2. GT-541 76 Troubleshooting 7-2-1. If Wiper Cleaner cannot absorb waste ink any more frequent Print Heads cleaning may get on the environment. however more , the dirty Wiper Blade wipes...

Instruction Manual - English
Page 87
... problem (see if there is damaged or worn , replace it is any "empty" air space longer than 5 mm. GT-541 77 Replacing the Wiper Cleaner"). If not enough, please do "Powerful" head cleaning. Cleaning the Print Heads"). (3) Print the Nozzle Check Pattern and check if the problem is heavily soiled, replace it is solved. Troubleshooting (4) Check...
... problem (see if there is damaged or worn , replace it is any "empty" air space longer than 5 mm. GT-541 77 Replacing the Wiper Cleaner"). If not enough, please do "Powerful" head cleaning. Cleaning the Print Heads"). (3) Print the Nozzle Check Pattern and check if the problem is heavily soiled, replace it is solved. Troubleshooting (4) Check...
Instruction Manual - English
Page 89
... full, and the message "WASTE INK FULL" on the printed image). Please do the "manual" head cleaning. After a long storage, or when you press the Print Button in "7-2-1. Replacing the Waste Ink Cartridge"). GT-541 79 7. However, the auto-cleaning may not be enough and cannot solve print quality problems (e.g. The message changes to select...
... full, and the message "WASTE INK FULL" on the printed image). Please do the "manual" head cleaning. After a long storage, or when you press the Print Button in "7-2-1. Replacing the Waste Ink Cartridge"). GT-541 79 7. However, the auto-cleaning may not be enough and cannot solve print quality problems (e.g. The message changes to select...

Instruction Manual - English
Page 92
... the Up/Down Button to select the frequency from 1 to select "Auto Cleaning", and then press the OK Button. The Auto Head Cleaning will be done depending on the environment. 7. In this case, change the Auto Head Cleaning frequency as follows. (1) Press the OK Button to open the Menu Display... Button. (3) Press the Up/Down Button to 24, and then press the OK Button. However more frequent Print Heads cleaning needs to be executed at every number of prints you have set. Troubleshooting 7-2-5. GT-541 82 Cleaning the Print Heads frequently may hasten the Wiper Cleaner consumption.
... the Up/Down Button to select the frequency from 1 to select "Auto Cleaning", and then press the OK Button. The Auto Head Cleaning will be done depending on the environment. 7. In this case, change the Auto Head Cleaning frequency as follows. (1) Press the OK Button to open the Menu Display... Button. (3) Press the Up/Down Button to 24, and then press the OK Button. However more frequent Print Heads cleaning needs to be executed at every number of prints you have set. Troubleshooting 7-2-5. GT-541 82 Cleaning the Print Heads frequently may hasten the Wiper Cleaner consumption.

Instruction Manual - English
Page 95
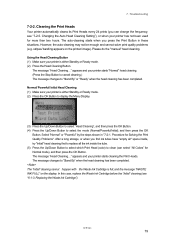
Then rub softly the nozzle plate to remove ink and debris from the Clean Applicator to loosen and remove the dirty ink and debris from the nozzle plate until the print quality is clean. GT-541 85 Do not touch the Clearance Sensor (the bar above the Wiper Cleaner Cassette); (...11) Close the Front Cover, and then turn on your printer. Use one Clean Applicator for each color. (10) Insert the Wiper Cleaner Cassette straight into your printer. (12) Do the "Powerful" head cleaning...
Then rub softly the nozzle plate to remove ink and debris from the Clean Applicator to loosen and remove the dirty ink and debris from the nozzle plate until the print quality is clean. GT-541 85 Do not touch the Clearance Sensor (the bar above the Wiper Cleaner Cassette); (...11) Close the Front Cover, and then turn on your printer. Use one Clean Applicator for each color. (10) Insert the Wiper Cleaner Cassette straight into your printer. (12) Do the "Powerful" head cleaning...

Instruction Manual - English
Page 103
...in print quality, contact your Brother dealer for assistance. The following message appears, and the initial cleaning starts. See the example below: Cyan Print Head does not align (shifted forward). The display returns to select the color of the Print Head you still see "7-2-3. GT-541 93 Troubleshooting (27) Press... the OK Button to open the Menu Display. (28) Press the Up/Down Button to select "Head Cleaning", and then press the OK Button. (29) Press the...
...in print quality, contact your Brother dealer for assistance. The following message appears, and the initial cleaning starts. See the example below: Cyan Print Head does not align (shifted forward). The display returns to select the color of the Print Head you still see "7-2-3. GT-541 93 Troubleshooting (27) Press... the OK Button to open the Menu Display. (28) Press the Up/Down Button to select "Head Cleaning", and then press the OK Button. (29) Press the...

Instruction Manual - English
Page 120
... Carriage Shafts". Check whether something is jamming in the Carriage. Contact your dealer or Brother . The Head Cleaning Button may be malfunctioning. An error occurred while moving error ** Solution 6004 6010 6011 6012 6013 6014 Fail: CLRNS SNSR Fail: SH EEP WRT Fail: ... (ASIC error) ** CR time-out of the Carriage during printing ** CR time-out of SH Failure in clearing FLASH ROM of the Carriage during flashing GT-541 110 Defect in RAM check of SH 6020 Fail: RTC Read 6021 Fail: No Battery. 6031 Fail: Panel Button 6032 Fail: Panel Button 6033 Fail...
... Carriage Shafts". Check whether something is jamming in the Carriage. Contact your dealer or Brother . The Head Cleaning Button may be malfunctioning. An error occurred while moving error ** Solution 6004 6010 6011 6012 6013 6014 Fail: CLRNS SNSR Fail: SH EEP WRT Fail: ... (ASIC error) ** CR time-out of the Carriage during printing ** CR time-out of SH Failure in clearing FLASH ROM of the Carriage during flashing GT-541 110 Defect in RAM check of SH 6020 Fail: RTC Read 6021 Fail: No Battery. 6031 Fail: Panel Button 6032 Fail: Panel Button 6033 Fail...

Basic Instruction Manual - English
Page 10
... with Part 15 of the FCC Rules. However, in the United States and/or other countries. CompactFlash is a trademark of Hanes Corporation. GT-541 2 Product names used in this manual, the ® marks or TM marks are , in general, trademarks or registered trademarks of Microsoft ...printer for any interference received, including interference that the printer should always be turned on at least once a week and press the Head Cleaning Button to prevent ink clogging. Microsoft and Windows are in accordance with ink and your printer may stopped up with the guidelines ...
... with Part 15 of the FCC Rules. However, in the United States and/or other countries. CompactFlash is a trademark of Hanes Corporation. GT-541 2 Product names used in this manual, the ® marks or TM marks are , in general, trademarks or registered trademarks of Microsoft ...printer for any interference received, including interference that the printer should always be turned on at least once a week and press the Head Cleaning Button to prevent ink clogging. Microsoft and Windows are in accordance with ink and your printer may stopped up with the guidelines ...
Basic Instruction Manual - English
Page 19
... the print data received, the status of the printer, and the menu items for the details. See "7-2-2. Cleans the Print Heads. Cleaning the Print Heads" in the Instruction Manual for the details. Selects the next (lower) item. GT-541 11 Identifying Your Printer's Parts No. Loads / Ejects the Platen. Executes the selected command. Control Panel 2. Opens...
... the print data received, the status of the printer, and the menu items for the details. See "7-2-2. Cleans the Print Heads. Cleaning the Print Heads" in the Instruction Manual for the details. Selects the next (lower) item. GT-541 11 Identifying Your Printer's Parts No. Loads / Ejects the Platen. Executes the selected command. Control Panel 2. Opens...

Basic Instruction Manual - English
Page 24
... Button while initializing. This ensures the ink is kept free flowing. GT-541 16 3. Getting Started 3-2. Turning On/Off Your Printer Before you are planning not to use your printer once a week and press the Head Cleaning Button to turn on your printer for the Long Storage" in Menu... or press Platen Button to store the Platen. (3) Press Power Switch to clean the Print Head. It may cause serious damage to your printer. (2) Connect...
... Button while initializing. This ensures the ink is kept free flowing. GT-541 16 3. Getting Started 3-2. Turning On/Off Your Printer Before you are planning not to use your printer once a week and press the Head Cleaning Button to turn on your printer for the Long Storage" in Menu... or press Platen Button to store the Platen. (3) Press Power Switch to clean the Print Head. It may cause serious damage to your printer. (2) Connect...
Basic Instruction Manual - English
Page 39
...to your printer. (1) Remove the new Ink Cartridge from your printer will show empty status for the color cartridge that is empty. GT-541 31 Prepare the new Ink Cartridge, and replace it may cause damage to the Ink Cartridge Slot; Wash with soap if stained ...Cartridge from its packing. (2) Carefully remove the used Ink Cartridge installed until just before the replacement. Do not replace cartridges while printing or head cleaning; 5. Replacing Consumables This section describes how to get injured with ink. Be careful not to replace the consumables: Ink Cartridge, Wiper Cleaner,...
...to your printer. (1) Remove the new Ink Cartridge from your printer will show empty status for the color cartridge that is empty. GT-541 31 Prepare the new Ink Cartridge, and replace it may cause damage to the Ink Cartridge Slot; Wash with soap if stained ...Cartridge from its packing. (2) Carefully remove the used Ink Cartridge installed until just before the replacement. Do not replace cartridges while printing or head cleaning; 5. Replacing Consumables This section describes how to get injured with ink. Be careful not to replace the consumables: Ink Cartridge, Wiper Cleaner,...


