
Basic Instruction Manual - English
Page 5
..., otherwise inflammation can result. Keep the grease out of the reach of children. GT-3 Series iii Transporting and setting up of the printer should only be used by ...Solution, Pretreatment or waste liquid under any accidents or problems resulting from the use only genuine Brother parts. Furthermore, do not get into contact with water. They may become unbalanced and fall... a suitable stable surface, otherwise it will not be mechanically and electrically damaged. The Platen moves forward while operating and it may cause diarrhea or vomiting. Be sure to wear...
..., otherwise inflammation can result. Keep the grease out of the reach of children. GT-3 Series iii Transporting and setting up of the printer should only be used by ...Solution, Pretreatment or waste liquid under any accidents or problems resulting from the use only genuine Brother parts. Furthermore, do not get into contact with water. They may become unbalanced and fall... a suitable stable surface, otherwise it will not be mechanically and electrically damaged. The Platen moves forward while operating and it may cause diarrhea or vomiting. Be sure to wear...
Basic Instruction Manual - English
Page 8
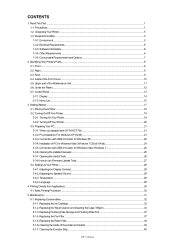
...Printing Directly from Applications...29 4-1. Maintenance...31 5-1. Cleaning the Encoder Strip ...40 GT-3 Series Precautions...1 1-2. Rear...9 2-4. Display...14 2-7-2. When you already have GT-541/GT-782 ...21 3-3-2. Adjusting the Speaker Volume...28 3-4-3. Unpacking Your Printer ...5 ...and Flushing Plate Felt 37 5-1-4. Required Condition...5 1-3-1. Other Requirements...6 1-3-5. Identifying Your Printer's Parts...8 2-1. Under the Platen...12 2-7. Turning On/Off Your Printer...19 3-2-1. Software Information...6 1-3-4. Menu List...15 3. Preparing Your PC...21 3-3-1....
...Printing Directly from Applications...29 4-1. Maintenance...31 5-1. Cleaning the Encoder Strip ...40 GT-3 Series Precautions...1 1-2. Rear...9 2-4. Display...14 2-7-2. When you already have GT-541/GT-782 ...21 3-3-2. Adjusting the Speaker Volume...28 3-4-3. Unpacking Your Printer ...5 ...and Flushing Plate Felt 37 5-1-4. Required Condition...5 1-3-1. Other Requirements...6 1-3-5. Identifying Your Printer's Parts...8 2-1. Under the Platen...12 2-7. Turning On/Off Your Printer...19 3-2-1. Software Information...6 1-3-4. Menu List...15 3. Preparing Your PC...21 3-3-1....
Basic Instruction Manual - English
Page 15
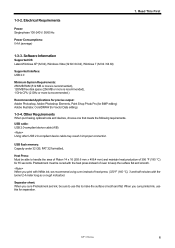
... purchasing optional tools and devices, choose one that meets the following requirements. When you cure Pretreatment and ink, be able to handle the area of Platen 14 x 16 (355.6 mm x 406.4 mm) and maintain heat production of oven to make the surface smooth and flat. 1-3-2. When you print with White ink... (for BMP editing) Adobe Illustrator, CorelDRAW (for separation. USB cable: USB 2.0-compliant device cable (A/B) Using other USB 2.0-compliant device cable may result in improper connection. GT-3 Series 6
... purchasing optional tools and devices, choose one that meets the following requirements. When you cure Pretreatment and ink, be able to handle the area of Platen 14 x 16 (355.6 mm x 406.4 mm) and maintain heat production of oven to make the surface smooth and flat. 1-3-2. When you print with White ink... (for BMP editing) Adobe Illustrator, CorelDRAW (for separation. USB cable: USB 2.0-compliant device cable (A/B) Using other USB 2.0-compliant device cable may result in improper connection. GT-3 Series 6
Basic Instruction Manual - English
Page 16
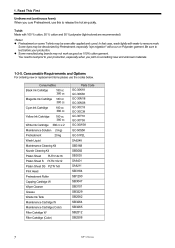
... 380 cc x 2 Maintenance Solution (5 kg) Pretreatment 20 kg Wash Liquid Maintenance Cleaning Kit Nozzle Cleaning Kit Platen Sheet PLTN 14x16 Platen Sheet S PLTN 10x12 Platen Sheet SS PLTN 7x8 Print Head Pretreatment Roller Capping Cartridge W Wiper Cleaner Grease Waste Ink Tank Maintenance Cartridge W...-50S5K GC-51P2L SA6248 SB3168 SB3082 SB3035 SA6401 SA8211 SB3184 SB1290 SB3047 SB3101 SB3229 SB2582 SB3264 SB3265 SB2512 SB2508 7 GT-3 Series Consumable Requirements and Options For ordering new or replacement items please use this to test before your production, especially...
... 380 cc x 2 Maintenance Solution (5 kg) Pretreatment 20 kg Wash Liquid Maintenance Cleaning Kit Nozzle Cleaning Kit Platen Sheet PLTN 14x16 Platen Sheet S PLTN 10x12 Platen Sheet SS PLTN 7x8 Print Head Pretreatment Roller Capping Cartridge W Wiper Cleaner Grease Waste Ink Tank Maintenance Cartridge W...-50S5K GC-51P2L SA6248 SB3168 SB3082 SB3035 SA6401 SA8211 SB3184 SB1290 SB3047 SB3101 SB3229 SB2582 SB3264 SB3265 SB2512 SB2508 7 GT-3 Series Consumable Requirements and Options For ordering new or replacement items please use this to test before your production, especially...

Basic Instruction Manual - English
Page 17
...the serial number of the appropriate color: from the left side W1, W2, W3, W4, Black(K), Magenta (M), Cyan (C), Yellow (Y). Name 1 Platen 2 Platen Sheet 3 T-shirt Tray 4 Front Cover 5 Stop Lever 6 Control Panel 7 Power Switch 8 Shoulder Bar 9 USB flash drive Slot 10 Ink ...if the material does not hit the flap of the Platens. Keep pushing it detects obstructions on your printer. GT-3 Series 8 Identifying Your Printer's Parts 2-1. Identifying Your Printer's Parts No. Prevents a T-shirt from the Platen (e.g. Keeps parts of the printer. Indicates the status...
...the serial number of the appropriate color: from the left side W1, W2, W3, W4, Black(K), Magenta (M), Cyan (C), Yellow (Y). Name 1 Platen 2 Platen Sheet 3 T-shirt Tray 4 Front Cover 5 Stop Lever 6 Control Panel 7 Power Switch 8 Shoulder Bar 9 USB flash drive Slot 10 Ink ...if the material does not hit the flap of the Platens. Keep pushing it detects obstructions on your printer. GT-3 Series 8 Identifying Your Printer's Parts 2-1. Identifying Your Printer's Parts No. Prevents a T-shirt from the Platen (e.g. Keeps parts of the printer. Indicates the status...
Basic Instruction Manual - English
Page 18
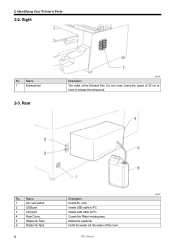
Right No. Leave the space of 20 cm or more to PC. 4 Rear Cover Covers the Platen moving area. 5 Waste Ink Tube Drains the waste ink. 6 Waste Ink Tank Holds the waste ink. Rear 0044Y Description The outlet of the room. 9 GT-3 Series Be aware of the Exhaust Fan. Name Description 1 AC cord socket Inserts AC cord. 2 USB port Inserts USB cable to PC. 3 LAN port Inserts LAN cable to release the exhaust air. 0045Y No. 2. Do not cover; Identifying Your Printer's Parts 2-2. Name 1 Exhaust slot 2-3.
Right No. Leave the space of 20 cm or more to PC. 4 Rear Cover Covers the Platen moving area. 5 Waste Ink Tube Drains the waste ink. 6 Waste Ink Tank Holds the waste ink. Rear 0044Y Description The outlet of the room. 9 GT-3 Series Be aware of the Exhaust Fan. Name Description 1 AC cord socket Inserts AC cord. 2 USB port Inserts USB cable to PC. 3 LAN port Inserts LAN cable to release the exhaust air. 0045Y No. 2. Do not cover; Identifying Your Printer's Parts 2-2. Name 1 Exhaust slot 2-3.
Basic Instruction Manual - English
Page 19
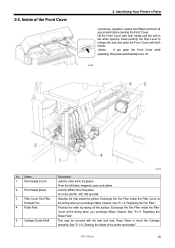
Inside of the printer and restart " GT-3 Series 10 If you open the Front Cover while operating, the power automatically turns off your printer before opening . Name 1 Print Heads (Front) 2 Print Heads (... turn off . 0046Y No. Jets the White Ink to move the Carriage smoothly. Protects the roller by wiping off the surface. Keep Clean to the platen. From the left black, magenta, cyan, and yellow. See "5-1-4. Absorbs ink mist inside of the Front Cover 2. Exchange the Fan Filter inside the Filter Cover...
Inside of the printer and restart " GT-3 Series 10 If you open the Front Cover while operating, the power automatically turns off your printer before opening . Name 1 Print Heads (Front) 2 Print Heads (... turn off . 0046Y No. Jets the White Ink to move the Carriage smoothly. Protects the roller by wiping off the surface. Keep Clean to the platen. From the left black, magenta, cyan, and yellow. See "5-1-4. Absorbs ink mist inside of the Front Cover 2. Exchange the Fan Filter inside the Filter Cover...
Basic Instruction Manual - English
Page 21
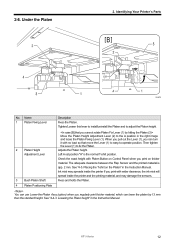
... is the normal T-shirt position. Fixes and holds the Platen. 4 Platen Positioning Plate You can lower the platen by 13 mm than the standard height. Lowering the Platen height" in the right image and loose the Platen Fixing Lever (1). GT-3 Series 12 Name 1 Platen Fixing Lever Description Fixes the Platen. Left most position "A" is app. 2 mm. Placing the...
... is the normal T-shirt position. Fixes and holds the Platen. 4 Platen Positioning Plate You can lower the platen by 13 mm than the standard height. Lowering the Platen height" in the right image and loose the Platen Fixing Lever (1). GT-3 Series 12 Name 1 Platen Fixing Lever Description Fixes the Platen. Left most position "A" is app. 2 mm. Placing the...
Basic Instruction Manual - English
Page 22
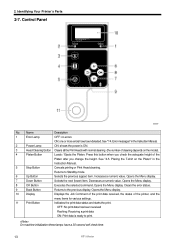
...3 Head Cleaning Button Cleans all the Print Heads with normal cleaning. (the number of cleaning depends on the model). 4 Platen Button Loads / Ejects the Platen. Increases a numeric value. See "4-5. Opens the Menu display. 7 Down Button Selects the next (lower) item. Name Description... 1 Error Lamp OFF: no errors ON: one or more errors have a 30-second self check time. 13 GT-3 Series On machine...
...3 Head Cleaning Button Cleans all the Print Heads with normal cleaning. (the number of cleaning depends on the model). 4 Platen Button Loads / Ejects the Platen. Increases a numeric value. See "4-5. Opens the Menu display. 7 Down Button Selects the next (lower) item. Name Description... 1 Error Lamp OFF: no errors ON: one or more errors have a 30-second self check time. 13 GT-3 Series On machine...

Basic Instruction Manual - English
Page 23
... the 30 characters of the Job Comment set by Printer Driver. 5 Number of Platen Shows the number of the received data. Identifying Your Printer's Parts The following image indicates that GT-3 has received a print data and ready to uni-directional printing. 2-7-1. When one... print of the Platen Move (loading/unloading) in each cartridge, from the left, W1, W2, W3, W4 , Black...
... the 30 characters of the Job Comment set by Printer Driver. 5 Number of Platen Shows the number of the received data. Identifying Your Printer's Parts The following image indicates that GT-3 has received a print data and ready to uni-directional printing. 2-7-1. When one... print of the Platen Move (loading/unloading) in each cartridge, from the left, W1, W2, W3, W4 , Black...

Basic Instruction Manual - English
Page 25
... the amount of White Ink that is flushed in the Instruction Manual. Sets the language shown on the display. See "7-2-12. Restores the Platen. Required Maintenance for the Long Storage" in DailyCleaning White. Default is finished. See "6-2-5. Shows versions of White Ink in Daily Cleaning... White" in the Instruction Manual. Adjusting the amount of the firmware. Shows the number of White Heads. See "3-4-4. GT-3 Series 16 Auto Job Delete: Deletes the print data automatically after the print number which is set with Printer Driver is OFF. ...
... the amount of White Ink that is flushed in the Instruction Manual. Sets the language shown on the display. See "7-2-12. Restores the Platen. Required Maintenance for the Long Storage" in DailyCleaning White. Default is finished. See "6-2-5. Shows versions of White Ink in Daily Cleaning... White" in the Instruction Manual. Adjusting the amount of the firmware. Shows the number of White Heads. See "3-4-4. GT-3 Series 16 Auto Job Delete: Deletes the print data automatically after the print number which is set with Printer Driver is OFF. ...
Basic Instruction Manual - English
Page 28
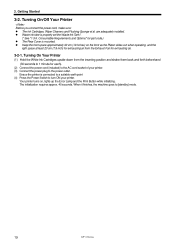
...cm (12 inches) on , lights up the Error Lamp and the Print Button while initializing. Your printer turns on the front as the Platen slides out when operating, and the right space at least 20 cm (7.9 inch) for exhausting air from the inserting position and shake them back... and forth beforehand (30 seconds to 1 minute for each). (2) Connect the power cord (included) to [standby] mode. 19 GT-3 Series are adequately installed. Consumable Requirements and Options" for exhausting air. 3-2-1. Turning On Your Printer (1) Hold the White Ink Cartridges upside down from the...
...cm (12 inches) on , lights up the Error Lamp and the Print Button while initializing. Your printer turns on the front as the Platen slides out when operating, and the right space at least 20 cm (7.9 inch) for exhausting air from the inserting position and shake them back... and forth beforehand (30 seconds to 1 minute for each). (2) Connect the power cord (included) to [standby] mode. 19 GT-3 Series are adequately installed. Consumable Requirements and Options" for exhausting air. 3-2-1. Turning On Your Printer (1) Hold the White Ink Cartridges upside down from the...
Basic Instruction Manual - English
Page 29
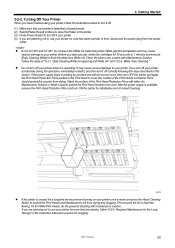
...the printer for initialization and do Head Cleaning. 0052Y z If the printer is [standby] or [ready] mode. (2) Select [Platen Reset] in Menu to store the Platen in the Instruction Manual to cover the nozzles of time, disconnect the power plug from drying and clogging. It may cause serious ... start your printer accidentally during the operation, immediately restart it, and then turn it is kept free flowing. Daily Cleaning White for GT-381 and GT-361, do the powerful cleaning with Maintenance Solution. If you have finished using your printer once a week and press the Head Cleaning...
...the printer for initialization and do Head Cleaning. 0052Y z If the printer is [standby] or [ready] mode. (2) Select [Platen Reset] in Menu to store the Platen in the Instruction Manual to cover the nozzles of time, disconnect the power plug from drying and clogging. It may cause serious ... start your printer accidentally during the operation, immediately restart it, and then turn it is kept free flowing. Daily Cleaning White for GT-381 and GT-361, do the powerful cleaning with Maintenance Solution. If you have finished using your printer once a week and press the Head Cleaning...
Basic Instruction Manual - English
Page 35
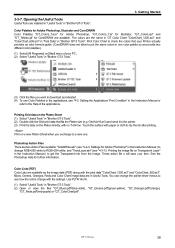
... the image file on the Platen Sheet (1) Select "Useful Tools" in one . Color Lists (PDF) Color Lists are the same in GT Color Chart "ColorChart_1200.ar3" and "ColorChart_600.ar3" in "Test Data" in Useful Tools. Use PLTN 14x16. (1) Select "Useful Tools" in "Brother GT-3 Tools". Color Palettes for Adobe... with the settings. See the Photoshop Help for Adobe Photoshop" in "Brother GT-3 Tools". (3) Click the files you exchange to dry the ink after printing. Print Color Chart to check the colors that fits the Platen size (e.g. Print on . You can change RGB=255 white to the...
... the image file on the Platen Sheet (1) Select "Useful Tools" in one . Color Lists (PDF) Color Lists are the same in GT Color Chart "ColorChart_1200.ar3" and "ColorChart_600.ar3" in "Test Data" in Useful Tools. Use PLTN 14x16. (1) Select "Useful Tools" in "Brother GT-3 Tools". Color Palettes for Adobe... with the settings. See the Photoshop Help for Adobe Photoshop" in "Brother GT-3 Tools". (3) Click the files you exchange to dry the ink after printing. Print Color Chart to check the colors that fits the Platen size (e.g. Print on . You can change RGB=255 white to the...
Basic Instruction Manual - English
Page 38
Do not move the Platen by operators who are appropriately trained in fire or electric shocks or problems with correct operation. The Printer ... inside the printer, immediately turn off the power switch and disconnect the power cord, and arrange for a service call to resolve. Contact Brother to arrange a service call to resolve. 4. Printing Directly from Applications WARNING If a foreign object gets inside the printer, immediately turn off... shocks or problems with the operation of the printer, contact the place of purchase or a qualified technician. 29 GT-3 Series
Do not move the Platen by operators who are appropriately trained in fire or electric shocks or problems with correct operation. The Printer ... inside the printer, immediately turn off the power switch and disconnect the power cord, and arrange for a service call to resolve. Contact Brother to arrange a service call to resolve. 4. Printing Directly from Applications WARNING If a foreign object gets inside the printer, immediately turn off... shocks or problems with the operation of the printer, contact the place of purchase or a qualified technician. 29 GT-3 Series
Basic Instruction Manual - English
Page 39
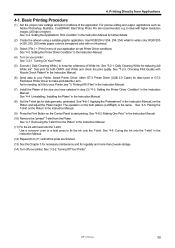
...application. See "3-2-2. Turning On Your Printer". (5) Execute [ Daily Cleaning White ] to deal with heat onto the T-shirt. Uninstalling / Installing the Platen" in step (3) "4-3. 4. Basic Printing Procedure (1) Set the proper color settings and print conditions of the size you have selected in the Instruction ..., CorelDRAW, Paint Shop Photo Pro are finished. (13) See the Chapter 5 for necessary maintenance and for direct print or GT-3 FileOutput Printer Driver to start printing. See "4-2. RGB=255 (=255, 255, 255) white (paper color) is the same. See "4-3. Select...
...application. See "3-2-2. Turning On Your Printer". (5) Execute [ Daily Cleaning White ] to deal with heat onto the T-shirt. Uninstalling / Installing the Platen" in step (3) "4-3. 4. Basic Printing Procedure (1) Set the proper color settings and print conditions of the size you have selected in the Instruction ..., CorelDRAW, Paint Shop Photo Pro are finished. (13) See the Chapter 5 for necessary maintenance and for direct print or GT-3 FileOutput Printer Driver to start printing. See "4-2. RGB=255 (=255, 255, 255) white (paper color) is the same. See "4-3. Select...

Basic Instruction Manual - English
Page 40
..., so that they can result. If the grease get your fingers caught when closing the front cover, otherwise it may be seriously damaged by hand. Brother will not be sure to your skin, otherwise inflammation can result in injury to use of non-genuine parts. 31... GT-3 Series CAUTION Wait at least 5 minutes after turning off the power switch and disconnecting the power cord from the use only genuine Brother parts. Do not move the Platen by this. Furthermore, do not drink or eat the grease. Be...
..., so that they can result. If the grease get your fingers caught when closing the front cover, otherwise it may be seriously damaged by hand. Brother will not be sure to your skin, otherwise inflammation can result in injury to use of non-genuine parts. 31... GT-3 Series CAUTION Wait at least 5 minutes after turning off the power switch and disconnecting the power cord from the use only genuine Brother parts. Do not move the Platen by this. Furthermore, do not drink or eat the grease. Be...
Basic Instruction Manual - English
Page 43
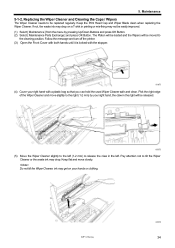
...attention not to the right (1-2 mm) by pressing Up/Down Buttons and press OK Button. (2) Select [ Maintenance Parts Exchange ] and press OK Button. Maintenance 5-1-2. The Platen will be loaded and the Wipers will be released. 0058Y (5) Move the Wiper Cleaner slightly to the left (1-2 mm) to the cleaning position.... GT-3 Series 0059Y 34 Replacing the Wiper Cleaner and Cleaning the Caps / Wipers The Wiper Cleaner needs to be moved to release the claw in ...
...attention not to the right (1-2 mm) by pressing Up/Down Buttons and press OK Button. (2) Select [ Maintenance Parts Exchange ] and press OK Button. Maintenance 5-1-2. The Platen will be loaded and the Wipers will be released. 0058Y (5) Move the Wiper Cleaner slightly to the left (1-2 mm) to the cleaning position.... GT-3 Series 0059Y 34 Replacing the Wiper Cleaner and Cleaning the Caps / Wipers The Wiper Cleaner needs to be moved to release the claw in ...
Basic Instruction Manual - English
Page 47
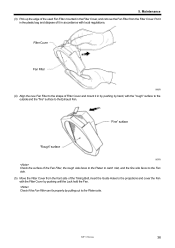
... the Fan. Filter Cover Fan Filter 0069Y (4) Align the new Fan Filter to the shape of the Timing Belt, insert the Guide Holes to the Platen side. GT-3 Series 38 5. Maintenance (3) Pick up the edge of the used Fan Filter mounted in the Filter Cover, and remove the Fan Filter from the... front side of Filter Cover and mount it in the plastic bag and dispose of the Fan Filter, the rough side faces to the Platen to catch...
... the Fan. Filter Cover Fan Filter 0069Y (4) Align the new Fan Filter to the shape of the Timing Belt, insert the Guide Holes to the Platen side. GT-3 Series 38 5. Maintenance (3) Pick up the edge of the used Fan Filter mounted in the Filter Cover, and remove the Fan Filter from the... front side of Filter Cover and mount it in the plastic bag and dispose of the Fan Filter, the rough side faces to the Platen to catch...
Basic Instruction Manual - English
Page 48
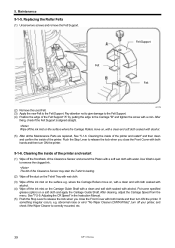
After fixing, check if the Felt Support is correctly mounted, etc. 39 GT-3 Series If something irregular occurs, e.g. Pay attention not to give damage to the Felt Support. (4) Position the edge of the Clearance Sensor and around the Platen with a soft wet cloth with wet cloth. (3) Wipe off the ink mist on the...
After fixing, check if the Felt Support is correctly mounted, etc. 39 GT-3 Series If something irregular occurs, e.g. Pay attention not to give damage to the Felt Support. (4) Position the edge of the Clearance Sensor and around the Platen with a soft wet cloth with wet cloth. (3) Wipe off the ink mist on the...

