
Basic Instruction Manual - English
Page 24
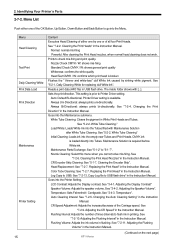
... White Tube Cleaning" Initial Cleaning: Loads ink into Tubes. Temperature". See "7-2-9. Flushing Interval: Adjusts the number of the Carriage speed. GT-3 Series (Continued on the next page) Normal: normal mis-firing Powerful: After cleaning the Print Head nozzles, when normal head... always prints bi-directionally. Cleaning the Print Head Nozzles" in USB flash drive. Cleaning the Encoder Strip". Adjusting the CR Speed" in the Instruction Manual. Adjusting the Flushing Interval" in the Instruction Manual. See "7-2-11. See "3-4-1. Changing the Print ...
... White Tube Cleaning" Initial Cleaning: Loads ink into Tubes. Temperature". See "7-2-9. Flushing Interval: Adjusts the number of the Carriage speed. GT-3 Series (Continued on the next page) Normal: normal mis-firing Powerful: After cleaning the Print Head nozzles, when normal head... always prints bi-directionally. Cleaning the Print Head Nozzles" in USB flash drive. Cleaning the Encoder Strip". Adjusting the CR Speed" in the Instruction Manual. Adjusting the Flushing Interval" in the Instruction Manual. See "7-2-11. See "3-4-1. Changing the Print ...
Basic Instruction Manual - English
Page 48
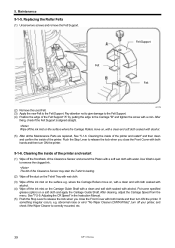
... cloth soaked with both hands and then turn ON the printer. Use Wash Liquid to the Felt Support. Adjusting the CR Speed" in loading. (2) Wipe off the dust on the T-shirt Tray with wet cloth. (3) Wipe off the ink mist ...with water. Replacing the Roller Felts (1) Unscrew two screws and remove the Felt Support. After cleaning, adjust the Carriage Speed from the menu. Push the Stop Lever to release the lock when you close the Front Cover with both hands ... See "5-1-6. Maintenance 5-1-5. After fixing, check if the Felt Support is correctly mounted, etc. 39 GT-3 Series
... cloth soaked with both hands and then turn ON the printer. Use Wash Liquid to the Felt Support. Adjusting the CR Speed" in loading. (2) Wipe off the dust on the T-shirt Tray with wet cloth. (3) Wipe off the ink mist ...with water. Replacing the Roller Felts (1) Unscrew two screws and remove the Felt Support. After cleaning, adjust the Carriage Speed from the menu. Push the Stop Lever to release the lock when you close the Front Cover with both hands ... See "5-1-6. Maintenance 5-1-5. After fixing, check if the Felt Support is correctly mounted, etc. 39 GT-3 Series
Instruction Manual - English
Page 10
Adjusting the CR Speed...124 7-2-10. Mechanical Specification...137 8-2. Adjustment after the Print Head has been replaced 123 7-2-9. Copy Log file to USB flash drive...127 7-3. Cleaning the Print ... 8-1. Adjusting the Flushing Interval...124 7-2-11. Adjusting the Flushing Volume...125 7-2-12. Replacing the Print Head ...114 7-2-8. 7-2-4. Changing the Print Direction ...111 7-2-5. Software Specification...137 GT-3 Series
Adjusting the CR Speed...124 7-2-10. Mechanical Specification...137 8-2. Adjustment after the Print Head has been replaced 123 7-2-9. Copy Log file to USB flash drive...127 7-3. Cleaning the Print ... 8-1. Adjusting the Flushing Interval...124 7-2-11. Adjusting the Flushing Volume...125 7-2-12. Replacing the Print Head ...114 7-2-8. 7-2-4. Changing the Print Direction ...111 7-2-5. Software Specification...137 GT-3 Series

Instruction Manual - English
Page 25
... Driver setting is required before White ink. Cleaning the Print Head Nozzles" CR Encoder Strip Cleaning: See "6-1-7. Flushing Interval: Adjusts the number of the Carriage speed. 2-7-2. Cleaning the Print Heads" Normal: normal mis-firing Powerful: After cleaning the Print Head nozzles, when normal head cleaning does not work. The inside ...Tube Cleaning. See "7-2-4. See "6-2-2. Maintenance Parts Exchange: See "6-1-2" to Printer Driver setting. Temperature: Sets Fahrenheit / Centigrade. Adjusting the Flushing Volume". (Continued on the next page) GT-3 Series 15
... Driver setting is required before White ink. Cleaning the Print Head Nozzles" CR Encoder Strip Cleaning: See "6-1-7. Flushing Interval: Adjusts the number of the Carriage speed. 2-7-2. Cleaning the Print Heads" Normal: normal mis-firing Powerful: After cleaning the Print Head nozzles, when normal head cleaning does not work. The inside ...Tube Cleaning. See "7-2-4. See "6-2-2. Maintenance Parts Exchange: See "6-1-2" to Printer Driver setting. Temperature: Sets Fahrenheit / Centigrade. Adjusting the Flushing Volume". (Continued on the next page) GT-3 Series 15

Instruction Manual - English
Page 101
... the Stop Lever to the Carriage "B" and tighten the screw with wet cloth. (3) Wipe off the front/back of the printer. GT-3 Series 91 Put some specified grease (option) on the Carriage Guide Shaft with a clean and soft cloth soaked with alcohol. (5) After all... the Maintenance Parts are replaced, See "6-1-6. After cleaning, adjust the Carriage Speed from the menu. After fixing, check if the Felt Support is correctly mounted, etc. Maintenance Felt Support Felt Felt 0071Y (2) Remove the used Felt. ...
... the Stop Lever to the Carriage "B" and tighten the screw with wet cloth. (3) Wipe off the front/back of the printer. GT-3 Series 91 Put some specified grease (option) on the Carriage Guide Shaft with a clean and soft cloth soaked with alcohol. (5) After all... the Maintenance Parts are replaced, See "6-1-6. After cleaning, adjust the Carriage Speed from the menu. After fixing, check if the Felt Support is correctly mounted, etc. Maintenance Felt Support Felt Felt 0071Y (2) Remove the used Felt. ...

Instruction Manual - English
Page 134
...Speed Execute this menu after you clean the Carriage Shaft, or you are asked from clogging with the Up / Down Button. The following message will be indicated. 10e0035Y (3) The initial setting is decided on the assumption that the printer works under the environment of the print. 124 GT.... 17e0042Y 7-2-10. Adjusting the Flushing Interval Flushing is very important to enter the Menu. (2) Select [ Printer Setting ] > [ CR Speed Adjustment ] with [ Flushing Volume ] menu when the print quality is not good while printing. Confirm the print quality before production. 11e0036Y ...
...Speed Execute this menu after you clean the Carriage Shaft, or you are asked from clogging with the Up / Down Button. The following message will be indicated. 10e0035Y (3) The initial setting is decided on the assumption that the printer works under the environment of the print. 124 GT.... 17e0042Y 7-2-10. Adjusting the Flushing Interval Flushing is very important to enter the Menu. (2) Select [ Printer Setting ] > [ CR Speed Adjustment ] with [ Flushing Volume ] menu when the print quality is not good while printing. Confirm the print quality before production. 11e0036Y ...
Instruction Manual - English
Page 145
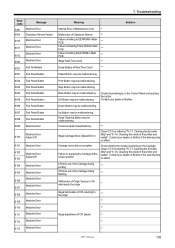
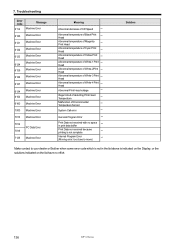
...Carriage. Contact your dealer or Brother if the cleaning has no effect. Contact your dealer or Brother. 7. Print Button may be malfunctioning. Down Button may be malfunctioning. Could not detect Head Memory ** Illegal Carriage Move (Speed Error) Clean GT-3 by referring ""6-1-7. Failure in... Machine Error Machine Error Machine Error Machine Error Machine Error Machine Error Machine Error Machine Error Machine Error Machine Error Meaning Internal Error of Maintenance Unit ** Malfunction of Clearance Sensor ** Failure of writing to the origin ** ** ** Illegal adjustment ...
...Carriage. Contact your dealer or Brother if the cleaning has no effect. Contact your dealer or Brother. 7. Print Button may be malfunctioning. Down Button may be malfunctioning. Could not detect Head Memory ** Illegal Carriage Move (Speed Error) Clean GT-3 by referring ""6-1-7. Failure in... Machine Error Machine Error Machine Error Machine Error Machine Error Machine Error Machine Error Machine Error Machine Error Machine Error Meaning Internal Error of Maintenance Unit ** Malfunction of Clearance Sensor ** Failure of writing to the origin ** ** ** Illegal adjustment ...
Instruction Manual - English
Page 146
... Machine Error 6160 Machine Error 7000 Machine Error 7013 Machine Error 7014 7015 PC Data Error 7125 Machine Error Meaning Abnormal decrease of CR Speed ** Abnormal temperature of Black Print Head ** Abnormal temperature of Magenta Print Head ** Abnormal temperature of Cyan Print Head ** Abnormal temperature... in print data buffer ** Print Data nor received because printing is not complete ** Internal Program Error (Moving error: too close to move) ** Solution Make contact to your dealer or Brother when some error code which is not in the list above is indicated on the ...
... Machine Error 6160 Machine Error 7000 Machine Error 7013 Machine Error 7014 7015 PC Data Error 7125 Machine Error Meaning Abnormal decrease of CR Speed ** Abnormal temperature of Black Print Head ** Abnormal temperature of Magenta Print Head ** Abnormal temperature of Cyan Print Head ** Abnormal temperature... in print data buffer ** Print Data nor received because printing is not complete ** Internal Program Error (Moving error: too close to move) ** Solution Make contact to your dealer or Brother when some error code which is not in the list above is indicated on the ...
