
Users Manual - English
Page 11
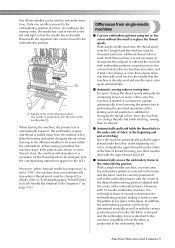
...", the machine does not automatically stop when it is not necessary to change the thread spools with the camera positioning function after the fabric is hooped and the embroidery frame is attached to the machine, regardless of how the fabric is positioned in the embroidery frame. However, with embroidery patterns containing...
...", the machine does not automatically stop when it is not necessary to change the thread spools with the camera positioning function after the fabric is hooped and the embroidery frame is attached to the machine, regardless of how the fabric is positioned in the embroidery frame. However, with embroidery patterns containing...
Users Manual - English
Page 14
... (H) × 14 inches (W)) can be sewn on caps. ■ Manual color sequence - An optional cap frame is an optional round frame holder C for the cap hoop.
... (H) × 14 inches (W)) can be sewn on caps. ■ Manual color sequence - An optional cap frame is an optional round frame holder C for the cap hoop.

Users Manual - English
Page 17
... in the Embroidery Frame 49 Hooping the fabric in the embroidery frame 49 Attaching the Embroidery Frame to the Machine 51 Attaching the embroidery frame...51 Checking the Embroidery Area 53 ... replace the embroidery frame 90 Types of embroidery frames/frame holders and their applications 91 Attaching Iron-On Stabilizer (Backing) to Fabric 93 Hooping the Fabric...94 Hooping the fabric in the extra-large and large embroidery frames 94 Using the embroidery sheet ...95 Large/small pieces of fabric...96 Embroidery Frame...
... in the Embroidery Frame 49 Hooping the fabric in the embroidery frame 49 Attaching the Embroidery Frame to the Machine 51 Attaching the embroidery frame...51 Checking the Embroidery Area 53 ... replace the embroidery frame 90 Types of embroidery frames/frame holders and their applications 91 Attaching Iron-On Stabilizer (Backing) to Fabric 93 Hooping the Fabric...94 Hooping the fabric in the extra-large and large embroidery frames 94 Using the embroidery sheet ...95 Large/small pieces of fabric...96 Embroidery Frame...
Users Manual - English
Page 19
... a mark on the fabric 244 Color thread table ...246 Colors of Tajima (.dst) embroidery data ...246 Creating Beautiful Embroidery 247 Threads...247 Stabilizers (backing) ...247 Hooping techniques ...249 Fabric/stabilizer compatibility chart ...250 Installing the Included Table 251 Contents 17
... a mark on the fabric 244 Color thread table ...246 Colors of Tajima (.dst) embroidery data ...246 Creating Beautiful Embroidery 247 Threads...247 Stabilizers (backing) ...247 Hooping techniques ...249 Fabric/stabilizer compatibility chart ...250 Installing the Included Table 251 Contents 17
Users Manual - English
Page 35
... Pattern ....... 46 Continuing to the embroidering settings screen 46 5.Specifying Embroidering Setting...... 47 6.Previewing the Image 48 Checking a preview image 48 7.Hooping the Fabric in the Embroidery Frame 49 Hooping the fabric in order-from turning on the machine and sewing a pattern to finishing sewing. 2 EMBROIDERING TUTORIAL This chapter describes the basic...
... Pattern ....... 46 Continuing to the embroidering settings screen 46 5.Specifying Embroidering Setting...... 47 6.Previewing the Image 48 Checking a preview image 48 7.Hooping the Fabric in the Embroidery Frame 49 Hooping the fabric in order-from turning on the machine and sewing a pattern to finishing sewing. 2 EMBROIDERING TUTORIAL This chapter describes the basic...
Users Manual - English
Page 39
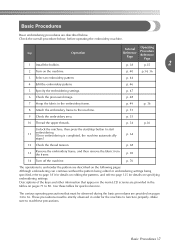
... tables for the machine to 36. These precautions must be strictly observed in order for quick reference. p. 40 p.34, 36 3 Select an embroidery pattern. p. 48 7 Hoop the fabric in the tables on the following pages. Use these precautions. The various operating precautions that appear in the main LCD screens are provided...
... tables for the machine to 36. These precautions must be strictly observed in order for quick reference. p. 40 p.34, 36 3 Select an embroidery pattern. p. 48 7 Hoop the fabric in the tables on the following pages. Use these precautions. The various operating precautions that appear in the main LCD screens are provided...
Users Manual - English
Page 51
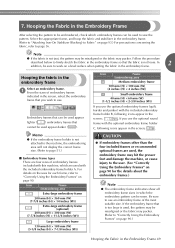
...embroidery frames that is too large is not loose. If the embroidery frame that cannot be used appear darker ( ). Select the appropriate frame, and hoop the fabric and stabilizer in the embroidery frame. (Refer to "Attaching Iron-On Stabilizer (Backing) to Fabric" on page 93.) For precautions concerning ...or cause injury to the user. (See "Correctly Using the Embroidery Frames" on page 90 for each frame, refer to page 36. 7. Hooping the Fabric in the Embroidery Frame After selecting the pattern to work on the uses for the details about the embroidery frames.) Note ●...
...embroidery frames that is too large is not loose. If the embroidery frame that cannot be used appear darker ( ). Select the appropriate frame, and hoop the fabric and stabilizer in the embroidery frame. (Refer to "Attaching Iron-On Stabilizer (Backing) to Fabric" on page 93.) For precautions concerning ...or cause injury to the user. (See "Correctly Using the Embroidery Frames" on page 90 for each frame, refer to page 36. 7. Hooping the Fabric in the Embroidery Frame After selecting the pattern to work on the uses for the details about the embroidery frames.) Note ●...
Users Manual - English
Page 52
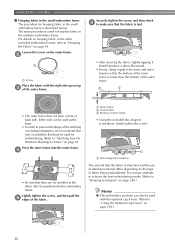
...; After securing the fabric, lightly tapping it is positioned in the small embroidery frame is described below. The same procedure is used for hooping fabric in the embroidery frame. Loosen the screw on page 93. Either side can also be used with the right side up on page...frame. • The outer frame does not have a front or back side. For details on the type of the outer frame. EMBROIDERING TUTORIAL ■ Hooping fabric in the small embroidery frame The procedure for embroidering. (Refer to "Attaching Iron-On Stabilizer (Backing) to Fabric" on the outer frame. 2 ...
...; After securing the fabric, lightly tapping it is positioned in the small embroidery frame is described below. The same procedure is used for hooping fabric in the embroidery frame. Loosen the screw on page 93. Either side can also be used with the right side up on page...frame. • The outer frame does not have a front or back side. For details on the type of the outer frame. EMBROIDERING TUTORIAL ■ Hooping fabric in the small embroidery frame The procedure for embroidering. (Refer to "Attaching Iron-On Stabilizer (Backing) to Fabric" on the outer frame. 2 ...
Users Manual - English
Page 53
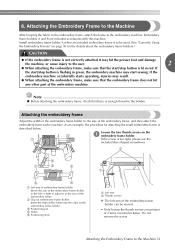
... into the clips on the embroidery frame holder. 3 Positioning pin 4 Holes 5 Positioning slots 1 Left arm 2 Thumb screws X The left or right to the Machine After hooping the fabric in red. Attaching the Embroidery Frame to adjust it may result. ● When attaching the embroidery frame, make sure that the embroidery frame...
... into the clips on the embroidery frame holder. 3 Positioning pin 4 Holes 5 Positioning slots 1 Left arm 2 Thumb screws X The left or right to the Machine After hooping the fabric in red. Attaching the Embroidery Frame to adjust it may result. ● When attaching the embroidery frame, make sure that the embroidery frame...

Users Manual - English
Page 80
This key is available when the camera view p.104 is displayed. Touch to display the grid lines on the camera view for hooping the fabric 4 Camera grid display key when embroidering the border pattern. Touch to zoom up the camera view twice the 3 size of normal view. Camera ...
This key is available when the camera view p.104 is displayed. Touch to display the grid lines on the camera view for hooping the fabric 4 Camera grid display key when embroidering the border pattern. Touch to zoom up the camera view twice the 3 size of normal view. Camera ...
Users Manual - English
Page 89
... to replace the embroidery frame 90 Types of embroidery frames/frame holders and their applications 91 Attaching Iron-On Stabilizer (Backing) to Fabric 93 Hooping the Fabric 94 Hooping the fabric in camera 103 Using the included embroidery positioning sticker 105 Switching the Thread Colors on the Screen 108 Embroidering a Pattern Containing...
... to replace the embroidery frame 90 Types of embroidery frames/frame holders and their applications 91 Attaching Iron-On Stabilizer (Backing) to Fabric 93 Hooping the Fabric 94 Hooping the fabric in camera 103 Using the included embroidery positioning sticker 105 Switching the Thread Colors on the Screen 108 Embroidering a Pattern Containing...
Users Manual - English
Page 93
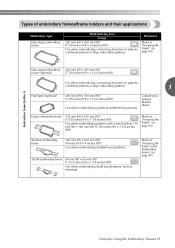
...frame 100 mm (H) × 100 mm (W) (4 inches (H) × 4 inches (W)) Use when embroidering standard-sized patterns. Consult your nearest Brother dealer. Large embroidery frame 130 mm (H) × 180 mm (W) (5-1/8 inches (H) × 7-1/8 inches (W)) Use when embroidering patterns with a ...size less than 130 mm (H) × 180 mm (W) (5-1/8 inches (H) × 7-1/8 inches (W)) (Refer to "Hooping the Fabric" on page 94.) Embroidery frame holder A Extra-large embroidery 200 mm (H) × 300 mm (W) frame (optional) (7-7/8 inches (H) × ...
...frame 100 mm (H) × 100 mm (W) (4 inches (H) × 4 inches (W)) Use when embroidering standard-sized patterns. Consult your nearest Brother dealer. Large embroidery frame 130 mm (H) × 180 mm (W) (5-1/8 inches (H) × 7-1/8 inches (W)) Use when embroidering patterns with a ...size less than 130 mm (H) × 180 mm (W) (5-1/8 inches (H) × 7-1/8 inches (W)) (Refer to "Hooping the Fabric" on page 94.) Embroidery frame holder A Extra-large embroidery 200 mm (H) × 300 mm (W) frame (optional) (7-7/8 inches (H) × ...
Users Manual - English
Page 95
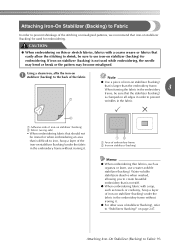
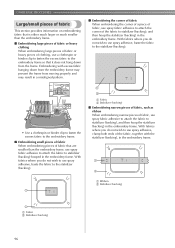
...use a water-soluble stabilizer (backing). CAUTION ● When embroidering on thin or stretch fabrics, fabrics with a nap, such as towels or corduroy, hoop a layer of iron-on stabilizer (backing) under the fabric in the embroidery frame without ironing it . 1 Area of embroidery frame 2 Iron-on ...9679; For other uses of the fabric. Note ● Use a piece of the stitching or misaligned patterns, we recommend that is difficult to iron, hoop a layer of the iron-on stabilizer (backing) under the fabric in the fabric. 1 Adhesive side of iron-on stabilizer (backing) 2 Fabric (wrong...
...use a water-soluble stabilizer (backing). CAUTION ● When embroidering on thin or stretch fabrics, fabrics with a nap, such as towels or corduroy, hoop a layer of iron-on stabilizer (backing) under the fabric in the embroidery frame without ironing it . 1 Area of embroidery frame 2 Iron-on ...9679; For other uses of the fabric. Note ● Use a piece of the stitching or misaligned patterns, we recommend that is difficult to iron, hoop a layer of the iron-on stabilizer (backing) under the fabric in the fabric. 1 Adhesive side of iron-on stabilizer (backing) 2 Fabric (wrong...

Users Manual - English
Page 96
...Disc-shaped screwdriver Memo ● To correctly frame the fabric in the embroidery frame, we recommend using a flat surface. ● Refer to "Hooping fabric in the small embroidery frame" on page 50 for details on the outer frame. 1 direction indicated by arrow B so that the fabric is... 3 First insert the inner frame at the corner with the screw A. OTHER BASIC PROCEDURES Hooping the Fabric Hooping the fabric in the extra-large and large embroidery frames Loosen the screw on hooping smaller frames. Then, while lightly pulling the fabric in the direction indicated by arrow D ...
...Disc-shaped screwdriver Memo ● To correctly frame the fabric in the embroidery frame, we recommend using a flat surface. ● Refer to "Hooping fabric in the small embroidery frame" on page 50 for details on the outer frame. 1 direction indicated by arrow B so that the fabric is... 3 First insert the inner frame at the corner with the screw A. OTHER BASIC PROCEDURES Hooping the Fabric Hooping the fabric in the extra-large and large embroidery frames Loosen the screw on hooping smaller frames. Then, while lightly pulling the fabric in the direction indicated by arrow D ...
Users Manual - English
Page 97
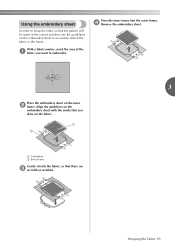
With a fabric marker, mark the area of the 1 fabric you drew on the inner 2 frame. Hooping the Fabric 95 Press the inner frame into the outer frame. 4 Remove the embroidery sheet. Align the guidelines on the embroidery sheet with the marks ... on the fabric. 1 Guidelines 2 Inner frame Gently stretch the fabric, so that there are 3 no folds or wrinkles. Using the embroidery sheet In order to hoop the fabric so that the pattern will be sewn in the frame.
With a fabric marker, mark the area of the 1 fabric you drew on the inner 2 frame. Hooping the Fabric 95 Press the inner frame into the outer frame. 4 Remove the embroidery sheet. Align the guidelines on the embroidery sheet with the marks ... on the fabric. 1 Guidelines 2 Inner frame Gently stretch the fabric, so that there are 3 no folds or wrinkles. Using the embroidery sheet In order to hoop the fabric so that the pattern will be sewn in the frame.
Users Manual - English
Page 98
... much larger or much smaller than the embroidery frame, use spray fabric adhesive to attach the fabric to stabilizer (backing), and then hoop the stabilizer (backing) in the embroidery frame. Embroidering with the stabilizer (backing), in the embroidery frame. With fabrics where you do... fabric, use spray fabric adhesive to attach the corner of fabric, use spray fabric adhesive to attach the fabric to stabilizer (backing), and then hoop the stabilizer (backing) in the embroidery frame. 1 Ribbon 2 Stabilizer (backing) 1 Fabric 2 Stabilizer (backing) 96 With fabrics where you do...
... much larger or much smaller than the embroidery frame, use spray fabric adhesive to attach the fabric to stabilizer (backing), and then hoop the stabilizer (backing) in the embroidery frame. Embroidering with the stabilizer (backing), in the embroidery frame. With fabrics where you do... fabric, use spray fabric adhesive to attach the corner of fabric, use spray fabric adhesive to attach the fabric to stabilizer (backing), and then hoop the stabilizer (backing) in the embroidery frame. 1 Ribbon 2 Stabilizer (backing) 1 Fabric 2 Stabilizer (backing) 96 With fabrics where you do...
Users Manual - English
Page 101
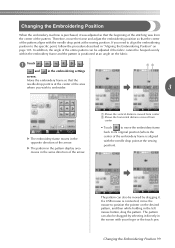
... the center of the pattern. The pattern can also be dragged by dragging it. In addition, the angle of the entire pattern can also be hooped evenly within the embroidery frame and the pattern is positioned at an angle on page 103. The pattern can be adjusted if the fabric cannot...
... the center of the pattern. The pattern can also be dragged by dragging it. In addition, the angle of the entire pattern can also be hooped evenly within the embroidery frame and the pattern is positioned at an angle on page 103. The pattern can be adjusted if the fabric cannot...

Users Manual - English
Page 104
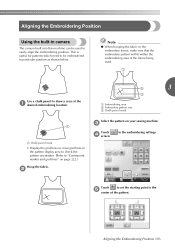
... angle; also, this operation, fine adjustments can be made to the left before embroidering. This will prevent the neck of the T-shirt, not from being hooped in the embroidery frame. Example: When embroidering a T-shirt Rotate the pattern 180 degrees.
... angle; also, this operation, fine adjustments can be made to the left before embroidering. This will prevent the neck of the T-shirt, not from being hooped in the embroidery frame. Example: When embroidering a T-shirt Rotate the pattern 180 degrees.
Users Manual - English
Page 105
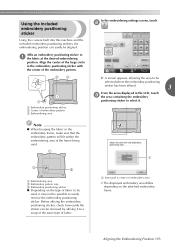
... the pattern. This is useful for patterns which need to "Centerpoint marker and grid lines" on page 222.) Hoop the fabric. 2 Select the pattern on your sewing machine. 3 Touch 4 screen. Note ● When hooping the fabric in the embroidery frame, make sure that the embroidery pattern will fit within the embroidering area...
... the pattern. This is useful for patterns which need to "Centerpoint marker and grid lines" on page 222.) Hoop the fabric. 2 Select the pattern on your sewing machine. 3 Touch 4 screen. Note ● When hooping the fabric in the embroidery frame, make sure that the embroidery pattern will fit within the embroidering area...
Users Manual - English
Page 107
... LCD, touch 3 the area containing the embroidery positioning sticker to easily remove the embroidery positioning sticker. In the embroidering settings screen, touch 2 . Note ● When hooping the fabric in the embroidery frame, make sure that the embroidery pattern will fit within the embroidering area of fabric to be used, it may...
... LCD, touch 3 the area containing the embroidery positioning sticker to easily remove the embroidery positioning sticker. In the embroidering settings screen, touch 2 . Note ● When hooping the fabric in the embroidery frame, make sure that the embroidery pattern will fit within the embroidering area of fabric to be used, it may...


