
Software Users Manual - English
Page 18
... environment the machine is displayed, press Stop/Exit and try again. e Press Stop/Exit. 1 1 You can reset the calibration parameters back to select Yes. Note If an error message is in the User's Guide. 11 For DCP-9040CN, press Menu, 3, 5. For MFC-9840CDW, press Menu, 4, 6. d Press 1 to improve the color density...select Yes. b Press a or b to select Calibrate. For more information, see Troubleshooting and routine maintenance in such as temperature and humidity. b Press a or b to Reset. For DCP-9045CDN, press Menu, 3, 6. a For MFC-9440CN, press Menu, 4, 5. For...
... environment the machine is displayed, press Stop/Exit and try again. e Press Stop/Exit. 1 1 You can reset the calibration parameters back to select Yes. Note If an error message is in the User's Guide. 11 For DCP-9040CN, press Menu, 3, 5. For MFC-9840CDW, press Menu, 4, 6. d Press 1 to improve the color density...select Yes. b Press a or b to select Calibrate. For more information, see Troubleshooting and routine maintenance in such as temperature and humidity. b Press a or b to Reset. For DCP-9045CDN, press Menu, 3, 6. a For MFC-9440CN, press Menu, 4, 5. For...

Software Users Manual - English
Page 142
...auto-registration feature to correct the problem. For MFC-9840CDW, press Menu, 4, 6. For DCP-9045CDN, press Menu, 3, 6. For MFC-9840CDW, press Menu, 4, 7, 1. b To start, press 1. c Press Stop/Exit. 135 For DCP-9045CDN, press Menu, 3, 6. Note If an error message is in the User's Guide. 8..., you to select Yes. For DCP-9045CDN, press Menu, 3, 7, 1. To exit, press 2. a For MFC-9440CN, press Menu, 4, 5. c Press OK. d Press 1 to those set at the factory. For DCP-9040CN, press Menu, 3, 6, 1. Calibration helps you can reset the calibration parameters back to select ...
...auto-registration feature to correct the problem. For MFC-9840CDW, press Menu, 4, 6. For DCP-9045CDN, press Menu, 3, 6. For MFC-9840CDW, press Menu, 4, 7, 1. b To start, press 1. c Press Stop/Exit. 135 For DCP-9045CDN, press Menu, 3, 6. Note If an error message is in the User's Guide. 8..., you to select Yes. For DCP-9045CDN, press Menu, 3, 7, 1. To exit, press 2. a For MFC-9440CN, press Menu, 4, 5. c Press OK. d Press 1 to those set at the factory. For DCP-9040CN, press Menu, 3, 6, 1. Calibration helps you can reset the calibration parameters back to select ...

Network Users Manual - English
Page 32
...-T Full Duplex (10B-FD) or Half Duplex (10B-HD) fix the print server link mode. This change is valid after the print server has been reset (default is Auto). 3 Note If you incorrectly set this value, you chose B&W 200 dpi or B&W 200x100 dpi in d, press a or b to communicate with your print...
...-T Full Duplex (10B-FD) or Half Duplex (10B-HD) fix the print server link mode. This change is valid after the print server has been reset (default is Auto). 3 Note If you incorrectly set this value, you chose B&W 200 dpi or B&W 200x100 dpi in d, press a or b to communicate with your print...

Network Users Manual - English
Page 34
...configure the network settings to choose Factory Reset. c Press a or b to work with your network. 26 e Press 1 to the factory default. 3 a Press Menu. Control panel setup Restoring the network settings to factory default 3 If you wish to reset the print server back to its ...default factory settings (resetting all information such as the password and IP address information), please follow these steps: Note This function restores all...
...configure the network settings to choose Factory Reset. c Press a or b to work with your network. 26 e Press 1 to the factory default. 3 a Press Menu. Control panel setup Restoring the network settings to factory default 3 If you wish to reset the print server back to its ...default factory settings (resetting all information such as the password and IP address information), please follow these steps: Note This function restores all...

Network Users Manual - English
Page 60
... that is BRN123456.) Note If you have a CA or if you want to keep the same certificate and the private key after resetting the print server, export them before using a CSR (Certificate Signing Request) from a CA. This printer overwrites the certificate and the... methods. b Type "http://printer's IP address/" into your system administrator before resetting and re-install them. If you want to use a certificate from a CA. Security features Creating and installing a certificate 9 The Brother print server allows you to use SSL/TLS communication by a CA (Certificate Authority...
... that is BRN123456.) Note If you have a CA or if you want to keep the same certificate and the private key after resetting the print server, export them before using a CSR (Certificate Signing Request) from a CA. This printer overwrites the certificate and the... methods. b Type "http://printer's IP address/" into your system administrator before resetting and re-install them. If you want to use a certificate from a CA. Security features Creating and installing a certificate 9 The Brother print server allows you to use SSL/TLS communication by a CA (Certificate Authority...
Network Users Manual - English
Page 80
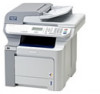
... print server to load its IP address after setting the IP address). 10 e If you have tried a to d above and it does not work, then reset the print server back to two minutes for your computer may be the result of mismatched or duplicate IP address. d Verify that the print server... it can take up to factory default on your network. Check following : If the installation failed, the Firewall on page 26. For information how to reset to the default factory settings, see Restoring the network settings to two minutes for your computer and reinstall the drivers.
... print server to load its IP address after setting the IP address). 10 e If you have tried a to d above and it does not work, then reset the print server back to two minutes for your computer may be the result of mismatched or duplicate IP address. d Verify that the print server... it can take up to factory default on your network. Check following : If the installation failed, the Firewall on page 26. For information how to reset to the default factory settings, see Restoring the network settings to two minutes for your computer and reinstall the drivers.
Network Users Manual - English
Page 81
...pages with the command: ping ipaddress Where ipaddress is the print server IP address (note that in some instances it does not work, then reset the print server back to the default factory settings and try to Windows® 2000/XP, Windows Vista™, Windows Server® 2003 ...try from the host operating system command prompt with high resolution), the printer is unable to factory default on page 26. For information how to reset to the default factory settings, see Restoring the network settings to accept your print job exceeds a certain limit, a time out situation occurs, ...
...pages with the command: ping ipaddress Where ipaddress is the print server IP address (note that in some instances it does not work, then reset the print server back to the default factory settings and try to Windows® 2000/XP, Windows Vista™, Windows Server® 2003 ...try from the host operating system command prompt with high resolution), the printer is unable to factory default on page 26. For information how to reset to the default factory settings, see Restoring the network settings to accept your print job exceeds a certain limit, a time out situation occurs, ...

Network Users Manual - English
Page 88
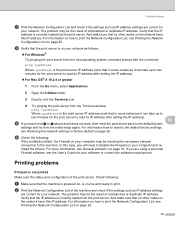
...colon ":" character between the print server and operating system) to use a web browser, Telnet (using the SET IP ADDRESS command) or factory reset the print server (which case, you have successfully configured the IP address of the Ethernet address. The print server will then allow you may ...one of the Ethernet address. The ARP command only works once. If there is , there cannot be a router between each digit of a Brother print server using BOOTP, DHCP or RARP your Administrator has configured the system to deliver IP addresses using the ARP command, you cannot use ...
...colon ":" character between the print server and operating system) to use a web browser, Telnet (using the SET IP ADDRESS command) or factory reset the print server (which case, you have successfully configured the IP address of the Ethernet address. The print server will then allow you may ...one of the Ethernet address. The ARP command only works once. If there is , there cannot be a router between each digit of a Brother print server using BOOTP, DHCP or RARP your Administrator has configured the system to deliver IP addresses using the ARP command, you cannot use ...
Network Users Manual - English
Page 95
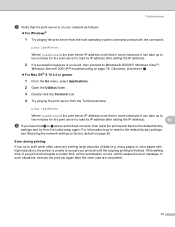
Appendix B Main Menu Submenu Menu Selections Options Page 4.LAN 1.TCP/IP 0.IPv6 On 23 (DCP-9040CN) (continued) Off* 5.LAN 2.Ethernet Auto* 24 (DCP-9045CDN) 100B-FD 7.LAN 100B-HD (MFC-9440CN) 10B-FD (continued) 10B-HD 3.Scan to value appropriate for your network. B 87 The factory settings are shown in Bold with an asterisk. 1 On connection to the network, the machine will automatically set the IP address and Subnet Mask to FTP Color 150 dpi* 24 Color 300 dpi Color 600 dpi B&W 200 dpi B&W 200x100 dpi 0.Factory 1.Reset 1.Yes 26 Reset 2.No 2.Exit -
Appendix B Main Menu Submenu Menu Selections Options Page 4.LAN 1.TCP/IP 0.IPv6 On 23 (DCP-9040CN) (continued) Off* 5.LAN 2.Ethernet Auto* 24 (DCP-9045CDN) 100B-FD 7.LAN 100B-HD (MFC-9440CN) 10B-FD (continued) 10B-HD 3.Scan to value appropriate for your network. B 87 The factory settings are shown in Bold with an asterisk. 1 On connection to the network, the machine will automatically set the IP address and Subnet Mask to FTP Color 150 dpi* 24 Color 300 dpi Color 600 dpi B&W 200 dpi B&W 200x100 dpi 0.Factory 1.Reset 1.Yes 26 Reset 2.No 2.Exit -

Quick Setup Guide - English
Page 29
...web browser, you will restart. For Network Users Web Based Management 3 (web browser) The Brother print server is equipped with a web server that JavaScript and csookies are always enabled in use...disconnect all the cables from the machine (except power cable). 2 Press Menu, 5, 0. 3 Press 1 to select Reset. 4 Press 1 to select Yes. 5 The machine will need to know the IP address of the print server....168.1.2/ Restoring the network 4 settings to factory default To restore all network settings of the internal Print/Scan server to enable JavaScript. Note • The User Name is 'admin' and...
...web browser, you will restart. For Network Users Web Based Management 3 (web browser) The Brother print server is equipped with a web server that JavaScript and csookies are always enabled in use...disconnect all the cables from the machine (except power cable). 2 Press Menu, 5, 0. 3 Press 1 to select Reset. 4 Press 1 to select Yes. 5 The machine will need to know the IP address of the print server....168.1.2/ Restoring the network 4 settings to factory default To restore all network settings of the internal Print/Scan server to enable JavaScript. Note • The User Name is 'admin' and...

Users Manual - English
Page 38
... will reduce the lamp's life. Press OK. When the machine receives computer data or makes a copy, the timer will remain turned off regularly will be reset.
... will reduce the lamp's life. Press OK. When the machine receives computer data or makes a copy, the timer will remain turned off regularly will be reset.

Users Manual - English
Page 91
... or wave Recommendation „ Make sure that you do not use the machine often, the paper may have finished printing, open the back cover and reset the lever back to the right as shown below. C Note When you have been in the paper tray too long. Troubleshooting and routine maintenance Examples...
... or wave Recommendation „ Make sure that you do not use the machine often, the paper may have finished printing, open the back cover and reset the lever back to the right as shown below. C Note When you have been in the paper tray too long. Troubleshooting and routine maintenance Examples...

Users Manual - English
Page 92
ABCDEFG EFGHIJKLMN c Close the back cover and re-send the print job. b Pull down the two gray levers, one on the left-hand side and one on the right-hand side to their original position. 78 Note When you have finished printing, open the back cover and reset the two gray levers back to the envelope position, as shown in the illustration below. Examples of poor print quality Envelope creases Recommendation a Open the back cover.
ABCDEFG EFGHIJKLMN c Close the back cover and re-send the print job. b Pull down the two gray levers, one on the left-hand side and one on the right-hand side to their original position. 78 Note When you have finished printing, open the back cover and reset the two gray levers back to the envelope position, as shown in the illustration below. Examples of poor print quality Envelope creases Recommendation a Open the back cover.

Users Manual - English
Page 93
... the page on the right-hand side, to the original position. „ Use thicker paper than you have finished printing, open the back cover and reset the two gray levers back to position B as shown in the printer driver and re-send the print job. C e If the problem is not solved...
... the page on the right-hand side, to the original position. „ Use thicker paper than you have finished printing, open the back cover and reset the two gray levers back to position B as shown in the printer driver and re-send the print job. C e If the problem is not solved...

Users Manual - English
Page 95
... failed. Do one . (See Replacing the drum unit on page 123.) The drum unit counter was not reset when a new drum was installed. then replace the drum unit with direct print or PictBridge. Call your Brother dealer to print with a new one of its life. Press Menu, 6, 6, and then a or b to ... Black (K) Toner Cartridge back in. 1 The toner cartridge is near the end of the following: „ Turn off the machine's power switch. Call your Brother dealer to reset the drum unit counter. It is time to replace the belt unit. Replace the belt unit. (See Replacing the belt unit on page 129...
... failed. Do one . (See Replacing the drum unit on page 123.) The drum unit counter was not reset when a new drum was installed. then replace the drum unit with direct print or PictBridge. Call your Brother dealer to print with a new one of its life. Press Menu, 6, 6, and then a or b to ... Black (K) Toner Cartridge back in. 1 The toner cartridge is near the end of the following: „ Turn off the machine's power switch. Call your Brother dealer to reset the drum unit counter. It is time to replace the belt unit. Replace the belt unit. (See Replacing the belt unit on page 129...

Users Manual - English
Page 101
... is not jammed. C c Close the MP tray. When you have just used the machine, some internal parts of the machine, DO NOT touch the shaded parts shown in the illustration. b Pull the jammed document out to reset the machine. b Remove any paper from the ADF that is jammed in the MP tray...
... is not jammed. C c Close the MP tray. When you have just used the machine, some internal parts of the machine, DO NOT touch the shaded parts shown in the illustration. b Pull the jammed document out to reset the machine. b Remove any paper from the ADF that is jammed in the MP tray...

Users Manual - English
Page 111
e Pull out the jammed paper slowly. h Put the paper tray firmly back in the illustration. When you have just used the machine, some internal parts of the machine, DO NOT touch the shaded parts shown in the machine. C 97 Troubleshooting and routine maintenance f Reset the gray lever on the left hand side (1) back to the original position. 1 g Close the back cover. HOT SURFACE After you open the front or back cover of the machine will be extremely hot.
e Pull out the jammed paper slowly. h Put the paper tray firmly back in the illustration. When you have just used the machine, some internal parts of the machine, DO NOT touch the shaded parts shown in the machine. C 97 Troubleshooting and routine maintenance f Reset the gray lever on the left hand side (1) back to the original position. 1 g Close the back cover. HOT SURFACE After you open the front or back cover of the machine will be extremely hot.

Users Manual - English
Page 142
Note When you need to reset the drum unit counter by completing the following steps: i Turn on both sides of the machine. 2 Push the drum unit in the machine, match the green guides (1) of the drum unit handle to the green arrows (2) on the machine's power switch. 128 When you replace the drum unit with a new one, you put the drum unit in until it stops. 2 1 2 1 h Close the front cover of the machine.
Note When you need to reset the drum unit counter by completing the following steps: i Turn on both sides of the machine. 2 Push the drum unit in the machine, match the green guides (1) of the drum unit handle to the green arrows (2) on the machine's power switch. 128 When you replace the drum unit with a new one, you put the drum unit in until it stops. 2 1 2 1 h Close the front cover of the machine.

Users Manual - English
Page 143
... out, the following message appears on the LCD. Damage caused by improper handling of the counter that needs to be reset. 66.Reset Menu Drum Select ab or OK k Press a or b to reset the drum unit counter. The LCD shows the part name of the belt unit may void your warranty. j Press Menu...
... out, the following message appears on the LCD. Damage caused by improper handling of the counter that needs to be reset. 66.Reset Menu Drum Select ab or OK k Press a or b to reset the drum unit counter. The LCD shows the part name of the belt unit may void your warranty. j Press Menu...

Users Manual - English
Page 148
... printed pages will stop printing. i Close the front cover of the counter that needs to be reset. 66.Reset Menu Belt Unit Select ab or OK l Press a or b to choose Belt Unit. Press OK. m Press 1 to reset the belt unit counter by completing the following message appears on the LCD and the machine... Waste Toner Box Full message C When the waste toner box is full, the following steps: j Turn on the print jobs and paper you need to reset the belt unit counter. When you replace the belt unit with a new one, you use. n Press Stop/Exit. The LCD shows the part name of...
... printed pages will stop printing. i Close the front cover of the counter that needs to be reset. 66.Reset Menu Belt Unit Select ab or OK l Press a or b to choose Belt Unit. Press OK. m Press 1 to reset the belt unit counter by completing the following message appears on the LCD and the machine... Waste Toner Box Full message C When the waste toner box is full, the following steps: j Turn on the print jobs and paper you need to reset the belt unit counter. When you replace the belt unit with a new one, you use. n Press Stop/Exit. The LCD shows the part name of...


