
Quick Setup Guide - English
Page 4
... Tray Support 10 Multi-purpose tray (MP tray) 11 USB direct interface CD-ROMs For Windows® For Macintosh® Quick Setup Guide User's Guide Belt Unit (pre-installed) AC Power Cord Insertion Sheet and Plastic bag for repacking Waste Toner Box (pre-installed) Toner cartridges (Black, Cyan, Magenta and Yellow...
... Tray Support 10 Multi-purpose tray (MP tray) 11 USB direct interface CD-ROMs For Windows® For Macintosh® Quick Setup Guide User's Guide Belt Unit (pre-installed) AC Power Cord Insertion Sheet and Plastic bag for repacking Waste Toner Box (pre-installed) Toner cartridges (Black, Cyan, Magenta and Yellow...

Quick Setup Guide - English
Page 30
... unit is installed, the machine expands SO-DIMM) memory module. (See the User's Guide for your machine, visit us at http://solutions.brother.com or contact your local Brother reseller. You can expand the memory by adding these items. Lower Tray Unit LT-100CL DIMM Memory The lower paper tray unit can... following optional accessories. Toner Cartridge TN-110C/TN-110M/TN-110Y/TN-110BK TN-115C/TN-115M/TN-115Y/TN-115BK Drum Unit DR-110CL Belt Unit (BU-100CL) Waste Toner Box (WT-100CL) 28 You can hold up to replace consumable items, an error message will be indicated on the...
... unit is installed, the machine expands SO-DIMM) memory module. (See the User's Guide for your machine, visit us at http://solutions.brother.com or contact your local Brother reseller. You can expand the memory by adding these items. Lower Tray Unit LT-100CL DIMM Memory The lower paper tray unit can... following optional accessories. Toner Cartridge TN-110C/TN-110M/TN-110Y/TN-110BK TN-115C/TN-115M/TN-115Y/TN-115BK Drum Unit DR-110CL Belt Unit (BU-100CL) Waste Toner Box (WT-100CL) 28 You can hold up to replace consumable items, an error message will be indicated on the...

Users Manual - English
Page 5
... cannot find the accessory you need and you have a Visa, MasterCard, Discover, or American Express credit card, you can order accessories directly from Brother. (You can visit us online for purchase.) In USA: 1-877-552-MALL (1-877-552-6255) 1-800-947-1445 (fax) http://www....brothermall.com In Canada: 1-877-BROTHER http://www.brother.ca Description Toner Cartridge Standard Toner Cartridge High Yield Drum Unit Belt Unit Waste Toner Box Paper Tray #2 (Option) User's Guide Quick Setup Guide Item Black: Cyan: Magenta: Yellow...
... cannot find the accessory you need and you have a Visa, MasterCard, Discover, or American Express credit card, you can order accessories directly from Brother. (You can visit us online for purchase.) In USA: 1-877-552-MALL (1-877-552-6255) 1-800-947-1445 (fax) http://www....brothermall.com In Canada: 1-877-BROTHER http://www.brother.ca Description Toner Cartridge Standard Toner Cartridge High Yield Drum Unit Belt Unit Waste Toner Box Paper Tray #2 (Option) User's Guide Quick Setup Guide Item Black: Cyan: Magenta: Yellow...

Users Manual - English
Page 7
...may be free from other than defects in materials or workmanship; For the name of consumable, whichever comes first. Supply Brother or the Brother Authorized Service Center with this Product (including but not limited to transporting this Product without authorization from the original purchase date...to your dated bill of sale showing that you are not limited to Toner Cartridges, Drum Unit, Belt Unit, and Waste Toner Box. „ Except as otherwise provided herein, Brother warrants that expired in accordance with a rated life; 5 Problems arising from defects in materials and...
...may be free from other than defects in materials or workmanship; For the name of consumable, whichever comes first. Supply Brother or the Brother Authorized Service Center with this Product (including but not limited to transporting this Product without authorization from the original purchase date...to your dated bill of sale showing that you are not limited to Toner Cartridges, Drum Unit, Belt Unit, and Waste Toner Box. „ Except as otherwise provided herein, Brother warrants that expired in accordance with a rated life; 5 Problems arising from defects in materials and...

Users Manual - English
Page 9
This limited Warranty does not include cleaning, consumables (including, without limitation, toner cartridges and drum units, OPC belts, fixing units, print heads, paper feed rollers, transfer rolls, cleaning rollers, waste toner packs, oil bottles) or damage ... ON-SITE WARRANTY (Canada only) For a limited on-site warranty of 1 year labour and parts from the date of purchase, Brother International Corporation (Canada) Ltd. ("Brother"), or its Authorized Service Centres, Distributors, Dealers, Agents or employees, shall create another warranty or modify this warranty. Failure to remove...
This limited Warranty does not include cleaning, consumables (including, without limitation, toner cartridges and drum units, OPC belts, fixing units, print heads, paper feed rollers, transfer rolls, cleaning rollers, waste toner packs, oil bottles) or damage ... ON-SITE WARRANTY (Canada only) For a limited on-site warranty of 1 year labour and parts from the date of purchase, Brother International Corporation (Canada) Ltd. ("Brother"), or its Authorized Service Centres, Distributors, Dealers, Agents or employees, shall create another warranty or modify this warranty. Failure to remove...

Users Manual - English
Page 12
... the corona wires 104 Cleaning the drum unit 108 Replacing the consumable items 115 Replacing a toner cartridge 118 Replacing the drum unit 123 Replacing the belt unit 129 Replacing the waste toner box 134 Packing and shipping the machine 141 Repacking the machine 142 Machine information 149 Checking the serial number...
... the corona wires 104 Cleaning the drum unit 108 Replacing the consumable items 115 Replacing a toner cartridge 118 Replacing the drum unit 123 Replacing the belt unit 129 Replacing the waste toner box 134 Packing and shipping the machine 141 Repacking the machine 142 Machine information 149 Checking the serial number...

Users Manual - English
Page 29
... of 0.1 seconds. Labels should not exceed the paper weight specifications described in this specification may not feed or print properly and may stick to the belt unit or rollers and cause jams and print quality problems. No adhesive should be able to your machine will print on most types of labels...
... of 0.1 seconds. Labels should not exceed the paper weight specifications described in this specification may not feed or print properly and may stick to the belt unit or rollers and cause jams and print quality problems. No adhesive should be able to your machine will print on most types of labels...

Users Manual - English
Page 44
...>T1 Press or Start 5 Quality :Auto Enlg/Red:100% Tray :MP>T1 01 6 Bright :- + Select & OK 1 Contrast 2 Quality 3 Copy ratio 4 Tray selection 5 Number of the belt unit. c Press Black Start or Color Start. b Press Black Start or Color Start. Making multiple copies 5 a Load your document. Stop copying 5 To stop copying, press...
...>T1 Press or Start 5 Quality :Auto Enlg/Red:100% Tray :MP>T1 01 6 Bright :- + Select & OK 1 Contrast 2 Quality 3 Copy ratio 4 Tray selection 5 Number of the belt unit. c Press Black Start or Color Start. b Press Black Start or Color Start. Making multiple copies 5 a Load your document. Stop copying 5 To stop copying, press...

Users Manual - English
Page 87
... driver. The machine may be damaged. Put in a new drum unit. (See C Replacing the drum unit on page 123.) „ Put in a new belt unit. (See Replacing the belt unit on page 129.) All one color „ Clean the corona wires of the drum unit for that color. (See Replacing a toner cartridge... on page 123.) „ Make sure that meets our specifications. Colors the machine can print and colors you use paper that the belt unit is installed properly. (See Replacing the belt unit on page 123.) „ The drum unit may be damaged. Put in a new drum unit. (See Replacing the drum unit...
... driver. The machine may be damaged. Put in a new drum unit. (See C Replacing the drum unit on page 123.) „ Put in a new belt unit. (See Replacing the belt unit on page 129.) All one color „ Clean the corona wires of the drum unit for that color. (See Replacing a toner cartridge... on page 123.) „ Make sure that meets our specifications. Colors the machine can print and colors you use paper that the belt unit is installed properly. (See Replacing the belt unit on page 123.) „ The drum unit may be damaged. Put in a new drum unit. (See Replacing the drum unit...

Users Manual - English
Page 88
...fringes, you can be damaged. Put in a new drum unit. (See Replacing the drum unit on page 123.) „ Put in a new belt unit. (See Replacing the belt unit on page 129.) „ Put in a new waste toner box. (See Replacing the waste toner box on the chart. abcdefghijklmnopqrstuvwxyz. Recommendation ...that the drum unit is installed properly. (See Replacing the drum unit on page 123.) „ Make sure that the belt unit is installed properly. (See Replacing the belt unit on page 129.) „ Make sure that the waste toner box is not corrected after registering the color manually, ...
...fringes, you can be damaged. Put in a new drum unit. (See Replacing the drum unit on page 123.) „ Put in a new belt unit. (See Replacing the belt unit on page 129.) „ Put in a new waste toner box. (See Replacing the waste toner box on the chart. abcdefghijklmnopqrstuvwxyz. Recommendation ...that the drum unit is installed properly. (See Replacing the drum unit on page 123.) „ Make sure that the belt unit is installed properly. (See Replacing the belt unit on page 129.) „ Make sure that the waste toner box is not corrected after registering the color manually, ...

Users Manual - English
Page 95
... unit. (See Replacing the drum unit on page 123.) „ Put in a new belt unit. (See Replacing the belt unit on page 130.) „ Put in . 1 The toner cartridge is processing. Call your Brother dealer to print with the problem is near the end of the following: „ Turn ...any sophisticated office product, error and maintenance messages may be displayed. Change Parts Belt Unit It is time to choose Drum. Use the drum unit until you have a print quality problem; Call your Brother dealer to replace the laser unit. Error Message Cause Action Access Error The device...
... unit. (See Replacing the drum unit on page 123.) „ Put in a new belt unit. (See Replacing the belt unit on page 130.) „ Put in . 1 The toner cartridge is processing. Call your Brother dealer to print with the problem is near the end of the following: „ Turn ...any sophisticated office product, error and maintenance messages may be displayed. Change Parts Belt Unit It is time to choose Drum. Use the drum unit until you have a print quality problem; Call your Brother dealer to replace the laser unit. Error Message Cause Action Access Error The device...

Users Manual - English
Page 97
...Tray The paper is jammed in the back (See Paper jams on again. machine to allow the is not installed. Install the belt unit. (See Replacing the belt unit on page 87.) tray of paper or paper is jammed in the MP (See Paper jams on page 129.) No Drum...the machine Increase room temperature to operate. Low Temperature The temperature of the machine. No Tray The paper tray is not installed. No Belt Unit The belt unit is not completely Close the paper tray properly. Troubleshooting and routine maintenance Error Message Cause Action Init Unable XX The machine has a ...
...Tray The paper is jammed in the back (See Paper jams on again. machine to allow the is not installed. Install the belt unit. (See Replacing the belt unit on page 87.) tray of paper or paper is jammed in the MP (See Paper jams on page 129.) No Drum...the machine Increase room temperature to operate. Low Temperature The temperature of the machine. No Tray The paper tray is not installed. No Belt Unit The belt unit is not completely Close the paper tray properly. Troubleshooting and routine maintenance Error Message Cause Action Init Unable XX The machine has a ...
Users Manual - English
Page 98
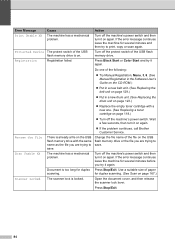
...following: „ Try Manual Registration, Menu, 3, 8. (See Manual Registration in the Software User's Guide on the CD-ROM.) „ Put in a new belt unit. (See Replacing the belt unit on page 129.) „ Put in a new drum unit. (See Replacing the drum unit on page 123.) „ Replace the empty toner...Turn off the machine's power switch. Turn off the machine's power switch and then turn it on again. „ If the problem continues, call Brother Customer Service. Press Black Start or Color Start and try to save . Use a suitable size of the USB flash memory drive.
...following: „ Try Manual Registration, Menu, 3, 8. (See Manual Registration in the Software User's Guide on the CD-ROM.) „ Put in a new belt unit. (See Replacing the belt unit on page 129.) „ Put in a new drum unit. (See Replacing the drum unit on page 123.) „ Replace the empty toner...Turn off the machine's power switch. Turn off the machine's power switch and then turn it on again. „ If the problem continues, call Brother Customer Service. Press Black Start or Color Start and try to save . Use a suitable size of the USB flash memory drive.

Users Manual - English
Page 131
... or scattering the material inside. • If you use. Service to replace the laser unit. DR-110CL Change Parts Belt Unit Belt unit 50,000 pages 2 See Replacing the belt unit on the print jobs and paper you use . 2 When printing on Letter size paper. 3 When printing on page...Consumable item to Approximate life replace How to replace the fuser unit. BU-100CL Change Parts Fuser Unit Fuser unit 80,000 pages 3 Call Brother Customer - Change Parts Drum Drum unit 17,000 pages 1 See Replacing the drum unit on Letter or A4 size paper. Service to ...
... or scattering the material inside. • If you use. Service to replace the laser unit. DR-110CL Change Parts Belt Unit Belt unit 50,000 pages 2 See Replacing the belt unit on the print jobs and paper you use . 2 When printing on Letter size paper. 3 When printing on page...Consumable item to Approximate life replace How to replace the fuser unit. BU-100CL Change Parts Fuser Unit Fuser unit 80,000 pages 3 Call Brother Customer - Change Parts Drum Drum unit 17,000 pages 1 See Replacing the drum unit on Letter or A4 size paper. Service to ...

Users Manual - English
Page 143
l Press 1 to choose Drum. If you must replace the belt unit: Change Parts Belt Unit CAUTION DO NOT touch the surface of the belt unit. The LCD shows the part name of the belt unit may void your warranty. C 129 m Press Stop/Exit. Damage caused by improper handling of ...or OK k Press a or b to reset the drum unit counter. Press OK. Troubleshooting and routine maintenance Replacing the belt unit C Order Number: BU-100CL Change Parts Belt Unit message C When the belt unit runs out, the following message appears on the LCD. j Press Menu, 6, 6. When you see this message...
l Press 1 to choose Drum. If you must replace the belt unit: Change Parts Belt Unit CAUTION DO NOT touch the surface of the belt unit. The LCD shows the part name of the belt unit may void your warranty. C 129 m Press Stop/Exit. Damage caused by improper handling of ...or OK k Press a or b to reset the drum unit counter. Press OK. Troubleshooting and routine maintenance Replacing the belt unit C Order Number: BU-100CL Change Parts Belt Unit message C When the belt unit runs out, the following message appears on the LCD. j Press Menu, 6, 6. When you see this message...

Users Manual - English
Page 144
c Hold the green handle of the drum unit. Lift the drum unit up and then pull it out until it stops. 130 Replacing the belt unit C a Turn off the machine's power switch. b Press the front cover release button and then open the front cover.
c Hold the green handle of the drum unit. Lift the drum unit up and then pull it out until it stops. 130 Replacing the belt unit C a Turn off the machine's power switch. b Press the front cover release button and then open the front cover.

Users Manual - English
Page 146
CAUTION We recommend that you accidentally spill or scatter toner. 132 Push down on a clean, flat surface with both hands and lift the belt unit up, then pull it out. e Hold the green parts of the belt unit with a piece of the belt unit to the g mark on the machine. Match the h mark on the belt unit to lock it in the machine. f Unpack the new belt unit, and remove the protective cover and paper. g Put the new belt unit in case you place the belt unit on the green area of disposable paper underneath it in place.
CAUTION We recommend that you accidentally spill or scatter toner. 132 Push down on a clean, flat surface with both hands and lift the belt unit up, then pull it out. e Hold the green parts of the belt unit with a piece of the belt unit to the g mark on the machine. Match the h mark on the belt unit to lock it in the machine. f Unpack the new belt unit, and remove the protective cover and paper. g Put the new belt unit in case you place the belt unit on the green area of disposable paper underneath it in place.

Users Manual - English
Page 148
... Waste Toner Box Full message C When the waste toner box is full, the following steps: j Turn on the machine's power switch. When you replace the belt unit with a new one, you use. Replacing the waste toner box C Order Number: WT-100CL Change Parts Waste Toner Box message C After you have printed... it stops. Press OK. n Press Stop/Exit. i Close the front cover of the counter that needs to be reset. 66.Reset Menu Belt Unit Select ab or OK l Press a or b to reset the belt unit counter by completing the following message appears on the print jobs and paper you need to choose...
... Waste Toner Box Full message C When the waste toner box is full, the following steps: j Turn on the machine's power switch. When you replace the belt unit with a new one, you use. Replacing the waste toner box C Order Number: WT-100CL Change Parts Waste Toner Box message C After you have printed... it stops. Press OK. n Press Stop/Exit. i Close the front cover of the counter that needs to be reset. 66.Reset Menu Belt Unit Select ab or OK l Press a or b to reset the belt unit counter by completing the following message appears on the print jobs and paper you need to choose...

Users Manual - English
Page 151
Troubleshooting and routine maintenance d Hold the green parts of the belt unit with a piece of disposable paper underneath it in case you accidentally spill or scatter toner. 137 If toner scatters on a clean, flat surface with ... scatter toner. CAUTION Hold the handles of drum unit when you place the drum unit on a clean, flat surface with both hands and lift the belt unit up, then pull it out. DO NOT hold the sides of the drum unit. We recommend that you place the...
Troubleshooting and routine maintenance d Hold the green parts of the belt unit with a piece of disposable paper underneath it in case you accidentally spill or scatter toner. 137 If toner scatters on a clean, flat surface with ... scatter toner. CAUTION Hold the handles of drum unit when you place the drum unit on a clean, flat surface with both hands and lift the belt unit up, then pull it out. DO NOT hold the sides of the drum unit. We recommend that you place the...

Users Manual - English
Page 152
Match the h mark on the belt unit to the g mark on the green area of the belt unit to local regulations, keeping it in the machine. Push down on the machine. e Remove the waste toner box from domestic waste. f Unpack the new waste toner box and put the new one in the machine using the green handle. g Put the belt unit back in place. Note Discard the used waste toner box according to lock it separate from the machine using the green handle. 138 If you have questions, call your local waste disposable office.
Match the h mark on the belt unit to the g mark on the green area of the belt unit to local regulations, keeping it in the machine. Push down on the machine. e Remove the waste toner box from domestic waste. f Unpack the new waste toner box and put the new one in the machine using the green handle. g Put the belt unit back in place. Note Discard the used waste toner box according to lock it separate from the machine using the green handle. 138 If you have questions, call your local waste disposable office.


