Software User's Guide - English
Page 10
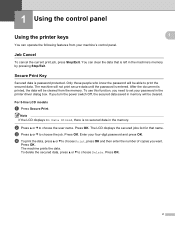
... Secured data is no secured data in the memory. After the document is entered. Press OK. The machine will not print secure data until the password is printed, the data will be cleared. You can operate the following features from the memory. c Press a or b to choose Print, press...secured data. Press OK. 1 Using the control panel 1 Using the printer keys You can clear the data that name. Only those people who know the password will be cleared from your machine's control panel. 1 1 Job Cancel 1 To cancel the current print job, press Stop/Exit. Press OK. d ...
... Secured data is no secured data in the memory. After the document is entered. Press OK. The machine will not print secure data until the password is printed, the data will be cleared. You can operate the following features from the memory. c Press a or b to choose Print, press...secured data. Press OK. 1 Using the control panel 1 Using the printer keys You can clear the data that name. Only those people who know the password will be cleared from your machine's control panel. 1 1 Job Cancel 1 To cancel the current print job, press Stop/Exit. Press OK. d ...
Software User's Guide - English
Page 11
The LCD displays the secured job list for that name. e Enter the number of copies you print the secured data, it will be cleared from memory. 1 1 3 Enter the four-digit password and press OK. To delete the secured data, press Delete. c Press a or b to display the user name. Note After you want. Using the control panel For Touchscreen models a Press Secure Print. Press the print job. The machine prints the data. f Press Start. d To print the data, press Print. b Press a or b to display the job. Press the user name. Press OK.
The LCD displays the secured job list for that name. e Enter the number of copies you print the secured data, it will be cleared from memory. 1 1 3 Enter the four-digit password and press OK. To delete the secured data, press Delete. c Press a or b to display the user name. Note After you want. Using the control panel For Touchscreen models a Press Secure Print. Press the print job. The machine prints the data. f Press Start. d To print the data, press Print. b Press a or b to display the job. Press the user name. Press OK.
Software User's Guide - English
Page 36
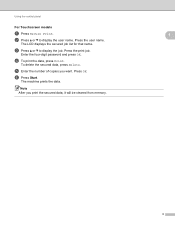
... Since the documents are sent to use with this feature is enabled, it will be printed. To send a secured document: a Click Settings... from your password from the control panel of the machine. (See Secure Print Key uu page 2.) To delete a secured document: You need to the machine. c To print...use the control panel of the machine to delete a secured document. (See Secure Print Key uu page 2.) 28 Only the people who know the password will be printed. b Enter your PC login user name will be able to On, prints appears lighter. By clicking Settings, you select Login ...
... Since the documents are sent to use with this feature is enabled, it will be printed. To send a secured document: a Click Settings... from your password from the control panel of the machine. (See Secure Print Key uu page 2.) To delete a secured document: You need to the machine. c To print...use the control panel of the machine to delete a secured document. (See Secure Print Key uu page 2.) 28 Only the people who know the password will be printed. b Enter your PC login user name will be able to On, prints appears lighter. By clicking Settings, you select Login ...
Software User's Guide - English
Page 37
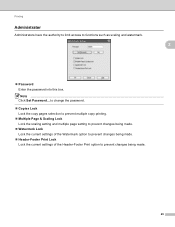
...-Footer Print Lock Lock the current settings of the Header-Footer Print option to functions such as scaling and watermark. 2 2 Password Enter the password into this box. to change the password. Copies Lock Lock the copy pages selection to prevent multiple copy printing. Multiple Page & Scaling Lock Lock the scaling... to prevent changes being made. Watermark Lock Lock the current settings of the Watermark option to prevent changes being made . 29 Note Click Set Password...
...-Footer Print Lock Lock the current settings of the Header-Footer Print option to functions such as scaling and watermark. 2 2 Password Enter the password into this box. to change the password. Copies Lock Lock the copy pages selection to prevent multiple copy printing. Multiple Page & Scaling Lock Lock the scaling... to prevent changes being made. Watermark Lock Lock the current settings of the Watermark option to prevent changes being made . 29 Note Click Set Password...
Software User's Guide - English
Page 49
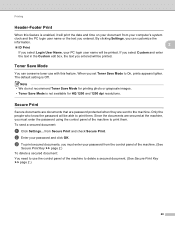
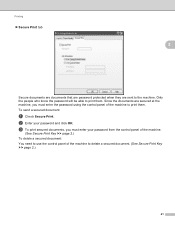
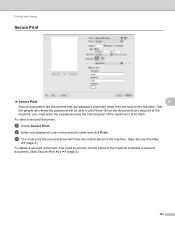
...able to print them . To send a secured document: a Check Secure Print. Since the documents are sent to the machine. b Enter your password from the control panel of the machine. (See Secure Print Key uu page 2.) To delete a secured document: You need to use the control...print them . c To print secured documents, you must enter your password and click OK. Printing Secure Print tab 2 Secure documents are documents that are password protected when they are secured at the machine, you must enter the password using the control panel of the machine to delete a secured document...
...able to print them . To send a secured document: a Check Secure Print. Since the documents are sent to the machine. b Enter your password from the control panel of the machine. (See Secure Print Key uu page 2.) To delete a secured document: You need to use the control...print them . c To print secured documents, you must enter your password and click OK. Printing Secure Print tab 2 Secure documents are documents that are password protected when they are secured at the machine, you must enter the password using the control panel of the machine to delete a secured document...
Software User's Guide - English
Page 70
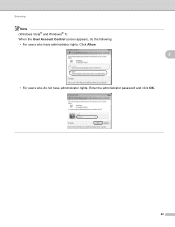
Scanning Note (Windows Vista® and Windows® 7) When the User Account Control screen appears, do the following. • For users who have administrator rights: Click Allow. 3 • For users who do not have administrator rights: Enter the administrator password and click OK. 62
Scanning Note (Windows Vista® and Windows® 7) When the User Account Control screen appears, do the following. • For users who have administrator rights: Click Allow. 3 • For users who do not have administrator rights: Enter the administrator password and click OK. 62
Software User's Guide - English
Page 91
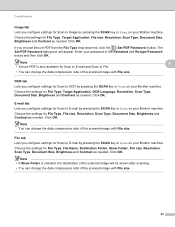
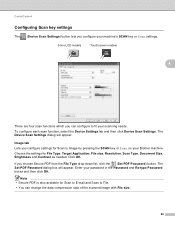
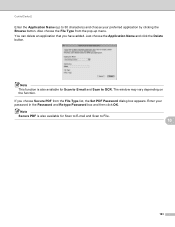
...configure settings for Scan to E-mail by pressing the SCAN key or Scan on your Brother machine. E-mail tab 4 Lets you choose Secure PDF from the File Type drop-down list, click the (Set PDF Password) button. Click OK. Click OK. Click OK. Choose the settings for File Type,... Target Application, OCR Language, Resolution, Scan Type, Document Size, Brightness and Contrast as needed . The Set PDF Password dialog box will be shown after scanning. • You can change the data compression ratio of the scanned image with File size. 83 Enter your...
...configure settings for Scan to E-mail by pressing the SCAN key or Scan on your Brother machine. E-mail tab 4 Lets you choose Secure PDF from the File Type drop-down list, click the (Set PDF Password) button. Click OK. Click OK. Click OK. Choose the settings for File Type,... Target Application, OCR Language, Resolution, Scan Type, Document Size, Brightness and Contrast as needed . The Set PDF Password dialog box will be shown after scanning. • You can change the data compression ratio of the scanned image with File size. 83 Enter your...
Software User's Guide - English
Page 104
...data compression ratio of the scanned image with File size. 96 Enter your scanning needs. Choose the settings for Scan to fit your password in the Password and Re-type Password boxes and then click OK. Click OK. Image tab 4 Lets you configure settings for File Type, Target Application, File size, ...for Scan to E-mail and Scan to File. • You can configure to Image by pressing the SCAN key or Scan on your Brother machine. The Device Scan Settings dialog will appear. To configure each scan function, select the Device Settings tab and then click Device Scan Settings.
...data compression ratio of the scanned image with File size. 96 Enter your scanning needs. Choose the settings for Scan to fit your password in the Password and Re-type Password boxes and then click OK. Click OK. Image tab 4 Lets you configure settings for File Type, Target Application, File size, ...for Scan to E-mail and Scan to File. • You can configure to Image by pressing the SCAN key or Scan on your Brother machine. The Device Scan Settings dialog will appear. To configure each scan function, select the Device Settings tab and then click Device Scan Settings.
Software User's Guide - English
Page 113
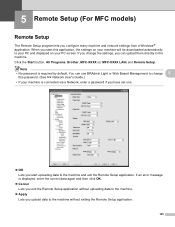
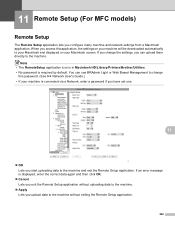
...machine without uploading data to the machine. Apply Lets you start this application, the settings on your machine is connected via a Network, enter a password if you have set one. OK Lets you upload data to the machine and exit the Remote Setup application. Click the Start button, All... Programs, Brother, MFC-XXXX (or MFC-XXXX LAN) and Remote Setup. You can use BRAdmin Light or Web Based Management to change the settings, you can ...
...machine without uploading data to the machine. Apply Lets you start this application, the settings on your machine is connected via a Network, enter a password if you have set one. OK Lets you upload data to the machine and exit the Remote Setup application. Click the Start button, All... Programs, Brother, MFC-XXXX (or MFC-XXXX LAN) and Remote Setup. You can use BRAdmin Light or Web Based Management to change the settings, you can ...
Software User's Guide - English
Page 136
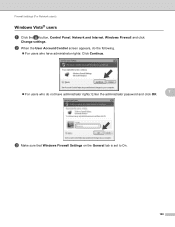
Firewall settings (For Network users) Windows Vista® users 7 a Click the button, Control Panel, Network and Internet, Windows Firewall and click Change settings. b When the User Account Control screen appears, do the following. For users who have administrator rights: Click Continue. For users who do not have administrator rights: Enter the administrator password and click OK. 7 c Make sure that Windows Firewall Settings on the General tab is set to On. 128
Firewall settings (For Network users) Windows Vista® users 7 a Click the button, Control Panel, Network and Internet, Windows Firewall and click Change settings. b When the User Account Control screen appears, do the following. For users who have administrator rights: Click Continue. For users who do not have administrator rights: Enter the administrator password and click OK. 7 c Make sure that Windows Firewall Settings on the General tab is set to On. 128
Software User's Guide - English
Page 151
... name and job name and click Print. Since the documents are sent to the machine. c You must enter the password using the control panel of the machine to delete a secured document. (See Secure Print Key uu page 2.) 143 Printing and Faxing Secure Print 8 ...Secure Print: 8 Secure documents are documents that are password protected when they are secured at the machine, you must print the secured document from the control panel of the machine. (See Secure Print Key...
... name and job name and click Print. Since the documents are sent to the machine. c You must enter the password using the control panel of the machine to delete a secured document. (See Secure Print Key uu page 2.) 143 Printing and Faxing Secure Print 8 ...Secure Print: 8 Secure documents are documents that are password protected when they are secured at the machine, you must print the secured document from the control panel of the machine. (See Secure Print Key...
Software User's Guide - English
Page 161
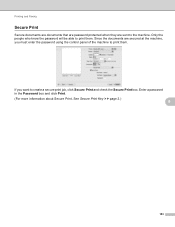
Enter a password in the Password box and click Print. (For more information about Secure Print, See Secure Print Key uu page 2.) 8 153 If you must enter the password using the control panel of the machine to create a secure print job, click Secure Print and check the Secure Print box. Since the documents are sent to print them . Printing and Faxing Secure Print 8 Secure documents are documents that are password protected when they are secured at the machine, you want to print them . Only the people who know the password will be able to the machine.
Enter a password in the Password box and click Print. (For more information about Secure Print, See Secure Print Key uu page 2.) 8 153 If you must enter the password using the control panel of the machine to create a secure print job, click Secure Print and check the Secure Print box. Since the documents are sent to print them . Printing and Faxing Secure Print 8 Secure documents are documents that are password protected when they are secured at the machine, you want to print them . Only the people who know the password will be able to the machine.
Software User's Guide - English
Page 191
... box appears. You can delete an application that you choose Secure PDF from the pop-up to 30 characters) and choose your password in the Password and Re-type Password box and then click OK. The window may vary depending on the function. Enter your preferred application by clicking the Browse button. Just...
... box appears. You can delete an application that you choose Secure PDF from the pop-up to 30 characters) and choose your password in the Password and Re-type Password box and then click OK. The window may vary depending on the function. Enter your preferred application by clicking the Browse button. Just...
Software User's Guide - English
Page 198
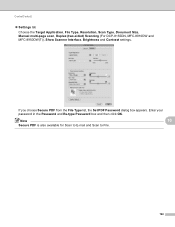
Enter your password in the Password and Re-type Password box and then click OK. Note 10 Secure PDF is also available for Scan to E-mail and Scan to File. 190 If you choose Secure PDF from the File Type list, the Set PDF Password dialog box appears. ControlCenter2 Settings tab Choose the Target Application, File Type, Resolution, Scan Type, Document Size, Manual multi-page scan, Duplex (two-sided) Scanning (For DCP-8155DN, MFC-8910DW and MFC-8950DW(T)), Show Scanner Interface, Brightness and Contrast settings.
Enter your password in the Password and Re-type Password box and then click OK. Note 10 Secure PDF is also available for Scan to E-mail and Scan to File. 190 If you choose Secure PDF from the File Type list, the Set PDF Password dialog box appears. ControlCenter2 Settings tab Choose the Target Application, File Type, Resolution, Scan Type, Document Size, Manual multi-page scan, Duplex (two-sided) Scanning (For DCP-8155DN, MFC-8910DW and MFC-8950DW(T)), Show Scanner Interface, Brightness and Contrast settings.
Software User's Guide - English
Page 210
Note • The RemoteSetup application icon is in Macintosh HD/Library/Printers/Brother/Utilities. • No password is connected via a Network, enter a password if you have set one. 11 OK Lets you access this application, the settings on your machine will be downloaded automatically to your Macintosh ... many machine and network settings from a Macintosh application. If you change the settings, you can use BRAdmin Light or Web Based Management to change this password. (See uu Network User's Guide.) • If your Macintosh screen.
Note • The RemoteSetup application icon is in Macintosh HD/Library/Printers/Brother/Utilities. • No password is connected via a Network, enter a password if you have set one. 11 OK Lets you access this application, the settings on your machine will be downloaded automatically to your Macintosh ... many machine and network settings from a Macintosh application. If you change the settings, you can use BRAdmin Light or Web Based Management to change this password. (See uu Network User's Guide.) • If your Macintosh screen.
Software User's Guide - English
Page 215
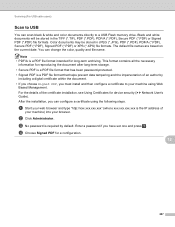
...must install and then configure a certificate to a USB Flash memory drive. You can change the color, quality and file name. c No password is the IP address of the certificate installation, see Using Certificates for a configuration. 12 207 a Start your browser. The default file names ...are based on the current date. Enter a password if you can configure a certificate using Web Based Management. Black and white documents will be stored in the TIFF (*.TIF), PDF (*.PDF), PDF...
...must install and then configure a certificate to a USB Flash memory drive. You can change the color, quality and file name. c No password is the IP address of the certificate installation, see Using Certificates for a configuration. 12 207 a Start your browser. The default file names ...are based on the current date. Enter a password if you can configure a certificate using Web Based Management. Black and white documents will be stored in the TIFF (*.TIF), PDF (*.PDF), PDF...
Software User's Guide - English
Page 217
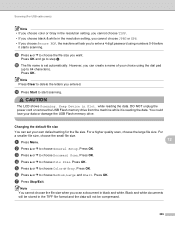
...; If you choose Secure PDF, the machine will not be stored in the TIFF file format and the data will ask you to enter a 4 digit password using the dial pad (up to choose the file size you want. However, you entered. DO NOT unplug the power cord or remove the USB...
...; If you choose Secure PDF, the machine will not be stored in the TIFF file format and the data will ask you to enter a 4 digit password using the dial pad (up to choose the file size you want. However, you entered. DO NOT unplug the power cord or remove the USB...
Software User's Guide - English
Page 219
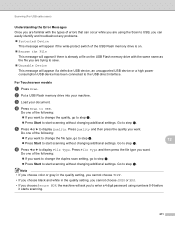
... memory drive with the same name as the file you are trying to save. Unusable Device This message will ask you to enter a 4 digit password using numbers 0-9 before it starts scanning. 211 d Press Scan to display File Type. Go to step k. Go to step k. Press Quality and then press the...
... memory drive with the same name as the file you are trying to save. Unusable Device This message will ask you to enter a 4 digit password using numbers 0-9 before it starts scanning. 211 d Press Scan to display File Type. Go to step k. Go to step k. Press Quality and then press the...
Software User's Guide - English
Page 232
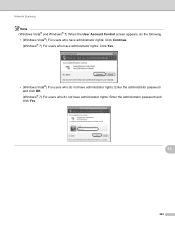
Network Scanning Note (Windows Vista® and Windows® 7) When the User Account Control screen appears, do the following. • (Windows Vista®) For users who have administrator rights: Click Continue. (Windows® 7) For users who have administrator rights: Click Yes. • (Windows Vista®) For users who do not have administrator rights: Enter the administrator password and click OK. (Windows® 7) For users who do not have administrator rights: Enter the administrator password and click Yes. 13 224
Network Scanning Note (Windows Vista® and Windows® 7) When the User Account Control screen appears, do the following. • (Windows Vista®) For users who have administrator rights: Click Continue. (Windows® 7) For users who have administrator rights: Click Yes. • (Windows Vista®) For users who do not have administrator rights: Enter the administrator password and click OK. (Windows® 7) For users who do not have administrator rights: Enter the administrator password and click Yes. 13 224
Software User's Guide - English
Page 239
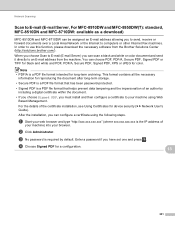
... impersonation of an author by default. For the details of your machine) into your machine using the following steps. In order to your browser. Enter a password if you have set one and press . a Start your web browser and type "http://xxx.xxx.xxx.xxx" (where xxx.xxx.xxx.xxx is a PDF... assigned an E-mail address allowing you to send, receive or forward documents over a Local Area Network or the Internet to an E-mail address from the Brother Solutions Center (http://solutions...
... impersonation of an author by default. For the details of your machine) into your machine using the following steps. In order to your browser. Enter a password if you have set one and press . a Start your web browser and type "http://xxx.xxx.xxx.xxx" (where xxx.xxx.xxx.xxx is a PDF... assigned an E-mail address allowing you to send, receive or forward documents over a Local Area Network or the Internet to an E-mail address from the Brother Solutions Center (http://solutions...

