
Users Manual - English
Page 96
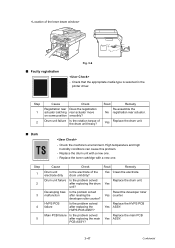
... was not reset when a new drum was installed. 1 Open the front cover, and then press Clear/Back. 2 Press 1 to save . several minutes, then reconnect it. Change the file name of its life. Troubleshooting and routine maintenance Error Message Cause Action Replace Parts The drum unit is not possible. Replace the drum unit. Call Brother Customer...
... was not reset when a new drum was installed. 1 Open the front cover, and then press Clear/Back. 2 Press 1 to save . several minutes, then reconnect it. Change the file name of its life. Troubleshooting and routine maintenance Error Message Cause Action Replace Parts The drum unit is not possible. Replace the drum unit. Call Brother Customer...
Users Manual - English
Page 99
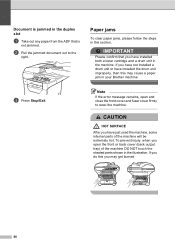
...a paper jam in your Brother machine. c Press Stop/Exit. Note If the error message remains, open the front or back cover (back output tray) of the machine will be extremely hot. To prevent injury, when you have not installed a drum unit or have installed the drum unit improperly, then this section... both a toner cartridge and a drum unit in the machine. b Pull the jammed document out to reset the machine. IMPORTANT Please confirm that is jammed in the duplex slot C a Take out any paper from the ADF that you have just used the machine, some internal parts of the machine DO NOT ...
...a paper jam in your Brother machine. c Press Stop/Exit. Note If the error message remains, open the front or back cover (back output tray) of the machine will be extremely hot. To prevent injury, when you have not installed a drum unit or have installed the drum unit improperly, then this section... both a toner cartridge and a drum unit in the machine. b Pull the jammed document out to reset the machine. IMPORTANT Please confirm that is jammed in the duplex slot C a Take out any paper from the ADF that you have just used the machine, some internal parts of the machine DO NOT ...
Users Manual - English
Page 120
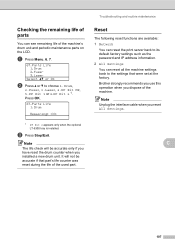
... installed. Note The life check will not be accurate only if you have reset the drum counter when you dispose of the machine. Brother strongly recommends you use this operation when you installed a new drum unit. a Press Menu, 6, 7. 67.Parts Life 1.Drum 2.Fuser 3.Laser Select ab or OK b Press a or b to the settings that part...
... installed. Note The life check will not be accurate only if you have reset the drum counter when you dispose of the machine. Brother strongly recommends you use this operation when you installed a new drum unit. a Press Menu, 6, 7. 67.Parts Life 1.Drum 2.Fuser 3.Laser Select ab or OK b Press a or b to the settings that part...

Users Manual - English
Page 121
... power for at least 30 minutes before packing and shipping may void your machine by failure to lock the scanner. e Take out the drum unit and toner cartridge assembly. Press OK. d Press the front cover release button and open the front cover. Press OK. If you chose... 1.Reset in the drum unit. 108 Note You can also reset the Network settings by leaving it disconnected from the machine. When you will begin the Restart. Press OK. Leave the toner...
... power for at least 30 minutes before packing and shipping may void your machine by failure to lock the scanner. e Take out the drum unit and toner cartridge assembly. Press OK. d Press the front cover release button and open the front cover. Press OK. If you chose... 1.Reset in the drum unit. 108 Note You can also reset the Network settings by leaving it disconnected from the machine. When you will begin the Restart. Press OK. Leave the toner...
Service Manual
Page 77
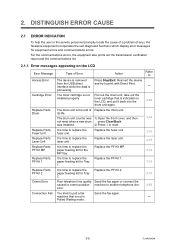
...its life. Replace the PF Kit MP. 3-14 It is the end of Replace the drum unit. processing. Pull out the drum unit, take out the toner cartridge that is time to reset. 3-14 It is not in - machine that is indicated on the LCD Error Message ... the facsimile equipment incorporates the self-diagnostic functions which display error messages for Tray 1. was 1) Open the front cover, and then not reset when a new drum press Clear/Back. The toner cartridge is removed Press Stop/Exit. Polled Waiting mode. 3-5 Confidential DISTINGUISH ERROR CAUSE 2.1 ERROR INDICATION To...
...its life. Replace the PF Kit MP. 3-14 It is the end of Replace the drum unit. processing. Pull out the drum unit, take out the toner cartridge that is time to reset. 3-14 It is not in - machine that is indicated on the LCD Error Message ... the facsimile equipment incorporates the self-diagnostic functions which display error messages for Tray 1. was 1) Open the front cover, and then not reset when a new drum press Clear/Back. The toner cartridge is removed Press Stop/Exit. Polled Waiting mode. 3-5 Confidential DISTINGUISH ERROR CAUSE 2.1 ERROR INDICATION To...
Service Manual
Page 119
... rear actuator. Replace the main PCB Yes ASSY. 3-47 Confidential Check that the appropriate media type is selected in the printer driver. Yes Replace the drum unit. ■ Dark - Developing bias Is the problem solved Reset the developer roller malfunciton after replacing the HVPS PCB ASSY? Step 1 2 3 4 5 Cause Check Result Remedy...
... rear actuator. Replace the main PCB Yes ASSY. 3-47 Confidential Check that the appropriate media type is selected in the printer driver. Yes Replace the drum unit. ■ Dark - Developing bias Is the problem solved Reset the developer roller malfunciton after replacing the HVPS PCB ASSY? Step 1 2 3 4 5 Cause Check Result Remedy...

Service Manual
Page 184
(30) Catch the Pins of the Outer chute onto the Back cover, and close the Back cover. 30b Pin Back cover Pin Outer chute ASSY 30a Back cover Fig. 4-44 Set the following parts after assembling. • Set the DX feed ASSY or DX blank cover. • Install the Drum/toner ASSY into the Printer. • Put the Paper into the Paper tray. • Reset the count of the Fuser unit and Laser unit after part replacement. (Refer to "5.1 Resetting the Periodical Replacement Parts Life" in Chapter7.) 4-29 Confidential
(30) Catch the Pins of the Outer chute onto the Back cover, and close the Back cover. 30b Pin Back cover Pin Outer chute ASSY 30a Back cover Fig. 4-44 Set the following parts after assembling. • Set the DX feed ASSY or DX blank cover. • Install the Drum/toner ASSY into the Printer. • Put the Paper into the Paper tray. • Reset the count of the Fuser unit and Laser unit after part replacement. (Refer to "5.1 Resetting the Periodical Replacement Parts Life" in Chapter7.) 4-29 Confidential

Service Manual
Page 195
Holder bearing MP Hook 3a 3c 3b Fig. 4-57 (4) Close the MP feed frame cover. (3) Put the Holder bearing MP into the Printer. (6) Close the Front cover. * Reset the count of the arrow 3c to the direction of the PF Kit MP after part replacement. 4-40 Confidential MP feed frame cover MP feed frame MP feed frame Front cover Fig. 4-58 (5) Install the Drum/toner ASSY into the MP feed frame and turn the Holder bearing MP to lock.
Holder bearing MP Hook 3a 3c 3b Fig. 4-57 (4) Close the MP feed frame cover. (3) Put the Holder bearing MP into the Printer. (6) Close the Front cover. * Reset the count of the arrow 3c to the direction of the PF Kit MP after part replacement. 4-40 Confidential MP feed frame cover MP feed frame MP feed frame Front cover Fig. 4-58 (5) Install the Drum/toner ASSY into the MP feed frame and turn the Holder bearing MP to lock.
Service Manual
Page 386
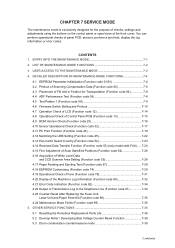
...the control panel or open/close of the front cover. OTHER SERVICE FUNCTIONS 7-36 5.1 Resetting the Periodical Replacement Parts Life 7-36 5.2 Develop Roller / Developing Bias Voltage Counter Reset Function 7-38 5.3 Drum condensation countermeasure mode 7-39 Confidential LIST OF MAINTENANCE-MODE FUNCTIONS 7-2 3. ENTRY INTO THE ...Indication (Function code 82 7-34 4.22 Output of Transmission Log to the Telephone Line (Function code 87 7-34 4.23 Counter Reset After Replacing the Fuser Unit, Laser Unit and Paper Feed Kit (Function code 88 7-35 4.24 Maintenance Mode Finish (Function code...
...the control panel or open/close of the front cover. OTHER SERVICE FUNCTIONS 7-36 5.1 Resetting the Periodical Replacement Parts Life 7-36 5.2 Develop Roller / Developing Bias Voltage Counter Reset Function 7-38 5.3 Drum condensation countermeasure mode 7-39 Confidential LIST OF MAINTENANCE-MODE FUNCTIONS 7-2 3. ENTRY INTO THE ...Indication (Function code 82 7-34 4.22 Output of Transmission Log to the Telephone Line (Function code 87 7-34 4.23 Counter Reset After Replacing the Fuser Unit, Laser Unit and Paper Feed Kit (Function code 88 7-35 4.24 Maintenance Mode Finish (Function code...

Service Manual
Page 422
... in the initial stage of the maintenance mode. (2) The maintenance mode is cleared, with implementing this operation after Step (2), the machine returns to reset the counter of the selected part. The machine returns to the initial stage of the maintenance mode. (5) When pressing the [Stop] button after...the fuser unit, laser unit and paper feed Kit (MP, T1, T2). (1) Press the [8] and [8] keys in this time, the drum counter and page counter are not reset. 4.24 Maintenance Mode Finish (Function code 99) Finish the maintenance mode. (1) Press the [9] key twice in the initial stage of the...
... in the initial stage of the maintenance mode. (2) The maintenance mode is cleared, with implementing this operation after Step (2), the machine returns to reset the counter of the selected part. The machine returns to the initial stage of the maintenance mode. (5) When pressing the [Stop] button after...the fuser unit, laser unit and paper feed Kit (MP, T1, T2). (1) Press the [8] and [8] keys in this time, the drum counter and page counter are not reset. 4.24 Maintenance Mode Finish (Function code 99) Finish the maintenance mode. (1) Press the [9] key twice in the initial stage of the...
Service Manual
Page 423
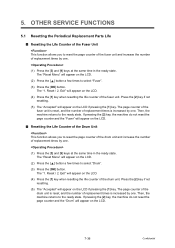
...to the ready state. The page counter of the drum unit is increased by one . OTHER SERVICE FUNCTIONS 5.1 Resetting the Periodical Replacement Parts Life ■ Resetting the Life Counter of the Fuser Unit This function allows you to reset the page counter of the fuser unit and increase the...page counter and the "Fuser" will appear on the LCD. ■ Resetting the Life Counter of the Drum Unit This function allows you to reset the page counter of the drum unit and increase the number of replacement times is reset, and the number of replacement times by one . (1) Press the [3]...
...to the ready state. The page counter of the drum unit is increased by one . OTHER SERVICE FUNCTIONS 5.1 Resetting the Periodical Replacement Parts Life ■ Resetting the Life Counter of the Fuser Unit This function allows you to reset the page counter of the fuser unit and increase the...page counter and the "Fuser" will appear on the LCD. ■ Resetting the Life Counter of the Drum Unit This function allows you to reset the page counter of the drum unit and increase the number of replacement times is reset, and the number of replacement times by one . (1) Press the [3]...
Service Manual
Page 425
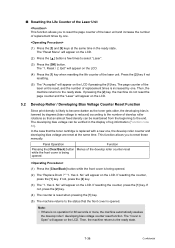
... do not reset the page ...Reset...Reset Menu" will appear on the LCD. Yes 2. Reset...resetting. (5) The "Accepted" will appear on the LCD. (4) Press the [1] key when resetting...resetting the counter, press the [1] key. Panel Operation Function Pressing the [Clear/Back] button Menus of the develop roller counter reset...reset when pressing the [1] key. (5) The machine returns to reset these manually. This function allows you to the ready state. 7-38 Confidential ■ Resetting...reset at the same time in...resetting the counter, press the [1] key. Then, the machine returns to reset...
... do not reset the page ...Reset...Reset Menu" will appear on the LCD. Yes 2. Reset...resetting. (5) The "Accepted" will appear on the LCD. (4) Press the [1] key when resetting...resetting the counter, press the [1] key. Panel Operation Function Pressing the [Clear/Back] button Menus of the develop roller counter reset...reset when pressing the [1] key. (5) The machine returns to reset these manually. This function allows you to the ready state. 7-38 Confidential ■ Resetting...reset at the same time in...resetting the counter, press the [1] key. Then, the machine returns to reset...


