Quick Setup Guide - English
Page 1
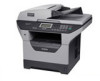
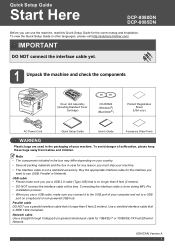
... Guide Start Here DCP-8080DN DCP-8085DN Before you can use a USB cable, make sure you use a USB 2.0 cable (Type A/B) that is IEEE 1284-compliant. IMPORTANT DO NOT connect the interface cable yet. 1 Unpack the machine and check the components Drum Unit Assembly (including Standard... Toner Cartridge) CD-ROMS (Windows®) (Macintosh®) Product Registration Sheet (USA only) AC Power Cord Quick Setup Guide User's Guide Accessory Order Form WARNING Plastic bags are used in other languages, please visit http://solutions.brother....
... Guide Start Here DCP-8080DN DCP-8085DN Before you can use a USB cable, make sure you use a USB 2.0 cable (Type A/B) that is IEEE 1284-compliant. IMPORTANT DO NOT connect the interface cable yet. 1 Unpack the machine and check the components Drum Unit Assembly (including Standard... Toner Cartridge) CD-ROMS (Windows®) (Macintosh®) Product Registration Sheet (USA only) AC Power Cord Quick Setup Guide User's Guide Accessory Order Form WARNING Plastic bags are used in other languages, please visit http://solutions.brother....
Quick Setup Guide - English
Page 3
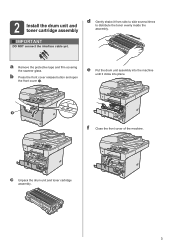
2 Install the drum unit and toner cartridge assembly IMPORTANT DO NOT connect the interface cable yet. d Gently shake it clicks into the machine until it from side to side several times to distribute the toner evenly inside the assembly. b Press the front cover release button and open the front cover a. e Put the drum unit assembly into place. 1 f Close the front cover of the machine. c Unpack the drum unit and toner cartridge assembly. 3 a Remove the protective tape and film covering the scanner glass.
2 Install the drum unit and toner cartridge assembly IMPORTANT DO NOT connect the interface cable yet. d Gently shake it clicks into the machine until it from side to side several times to distribute the toner evenly inside the assembly. b Press the front cover release button and open the front cover a. e Put the drum unit assembly into place. 1 f Close the front cover of the machine. c Unpack the drum unit and toner cartridge assembly. 3 a Remove the protective tape and film covering the scanner glass.
Quick Setup Guide - English
Page 28
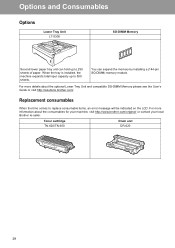
...Toner cartridge TN-620/TN-650 Drum unit DR-620 28 You can hold up to replace consumable items, an error message will be indicated on the LCD. Options and Consumables Options Lower Tray Unit LT-5300 SO-DIMM Memory Second lower paper tray unit can expand the memory by installing ...a (144-pin SO-DIMM) memory module. For more details about the consumables for your machine, visit http://www.brother.com/original/ or contact your local Brother re-seller. Replacement consumables When the time ...
...Toner cartridge TN-620/TN-650 Drum unit DR-620 28 You can hold up to replace consumable items, an error message will be indicated on the LCD. Options and Consumables Options Lower Tray Unit LT-5300 SO-DIMM Memory Second lower paper tray unit can expand the memory by installing ...a (144-pin SO-DIMM) memory module. For more details about the consumables for your machine, visit http://www.brother.com/original/ or contact your local Brother re-seller. Replacement consumables When the time ...
Users Manual - English
Page 4
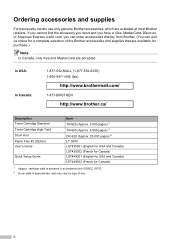
..., which are accepted. ii cartridge yield is declared in accordance with ISO/IEC 19752. 2 Drum yield is approximate, and may vary by type of the Brother accessories and supplies that are available for Canada) 1 Approx. Ordering accessories and supplies For best quality results use . In... In Canada: 1-877-552-MALL (1-877-552-6255) 1-800-947-1445 (fax) http://www.brothermall.com/ 1-877-BROTHER http://www.brother.ca/ Description Toner Cartridge Standard Toner Cartridge High Yield Drum Unit Paper Tray #2 (Option) User's Guide Quick Setup Guide Item TN-620 (Approx. 3,000 pages) 1 TN-650 ...
..., which are accepted. ii cartridge yield is declared in accordance with ISO/IEC 19752. 2 Drum yield is approximate, and may vary by type of the Brother accessories and supplies that are available for Canada) 1 Approx. Ordering accessories and supplies For best quality results use . In... In Canada: 1-877-552-MALL (1-877-552-6255) 1-800-947-1445 (fax) http://www.brothermall.com/ 1-877-BROTHER http://www.brother.ca/ Description Toner Cartridge Standard Toner Cartridge High Yield Drum Unit Paper Tray #2 (Option) User's Guide Quick Setup Guide Item TN-620 (Approx. 3,000 pages) 1 TN-650 ...

Users Manual - English
Page 9
... (Canada only) Pursuant to the limited warranty of 1 year from the date of purchase for labour and parts, Brother International Corporation (Canada) Ltd. ("Brother"), or its Authorized Service Centres, Distributors, Dealers, Agents or employees, shall create another warranty or modify this warranty....the Warranty. For Laser units: Failure to remove the Toner Cartridge (and Toner Drum Unit, waste toner packs or oil bottles on applicable models) during shipping and will void the warranty. Improper packaging may also have other than a Brother Authorized Service Representative, or...
... (Canada only) Pursuant to the limited warranty of 1 year from the date of purchase for labour and parts, Brother International Corporation (Canada) Ltd. ("Brother"), or its Authorized Service Centres, Distributors, Dealers, Agents or employees, shall create another warranty or modify this warranty....the Warranty. For Laser units: Failure to remove the Toner Cartridge (and Toner Drum Unit, waste toner packs or oil bottles on applicable models) during shipping and will void the warranty. Improper packaging may also have other than a Brother Authorized Service Representative, or...
Users Manual - English
Page 12
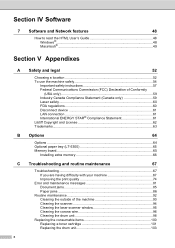
...) Declaration of Conformity (USA only 59 Industry Canada Compliance Statement (Canada only 59 Laser safety 60 FDA regulations 60 Disconnect device 61 LAN connection 61 International ENERGY STAR® Compliance Statement 61 Libtiff Copyright and License 62 Trademarks...63 Options 64 Options ...64 Optional paper tray (LT-5300 65 Memory board... 92 Cleaning the outside of the machine 93 Cleaning the scanner 94 Cleaning the laser scanner window 95 Cleaning the corona wire 96 Cleaning the drum unit 98 Replacing the consumable items 100 Replacing a toner cartridge 101 Replacing the...
...) Declaration of Conformity (USA only 59 Industry Canada Compliance Statement (Canada only 59 Laser safety 60 FDA regulations 60 Disconnect device 61 LAN connection 61 International ENERGY STAR® Compliance Statement 61 Libtiff Copyright and License 62 Trademarks...63 Options 64 Options ...64 Optional paper tray (LT-5300 65 Memory board... 92 Cleaning the outside of the machine 93 Cleaning the scanner 94 Cleaning the laser scanner window 95 Cleaning the corona wire 96 Cleaning the drum unit 98 Replacing the consumable items 100 Replacing a toner cartridge 101 Replacing the...
Users Manual - English
Page 32
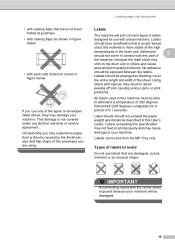
...spaces may cause damage to your machine will print on most types of the sheet. Labels exceeding this material is not covered under any Brother warranty or service agreement. Labels should be damaged. 19 Labels should have not been folded at the high temperatures in this machine must ...fed from the MP Tray only. Loading paper and documents Labels 2 The machine will be arranged so that they may stick to the drum unit or rollers and cause jams and print quality problems. No adhesive should not exceed the paper weight specifications described in the fuser...
...spaces may cause damage to your machine will print on most types of the sheet. Labels exceeding this material is not covered under any Brother warranty or service agreement. Labels should be damaged. 19 Labels should have not been folded at the high temperatures in this machine must ...fed from the MP Tray only. Loading paper and documents Labels 2 The machine will be arranged so that they may stick to the drum unit or rollers and cause jams and print quality problems. No adhesive should not exceed the paper weight specifications described in the fuser...
Users Manual - English
Page 67
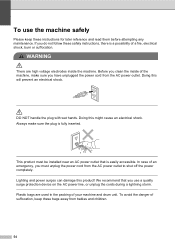
... an electrical shock. Lighting and power surges can damage this product! We recommend that is fully inserted. To avoid the danger of your machine and drum unit.
... an electrical shock. Lighting and power surges can damage this product! We recommend that is fully inserted. To avoid the danger of your machine and drum unit.
Users Manual - English
Page 81
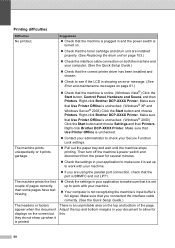
... for several minutes. „ Check the settings in and the power switch is turned on. „ Check that the toner cartridge and drum unit are using the parallel port connection, check that the port is BRMFC and not LPT1. „ Check the settings in your document to...that you are installed properly. (See Replacing the drum unit on page 103.) „ Check the interface cable connection on the top and bottom of pages correctly, then some pages have text missing. Printing difficulties Difficulties No printout. Right-click Brother DCP-XXXX Printer. Suggestions „ Check that Use ...
... for several minutes. „ Check the settings in and the power switch is turned on. „ Check that the toner cartridge and drum unit are using the parallel port connection, check that the port is BRMFC and not LPT1. „ Check the settings in your document to...that you are installed properly. (See Replacing the drum unit on page 103.) „ Check the interface cable connection on the top and bottom of pages correctly, then some pages have text missing. Printing difficulties Difficulties No printout. Right-click Brother DCP-XXXX Printer. Suggestions „ Check that Use ...
Users Manual - English
Page 87
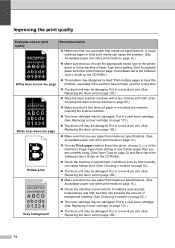
... Examples of paper is not inside the machine covering the scanner window. „ The toner cartridge may be damaged. Put in a new drum unit. (See Replacing the drum unit on page 103.) „ Wipe the laser scanner windows with a dry, lint-free soft cloth. (See Cleaning the laser scanner window... paper and other print media on page 14.) „ Choose Thick paper mode in the printer driver, choose Thick in a new drum unit. (See Replacing the drum unit on the CD-ROM.) „ The problem may be damaged. Conditions such as high temperatures and high humidity can increase the amount ...
... Examples of paper is not inside the machine covering the scanner window. „ The toner cartridge may be damaged. Put in a new drum unit. (See Replacing the drum unit on page 103.) „ Wipe the laser scanner windows with a dry, lint-free soft cloth. (See Cleaning the laser scanner window... paper and other print media on page 14.) „ Choose Thick paper mode in the printer driver, choose Thick in a new drum unit. (See Replacing the drum unit on the CD-ROM.) „ The problem may be damaged. Conditions such as high temperatures and high humidity can increase the amount ...

Users Manual - English
Page 88
... paper and other print media on page 14 and Basic tab in a new drum unit. (See Replacing the drum unit on page 103.) „ The fuser unit may be damaged. Put in the Software User's Guide on the CD-ROM.) „ The drum unit may be too full. „ Check the paper type and quality. (See...° in the multi-purpose tray (MP tray) on page 12. „ The paper tray may be contaminated. Call Brother Customer Service at 1-877-BROTHER (1-877-276-8437) (in USA) or 1-877-BROTHER (in Canada). „ Check the paper type and quality. (See Acceptable paper and other print media on page 14.) ...
... paper and other print media on page 14 and Basic tab in a new drum unit. (See Replacing the drum unit on page 103.) „ The fuser unit may be damaged. Put in the Software User's Guide on the CD-ROM.) „ The drum unit may be too full. „ Check the paper type and quality. (See...° in the multi-purpose tray (MP tray) on page 12. „ The paper tray may be contaminated. Call Brother Customer Service at 1-877-BROTHER (1-877-276-8437) (in USA) or 1-877-BROTHER (in Canada). „ Check the paper type and quality. (See Acceptable paper and other print media on page 14.) ...
Users Manual - English
Page 91
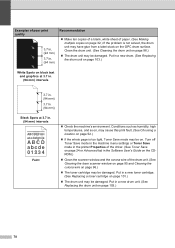
...Advanced tab in a new toner cartridge. (See Replacing a toner cartridge on page 98.) „ The drum unit may be damaged. Clean the drum unit. (See Cleaning the drum unit on page 101.) „ The drum unit may be damaged. Put in the Software User's Guide on the CDROM.) „ Clean the scanner window... too light, Toner Save mode may be on. Put in a new drum unit. (See Replacing the drum unit on black text and graphics at 3.7 in. (94 mm) intervals Black Spots at 3.7 in a new drum. (See Replacing the drum unit on page 103.) White Spots on page 103.) 78 Conditions such as ...
...Advanced tab in a new toner cartridge. (See Replacing a toner cartridge on page 98.) „ The drum unit may be damaged. Clean the drum unit. (See Cleaning the drum unit on page 101.) „ The drum unit may be damaged. Put in the Software User's Guide on the CDROM.) „ Clean the scanner window... too light, Toner Save mode may be on. Put in a new drum unit. (See Replacing the drum unit on black text and graphics at 3.7 in. (94 mm) intervals Black Spots at 3.7 in a new drum. (See Replacing the drum unit on page 103.) White Spots on page 103.) 78 Conditions such as ...

Users Manual - English
Page 92
... page 96 and Cleaning the drum unit on page 96.) „ The drum unit may be damaged. Put in a new drum unit. (See Replacing the drum unit on page 103.) „ The fuser unit may be damaged. Call Brother Customer Service at 1-877-BROTHER (1-877-276-8437) (in USA) or 1-877-BROTHER (in a new drum unit. (See Replacing the drum unit on page 103.) ABCDEFGH abcdefghijk...
... page 96 and Cleaning the drum unit on page 96.) „ The drum unit may be damaged. Put in a new drum unit. (See Replacing the drum unit on page 103.) „ The fuser unit may be damaged. Call Brother Customer Service at 1-877-BROTHER (1-877-276-8437) (in USA) or 1-877-BROTHER (in a new drum unit. (See Replacing the drum unit on page 103.) ABCDEFGH abcdefghijk...
Users Manual - English
Page 93
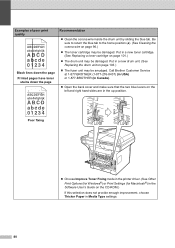
...-276-8437) (in USA) or 1-877-BROTHER (in Media Type settings. 80 Be sure to return the blue tab to the home position (a). (See ... the back cover and make sure that the two blue levers on page 103.) „ The fuser unit may be damaged. Put in a new drum unit. (See Replacing the drum unit on the left and right hand sides are in the Software User's Guide on page 101.) „...; The drum unit may be smudged. Poor fixing „ Choose Improve Toner Fixing mode in the printer driver. (See Other ...
...-276-8437) (in USA) or 1-877-BROTHER (in Media Type settings. 80 Be sure to return the blue tab to the home position (a). (See ... the back cover and make sure that the two blue levers on page 103.) „ The fuser unit may be damaged. Put in a new drum unit. (See Replacing the drum unit on the left and right hand sides are in the Software User's Guide on page 101.) „...; The drum unit may be smudged. Poor fixing „ Choose Improve Toner Fixing mode in the printer driver. (See Other ...
Users Manual - English
Page 94
...sophisticated office product, errors may occur and consumable items may need more help, the Brother Solutions Center offers the latest FAQs and troubleshooting tips. Cleaning the corona wire on the drum unit. (See needs to print with any obstacles that the exhaust outlet machine will hear...is too hot. Cooling Down The temperature of the machine. Press Stop/Exit. Replace the drum unit. (See Replacing the drum unit on page 20. print job and go into the drum unit again. If this happens, your machine identifies the error or required routine maintenance and shows ...
...sophisticated office product, errors may occur and consumable items may need more help, the Brother Solutions Center offers the latest FAQs and troubleshooting tips. Cleaning the corona wire on the drum unit. (See needs to print with any obstacles that the exhaust outlet machine will hear...is too hot. Cooling Down The temperature of the machine. Press Stop/Exit. Replace the drum unit. (See Replacing the drum unit on page 20. print job and go into the drum unit again. If this happens, your machine identifies the error or required routine maintenance and shows ...

Users Manual - English
Page 95
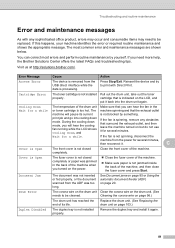
...memory. (See Out of memory message on page 86.) machine. closed. The paper is on . The toner cartridge or the drum Re-install the toner cartridge or the drum unit unit and toner cartridge assembly and toner cartridge assembly. Copy operation in progress Do one of the following : „ Press Start ... Tray 1 Jam Tray 2 No Paper No Toner No Tray Out of Memory Print Unable XX Protected Device Cause Action The temperature of fuser unit Turn the power switch off the protect switch of the USB Flash memory drive. 82 Leave the temperature within specified time. The paper is...
...memory. (See Out of memory message on page 86.) machine. closed. The paper is on . The toner cartridge or the drum Re-install the toner cartridge or the drum unit unit and toner cartridge assembly and toner cartridge assembly. Copy operation in progress Do one of the following : „ Press Start ... Tray 1 Jam Tray 2 No Paper No Toner No Tray Out of Memory Print Unable XX Protected Device Cause Action The temperature of fuser unit Turn the power switch off the protect switch of the USB Flash memory drive. 82 Leave the temperature within specified time. The paper is...

Users Manual - English
Page 96
.... several minutes, then reconnect it. Replace the drum unit. Replace Toner The toner cartridge is at the end of its life. Press Stop/Exit. Call Brother Customer Service to replace the laser unit. 1-877-BROTHER (1-877-276-8437) (in USA) 1-877-BROTHER (in Canada) Replace Parts PF Kit MP It... and routine maintenance Error Message Cause Action Replace Parts The drum unit is the end of its life and printing is not possible. Call Brother Customer Service to replace the fuser unit. 1-877-BROTHER (1-877-276-8437) (in USA) 1-877-BROTHER (in Canada) Replace Parts PF Kit 2 It is ...
.... several minutes, then reconnect it. Replace the drum unit. Replace Toner The toner cartridge is at the end of its life. Press Stop/Exit. Call Brother Customer Service to replace the laser unit. 1-877-BROTHER (1-877-276-8437) (in USA) 1-877-BROTHER (in Canada) Replace Parts PF Kit MP It... and routine maintenance Error Message Cause Action Replace Parts The drum unit is the end of its life and printing is not possible. Call Brother Customer Service to replace the fuser unit. 1-877-BROTHER (1-877-276-8437) (in USA) 1-877-BROTHER (in Canada) Replace Parts PF Kit 2 It is ...
Users Manual - English
Page 99
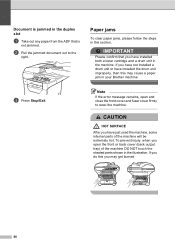
... paper from the ADF that you have installed both a toner cartridge and a drum unit in your Brother machine. IMPORTANT Please confirm that is not jammed. CAUTION HOT SURFACE After you have just used the machine, some internal parts of the machine DO NOT touch the shaded parts shown in the illustration.... If you may cause a paper jam in the machine. Document is jammed in this may get burned. 86 If you do this you have not installed a drum unit or have installed the drum unit improperly, ...
... paper from the ADF that you have installed both a toner cartridge and a drum unit in your Brother machine. IMPORTANT Please confirm that is not jammed. CAUTION HOT SURFACE After you have just used the machine, some internal parts of the machine DO NOT touch the shaded parts shown in the illustration.... If you may cause a paper jam in the machine. Document is jammed in this may get burned. 86 If you do this you have not installed a drum unit or have installed the drum unit improperly, ...

Users Manual - English
Page 102
...assembly C a Press the front cover release button and open the front cover. IMPORTANT We recommend that you place the drum unit and toner cartridge assembly on a clean, flat surface with the drum unit and toner cartridge assembly, or this may release the paper so you accidentally spill or scatter toner. C b Slowly ...take out the drum unit and toner cartridge assembly. g Put the paper tray firmly back in the illustration. To prevent damage to the machine from static electricity, ...
...assembly C a Press the front cover release button and open the front cover. IMPORTANT We recommend that you place the drum unit and toner cartridge assembly on a clean, flat surface with the drum unit and toner cartridge assembly, or this may release the paper so you accidentally spill or scatter toner. C b Slowly ...take out the drum unit and toner cartridge assembly. g Put the paper tray firmly back in the illustration. To prevent damage to the machine from static electricity, ...

Users Manual - English
Page 103
...print quality problems, DO NOT touch the shaded parts shown in the illustrations below. g Close the front cover. e Put the toner cartridge back into the drum unit until you put it in properly, the blue lock lever will lift automatically. If you hear it in the machine. c Push down the blue lock... lever and take the toner cartridge out of disposable paper or cloth underneath it lock into place. f Put the drum unit and toner cartridge assembly back in case you accidentally spill or scatter toner. d Clear the jammed paper if there is any inside the...
...print quality problems, DO NOT touch the shaded parts shown in the illustrations below. g Close the front cover. e Put the toner cartridge back into the drum unit until you put it in properly, the blue lock lever will lift automatically. If you hear it in the machine. c Push down the blue lock... lever and take the toner cartridge out of disposable paper or cloth underneath it lock into place. f Put the drum unit and toner cartridge assembly back in case you accidentally spill or scatter toner. d Clear the jammed paper if there is any inside the...


