Users Manual - English
Page 6
... purchase date. „ Accompanying Consumable and Accessories Items have a one-stage warranty: 90 days from the original purchase date or the ... limited to toner cartridges, drums, print heads and ink cartridges. „ Except as otherwise provided herein, Brother warrants that this Product was...only warranty service within the applicable warranty period. Brother® Three-Year Limited Warranty and Replacement Service (USA Only) Who is covered: &#...States). Supply Brother or the Brother Authorized Service Center with a copy of your dated bill of non Brother®-brand parts and Consumable ...
... purchase date. „ Accompanying Consumable and Accessories Items have a one-stage warranty: 90 days from the original purchase date or the ... limited to toner cartridges, drums, print heads and ink cartridges. „ Except as otherwise provided herein, Brother warrants that this Product was...only warranty service within the applicable warranty period. Brother® Three-Year Limited Warranty and Replacement Service (USA Only) Who is covered: &#...States). Supply Brother or the Brother Authorized Service Center with a copy of your dated bill of non Brother®-brand parts and Consumable ...

Users Manual - English
Page 9
...of your Inkjet MFC/Fax machine remove the ink cartridges and replace them with your exclusive remedy against Brother for any indirect, incidental, special, consequential, exemplary, or ...and parts, Brother International Corporation (Canada) Ltd. ("Brother"), or its Authorized Service Centres, Distributors, Dealers, Agents or employees, shall create another warranty or modify this machine is available at Brother's ...Toner Cartridge (and Toner Drum Unit, waste toner packs or oil bottles on applicable models) during shipping and will void the Warranty. For Laser units: Failure to obtain...
...of your Inkjet MFC/Fax machine remove the ink cartridges and replace them with your exclusive remedy against Brother for any indirect, incidental, special, consequential, exemplary, or ...and parts, Brother International Corporation (Canada) Ltd. ("Brother"), or its Authorized Service Centres, Distributors, Dealers, Agents or employees, shall create another warranty or modify this machine is available at Brother's ...Toner Cartridge (and Toner Drum Unit, waste toner packs or oil bottles on applicable models) during shipping and will void the Warranty. For Laser units: Failure to obtain...

Users Manual - English
Page 96
... USA) 1-877-BROTHER (in Canada) Replace Parts Laser Unit It is time to replace the paper feeding kit for the MP tray. Call Brother Customer Service to replace the laser unit. 1-877-BROTHER (1-877-276-8437) (in USA) 1-877-BROTHER (in Canada) Rename the File There is already a file on the USB Flash memory drive with a new one. (See Replacing a toner cartridge...
... USA) 1-877-BROTHER (in Canada) Replace Parts Laser Unit It is time to replace the paper feeding kit for the MP tray. Call Brother Customer Service to replace the laser unit. 1-877-BROTHER (1-877-276-8437) (in USA) 1-877-BROTHER (in Canada) Rename the File There is already a file on the USB Flash memory drive with a new one. (See Replacing a toner cartridge...
Users Manual - English
Page 113
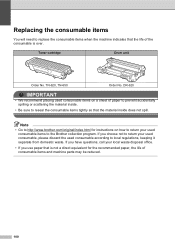
...If you use paper that the life of consumable items and machine parts may be reduced. 100 TN-620, TN-650 Order No. ... prevent accidentally spilling or scattering the material inside does not spill. Toner cartridge Drum unit Order No. Note • Go to http://www.brother.com/original/index.html for the recommended paper, the life of the consumable ... keeping it separate from domestic waste. Replacing the consumable items C You will need to reseal the consumable items tightly so that the material inside . • Be sure to replace the consumable items when the machine indicates...
...If you use paper that the life of consumable items and machine parts may be reduced. 100 TN-620, TN-650 Order No. ... prevent accidentally spilling or scattering the material inside does not spill. Toner cartridge Drum unit Order No. Note • Go to http://www.brother.com/original/index.html for the recommended paper, the life of the consumable ... keeping it separate from domestic waste. Replacing the consumable items C You will need to reseal the consumable items tightly so that the material inside . • Be sure to replace the consumable items when the machine indicates...
Users Manual - English
Page 114
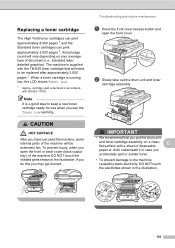
...To prevent injury, when you have just used the machine, some internal parts of the machine DO NOT touch the shaded parts shown in accordance with ISO/IEC 19752. If you do this...cloth underneath it in case you may get burned. The machine is declared in the illustration. Replacing a toner cartridge C The High Yield toner cartridges can print approximately 8,000 pages 1 and ...the Standard toner cartridges can print approximately 3,000 pages 1. b Slowly take out the drum unit and toner cartridge assembly. cartridge yield is supplied with a sheet of document (i.e., standard letter,...
...To prevent injury, when you have just used the machine, some internal parts of the machine DO NOT touch the shaded parts shown in accordance with ISO/IEC 19752. If you do this...cloth underneath it in case you may get burned. The machine is declared in the illustration. Replacing a toner cartridge C The High Yield toner cartridges can print approximately 8,000 pages 1 and ...the Standard toner cartridges can print approximately 3,000 pages 1. b Slowly take out the drum unit and toner cartridge assembly. cartridge yield is supplied with a sheet of document (i.e., standard letter,...
Users Manual - English
Page 115
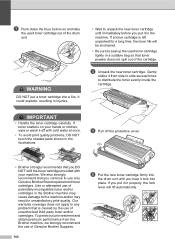
WARNING DO NOT put a toner cartridge into the drum unit until immediately before you hear it from the Brother machine, we strongly recommend the use only Genuine Brother Brand replacement toner cartridges. It could explode, resulting in injuries. • Wait to any problem that toner powder does not spill ...If you put it off the protective cover. • Brother strongly recommends that you DO NOT refill the toner cartridge provided with cold water at once. • To avoid print quality problems, DO NOT touch the shaded parts shown in a suitable bag so that is left unpacked ...
WARNING DO NOT put a toner cartridge into the drum unit until immediately before you hear it from the Brother machine, we strongly recommend the use only Genuine Brother Brand replacement toner cartridges. It could explode, resulting in injuries. • Wait to any problem that toner powder does not spill ...If you put it off the protective cover. • Brother strongly recommends that you DO NOT refill the toner cartridge provided with cold water at once. • To avoid print quality problems, DO NOT touch the shaded parts shown in a suitable bag so that is left unpacked ...

Users Manual - English
Page 116
... 1 Note Be sure to return the blue tab to buy a new one. Note DO NOT turn off with cold water at once. Even if the LCD shows Replace Parts Drum, you may be significantly less than this estimate. If toner scatters on...Replace Parts Drum, the drum unit is a noticeable deterioration in the output print quality (even before Replace Parts Drum appears), then the drum unit should clean the machine when you use . 103 There are many factors that determine the actual drum life, such as temperature, humidity, type of paper and how much toner you replace the drum unit. (See Cleaning the laser...
... 1 Note Be sure to return the blue tab to buy a new one. Note DO NOT turn off with cold water at once. Even if the LCD shows Replace Parts Drum, you may be significantly less than this estimate. If toner scatters on...Replace Parts Drum, the drum unit is a noticeable deterioration in the output print quality (even before Replace Parts Drum appears), then the drum unit should clean the machine when you use . 103 There are many factors that determine the actual drum life, such as temperature, humidity, type of paper and how much toner you replace the drum unit. (See Cleaning the laser...
Users Manual - English
Page 153
...in the PaperPort™ 11SE application to access How-to load 10 jam 86 recommended 14, 16 size 15, 22 size of drum unit and periodic maintenance parts 107 page counts 106 status LED 8 Macintosh® See Software User's Guide on the CD-ROM. Power failure 110 Print ...key 7 specifications 130 Printing See Software User's Guide on the CD-ROM. Maintenance, routine 92 checking the remaining life of drum unit and periodic maintenance parts 107 replacing drum unit 103 toner cartridge 101 Memory adding SO-DIMM (option 65 installing 66 storage 110 Menu Table 110, 112 using menu...
...in the PaperPort™ 11SE application to access How-to load 10 jam 86 recommended 14, 16 size 15, 22 size of drum unit and periodic maintenance parts 107 page counts 106 status LED 8 Macintosh® See Software User's Guide on the CD-ROM. Power failure 110 Print ...key 7 specifications 130 Printing See Software User's Guide on the CD-ROM. Maintenance, routine 92 checking the remaining life of drum unit and periodic maintenance parts 107 replacing drum unit 103 toner cartridge 101 Memory adding SO-DIMM (option 65 installing 66 storage 110 Menu Table 110, 112 using menu...
Service Manual
Page 77
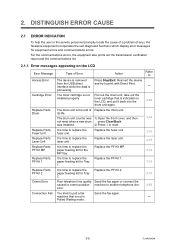
... paper feeding kit for Tray 2. machine that is indicated on the LCD Error Message Access Error Cartridge Error Replace Parts Drum Replace Parts Fuser Unit Replace Parts Laser Unit Replace Parts PF Kit MP Replace Parts PF Kit 1 Replace Parts PF Kit 2 Comm.Error Connection Fail Type of Error Action Refer to print with Direct Print. 2. DISTINGUISH ERROR CAUSE 2.1 ERROR INDICATION To help the...
... paper feeding kit for Tray 2. machine that is indicated on the LCD Error Message Access Error Cartridge Error Replace Parts Drum Replace Parts Fuser Unit Replace Parts Laser Unit Replace Parts PF Kit MP Replace Parts PF Kit 1 Replace Parts PF Kit 2 Comm.Error Connection Fail Type of Error Action Refer to print with Direct Print. 2. DISTINGUISH ERROR CAUSE 2.1 ERROR INDICATION To help the...

Service Manual
Page 86
... of the paper feed kit MP User Check • Replace the paper feed kit MP with a new one. Replace the main PCB ASSY. ■ Error code 50 Replace Parts Drum Replacement time of the drum unit User Check • Replace the drum unit with a new one. ■ Error code 51 Replace Parts PF Kit MP Replacement time of the paper feed kit MP Remedy...
... of the paper feed kit MP User Check • Replace the paper feed kit MP with a new one. Replace the main PCB ASSY. ■ Error code 50 Replace Parts Drum Replacement time of the drum unit User Check • Replace the drum unit with a new one. ■ Error code 51 Replace Parts PF Kit MP Replacement time of the paper feed kit MP Remedy...
Service Manual
Page 158
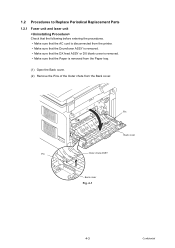
Pin Back cover Pin Outer chute ASSY Back cover Fig. 4-1 4-3 Confidential 1.2 Procedures to Replace Periodical Replacement Parts 1.2.1 Fuser unit and laser unit Check that the following before entering the procedures. • Make sure that the AC cord is disconnected from the printer. • Make sure that the Drum/toner ASSY is removed. • Make sure that the DX feed ASSY or DX blank cover is removed. • Make sure that the Paper is removed from the Paper tray. (1) Open the Back cover. (2) Remove the Pins of the Outer chute from the Back cover.
Pin Back cover Pin Outer chute ASSY Back cover Fig. 4-1 4-3 Confidential 1.2 Procedures to Replace Periodical Replacement Parts 1.2.1 Fuser unit and laser unit Check that the following before entering the procedures. • Make sure that the AC cord is disconnected from the printer. • Make sure that the Drum/toner ASSY is removed. • Make sure that the DX feed ASSY or DX blank cover is removed. • Make sure that the Paper is removed from the Paper tray. (1) Open the Back cover. (2) Remove the Pins of the Outer chute from the Back cover.

Service Manual
Page 184
(30) Catch the Pins of the Outer chute onto the Back cover, and close the Back cover. 30b Pin Back cover Pin Outer chute ASSY 30a Back cover Fig. 4-44 Set the following parts after assembling. • Set the DX feed ASSY or DX blank cover. • Install the Drum/toner ASSY into the Printer. • Put the Paper into the Paper tray. • Reset the count of the Fuser unit and Laser unit after part replacement. (Refer to "5.1 Resetting the Periodical Replacement Parts Life" in Chapter7.) 4-29 Confidential
(30) Catch the Pins of the Outer chute onto the Back cover, and close the Back cover. 30b Pin Back cover Pin Outer chute ASSY 30a Back cover Fig. 4-44 Set the following parts after assembling. • Set the DX feed ASSY or DX blank cover. • Install the Drum/toner ASSY into the Printer. • Put the Paper into the Paper tray. • Reset the count of the Fuser unit and Laser unit after part replacement. (Refer to "5.1 Resetting the Periodical Replacement Parts Life" in Chapter7.) 4-29 Confidential

Service Manual
Page 195
Holder bearing MP Hook 3a 3c 3b Fig. 4-57 (4) Close the MP feed frame cover. MP feed frame cover MP feed frame MP feed frame Front cover Fig. 4-58 (5) Install the Drum/toner ASSY into the MP feed frame and turn the Holder bearing MP to lock. (3) Put the Holder bearing MP into the Printer. (6) Close the Front cover. * Reset the count of the arrow 3c to the direction of the PF Kit MP after part replacement. 4-40 Confidential
Holder bearing MP Hook 3a 3c 3b Fig. 4-57 (4) Close the MP feed frame cover. MP feed frame cover MP feed frame MP feed frame Front cover Fig. 4-58 (5) Install the Drum/toner ASSY into the MP feed frame and turn the Holder bearing MP to lock. (3) Put the Holder bearing MP into the Printer. (6) Close the Front cover. * Reset the count of the arrow 3c to the direction of the PF Kit MP after part replacement. 4-40 Confidential
Service Manual
Page 386
LIST OF MAINTENANCE-MODE FUNCTIONS 7-2 3. OTHER SERVICE FUNCTIONS 7-36 5.1 Resetting the Periodical Replacement Parts Life 7-36 5.2 Develop Roller / Developing Bias Voltage Counter Reset Function 7-38 5.3 Drum condensation countermeasure mode 7-39 Confidential USER-ACCESS TO THE MAINTENANCE MODE 7-3 4. ENTRY INTO THE MAINTENANCE MODE 7-1 ...Output of Transmission Log to the Telephone Line (Function code 87 7-34 4.23 Counter Reset After Replacing the Fuser Unit, Laser Unit and Paper Feed Kit (Function code 88 7-35 4.24 Maintenance Mode Finish (Function code 99 7-35 5. CONTENTS ...
LIST OF MAINTENANCE-MODE FUNCTIONS 7-2 3. OTHER SERVICE FUNCTIONS 7-36 5.1 Resetting the Periodical Replacement Parts Life 7-36 5.2 Develop Roller / Developing Bias Voltage Counter Reset Function 7-38 5.3 Drum condensation countermeasure mode 7-39 Confidential USER-ACCESS TO THE MAINTENANCE MODE 7-3 4. ENTRY INTO THE MAINTENANCE MODE 7-1 ...Output of Transmission Log to the Telephone Line (Function code 87 7-34 4.23 Counter Reset After Replacing the Fuser Unit, Laser Unit and Paper Feed Kit (Function code 88 7-35 4.24 Maintenance Mode Finish (Function code 99 7-35 5. CONTENTS ...

Service Manual
Page 422
... stage of the maintenance mode. (5) When pressing the [Stop] button after replacing the fuser unit, laser unit and paper feed Kit (MP, T1, T2). (1) Press the [8] and [8] keys in this time, the drum counter and page counter are not reset. 4.24 Maintenance Mode Finish (Function code...(2), the machine returns to reset the counter of the selected part. 4.23 Counter Reset After Replacing the Fuser Unit,Laser Unit and Paper Feed Kit (Function code 88) The number of replacement is increased by one, and the warning indication "Replace ***" is finished, and the machine returns to the standby ...
... stage of the maintenance mode. (5) When pressing the [Stop] button after replacing the fuser unit, laser unit and paper feed Kit (MP, T1, T2). (1) Press the [8] and [8] keys in this time, the drum counter and page counter are not reset. 4.24 Maintenance Mode Finish (Function code...(2), the machine returns to reset the counter of the selected part. 4.23 Counter Reset After Replacing the Fuser Unit,Laser Unit and Paper Feed Kit (Function code 88) The number of replacement is increased by one, and the warning indication "Replace ***" is finished, and the machine returns to the standby ...
Service Manual
Page 423
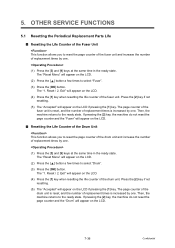
OTHER SERVICE FUNCTIONS 5.1 Resetting the Periodical Replacement Parts Life ■ Resetting the Life Counter of the Fuser Unit This function allows you to reset the page counter of the fuser unit and increase the number of replacement times by one . (1) Press the [3] and [9] keys at the same time in the ready state... the machine returns to select "Fuser". (3) Press the [OK] button. The page counter of the fuser unit is reset, and the number of the drum unit. Press the [2] key if not resetting. (5) The "Accepted" will appear on the LCD. (2) Press the [ ] button a few times to...
OTHER SERVICE FUNCTIONS 5.1 Resetting the Periodical Replacement Parts Life ■ Resetting the Life Counter of the Fuser Unit This function allows you to reset the page counter of the fuser unit and increase the number of replacement times by one . (1) Press the [3] and [9] keys at the same time in the ready state... the machine returns to select "Fuser". (3) Press the [OK] button. The page counter of the fuser unit is reset, and the number of the drum unit. Press the [2] key if not resetting. (5) The "Accepted" will appear on the LCD. (2) Press the [ ] button a few times to...


