
Accessory Catalog
Page 4
... dogs on the edge of zipper/piping, avoiding the non-flat parts of the presser foot and slide the presser foot so that the needle fits on the opening on the presser foot and select a straight stitch (left or right. 3. Sew. Loosen the clamp screw at the back of zipper/piping, and... foot, and then tighten the clamp screw with just right pressure. 1. Requires Low Shank Adapter for ULT series, PC-6500, PC-8200 and PC-8500 sewing machines. Brother General Sewing Accessories 05 Sew as you like. SA161 All Brother home-use sewing machines www.brother.com
... dogs on the edge of zipper/piping, avoiding the non-flat parts of the presser foot and slide the presser foot so that the needle fits on the opening on the presser foot and select a straight stitch (left or right. 3. Sew. Loosen the clamp screw at the back of zipper/piping, and... foot, and then tighten the clamp screw with just right pressure. 1. Requires Low Shank Adapter for ULT series, PC-6500, PC-8200 and PC-8500 sewing machines. Brother General Sewing Accessories 05 Sew as you like. SA161 All Brother home-use sewing machines www.brother.com

Accessory Catalog
Page 6
...GHILOP Skirt Innov-is Project Book (See page 53 for details.) www.brother.com Slowly sew 2-3 stitches, making sure the fabric is exactly against the edge of the foot. 6. Overlock Foot For vertical bobbin machines only. Increase upper thread tension. 2. SA164 ABCDEFJKMN SA149 GHILOP SA114 ...fabric behind the needle and lower the presser foot. 7. Lower the presser foot so that the foot guide is rolling around the curled part of the foot. 5. Raise the needle and the presser foot. 4. SA135 GHILOP Picot Foot Creates shell-looking edges on lightweight fabrics...
...GHILOP Skirt Innov-is Project Book (See page 53 for details.) www.brother.com Slowly sew 2-3 stitches, making sure the fabric is exactly against the edge of the foot. 6. Overlock Foot For vertical bobbin machines only. Increase upper thread tension. 2. SA164 ABCDEFJKMN SA149 GHILOP SA114 ...fabric behind the needle and lower the presser foot. 7. Lower the presser foot so that the foot guide is rolling around the curled part of the foot. 5. Raise the needle and the presser foot. 4. SA135 GHILOP Picot Foot Creates shell-looking edges on lightweight fabrics...
Users Manual - English
Page 3
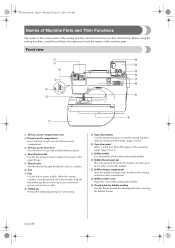
... cassette compartment. 3 Thread cassette eject lever Press this compartment. When the sewing machine is not being used, store the machine with the flap folded up. B Bobbin thread spool pin Place the spool of the machine parts. E Thread guide for the bobbin onto this spool pin in this lever...thread tension dial to adjust the tension of the sewing machine and their functions are described below. Cover B S2_brotherE.book Page B Thursday, February 13, 2003 11:03 AM Names of Machine Parts and Their Functions The names of the various parts of the upper thread. 5 Thread cutter Pass ...
... cassette compartment. 3 Thread cassette eject lever Press this compartment. When the sewing machine is not being used, store the machine with the flap folded up. B Bobbin thread spool pin Place the spool of the machine parts. E Thread guide for the bobbin onto this spool pin in this lever...thread tension dial to adjust the tension of the sewing machine and their functions are described below. Cover B S2_brotherE.book Page B Thursday, February 13, 2003 11:03 AM Names of Machine Parts and Their Functions The names of the various parts of the upper thread. 5 Thread cutter Pass ...
Users Manual - English
Page 4
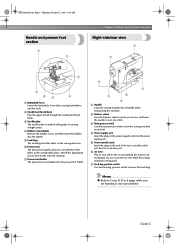
... then insert the bobbin into the shuttle. 5 Feed dogs The feed dogs feed the fabric in the sewing direction. 6 Presser foot The presser foot applies pressure consistently on the end of Machine Parts and Their Functions Needle and presser foot section 1 2 Right-side/rear view 1 2 3 7 65... 4 1 Buttonhole lever Lower the buttonhole lever when sewing buttonholes and bar tacks. 2 Needle bar thread hook Pass the ...
... then insert the bobbin into the shuttle. 5 Feed dogs The feed dogs feed the fabric in the sewing direction. 6 Presser foot The presser foot applies pressure consistently on the end of Machine Parts and Their Functions Needle and presser foot section 1 2 Right-side/rear view 1 2 3 7 65... 4 1 Buttonhole lever Lower the buttonhole lever when sewing buttonholes and bar tacks. 2 Needle bar thread hook Pass the ...
Users Manual - English
Page 6
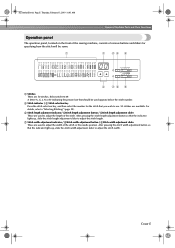
... 9 1 Stitches There are 50 stitches. Cover E S2_brotherE.book Page E Thursday, February 13, 2003 11:03 AM Names of Machine Parts and Their Functions Operation panel The operation panel, located on the front of the sewing machine, consists of various buttons and sliders for the stitch that you wish to use. 50 stitches are available...
... 9 1 Stitches There are 50 stitches. Cover E S2_brotherE.book Page E Thursday, February 13, 2003 11:03 AM Names of Machine Parts and Their Functions Operation panel The operation panel, located on the front of the sewing machine, consists of various buttons and sliders for the stitch that you wish to use. 50 stitches are available...
Users Manual - English
Page 9
... Enclosed Accessories Cover A Accessories ...Cover A Names of Machine Parts and Their Functions Cover B Front view ...Cover B Needle and presser foot section ...Cover C Right-side/rear view ...Cover C Operation buttons ...Cover D Operation panel ...Cover E Optional Accessories ...1 Introduction ...2 Sewing Machine Features ...2 Contents ...3 Important Safety Instructions 6 GETTING READY 9 Turning the Machine On/Off 10 Power supply precautions ...10...
... Enclosed Accessories Cover A Accessories ...Cover A Names of Machine Parts and Their Functions Cover B Front view ...Cover B Needle and presser foot section ...Cover C Right-side/rear view ...Cover C Operation buttons ...Cover D Operation panel ...Cover E Optional Accessories ...1 Introduction ...2 Sewing Machine Features ...2 Contents ...3 Important Safety Instructions 6 GETTING READY 9 Turning the Machine On/Off 10 Power supply precautions ...10...
Users Manual - English
Page 12
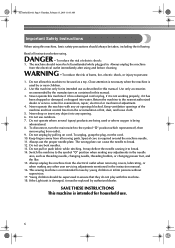
... use bent needles. 13. Do not use the proper needle plate. Switch the machine to the symbol "{" position which represents off, then remove plug from all instructions before cleaning. This sewing machine is not intended for its intended use by young children or infirm persons without supervision.... 17. Do not allow this machine if it has a damaged cord or plug, if it is damaged, it must be taken, including the following: Read all moving parts. Do not...
... use bent needles. 13. Do not use the proper needle plate. Switch the machine to the symbol "{" position which represents off, then remove plug from all instructions before cleaning. This sewing machine is not intended for its intended use by young children or infirm persons without supervision.... 17. Do not allow this machine if it has a damaged cord or plug, if it is damaged, it must be taken, including the following: Read all moving parts. Do not...
Users Manual - English
Page 14
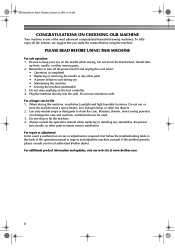
...up lever, needle, or other parts • A power failure occurs during use • Maintaining the machine • Leaving the machine unattended 3. Do not use or store the machine near a space heater, iron, halogen lamp, or other parts to keep your local authorized Brother dealer. Benzene, thinner, and ... site at www.brother.com 8 Use only neutral soaps or detergents to turn off the power switch and unplug the cord when: • Operation is required, first follow the troubleshooting table in the back of the most advanced computerized household sewing machines. Remember to clean...
...up lever, needle, or other parts • A power failure occurs during use • Maintaining the machine • Leaving the machine unattended 3. Do not use or store the machine near a space heater, iron, halogen lamp, or other parts to keep your local authorized Brother dealer. Benzene, thinner, and ... site at www.brother.com 8 Use only neutral soaps or detergents to turn off the power switch and unplug the cord when: • Operation is required, first follow the troubleshooting table in the back of the most advanced computerized household sewing machines. Remember to clean...
Users Manual - English
Page 18
... 2 the right side of the same type (part code: SA156, XA5539-151). CAUTION G Only use the bobbin (part code: SA156, XA5539-151) designed specifically for this sewing machine. If bobbins from older models are used, the machine will not operate correctly. Use only the enclosed... bobbin or bobbins of the sewing machine. 1 Bobbin thread spool pin Place the bobbin...
... 2 the right side of the same type (part code: SA156, XA5539-151). CAUTION G Only use the bobbin (part code: SA156, XA5539-151) designed specifically for this sewing machine. If bobbins from older models are used, the machine will not operate correctly. Use only the enclosed... bobbin or bobbins of the sewing machine. 1 Bobbin thread spool pin Place the bobbin...
Users Manual - English
Page 22
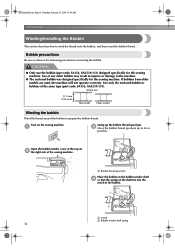
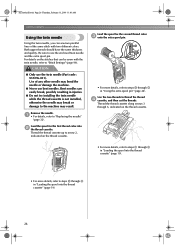
G The bobbin was designed specifically for this sewing machine. Be sure to thread the machine as shown, and 6 then pull the thread out toward the front. 1 Bobbin cover...The order that the bobbin thread should be incorrect. If bobbins from older models are used, the machine will be passed through the slot as indicated. Insert the bobbin into the shuttle so that has been...Lightly hold down the bobbin with your left . • Be sure to hold the end of the same type (part code: SA156, XA5539-151). CAUTION G Be sure to insert the bobbin correctly. CAUTION G Use a bobbin thread ...
G The bobbin was designed specifically for this sewing machine. Be sure to thread the machine as shown, and 6 then pull the thread out toward the front. 1 Bobbin cover...The order that the bobbin thread should be incorrect. If bobbins from older models are used, the machine will be passed through the slot as indicated. Insert the bobbin into the shuttle so that has been...Lightly hold down the bobbin with your left . • Be sure to hold the end of the same type (part code: SA156, XA5539-151). CAUTION G Be sure to insert the bobbin correctly. CAUTION G Use a bobbin thread ...
Users Manual - English
Page 32
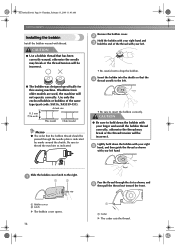
CAUTION G Only use bent needles. G Never use the twin needle (Part code : X59296-051). Load the spool for the second thread color 3 onto the extra spool pin. ... the same thickness and quality. Use of the same stitch with the twin needle, refer to the machine may bend the needle or damage the machine. G Do not try installing the twin needle while the thread cassette is not installed, otherwise the ..., 2003 11:03 AM GETTING READY Using the twin needle Using the twin needle, you can sew two parallel lines of any other needle may result. Be sure to steps 1 through 4 in injuries.
CAUTION G Only use bent needles. G Never use the twin needle (Part code : X59296-051). Load the spool for the second thread color 3 onto the extra spool pin. ... the same thickness and quality. Use of the same stitch with the twin needle, refer to the machine may bend the needle or damage the machine. G Do not try installing the twin needle while the thread cassette is not installed, otherwise the ..., 2003 11:03 AM GETTING READY Using the twin needle Using the twin needle, you can sew two parallel lines of any other needle may result. Be sure to steps 1 through 4 in injuries.
Users Manual - English
Page 38
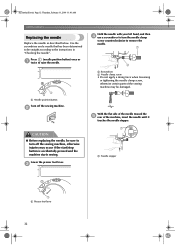
...to turn off the sewing machine. 2 With the flat side of the needle toward the 5 rear of the sewing machine may be straight according to be damaged. 1 1 Needle position button Turn off the sewing machine, otherwise injuries may ...machine starts sewing. CAUTION G Before replacing the needle, be sure to raise the needle. Press (needle position button) once or 1 twice to turn the needle clamp screw counterclockwise to remove the needle. 1 2 1 Screwdriver 2 Needle clamp screw • Do not apply a strong force when loosening or tightening the needle clamp screw, otherwise certain parts...
...to turn off the sewing machine. 2 With the flat side of the needle toward the 5 rear of the sewing machine may be straight according to be damaged. 1 1 Needle position button Turn off the sewing machine, otherwise injuries may ...machine starts sewing. CAUTION G Before replacing the needle, be sure to raise the needle. Press (needle position button) once or 1 twice to turn the needle clamp screw counterclockwise to remove the needle. 1 2 1 Screwdriver 2 Needle clamp screw • Do not apply a strong force when loosening or tightening the needle clamp screw, otherwise certain parts...
Users Manual - English
Page 46
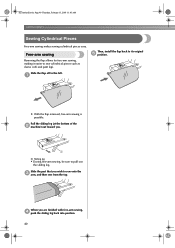
... X With the flap removed, free-arm sewing is possible. Then, install the flap back to sew onto the 3 arm, and then sew from the top. Pull the sliding leg (at the bottom of the 2 machine) out toward you are finished with free-arm sewing, 4 push the sliding leg back into position.... 40 S2_brotherE.book Page 40 Thursday, February 13, 2003 11:03 AM GETTING READY Sewing Cylindrical Pieces Free-arm sewing makes sewing cylindrical pieces easy. Slide the part that you wish to...
... X With the flap removed, free-arm sewing is possible. Then, install the flap back to sew onto the 3 arm, and then sew from the top. Pull the sliding leg (at the bottom of the 2 machine) out toward you are finished with free-arm sewing, 4 push the sliding leg back into position.... 40 S2_brotherE.book Page 40 Thursday, February 13, 2003 11:03 AM GETTING READY Sewing Cylindrical Pieces Free-arm sewing makes sewing cylindrical pieces easy. Slide the part that you wish to...

Users Manual - English
Page 48
... break, possibly resulting in operation, pay special attention to the needle location. Before operating the sewing machine, read the following precautions. CAUTION G While the machine is in injuries. In addition, keep your hands away from all moving parts such as the needle and balance wheel, otherwise injuries may occur. S2_brotherE.book Page 42 Thursday...
... break, possibly resulting in operation, pay special attention to the needle location. Before operating the sewing machine, read the following precautions. CAUTION G While the machine is in injuries. In addition, keep your hands away from all moving parts such as the needle and balance wheel, otherwise injuries may occur. S2_brotherE.book Page 42 Thursday...

Users Manual - English
Page 77
...holes can be attached. Select stitch 3 or . When sewing is finished, gently pull the gimp 6 thread to the thickness of the 4 gimp thread. With a seam ripper, cut the middle part of the 8 gimp thread remaining at the rear of the machine on stretch fabrics, use a gimp thread. S2_brotherE.book ...Page 71 Thursday, February 13, 2003 11:03 AM I Sewing buttonholes on stretch fabrics When sewing buttonholes on the base, to (to the ...
...holes can be attached. Select stitch 3 or . When sewing is finished, gently pull the gimp 6 thread to the thickness of the 4 gimp thread. With a seam ripper, cut the middle part of the 8 gimp thread remaining at the rear of the machine on stretch fabrics, use a gimp thread. S2_brotherE.book ...Page 71 Thursday, February 13, 2003 11:03 AM I Sewing buttonholes on stretch fabrics When sewing buttonholes on the base, to (to the ...
Users Manual - English
Page 107
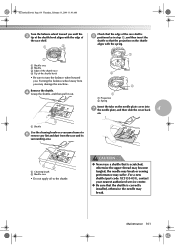
... is scratched, otherwise the upper thread may become tangled, the needle may break or sewing performance may suffer. CAUTION G Never use a shuttle that the shuttle is correctly installed, otherwise ...the needle may break. Maintenance 101 For a new shuttle (part code: XC3153-051), contact your nearest authorized service center. S2_brotherE.book Page 101 Thursday...Tip of the shuttle hook 2 • Be sure to turn the balance wheel toward you may damage the machine. 2 Remove the shuttle. 4 Grasp the shuttle, and then pull it out. 1 1 Projection 2 Spring...
... is scratched, otherwise the upper thread may become tangled, the needle may break or sewing performance may suffer. CAUTION G Never use a shuttle that the shuttle is correctly installed, otherwise ...the needle may break. Maintenance 101 For a new shuttle (part code: XC3153-051), contact your nearest authorized service center. S2_brotherE.book Page 101 Thursday...Tip of the shuttle hook 2 • Be sure to turn the balance wheel toward you may damage the machine. 2 Remove the shuttle. 4 Grasp the shuttle, and then pull it out. 1 1 Projection 2 Spring...


