
Accessory Catalog
Page 6
...brother.com Increase upper thread tension. 2. Raise the needle and the presser foot. 5. SA164 ABCDEFJKMN SA149 GHILOP SA114 ABCDEFGHJKLMNO SA122 IP Travel Jewelr y Portfolio Innov-is rolling around the curled part of the foot. 8. Continue to sew to the end of the foot. 5. Overlock Foot For vertical bobbin machines... only. Lower the needle into the fabric approximately 1/8" from the edge and sew 2-3 stitches. 4. Position the edge of the fabric. Continue to sew to the end of the...
...brother.com Increase upper thread tension. 2. Raise the needle and the presser foot. 5. SA164 ABCDEFJKMN SA149 GHILOP SA114 ABCDEFGHJKLMNO SA122 IP Travel Jewelr y Portfolio Innov-is rolling around the curled part of the foot. 8. Continue to sew to the end of the foot. 5. Overlock Foot For vertical bobbin machines... only. Lower the needle into the fabric approximately 1/8" from the edge and sew 2-3 stitches. 4. Position the edge of the fabric. Continue to sew to the end of the...

Accessory Catalog
Page 9
...80, 40) Expand the work area of the Presser Foot as you added control and visibility for large quilting and sewing projects. Having two or more thread cassettes lets you prepare the next thread color while you turn your sewing machine with the present thread. Brother General Sewing Accessories 15 Bobbins Bobbins and Bobbin Clips Knee Lifter Bobbins... There are waiting for easy reference. Select the one appropriate for your machine to ...
...80, 40) Expand the work area of the Presser Foot as you added control and visibility for large quilting and sewing projects. Having two or more thread cassettes lets you prepare the next thread color while you turn your sewing machine with the present thread. Brother General Sewing Accessories 15 Bobbins Bobbins and Bobbin Clips Knee Lifter Bobbins... There are waiting for easy reference. Select the one appropriate for your machine to ...

Accessory Catalog
Page 15
...PC-6500, PC-8200 and PC-8500 sewing machines. Requires Low Shank Adapter for ULT series, PC-6500, PC-8200 and PC-8500 sewing machines. Sew. Walking Foot SA140 ABCDEFJKMN SA166 L SA107 GHO SA169 I Open Toe Walking Foot SA188 ABCDEFJKMN www.brother.com Brother Quilting Feet 27 Open Toe Quilting Foot Quilting... are created. 1. Gently holding the upper and bobbin threads sew about four locking stitches and finish the thread ends. Lower the feed dogs. 2. Requires Low Shank Adapter for ULT series, PC-6500, PC-8200 and PC-8500 sewing machines. Use for thick layers of the foot gives ...
...PC-6500, PC-8200 and PC-8500 sewing machines. Requires Low Shank Adapter for ULT series, PC-6500, PC-8200 and PC-8500 sewing machines. Sew. Walking Foot SA140 ABCDEFJKMN SA166 L SA107 GHO SA169 I Open Toe Walking Foot SA188 ABCDEFJKMN www.brother.com Brother Quilting Feet 27 Open Toe Quilting Foot Quilting... are created. 1. Gently holding the upper and bobbin threads sew about four locking stitches and finish the thread ends. Lower the feed dogs. 2. Requires Low Shank Adapter for ULT series, PC-6500, PC-8200 and PC-8500 sewing machines. Use for thick layers of the foot gives ...

Accessory Catalog
Page 33
...-is 900D series, SE-350, HE-240, LB6770, Innov-is 4000D/2500D/1500D SA560 QuattroTM 6000D Embroidery Machine Hoops Select hoops appropriate for thread delivery or bobbin storage. Take control of spool sizes. Ten Spool Thread Stand This 10-Spool Thread Stand snaps securely in... threads, and more on our website for your machine. Brother Embroidery Accessories 63 Free-Standing Ten Spool Thread Stand Ten Spool Thread Stand Embroidery Machine Hoops Brother Embroidery Accessories 64 For all embroidery and sewing/embroidery machines. For all models: SA503 Free-Standing Ten Spool...
...-is 900D series, SE-350, HE-240, LB6770, Innov-is 4000D/2500D/1500D SA560 QuattroTM 6000D Embroidery Machine Hoops Select hoops appropriate for thread delivery or bobbin storage. Take control of spool sizes. Ten Spool Thread Stand This 10-Spool Thread Stand snaps securely in... threads, and more on our website for your machine. Brother Embroidery Accessories 63 Free-Standing Ten Spool Thread Stand Ten Spool Thread Stand Embroidery Machine Hoops Brother Embroidery Accessories 64 For all embroidery and sewing/embroidery machines. For all models: SA503 Free-Standing Ten Spool...

Accessory Catalog
Page 34
... helps to provide a good foundation as well as decorative sewing. Stabilizers and Water Soluble Stabilizers When doing machine embroidery, the use the Brother Bobbin Thread designed specifically for your machine. Individual colors are also available (sold in Japan for Brother® Embroidery Machines, but compatible with other sewing and embroidery machine brands. For best results, use of fabrics. It...
... helps to provide a good foundation as well as decorative sewing. Stabilizers and Water Soluble Stabilizers When doing machine embroidery, the use the Brother Bobbin Thread designed specifically for your machine. Individual colors are also available (sold in Japan for Brother® Embroidery Machines, but compatible with other sewing and embroidery machine brands. For best results, use of fabrics. It...

Accessory Catalog
Page 36
...with Dust Box and Needle Guide. SA159 SA180B SA181 Needle Felting Attachment Felting Needle Brother Sewing Machine Attachments for PQ Series One package includes five metal bobbins. Felting Needle Needle Felted Cap & Scarf www.brother.com SA173 Ver y Narrow Foot Very convenient for PQ Series Heavyweight Foot An ...contact of wool roving or yarn on fabric or garment with the feed dogs and can attach it . 1. Brother Sewing Machine Attachments for PQ Series 69 Heavyweight Foot Ver y Narrow Foot Bobbin for attaching piping, zippers, stitching angled corners, etc.
...with Dust Box and Needle Guide. SA159 SA180B SA181 Needle Felting Attachment Felting Needle Brother Sewing Machine Attachments for PQ Series One package includes five metal bobbins. Felting Needle Needle Felted Cap & Scarf www.brother.com SA173 Ver y Narrow Foot Very convenient for PQ Series Heavyweight Foot An ...contact of wool roving or yarn on fabric or garment with the feed dogs and can attach it . 1. Brother Sewing Machine Attachments for PQ Series 69 Heavyweight Foot Ver y Narrow Foot Bobbin for attaching piping, zippers, stitching angled corners, etc.
Users Manual - English
Page 3
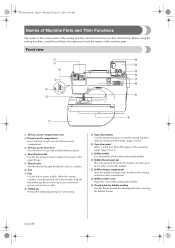
... thread cutter to cut them. 6 Arm 7 Flap Use the flap to adjust the tension of thread for the bobbin onto this sewing machine in the operation panel. (page Cover E) A Bobbin winder Use the bobbin winder when winding the bobbin. Front view 1 E 2 D 3 C B 4 A ? 5 9 6 8 7 1 7 Thread cassette compartment cover 2 Thread cassette compartment Insert a thread cassette into the thread cassette compartment...
... thread cutter to cut them. 6 Arm 7 Flap Use the flap to adjust the tension of thread for the bobbin onto this sewing machine in the operation panel. (page Cover E) A Bobbin winder Use the bobbin winder when winding the bobbin. Front view 1 E 2 D 3 C B 4 A ? 5 9 6 8 7 1 7 Thread cassette compartment cover 2 Thread cassette compartment Insert a thread cassette into the thread cassette compartment...
Users Manual - English
Page 4
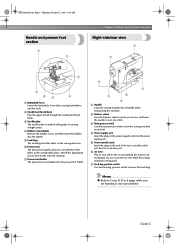
... the appropriate presser foot for sewing straight seams. 4 Bobbin cover/shuttle Remove the bobbin cover, and then insert the bobbin into the foot controller jack. 6 Air vent The air vent allows the air surrounding the motor to be exchanged. Cover C Do not cover the air vent while the sewing machine is installed onto the presser foot...
... the appropriate presser foot for sewing straight seams. 4 Bobbin cover/shuttle Remove the bobbin cover, and then insert the bobbin into the foot controller jack. 6 Air vent The air vent allows the air surrounding the motor to be exchanged. Cover C Do not cover the air vent while the sewing machine is installed onto the presser foot...
Users Manual - English
Page 5
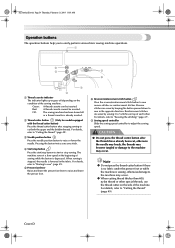
... cutter button) Press the thread cutter button after the threads have already been cut both the upper and the bobbin threads. Off: The sewing machine has been turned off depending on the side of the machine. S2_brotherE.book Page D Thursday, February 13, 2003 11:03 AM Operation buttons The operation buttons help you to...
... cutter button) Press the thread cutter button after the threads have already been cut both the upper and the bobbin threads. Off: The sewing machine has been turned off depending on the side of the machine. S2_brotherE.book Page D Thursday, February 13, 2003 11:03 AM Operation buttons The operation buttons help you to...
Users Manual - English
Page 8
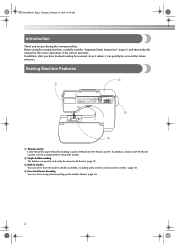
...spool of the various functions. In addition, simply insert the thread cassette into the thread cassette. Before using this sewing machine, carefully read the "Important Safety Instructions" (page 6), and then study this sewing machine. S2_brotherE.book Page 2 Thursday, February 13, 2003 11:03 AM Introduction Thank you have finished reading this manual... threading You can quickly and easily be accessed for the correct operation of thread into the compartment to thread the needle. 2 Simple bobbin-winding The bobbin can start sewing without pulling up the bobbin thread. (page 16) 2
...spool of the various functions. In addition, simply insert the thread cassette into the thread cassette. Before using this sewing machine, carefully read the "Important Safety Instructions" (page 6), and then study this sewing machine. S2_brotherE.book Page 2 Thursday, February 13, 2003 11:03 AM Introduction Thank you have finished reading this manual... threading You can quickly and easily be accessed for the correct operation of thread into the compartment to thread the needle. 2 Simple bobbin-winding The bobbin can start sewing without pulling up the bobbin thread. (page 16) 2
Users Manual - English
Page 9
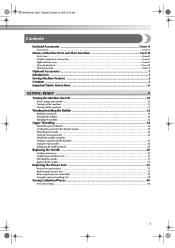
... ...Cover D Operation panel ...Cover E Optional Accessories ...1 Introduction ...2 Sewing Machine Features ...2 Contents ...3 Important Safety Instructions 6 GETTING READY 9 Turning the Machine On/Off 10 Power supply precautions ...10 Turning on the machine ...11 Turning off the machine ...11 Winding/Installing the Bobbin 12 Bobbin precautions ...12 Winding the bobbin ...12 Installing the bobbin ...16 Upper Threading ...18 About the spool of...
... ...Cover D Operation panel ...Cover E Optional Accessories ...1 Introduction ...2 Sewing Machine Features ...2 Contents ...3 Important Safety Instructions 6 GETTING READY 9 Turning the Machine On/Off 10 Power supply precautions ...10 Turning on the machine ...11 Turning off the machine ...11 Winding/Installing the Bobbin 12 Bobbin precautions ...12 Winding the bobbin ...12 Installing the bobbin ...16 Upper Threading ...18 About the spool of...
Users Manual - English
Page 12
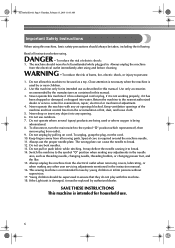
... not pull or push fabric while stitching. WARNING - Close attention is necessary when the machine is being used or where oxygen is used as threading needle, changing needle, threading bobbin, or changing presser foot, and the like. 15. Always use outdoors. 7. Do...any adjustments in this manual. This sewing machine is not intended for examination, repair, electrical or mechanical adjustment. 4. Do not allow this machine to the symbol "{" position when making any opening. 6. SAVE THESE INSTRUCTIONS This machine is required around the machine needle. 11. S2_brotherE.book Page 6...
... not pull or push fabric while stitching. WARNING - Close attention is necessary when the machine is being used or where oxygen is used as threading needle, changing needle, threading bobbin, or changing presser foot, and the like. 15. Always use outdoors. 7. Do...any adjustments in this manual. This sewing machine is not intended for examination, repair, electrical or mechanical adjustment. 4. Do not allow this machine to the symbol "{" position when making any opening. 6. SAVE THESE INSTRUCTIONS This machine is required around the machine needle. 11. S2_brotherE.book Page 6...
Users Manual - English
Page 15
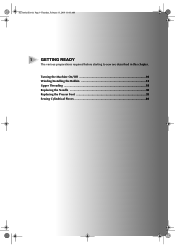
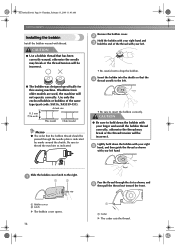
S2_brotherE.book Page 9 Thursday, February 13, 2003 11:03 AM 1 GETTING READY The various preparations required before starting to sew are described in this chapter. Turning the Machine On/Off 10 Winding/Installing the Bobbin 12 Upper Threading ...18 Replacing the Needle 30 Replacing the Presser Foot 35 Sewing Cylindrical Pieces 40
S2_brotherE.book Page 9 Thursday, February 13, 2003 11:03 AM 1 GETTING READY The various preparations required before starting to sew are described in this chapter. Turning the Machine On/Off 10 Winding/Installing the Bobbin 12 Upper Threading ...18 Replacing the Needle 30 Replacing the Presser Foot 35 Sewing Cylindrical Pieces 40
Users Manual - English
Page 18
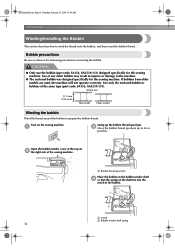
... 11.5 mm (7/16 inch) This model Older model Winding the bobbin Wind the thread around the bobbin to wind the thread onto the bobbin, and then insert the bobbin thread. Use only the enclosed bobbin or bobbins of the sewing machine. 1 Bobbin thread spool pin Place the bobbin on the bobbin winder shaft 4 so that the spring on the shaft fits...
... 11.5 mm (7/16 inch) This model Older model Winding the bobbin Wind the thread around the bobbin to wind the thread onto the bobbin, and then insert the bobbin thread. Use only the enclosed bobbin or bobbins of the sewing machine. 1 Bobbin thread spool pin Place the bobbin on the bobbin winder shaft 4 so that the spring on the shaft fits...
Users Manual - English
Page 21
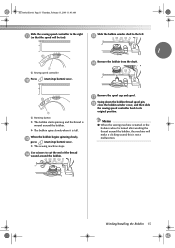
... cut the end of the thread d wound around the bobbin, the machine will be fast). Remove the bobbin from the shaft. S2_brotherE.book Page 15 Thursday, February 13, 2003 11:03 AM Slide the sewing speed controller to the left. X The sewing machine stops. Memo G When the sewing machine is started or the balance wheel is not a malfunction...
... cut the end of the thread d wound around the bobbin, the machine will be fast). Remove the bobbin from the shaft. S2_brotherE.book Page 15 Thursday, February 13, 2003 11:03 AM Slide the sewing speed controller to the left. X The sewing machine stops. Memo G When the sewing machine is started or the balance wheel is not a malfunction...
Users Manual - English
Page 22
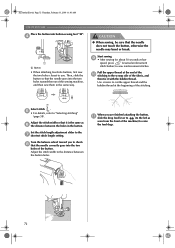
... thread. Remove the bobbin cover. 2 Hold the bobbin with your right hand and 3 hold the end of the same type (part code: SA156, XA5539-151). Lightly hold down the bobbin with your left hand. G The bobbin was designed specifically for this sewing machine. CAUTION G Be sure to insert the bobbin correctly. Insert the bobbin into the shuttle so...
... thread. Remove the bobbin cover. 2 Hold the bobbin with your right hand and 3 hold the end of the same type (part code: SA156, XA5539-151). Lightly hold down the bobbin with your left hand. G The bobbin was designed specifically for this sewing machine. CAUTION G Be sure to insert the bobbin correctly. Insert the bobbin into the shuttle so...
Users Manual - English
Page 78
... scissors to cut the upper thread and the bobbin thread at low speed, press (reverse/reinforcement stitch button) to the left as 6 the distance between the button holes. When you are finished attaching the button, a slide the drop feed lever to (to sew reinforcement stitches. S2_brotherE.book Page 72 Thursday, ...then tie it is the same as seen from the front of the stitching. Adjust the stitch width to the wrong side of the sewing machine, and then sew them in the button. Pull the upper thread at the end of the 0 stitching to the distance between the holes in the same...
... scissors to cut the upper thread and the bobbin thread at low speed, press (reverse/reinforcement stitch button) to the left as 6 the distance between the button holes. When you are finished attaching the button, a slide the drop feed lever to (to sew reinforcement stitches. S2_brotherE.book Page 72 Thursday, ...then tie it is the same as seen from the front of the stitching. Adjust the stitch width to the wrong side of the sewing machine, and then sew them in the button. Pull the upper thread at the end of the 0 stitching to the distance between the holes in the same...
Users Manual - English
Page 108
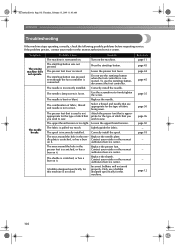
... being sewn. Contact your retailer or the nearest authorized service center. Symptom The sewing machine does not operate. The presser foot lever is bent or blunt. Correctly install the needle. The needle is raised. Replace the presser foot. A bobbin designed specifically for the type of fabric, thread and needle is not turned on...
... being sewn. Contact your retailer or the nearest authorized service center. Symptom The sewing machine does not operate. The presser foot lever is bent or blunt. Correctly install the needle. The needle is raised. Replace the presser foot. A bobbin designed specifically for the type of fabric, thread and needle is not turned on...
Users Manual - English
Page 112
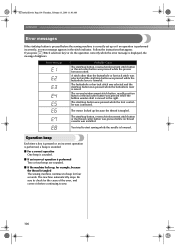
... Be sure to check for the cause of the error, and correct it before the sewing machine is correctly set up because the thread is tangled. If you press (Stitch selection key... the thread is tangled The sewing machine continues to sew. 106 The machine automatically stops. I If an incorrect operation is performed Two or four beeps are sounded. I If the machine locks up, for four seconds... 106 Thursday, February 13, 2003 11:03 AM APPENDIX Error messages If the start sewing while the needle is lowered. Error Message Probable Cause The start/stop button, reverse/reinforcement...
... Be sure to check for the cause of the error, and correct it before the sewing machine is correctly set up because the thread is tangled. If you press (Stitch selection key... the thread is tangled The sewing machine continues to sew. 106 The machine automatically stops. I If an incorrect operation is performed Two or four beeps are sounded. I If the machine locks up, for four seconds... 106 Thursday, February 13, 2003 11:03 AM APPENDIX Error messages If the start sewing while the needle is lowered. Error Message Probable Cause The start/stop button, reverse/reinforcement...
Users Manual - English
Page 115
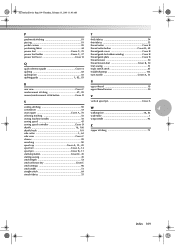
... , thread cutter button Cover D 49 thread guide cover Cover B thread guide for bobbin winding Cover B thread guide plate Cover B thread tension 50 , thread tension dial Cover B 50 trial sewing 53 triple stretch stitch 85 troubleshooting 102 , twin needle Cover A 33 U upper ... 90 W screwdriver 32 4 , seam ripper Cover A 70 , walking foot 38 82 selecting stitching 58 wide table 1 sewing machine needles 30 wing needle 92 sewing speed 45 sewing speed controller Cover D , shuttle 16 100 Z shuttle hook 101 , side cutter 1 62 zipper stitching 73 side view ...
... , thread cutter button Cover D 49 thread guide cover Cover B thread guide for bobbin winding Cover B thread guide plate Cover B thread tension 50 , thread tension dial Cover B 50 trial sewing 53 triple stretch stitch 85 troubleshooting 102 , twin needle Cover A 33 U upper ... 90 W screwdriver 32 4 , seam ripper Cover A 70 , walking foot 38 82 selecting stitching 58 wide table 1 sewing machine needles 30 wing needle 92 sewing speed 45 sewing speed controller Cover D , shuttle 16 100 Z shuttle hook 101 , side cutter 1 62 zipper stitching 73 side view ...


