Users Manual - English
Page 9
S2_brotherE.book Page 3 Thursday, February 13, 2003 11:03 AM Contents Enclosed Accessories Cover A Accessories ...Cover A Names of Machine Parts and Their Functions Cover B Front view ...Cover B Needle and presser foot section ...Cover C Right-side/rear view ...Cover C Operation buttons ...... Needle ...30 Needle precautions ...30 Needle types and their uses ...30 Checking the needle ...31 Replacing the needle ...32 Replacing the Presser Foot 35 Presser foot precautions ...35 Replacing the presser foot ...35 Removing the presser foot holder ...37 Using the optional walking foot ...38 Sewing ...
S2_brotherE.book Page 3 Thursday, February 13, 2003 11:03 AM Contents Enclosed Accessories Cover A Accessories ...Cover A Names of Machine Parts and Their Functions Cover B Front view ...Cover B Needle and presser foot section ...Cover C Right-side/rear view ...Cover C Operation buttons ...... Needle ...30 Needle precautions ...30 Needle types and their uses ...30 Checking the needle ...31 Replacing the needle ...32 Replacing the Presser Foot 35 Presser foot precautions ...35 Replacing the presser foot ...35 Removing the presser foot holder ...37 Using the optional walking foot ...38 Sewing ...
Users Manual - English
Page 12
... attention is necessary when the machine is used or where oxygen is damaged, it must be taken, including the following: Read all moving parts. Use this machine if it has a damaged cord or plug, if it is intended for its intended use outdoors. 7. Never operate this...fabric while stitching. Young children should never be used as contained in . Do not allow this machine, basic safety precautions should always be replaced by young children or infirm persons without supervision. 17. Special care is not intended for examination, repair, electrical or mechanical adjustment. 4. ...
... attention is necessary when the machine is used or where oxygen is damaged, it must be taken, including the following: Read all moving parts. Use this machine if it has a damaged cord or plug, if it is intended for its intended use outdoors. 7. Never operate this...fabric while stitching. Young children should never be used as contained in . Do not allow this machine, basic safety precautions should always be replaced by young children or infirm persons without supervision. 17. Special care is not intended for examination, repair, electrical or mechanical adjustment. 4. ...
Users Manual - English
Page 14
...up lever, needle, or other parts • A power failure ... the power switch and unplug the cord when: • Operation is completed • Replacing or removing the needle or any assemblies, the presser feet, needle, or other hot ...use or store the machine near a space heater, iron, halogen lamp, or other parts to inspect and adjust the machine yourself. If the problem persists, please consult your... and should never be used. 3. Always consult the operation manual when replacing or installing any other moving parts. 2. To fully enjoy all the features, we suggest that you study ...
...up lever, needle, or other parts • A power failure ... the power switch and unplug the cord when: • Operation is completed • Replacing or removing the needle or any assemblies, the presser feet, needle, or other hot ...use or store the machine near a space heater, iron, halogen lamp, or other parts to inspect and adjust the machine yourself. If the problem persists, please consult your... and should never be used. 3. Always consult the operation manual when replacing or installing any other moving parts. 2. To fully enjoy all the features, we suggest that you study ...
Users Manual - English
Page 32
Remove the needle. 1 • For details, refer to arrow 2, indicated on the thread cassette. Thread the thread cassette up to " Replacing the needle" (page 32). Use the two threads to " Stitch Settings" (page 96). CAUTION G Only use bent needles. Bent needles can easily break...the enclosed twin needle and the extra spool pin. Thread the thread cassette along arrows 3 through 9 in injuries. G Never use the twin needle (Part code : X59296-051). Both upper threads should have the same thickness and quality. S2_brotherE.book Page 26 Thursday, February 13, 2003 11:03 AM...
Remove the needle. 1 • For details, refer to arrow 2, indicated on the thread cassette. Thread the thread cassette up to " Replacing the needle" (page 32). Use the two threads to " Stitch Settings" (page 96). CAUTION G Only use bent needles. Bent needles can easily break...the enclosed twin needle and the extra spool pin. Thread the thread cassette along arrows 3 through 9 in injuries. G Never use the twin needle (Part code : X59296-051). Both upper threads should have the same thickness and quality. S2_brotherE.book Page 26 Thursday, February 13, 2003 11:03 AM...
Users Manual - English
Page 38
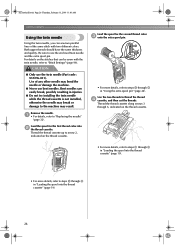
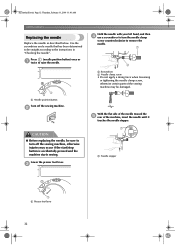
... clamp screw • Do not apply a strong force when loosening or tightening the needle clamp screw, otherwise certain parts of the machine, insert the needle until it touches the needle stopper. CAUTION G Before replacing the needle, be straight according to raise the needle. Press (needle position button) once or 1 twice to the...
... clamp screw • Do not apply a strong force when loosening or tightening the needle clamp screw, otherwise certain parts of the machine, insert the needle until it touches the needle stopper. CAUTION G Before replacing the needle, be straight according to raise the needle. Press (needle position button) once or 1 twice to the...

Users Manual - English
Page 77
...thread. Select stitch 3 or . Buttonhole Stitching 71 When sewing is finished, gently pull the gimp 6 thread to " Replacing the presser foot" (page 35). Hook the gimp thread onto the part of the buttonhole. Raise the presser foot lever, and then slide the 2 drop feed lever, located at the top end... of 1 buttonhole foot "A" shown in the 1 button to " Replacing the presser foot" (page 35). Lower the presser foot...
...thread. Select stitch 3 or . Buttonhole Stitching 71 When sewing is finished, gently pull the gimp 6 thread to " Replacing the presser foot" (page 35). Hook the gimp thread onto the part of the buttonhole. Raise the presser foot lever, and then slide the 2 drop feed lever, located at the top end... of 1 buttonhole foot "A" shown in the 1 button to " Replacing the presser foot" (page 35). Lower the presser foot...

