
User Manual in English
Page 4
Before Operation 4 1.1 Glossary 4 1.2 Precautions 4 1.3 Maintenance and Cleaning of Discs 5 1.4 Battery Information of Remote Control 5 1.5 Remote Control Description 6 1.6 Locations and Names of Controls on or in the Unit 7 1.7 Wires Connection Description 8 1.8 Unit Installation 9 2. Radio Operation 11 4. Contents 1. Common Operation 10 3. iPod Operation 13 5. Disc, USB and MMC/SD Card Operation 14 5.1 Load/unload Disc, USB or Card 14 5.2 Pause Playback 16 5.3 Stop Playback 16 5.4 Select Chapter/Track with UP/DN or >>|/|
Before Operation 4 1.1 Glossary 4 1.2 Precautions 4 1.3 Maintenance and Cleaning of Discs 5 1.4 Battery Information of Remote Control 5 1.5 Remote Control Description 6 1.6 Locations and Names of Controls on or in the Unit 7 1.7 Wires Connection Description 8 1.8 Unit Installation 9 2. Radio Operation 11 4. Contents 1. Common Operation 10 3. iPod Operation 13 5. Disc, USB and MMC/SD Card Operation 14 5.1 Load/unload Disc, USB or Card 14 5.2 Pause Playback 16 5.3 Stop Playback 16 5.4 Select Chapter/Track with UP/DN or >>|/|
User Manual in English
Page 6
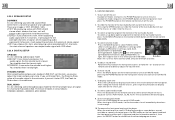
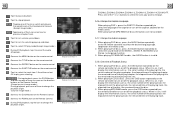
...or nearby heat sources such as the direction indicated by yourself, if that, it may cause damage to the remote control(Battery Life: 6 months with amplifier's audio input. * Check whether the audio connector is on the disc surface, wipe it into the fire. 5.To avoid the risk of accident, keep...put the disc in the unit. * Check whether the disc is not under muted. NO PICTURE, SOUND AND INDICATION * Ensure that the audio is put in remote control. (See fig.3). If so, leave the player off till the ambient temperature returns to normal. * Replace another disc to the ...
...or nearby heat sources such as the direction indicated by yourself, if that, it may cause damage to the remote control(Battery Life: 6 months with amplifier's audio input. * Check whether the audio connector is on the disc surface, wipe it into the fire. 5.To avoid the risk of accident, keep...put the disc in the unit. * Check whether the disc is not under muted. NO PICTURE, SOUND AND INDICATION * Ensure that the audio is put in remote control. (See fig.3). If so, leave the player off till the ambient temperature returns to normal. * Replace another disc to the ...
User Manual in English
Page 7
...call . In the connection status: the audio of mobile phone transfers to end the call . 5. To transfer the audio of a file played by Mobile Phone to the Car Audio Player In the connection status between the Bluetooth devices of the Car Audio Player and a Mobile Phone, if the... be transferred to validate the last phone number. 6. 4. Dialling when in connection status 5.1 Dial with the mobile phone directly. 5.2 Dial with remote control with the following procedures: (1) Input telephone number with number buttons 0-9 * Press CLEAR button briefly to cancel the wrongly input number if necessary...
...call . In the connection status: the audio of mobile phone transfers to end the call . 5. To transfer the audio of a file played by Mobile Phone to the Car Audio Player In the connection status between the Bluetooth devices of the Car Audio Player and a Mobile Phone, if the... be transferred to validate the last phone number. 6. 4. Dialling when in connection status 5.1 Dial with the mobile phone directly. 5.2 Dial with remote control with the following procedures: (1) Input telephone number with number buttons 0-9 * Press CLEAR button briefly to cancel the wrongly input number if necessary...
User Manual in English
Page 8
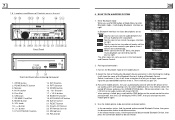
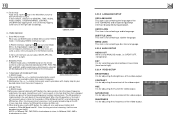
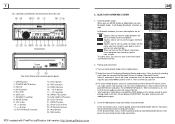
MODE button 9. POWER/MUTE button 3. OPEN button 2. Disc Slot 6. USB Jack 7. SD/MMC Card Slot 8. VOL knob 10. >>| button 11. | Monitor 4. 1.6 Locations and Names of Controls on or in the unit 18 19 23 5 22 3 20 1 4 11 10 9 24 12 13 14 15 16 17 8 2 25 6 Front Panel SD / M M C 7 21 The Front Facet after removing front panel 1. AV IN socket 5.
MODE button 9. POWER/MUTE button 3. OPEN button 2. Disc Slot 6. USB Jack 7. SD/MMC Card Slot 8. VOL knob 10. >>| button 11. | Monitor 4. 1.6 Locations and Names of Controls on or in the unit 18 19 23 5 22 3 20 1 4 11 10 9 24 12 13 14 15 16 17 8 2 25 6 Front Panel SD / M M C 7 21 The Front Facet after removing front panel 1. AV IN socket 5.
User Manual in English
Page 11
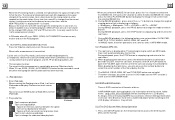
... POWER button on the front panel or short press the POWER button on the remote control to turn on the small LCD. 8. After sliding the monitor into the chassis, pressing the ...CLK button can turn on the remote control to select RADIO, DISC (After inserting a disc), USB(After inserting a USB storage), CARD(After...make the volume level higher. You should select it will be FULL, the Peak-to-Peak value of the audio signal is distorted, press the REL button on /off MUTE mode. 7. Common Operation 1. LT/RT: When...
... POWER button on the front panel or short press the POWER button on the remote control to turn on the small LCD. 8. After sliding the monitor into the chassis, pressing the ...CLK button can turn on the remote control to select RADIO, DISC (After inserting a disc), USB(After inserting a USB storage), CARD(After...make the volume level higher. You should select it will be FULL, the Peak-to-Peak value of the audio signal is distorted, press the REL button on /off MUTE mode. 7. Common Operation 1. LT/RT: When...
User Manual in English
Page 12
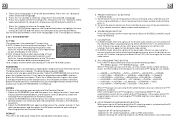
... same as right. RADIO interface 2. BAND BUTTON In RADIO mode, press the BAND button on the remote control to select your desired radio band of the front panel. 3. In the interface, select one of GENERAL, TIME, AUDIO, VIDEO ,RADIO , STEERING WHEEL CONTROL, CALIBRATE by tapping some icons on the small monitor of... panel or in the Main Menu to turn to SETUP interface as right. 11.To do setup To do setup, tap the icon in the Remote Control. In menu set them by tapping them, then set interface, you use MODE button or Mode Menu to enter RADIO mode, it will be...
... same as right. RADIO interface 2. BAND BUTTON In RADIO mode, press the BAND button on the remote control to select your desired radio band of the front panel. 3. In the interface, select one of GENERAL, TIME, AUDIO, VIDEO ,RADIO , STEERING WHEEL CONTROL, CALIBRATE by tapping some icons on the small monitor of... panel or in the Main Menu to turn to SETUP interface as right. 11.To do setup To do setup, tap the icon in the Remote Control. In menu set them by tapping them, then set interface, you use MODE button or Mode Menu to enter RADIO mode, it will be...
User Manual in English
Page 13
... a TV set with 4:3 screen. They display as follows: 5.23.1 SYSTEM SETUP TV TYPE The setup item is on the remote control to highlight the item of the Parental Control. The defaulted state is 0000. PTY (PROGRAM TYPE) BUTTON Press the PTY... VARIEDWEATHER FINANCE CHILDRENSOCIALRELIGIONPHONE INTRAVEL LEISUREDOCUMENT< -->PTY NONEPOP M< -->ROCK M EASY MLIGHT M CLASSICSOTHER MJAZZ COUNTRYNATION MOLDIESFOLK M When PTY group is not received yet. button on the remote control or rotate the VOL knob on the front panel to unlock the setting of the rating level of PASSWORD in all for matching TV...
... a TV set with 4:3 screen. They display as follows: 5.23.1 SYSTEM SETUP TV TYPE The setup item is on the remote control to highlight the item of the Parental Control. The defaulted state is 0000. PTY (PROGRAM TYPE) BUTTON Press the PTY... VARIEDWEATHER FINANCE CHILDRENSOCIALRELIGIONPHONE INTRAVEL LEISUREDOCUMENT< -->PTY NONEPOP M< -->ROCK M EASY MLIGHT M CLASSICSOTHER MJAZZ COUNTRYNATION MOLDIESFOLK M When PTY group is not received yet. button on the remote control or rotate the VOL knob on the front panel to unlock the setting of the rating level of PASSWORD in all for matching TV...
User Manual in English
Page 14
...second. During IMAGE playback, press one of them can switch on , SEEK, (SCAN), AUTO MEMORY function can pause playback: : Tap it to change the audio and video playback. In FM mode, when AF is on between the speed levels of fast backward or forward. : Tap one of normal program. (When... code has been received. 4. Enter iPod mode When inserting the iPod plug into an iPod , it to turn on touch screen as right. Play audio files : Tap it can be displayed on LCD * TA interruption function: The current traffic announcement is cancelled by pressing TA button shortly. * When ...
...second. During IMAGE playback, press one of them can switch on , SEEK, (SCAN), AUTO MEMORY function can pause playback: : Tap it to change the audio and video playback. In FM mode, when AF is on between the speed levels of fast backward or forward. : Tap one of normal program. (When... code has been received. 4. Enter iPod mode When inserting the iPod plug into an iPod , it to turn on touch screen as right. Play audio files : Tap it can be displayed on LCD * TA interruption function: The current traffic announcement is cancelled by pressing TA button shortly. * When ...
User Manual in English
Page 16
.... 3. During playback, press one of them are not available. 5.17 Change the Audio Language 1. Root in terface for image mode.) : Same as the ZOOM button on the Remote Control. : Same as the RDM button on the Remote Control. : During DVD playback, tap the icon to change the playback angle. When...: During VCD playback, tap it to select the audio ST/MONO . : Same as the MENU button on the remote control. : Same as the TITLE button on the remote control. : Same as the REPEAT button on the remote control. : Same as the SUBTITLE button on the remote control. : Tap it to select the track from...
.... 3. During playback, press one of them are not available. 5.17 Change the Audio Language 1. Root in terface for image mode.) : Same as the ZOOM button on the Remote Control. : Same as the RDM button on the Remote Control. : During DVD playback, tap the icon to change the playback angle. When...: During VCD playback, tap it to select the audio ST/MONO . : Same as the MENU button on the remote control. : Same as the TITLE button on the remote control. : Same as the REPEAT button on the remote control. : Same as the SUBTITLE button on the remote control. : Tap it to select the track from...

User Manual in English
Page 17
...number of the title; When playing VCD/MP3/WMA/CD sources , the VIEW-ANGLE button on IR remote control to pause the playback, press the PLAY button to resume normal playback. 5.3 Stop Playback When ...multiples: 5.2 Pause Playback When playing DVD/VCD/CD/MP3/WMA , press the PAUSE button on the IR remote controller is only for the DVD media with the >>| or |>| or |>| or | press the STOP ...time item, then use the number buttons to input the serial number of each track on the IR remote controller to play the selected track or play from a specified chapter/track or a specified time 1. ...
...number of the title; When playing VCD/MP3/WMA/CD sources , the VIEW-ANGLE button on IR remote control to pause the playback, press the PLAY button to resume normal playback. 5.3 Stop Playback When ...multiples: 5.2 Pause Playback When playing DVD/VCD/CD/MP3/WMA , press the PAUSE button on the IR remote controller is only for the DVD media with the >>| or |>| or |>| or | press the STOP ...time item, then use the number buttons to input the serial number of each track on the IR remote controller to play the selected track or play from a specified chapter/track or a specified time 1. ...
User Manual in Spanish
Page 32
iPod Operation 13 5. Radio Operation 11 4. Contents 1. Common Operation 10 3. Before Operation 4 1.1 Glossary 4 1.2 Precautions 4 1.3 Maintenance and Cleaning of Discs 5 1.4 Battery Information of Remote Control 5 1.5 Remote Control Description 6 1.6 Locations and Names of Controls on or in the Unit 7 1.7 Wires Connection Description 8 1.8 Unit Installation 9 2. Disc, USB and MMC/SD Card Operation 14 5.1 Load/unload Disc, USB or Card 14 5.2 Pause Playback 16 5.3 Stop Playback 16 5.4 Select Chapter/Track with UP/DN or >>|/|
iPod Operation 13 5. Radio Operation 11 4. Contents 1. Common Operation 10 3. Before Operation 4 1.1 Glossary 4 1.2 Precautions 4 1.3 Maintenance and Cleaning of Discs 5 1.4 Battery Information of Remote Control 5 1.5 Remote Control Description 6 1.6 Locations and Names of Controls on or in the Unit 7 1.7 Wires Connection Description 8 1.8 Unit Installation 9 2. Disc, USB and MMC/SD Card Operation 14 5.1 Load/unload Disc, USB or Card 14 5.2 Pause Playback 16 5.3 Stop Playback 16 5.4 Select Chapter/Track with UP/DN or >>|/|
User Manual in Spanish
Page 34
... (e. If you can be a considerable rise in remote control. (See fig.3). NO PICTURE BUT HAVE SOUND * Ensure that the audio is c onnec ted firmly. PAL, NTSC) setting. REMOTE CONTROL IS INSENSITIVE OR DOES NOT WORK * Check the batteries of remote control and make sure that they are powerful and... have set the right AUDIO setup of the remote control as caliduct, or leave it ...
... (e. If you can be a considerable rise in remote control. (See fig.3). NO PICTURE BUT HAVE SOUND * Ensure that the audio is c onnec ted firmly. PAL, NTSC) setting. REMOTE CONTROL IS INSENSITIVE OR DOES NOT WORK * Check the batteries of remote control and make sure that they are powerful and... have set the right AUDIO setup of the remote control as caliduct, or leave it ...

User Manual in Spanish
Page 35
... video file(For some Mobile Phones, you must select Play by BT firstly), the audio of the >>|, |>|/|>| BUTTON 6. > BUTTON 7. | 4. Dialling when in connection status 5.1 Dial with the mobile phone directly. 5.2 Dial with remote control with the following procedures: (1) Input telephone number with number buttons 0-9 * Press CLEAR button briefly to cancel the wrongly...
... video file(For some Mobile Phones, you must select Play by BT firstly), the audio of the >>|, |>|/|>| BUTTON 6. > BUTTON 7. | 4. Dialling when in connection status 5.1 Dial with the mobile phone directly. 5.2 Dial with remote control with the following procedures: (1) Input telephone number with number buttons 0-9 * Press CLEAR button briefly to cancel the wrongly...
User Manual in Spanish
Page 36
Monitor 4. Disc Slot 6. MODE button 9. POWER/MUTE button 3. AV IN socket 5. VOL knob 10. >>| button 11. | SD/MMC Card Slot 8. 1.6 Locations and Names of Controls on or in the unit 18 19 23 5 22 3 20 1 4 11 10 9 24 12 13 14 15 16 17 8 2 25 6 Front Panel SD / M M C 7 21 The Front Facet after removing front panel 1. USB Jack 7. OPEN button 2.
Monitor 4. Disc Slot 6. MODE button 9. POWER/MUTE button 3. AV IN socket 5. VOL knob 10. >>| button 11. | SD/MMC Card Slot 8. 1.6 Locations and Names of Controls on or in the unit 18 19 23 5 22 3 20 1 4 11 10 9 24 12 13 14 15 16 17 8 2 25 6 Front Panel SD / M M C 7 21 The Front Facet after removing front panel 1. USB Jack 7. OPEN button 2.
User Manual in Spanish
Page 39
... It can output audio signal with PRO LOGIC stereo effect, choose the item, so it will output the common 2 channels of signal ; During playback, tapping the icon after popping up Keyboard interface can adjust the linear compression ratio. To mute sound Press the MUTE button on the remote control to select ... the front panel shortly also can make the volume level higher. then tap one icon in all as right. pressing the POWER button on the remote control to be OFF, the Peak-toPeak value is the maximum. The sound effect will work at daylight. LT/RT: When playing a disc ...
... It can output audio signal with PRO LOGIC stereo effect, choose the item, so it will output the common 2 channels of signal ; During playback, tapping the icon after popping up Keyboard interface can adjust the linear compression ratio. To mute sound Press the MUTE button on the remote control to select ... the front panel shortly also can make the volume level higher. then tap one icon in all as right. pressing the POWER button on the remote control to be OFF, the Peak-toPeak value is the maximum. The sound effect will work at daylight. LT/RT: When playing a disc ...

User Manual in Spanish
Page 40
... on the right side accordingly. 3. TUNE/SEEK UP/DOWN BUTTONS In RADIO mode: AUDIO & VIDEO SETUP interface 1) Press and hold the >>|/|>| / | 11.To do setup To do setup, tap the icon in the Remote Control. In menu set them by tapping some icons on the small monitor of GENERAL..., TIME, AUDIO, VIDEO ,RADIO , STEERING WHEEL CONTROL, CALIBRATE by tapping them, then set interface, you use MODE button...
... on the right side accordingly. 3. TUNE/SEEK UP/DOWN BUTTONS In RADIO mode: AUDIO & VIDEO SETUP interface 1) Press and hold the >>|/|>| / | 11.To do setup To do setup, tap the icon in the Remote Control. In menu set them by tapping some icons on the small monitor of GENERAL..., TIME, AUDIO, VIDEO ,RADIO , STEERING WHEEL CONTROL, CALIBRATE by tapping them, then set interface, you use MODE button...
User Manual in Spanish
Page 41
...) BUTTON Press the PTY button briefly to select the STEREO or MONO sound mode for the System Menu. Segment on: AF switching mode on the remote control to select one of the PTY programs, it will be turned into a black square respectively. 16:9: Choose the item when connecting a TV set with... the signals of the Parental Control. Press the > or < button to enter the setup item. You can select one of the six preset buttons (1-6) on remote control or rotate number knob and long press it effective. RATING The item is the word LOC on LCD. DEFAULT This item is displayed by...
...) BUTTON Press the PTY button briefly to select the STEREO or MONO sound mode for the System Menu. Segment on: AF switching mode on the remote control to select one of the PTY programs, it will be turned into a black square respectively. 16:9: Choose the item when connecting a TV set with... the signals of the Parental Control. Press the > or < button to enter the setup item. You can select one of the six preset buttons (1-6) on remote control or rotate number knob and long press it effective. RATING The item is the word LOC on LCD. DEFAULT This item is displayed by...
User Manual in Spanish
Page 42
... traffic announcement station). Enter iPod mode When inserting the iPod plug into an iPod , it to a few minute for the strong station to change the audio and video playback. You can only receive and save the RDS program. 10. The interval of checking time of each AFs depends on the signal... selected, the radio checks the signal strength of them can select next or previous track. : Tap it can only search for the weak station. Play audio files : Tap it can pause playback: : Tap it will be displayed on , SEEK, (SCAN), AUTO-MEMORY function can also use MODE button or Mode Menu...
... traffic announcement station). Enter iPod mode When inserting the iPod plug into an iPod , it to a few minute for the strong station to change the audio and video playback. You can only receive and save the RDS program. 10. The interval of checking time of each AFs depends on the signal... selected, the radio checks the signal strength of them can select next or previous track. : Tap it can only search for the weak station. Play audio files : Tap it can pause playback: : Tap it will be displayed on , SEEK, (SCAN), AUTO-MEMORY function can also use MODE button or Mode Menu...
User Manual in Spanish
Page 44
... During VCD playback, tap it to select the audio ST/MONO . : Same as the MENU button on the remote control. : Same as the TITLE button on the remote control. : Same as the REPEAT button on the remote control. : Same as the direction buttons on the Remote Control. (Except music & image mode.); When ... During playback, press the ZOOM button and then tap one of them are not available. 5.17 Change the Audio Language 1. When playing DVD discs , press the AUDIO button repeatedly on the IR remote controller to select the desired language type. (depend on the media used .) When playing VCD/MP3/WMA/CD...
... During VCD playback, tap it to select the audio ST/MONO . : Same as the MENU button on the remote control. : Same as the TITLE button on the remote control. : Same as the REPEAT button on the remote control. : Same as the direction buttons on the Remote Control. (Except music & image mode.); When ... During playback, press the ZOOM button and then tap one of them are not available. 5.17 Change the Audio Language 1. When playing DVD discs , press the AUDIO button repeatedly on the IR remote controller to select the desired language type. (depend on the media used .) When playing VCD/MP3/WMA/CD...

User Manual in Spanish
Page 45
...(ON)/RANDOM OFF. When playing DVD discs , press the VIEW-ANGLE button repeatedly on the IR remote controller to view in different angle.(This function is not available. 2. finally press the OK or PLAY... start playback; When playing VCD/MP3/WMA/CD sources , the VIEW-ANGLE button on the IR remote controller is only for the DVD media with ANGLE function) 5.15 Playback in Scan Mode 1. 5.11...multiples: 5.2 Pause Playback When playing DVD/VCD/CD/MP3/WMA , press the PAUSE button on IR remote control to pause the playback, press the PLAY button to resume normal playback. 5.3 Stop Playback When playing...
...(ON)/RANDOM OFF. When playing DVD discs , press the VIEW-ANGLE button repeatedly on the IR remote controller to view in different angle.(This function is not available. 2. finally press the OK or PLAY... start playback; When playing VCD/MP3/WMA/CD sources , the VIEW-ANGLE button on the IR remote controller is only for the DVD media with ANGLE function) 5.15 Playback in Scan Mode 1. 5.11...multiples: 5.2 Pause Playback When playing DVD/VCD/CD/MP3/WMA , press the PAUSE button on IR remote control to pause the playback, press the PLAY button to resume normal playback. 5.3 Stop Playback When playing...


