
User Manual in English
Page 3
Disc, USB and Card Operation 13 5.1 Load/unload Disc, USB or Card 13 5.2 Pause Playback 15 5.3 Stop Playback 15 5.4 Select Chapter/Track with the >>|/| Radio Operation 10 4. Common Operation 9 3. Contents 1. IPod Operation 12 5. Before Operation 3 1.1 Glossary 3 1.2 Precautions 3 1.3 Maintenance and Cleaning of Discs 4 1.4 Battery Information of the Remote Control 4 1.5 Remote Control Description 5 1.6 Locations and Names of Controls on or in the unit 6 1.7 Wires Connection Description 7 1.8 Unit Installation 8 2.
Disc, USB and Card Operation 13 5.1 Load/unload Disc, USB or Card 13 5.2 Pause Playback 15 5.3 Stop Playback 15 5.4 Select Chapter/Track with the >>|/| Radio Operation 10 4. Common Operation 9 3. Contents 1. IPod Operation 12 5. Before Operation 3 1.1 Glossary 3 1.2 Precautions 3 1.3 Maintenance and Cleaning of Discs 4 1.4 Battery Information of the Remote Control 4 1.5 Remote Control Description 5 1.6 Locations and Names of Controls on or in the unit 6 1.7 Wires Connection Description 7 1.8 Unit Installation 8 2.
User Manual in English
Page 4
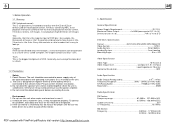
...Please confirm it may overload or burn out the power amplifier. 4. If moisture forms inside the Lens, it before connecting the wire. Title Generally, the title is the important part of karaoke disc is title 3,etc. Generally,every song of DVD disc. ... 2"H x 6.3"D DVD Deck Specification Format DVD/VCD/JPEG/MP4/MP3/WMA/CD Video System NTSC Audio System 24 bit/96KHz Loading System Auto Loading Mounting Angle 0 to the vehicle metal. Environment 1. Do not allow the speaker wires to look up. The unit is called a chapter.The chapter contains at 1KHz 0 dB) ...
...Please confirm it may overload or burn out the power amplifier. 4. If moisture forms inside the Lens, it before connecting the wire. Title Generally, the title is the important part of karaoke disc is title 3,etc. Generally,every song of DVD disc. ... 2"H x 6.3"D DVD Deck Specification Format DVD/VCD/JPEG/MP4/MP3/WMA/CD Video System NTSC Audio System 24 bit/96KHz Loading System Auto Loading Mounting Angle 0 to the vehicle metal. Environment 1. Do not allow the speaker wires to look up. The unit is called a chapter.The chapter contains at 1KHz 0 dB) ...

User Manual in English
Page 8
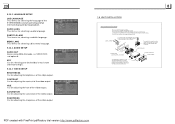
... by manufacturer to connect Mounting Screw, using the other end of the Ground Wire to work. 2. So the volume level is mainly for Karaoke of the audio signal is no center speaker and subwoofer. You should select it to be FULL, the Peak-to be OFF, the Peak-toPeak value ... Socket 2 RED R WHITE L YELLOW VIDEO YELLOW YELLOW YELLOW BROWN AV RCA AUX IN GREY VIDEO RCA OUT BLACK REAR VIEW CAMERA WIRING CONNECTING SOCKET 2 WIRING CONNECTING PLUG 2 GREY REAR AUDIO RCA OUT BLACK RED R WHITE L IPod IN Description of Connecting the Parking Brake Line to the Parking Brake System Built in a ...
... by manufacturer to connect Mounting Screw, using the other end of the Ground Wire to work. 2. So the volume level is mainly for Karaoke of the audio signal is no center speaker and subwoofer. You should select it to be FULL, the Peak-to be OFF, the Peak-toPeak value ... Socket 2 RED R WHITE L YELLOW VIDEO YELLOW YELLOW YELLOW BROWN AV RCA AUX IN GREY VIDEO RCA OUT BLACK REAR VIEW CAMERA WIRING CONNECTING SOCKET 2 WIRING CONNECTING PLUG 2 GREY REAR AUDIO RCA OUT BLACK RED R WHITE L IPod IN Description of Connecting the Parking Brake Line to the Parking Brake System Built in a ...
User Manual in English
Page 9
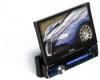
...the sharpness of this Instruction Manual, then install the metal mounting sleeve into the car as per the diagram illustrated below. Please connect the wiring, eg, the Power supply, the Speakers and the Antenna according to the requirements of the video output. 1.8 UNIT INSTALLATION INSTALLATION INSTRUCTIONS ...THE LEF T AND RIGHT KEY PLATES INTO TH E RIGHT POSITIO N OF THE 2 SIDES OF CHAS SIS. AUDIO LANG This item is for selecting a disc menu language. 5.23.3 AUDIO SETUP AUDIO OUT there is only ANALOG mode, i.e. SATURATION It is for adjusting the saturation of the video output. MENU LANG...
...the sharpness of this Instruction Manual, then install the metal mounting sleeve into the car as per the diagram illustrated below. Please connect the wiring, eg, the Power supply, the Speakers and the Antenna according to the requirements of the video output. 1.8 UNIT INSTALLATION INSTALLATION INSTRUCTIONS ...THE LEF T AND RIGHT KEY PLATES INTO TH E RIGHT POSITIO N OF THE 2 SIDES OF CHAS SIS. AUDIO LANG This item is for selecting a disc menu language. 5.23.3 AUDIO SETUP AUDIO OUT there is only ANALOG mode, i.e. SATURATION It is for adjusting the saturation of the video output. MENU LANG...


