
User Manual
Page 2
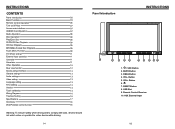
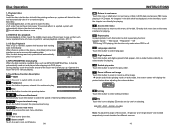
... Rear view function 12 Access setup interface 13 General setting 13 Audio setting 13 Video setting 13 Language setting 13 Time setting 13 Version 14 Touch calibration 14 Wiring Diagram 16 Trouble shooting 16 Specifications 17 Accessory 18 DVD Parental control function 18 Warning: To ensure safety while driving and to comply with laws, drivers should not watch video or operate the video device while driving. 01 Panel Introduction INSTRUCTIONS 10 9 1. / SRC Button 2. USB Slot 9. DBAS Button 4. Button 5. VOL- VOL+ Button 6. 7. AUX External Input 02 MUTE...
... Rear view function 12 Access setup interface 13 General setting 13 Audio setting 13 Video setting 13 Language setting 13 Time setting 13 Version 14 Touch calibration 14 Wiring Diagram 16 Trouble shooting 16 Specifications 17 Accessory 18 DVD Parental control function 18 Warning: To ensure safety while driving and to comply with laws, drivers should not watch video or operate the video device while driving. 01 Panel Introduction INSTRUCTIONS 10 9 1. / SRC Button 2. USB Slot 9. DBAS Button 4. Button 5. VOL- VOL+ Button 6. 7. AUX External Input 02 MUTE...
User Manual
Page 3
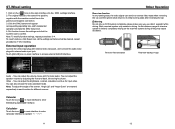
... rear) AUX To input external audio. Press this button to power off . 4. This could cause malfunctions. 9. BASE 12 13 11 11. Slot indicator light INSTRUCTIONS 03 04 VOL- BASIC FUNCTION 1. / SRC button If unit is able of receiving infrared signals launched by the remote control matching the unit. 10. MUTE button Press this button can turn off the sound output, re-press this button can eject the disc. 7. VOL+ button Press this button to shut off the TFT LCD display...
... rear) AUX To input external audio. Press this button to power off . 4. This could cause malfunctions. 9. BASE 12 13 11 11. Slot indicator light INSTRUCTIONS 03 04 VOL- BASIC FUNCTION 1. / SRC button If unit is able of receiving infrared signals launched by the remote control matching the unit. 10. MUTE button Press this button can turn off the sound output, re-press this button can eject the disc. 7. VOL+ button Press this button to shut off the TFT LCD display...
User Manual
Page 4
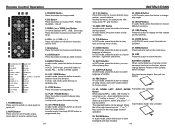
... left time. 16. SOURCE Button Press this button to change play . 05 INSTRUCTIONS 14. 0-10+ Button Press this button, you can help STOP button to choose songs. SEL Button Press this button to display all song menus, work with number button to programmed play angle. 24. In VCD、CD mode, press this button to randomly play repeatedly. 23. In audio mode, press this key to play . 11. ZOOM Button In DVD/VCD mode, press this button to resume volume...
... left time. 16. SOURCE Button Press this button to change play . 05 INSTRUCTIONS 14. 0-10+ Button Press this button, you can help STOP button to choose songs. SEL Button Press this button to display all song menus, work with number button to programmed play angle. 24. In VCD、CD mode, press this button to randomly play repeatedly. 23. In audio mode, press this key to play . 11. ZOOM Button In DVD/VCD mode, press this button to resume volume...
User Manual
Page 5
... When receiving stereo signals, click icon to the unit by a USB connecting cable. 2. After a station is selected. 7. In other modes, traffic announcement will automatically switch to turn the AF function on/off loudness function. 4. After the host starts, hold [ ] button for 3 seconds, the host will automatically fine-tune to other function icons so as to radio mode, after traffic information is a USB device/SD card connected, the unit can receive remote weak radio signals. Touch [SD...
... When receiving stereo signals, click icon to the unit by a USB connecting cable. 2. After a station is selected. 7. In other modes, traffic announcement will automatically switch to turn the AF function on/off loudness function. 4. After the host starts, hold [ ] button for 3 seconds, the host will automatically fine-tune to other function icons so as to radio mode, after traffic information is a USB device/SD card connected, the unit can receive remote weak radio signals. Touch [SD...
User Manual
Page 6
.... Disc Operation 1. Play/eject disc Play disc Insert the disc into pre stop status. CD Disc Playback TT 1/1 CH 1/48 x After a CD is off stereo. 09 INSTRUCTIONS Return to root menu Touch this icon, it shall return to pause, retouch it in /zoom out the image. Play/pause Touch the button to root menu of the disk. Touch Menu Function Description MUTE Touch this icon to display EQ mode one by one for playing. Digit keyboard Touch...
.... Disc Operation 1. Play/eject disc Play disc Insert the disc into pre stop status. CD Disc Playback TT 1/1 CH 1/48 x After a CD is off stereo. 09 INSTRUCTIONS Return to root menu Touch this icon, it shall return to pause, retouch it in /zoom out the image. Play/pause Touch the button to root menu of the disk. Touch Menu Function Description MUTE Touch this icon to display EQ mode one by one for playing. Digit keyboard Touch...
User Manual
Page 7
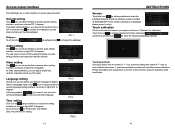
... settings and click the Confirm icon to the control line positive, negative with external audio input jack. You can also choose the video standard mode. Warning Do not rely on main interface to its initial running state, the video signal can adjust the volume, bass, pitch for resetting. Back rearview system only assists in main interface to enter calculator interface to operate 11 Other Operation Rear view function...
... settings and click the Confirm icon to the control line positive, negative with external audio input jack. You can also choose the video standard mode. Warning Do not rely on main interface to its initial running state, the video signal can adjust the volume, bass, pitch for resetting. Back rearview system only assists in main interface to enter calculator interface to operate 11 Other Operation Rear view function...
User Manual
Page 8
... the languagebar [ ] you can turn on or turn off the existing functions on audio setting interface and adjust the rearview volume. Time setting Click icon on setup interface to access time setting interface.as shown in right (PIC 3) diagram: At video setting interface, you need to set your favorite wallpaper Wallpaper Touch the icon[ PIC 1 ]in wallpaper bar[ ]to change the wallpaper. Touch the icon[ ]in setting interface to enter the...
... the languagebar [ ] you can turn on or turn off the existing functions on audio setting interface and adjust the rearview volume. Time setting Click icon on setup interface to access time setting interface.as shown in right (PIC 3) diagram: At video setting interface, you need to set your favorite wallpaper Wallpaper Touch the icon[ PIC 1 ]in wallpaper bar[ ]to change the wallpaper. Touch the icon[ ]in setting interface to enter the...
User Manual
Page 9
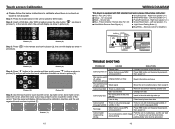
...display as show in picture (1). WIRING DIAGRAM This player is not accurate. Ground wire ● Blue - Right front speaker (+/-) ● Yellow - 12 V Constant ● Black - Picture ( 5 ) Picture ( 6 ) Step 5: Use the touch pen to DVD mode. Left rear speaker (+/-) ● Violet/White-Reverse Gear Signal (+) ● Light Green-Parking Brake (-) ●Blue/White - (Remote control for Amplifier) Picture ( 1 ) Picture ( 2 ) Step 3: Press " " in the remote as show in picture (3), the unit will enter the touch calibration interface as show in the unit to switch to touch...
...display as show in picture (1). WIRING DIAGRAM This player is not accurate. Ground wire ● Blue - Right front speaker (+/-) ● Yellow - 12 V Constant ● Black - Picture ( 5 ) Picture ( 6 ) Step 5: Use the touch pen to DVD mode. Left rear speaker (+/-) ● Violet/White-Reverse Gear Signal (+) ● Light Green-Parking Brake (-) ●Blue/White - (Remote control for Amplifier) Picture ( 1 ) Picture ( 2 ) Step 3: Press " " in the remote as show in picture (3), the unit will enter the touch calibration interface as show in the unit to switch to touch...
User Manual
Page 10
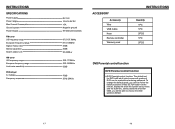
... show the system set up menu and the submenu, select password and enter 0000, you need to choose the DVD grade as default. 17 18 INSTRUCTIONS SPECIFICATIONS Power supply Power range Max Current Consumption Ground system Power Output FM tuner US frequency range European frequency range Signal / Noise ratio Stereo separation Search station volt AM tuner US frequency range European frequency range Limit noise sensitivity DVD player S / N Ratio Frequency...
... show the system set up menu and the submenu, select password and enter 0000, you need to choose the DVD grade as default. 17 18 INSTRUCTIONS SPECIFICATIONS Power supply Power range Max Current Consumption Ground system Power Output FM tuner US frequency range European frequency range Signal / Noise ratio Stereo separation Search station volt AM tuner US frequency range European frequency range Limit noise sensitivity DVD player S / N Ratio Frequency...


