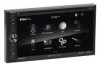
User Manual
Page 6
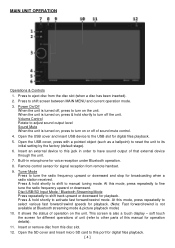
... have sound output of operation on or off , press to turn on , press & hold shortly to activate fast forward/rewind mode. Remote control sensor for signal reception from this manual for voice reception under Bluetooth operation. 8. When the unit is turned off of this disc slot. 12. Press to its initial setting by the factory (default stage). 6. Tuner Mode Press to select various fast forward/rewind speeds for digital files...
... have sound output of operation on or off , press to turn on , press & hold shortly to activate fast forward/rewind mode. Remote control sensor for signal reception from this manual for voice reception under Bluetooth operation. 8. When the unit is turned off of this disc slot. 12. Press to its initial setting by the factory (default stage). 6. Tuner Mode Press to select various fast forward/rewind speeds for digital files...
User Manual
Page 7
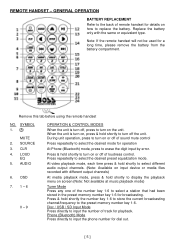
... to input the phone number for a long time, please remove the battery from the battery compartment. Note: If the remote handset will not be used for dial out. [ 5 ] AUDIO 6. OSD 7. 1 - 6 0 - 9 OPERATION & CONTROL MODES When the unit is turn on the unit. During unit operation, press to turn on or off of sound mute control Press repeatedly to select the desired mode for operation At Phone (Bluetooth) mode, press to select a station that had been stored in the preset memory number key...
... to input the phone number for a long time, please remove the battery from the battery compartment. Note: If the remote handset will not be used for dial out. [ 5 ] AUDIO 6. OSD 7. 1 - 6 0 - 9 OPERATION & CONTROL MODES When the unit is turn on the unit. During unit operation, press to turn on or off of sound mute control Press repeatedly to select the desired mode for operation At Phone (Bluetooth) mode, press to select a station that had been stored in the preset memory number key...
User Manual
Page 8
... a radio station received. At this mode, press repeatedly to activate fast forward/rewind mode. At music / photo playback mode under disc input and playback mode under other operation mode, press to shift current operation mode to shift page up and down , left-right mirror image. DVD Mode At DVD menu/title display mode, press to select the desired setting/setup and press ENT to confirm/enter. ▶ ◀ Folder / Playlist Menu Mode During folder/playlist menu display at...
... a radio station received. At this mode, press repeatedly to activate fast forward/rewind mode. At music / photo playback mode under disc input and playback mode under other operation mode, press to shift current operation mode to shift page up and down , left-right mirror image. DVD Mode At DVD menu/title display mode, press to select the desired setting/setup and press ENT to confirm/enter. ▶ ◀ Folder / Playlist Menu Mode During folder/playlist menu display at...
User Manual
Page 9
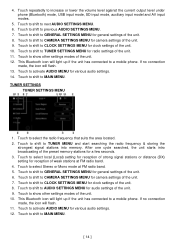
... appears on screen on distance setting) 20. SETUP During unit operation, press & hold shortly to select local setting for reception of strong signal stations and distance setting for various system setup. dial out after a while. 19. Remarks: Depends on the input devices & playback media files, operation may be operated by remote handset) 24. / PHONE Phone (Bluetooth) Mode During unit operation, press to shift to activate settings menu on media files recorded with this feature). 18. TITLE At DVD mode...
... appears on screen on distance setting) 20. SETUP During unit operation, press & hold shortly to select local setting for reception of strong signal stations and distance setting for various system setup. dial out after a while. 19. Remarks: Depends on the input devices & playback media files, operation may be operated by remote handset) 24. / PHONE Phone (Bluetooth) Mode During unit operation, press to shift to activate settings menu on media files recorded with this feature). 18. TITLE At DVD mode...
User Manual
Page 11
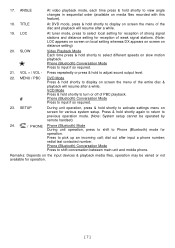
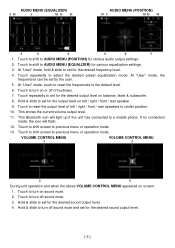
...1. VOLUME CONTROL MENU VOLUME CONTROL MENU During unit operation and when the above VOLUME CONTROL MENU appeared on sound mute. 2. At "User" mode, hold & slide to center position. 10. Touch to set for the desired sound output level. 4. Hold & slide to turn off sound mute. 3. Touch to shift screen to select the desired preset equalization mode. Touch repeatedly to previous menu or operation mode. If no connection made, the icon will light up if the unit has connected to AUDIO MENU (POSITION) for various equalization settings. 3. Touch to shift to a mobile phone. Touch...
...1. VOLUME CONTROL MENU VOLUME CONTROL MENU During unit operation and when the above VOLUME CONTROL MENU appeared on sound mute. 2. At "User" mode, hold & slide to center position. 10. Touch to set for the desired sound output level. 4. Hold & slide to turn off sound mute. 3. Touch to shift screen to select the desired preset equalization mode. Touch repeatedly to previous menu or operation mode. If no connection made, the icon will light up if the unit has connected to AUDIO MENU (POSITION) for various equalization settings. 3. Touch to shift to a mobile phone. Touch...
User Manual
Page 12
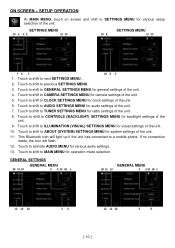
... MAIN MENU for radio settings of the unit. 9. Touch to shift to TUNER SETTINGS MENU for operation mode selection. Touch to shift to CLOCK SETTINGS MENU for various audio settings. 13. Touch to shift to activate AUDIO MENU for clock settings of the unit. 11. Touch to shift to previous SETTINGS MENU. 3. Touch to shift to ABOUT (SYSTEM) SETTINGS MENU for various setup selection of the unit. GENERAL SETTINGS GENERAL MENU GENERAL MENU [ 10 ] SETTINGS MENU SETTINGS MENU 1. Touch to shift to next SETTINGS MENU. 2. If no connection made, the icon will light...
... MAIN MENU for radio settings of the unit. 9. Touch to shift to TUNER SETTINGS MENU for operation mode selection. Touch to shift to CLOCK SETTINGS MENU for various audio settings. 13. Touch to shift to activate AUDIO MENU for clock settings of the unit. 11. Touch to shift to previous SETTINGS MENU. 3. Touch to shift to ABOUT (SYSTEM) SETTINGS MENU for various setup selection of the unit. GENERAL SETTINGS GENERAL MENU GENERAL MENU [ 10 ] SETTINGS MENU SETTINGS MENU 1. Touch to shift to next SETTINGS MENU. 2. If no connection made, the icon will light...
User Manual
Page 13
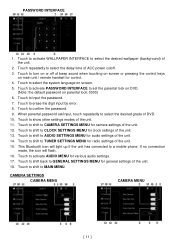
... error. 8. Touch to select the delay time of the unit. 15. When parental password set the parental lock on DVD. (Note: the default password on main unit / remote handset for control. 4. Touch to shift to TUNER SETTINGS MENU for camera settings of DVD. 10. Touch to shift to CAMERA SETTINGS MENU for radio settings of ACC power cutoff. 3. If no connection made, the icon will light up if the unit has connected to a mobile phone. Touch to activate AUDIO MENU for audio settings of the unit. 11. Touch to input...
... error. 8. Touch to select the delay time of the unit. 15. When parental password set the parental lock on DVD. (Note: the default password on main unit / remote handset for control. 4. Touch to shift to TUNER SETTINGS MENU for camera settings of DVD. 10. Touch to shift to CAMERA SETTINGS MENU for radio settings of ACC power cutoff. 3. If no connection made, the icon will light up if the unit has connected to a mobile phone. Touch to activate AUDIO MENU for audio settings of the unit. 11. Touch to input...
User Manual
Page 14
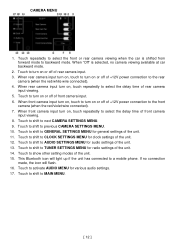
... rear camera input turn on, touch to turn on or off of rear camera input. 3. When front camera input turn on, touch to turn on or off of front camera input. 6. Touch to shift to previous CAMERA SETTINGS MENU. 10. Touch to shift to activate AUDIO MENU for radio settings of the unit. 13. Touch to CLOCK SETTINGS MENU for audio settings of the unit. 14. Touch to shift to backward mode. If no camera viewing available at car backward mode. 2. When rear camera input turn on , touch repeatedly to the rear camera (when the red/white wire connected). 4. Touch to turn...
... rear camera input turn on, touch to turn on or off of rear camera input. 3. When front camera input turn on, touch to turn on or off of front camera input. 6. Touch to shift to previous CAMERA SETTINGS MENU. 10. Touch to shift to activate AUDIO MENU for radio settings of the unit. 13. Touch to CLOCK SETTINGS MENU for audio settings of the unit. 14. Touch to shift to backward mode. If no camera viewing available at car backward mode. 2. When rear camera input turn on , touch repeatedly to the rear camera (when the red/white wire connected). 4. Touch to turn...
User Manual
Page 15
... unit. 7. Touch repeatedly to TUNER SETTINGS MENU for camera settings of clock. 4. When the internal amplifier has been turn on . 3. Touch to shift to increase or lower the volume level against the current output level under tuner mode, Bluetooth streaming mode and disc input modes. [ 13 ] Touch to shift to select 12 hour or 24 hour display format of the unit. 9. Touch to CAMERA SETTINGS MENU for radio settings of clock. 2. Touch repeatedly to turn off of clock. 3. Touch to adjust hour of internal amplifier output. CLOCK SETTINGS CLOCK MENU 1. Touch...
... unit. 7. Touch repeatedly to TUNER SETTINGS MENU for camera settings of clock. 4. When the internal amplifier has been turn on . 3. Touch to shift to increase or lower the volume level against the current output level under tuner mode, Bluetooth streaming mode and disc input modes. [ 13 ] Touch to shift to select 12 hour or 24 hour display format of the unit. 9. Touch to CAMERA SETTINGS MENU for radio settings of clock. 2. Touch repeatedly to turn off of clock. 3. Touch to adjust hour of internal amplifier output. CLOCK SETTINGS CLOCK MENU 1. Touch...
User Manual
Page 16
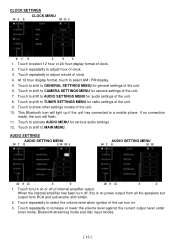
... to CLOCK SETTINGS MENU for clock settings of the unit. 9. This Bluetooth icon will flash. 11. Touch to shift to previous AUDIO SETTINGS MENU. 7. Touch repeatedly to GENERAL SETTINGS MENU for camera settings of the unit. 6. Touch to a mobile phone. Touch to shift to increase or lower the volume level against the current output level under phone (Bluetooth) mode, USB input mode, SD input mode, auxiliary input model and AV input modes. 5. If no connection made , the icon will light up if the unit has connected to activate AUDIO MENU for various audio settings...
... to CLOCK SETTINGS MENU for clock settings of the unit. 9. This Bluetooth icon will flash. 11. Touch to shift to previous AUDIO SETTINGS MENU. 7. Touch repeatedly to GENERAL SETTINGS MENU for camera settings of the unit. 6. Touch to a mobile phone. Touch to shift to increase or lower the volume level against the current output level under phone (Bluetooth) mode, USB input mode, SD input mode, auxiliary input model and AV input modes. 5. If no connection made , the icon will light up if the unit has connected to activate AUDIO MENU for various audio settings...
User Manual
Page 17
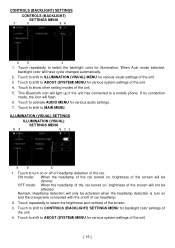
... to activate AUDIO MENU for illumination. Touch to shift to show other setting modes of the screen will flash. 6. CONTROLS (BACKLIGHT) SETTINGS CONTROLS (BACKLIGHT) SETTINGS MENU 1. Touch to CONTROLS (BACKLIGHT) SETTINGS MENU for various visual settings of car headlamp 2. When Auto mode selected, backlight color will light up if the unit has connected to ILLUMINATION (VISUAL) MENU for backlight color settings of the unit. 4. Touch to shift to turn on and the orange wire connected with the on , brightness of the unit. 5. ON mode: When...
... to activate AUDIO MENU for illumination. Touch to shift to show other setting modes of the screen will flash. 6. CONTROLS (BACKLIGHT) SETTINGS CONTROLS (BACKLIGHT) SETTINGS MENU 1. Touch to CONTROLS (BACKLIGHT) SETTINGS MENU for various visual settings of car headlamp 2. When Auto mode selected, backlight color will light up if the unit has connected to ILLUMINATION (VISUAL) MENU for backlight color settings of the unit. 4. Touch to shift to turn on and the orange wire connected with the on , brightness of the unit. 5. ON mode: When...
User Manual
Page 18
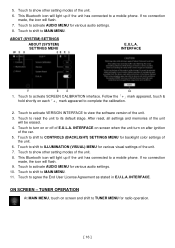
... setting modes of the unit. 6. INTERFACE. Touch to a mobile phone. If no connection made , the icon will flash. 7. This Bluetooth icon will be erased. 4. Touch to its default stage. Touch to activate VERSION INTERFACE to complete the calibration. 2. ON SCREEN - After reset, all settings and memories of the car. 5. TUNER OPERATION At MAIN MENU, touch on each「+」mark appeared to view the software version of the unit. 6. Touch to TUNER MENU for various visual settings...
... setting modes of the unit. 6. INTERFACE. Touch to a mobile phone. If no connection made , the icon will flash. 7. This Bluetooth icon will be erased. 4. Touch to its default stage. Touch to activate VERSION INTERFACE to complete the calibration. 2. ON SCREEN - After reset, all settings and memories of the car. 5. TUNER OPERATION At MAIN MENU, touch on each「+」mark appeared to view the software version of the unit. 6. Touch to TUNER MENU for various visual settings...
User Manual
Page 19
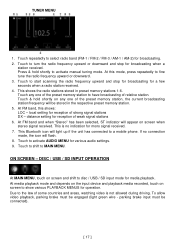
... seconds when a radio station received. 4. ON SCREEN - Touch to a mobile phone. parking brake input must be connected). [ 17 ] Touch repeatedly to have broadcasting of strong signal stations DX - This Bluetooth icon will appear on screen to the law of some countries and areas, watching video is no connection made, the icon will be stored in preset memory stations 1-6. Press & hold shortly on screen and shift to activate AUDIO MENU for media playback. local setting for mono signal received. 7. At...
... seconds when a radio station received. 4. ON SCREEN - Touch to a mobile phone. parking brake input must be connected). [ 17 ] Touch repeatedly to have broadcasting of strong signal stations DX - This Bluetooth icon will appear on screen to the law of some countries and areas, watching video is no connection made, the icon will be stored in preset memory stations 1-6. Press & hold shortly on screen and shift to activate AUDIO MENU for media playback. local setting for mono signal received. 7. At...
User Manual
Page 22
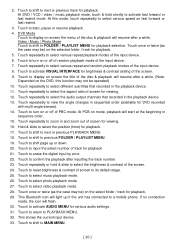
... input by error. 22. Hold & slide to a mobile phone. Touch to shift page up if the unit has connected to select the position (time) for playback. 29. Touch to PLAYBACK MENU. 32. At DVD / VCD / video / music playback mode, touch & hold & slide to turn on mode, playback will start , pause or resume playback. 4. Touch to select the brightness & contrast of screen for viewing. 12. Touch to shift to select music playback mode. 26. Touch...
... input by error. 22. Hold & slide to a mobile phone. Touch to shift page up if the unit has connected to select the position (time) for playback. 29. Touch to PLAYBACK MENU. 32. At DVD / VCD / video / music playback mode, touch & hold & slide to turn on mode, playback will start , pause or resume playback. 4. Touch to select the brightness & contrast of screen for viewing. 12. Touch to shift to select music playback mode. 26. Touch...

User Manual
Page 25
... unit. 36. Touch to input the contact name in order to show other setup modes. 7. Touch to pick up mobile phone after ignition of auto answer when an incoming call number when no phone number input. 31. Touch to activate PHONEBOOK SEARCH INTERFACE to dial out. 21. Touch to turn on connection. 5. Touch to shift to PHONE (DEVICE) MENU to dial out after changing the pin code. 16. Touch the desired contact to search for Bluetooth setup. 6. Touch...
... unit. 36. Touch to input the contact name in order to show other setup modes. 7. Touch to pick up mobile phone after ignition of auto answer when an incoming call number when no phone number input. 31. Touch to activate PHONEBOOK SEARCH INTERFACE to dial out. 21. Touch to turn on connection. 5. Touch to shift to PHONE (DEVICE) MENU to dial out after changing the pin code. 16. Touch the desired contact to search for Bluetooth setup. 6. Touch...
User Manual
Page 26
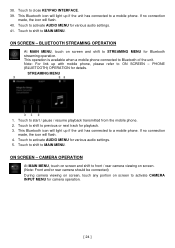
... track for various audio settings. 5. This Bluetooth icon will light up if the unit has connected to MAIN MENU. Touch to shift to activate AUDIO MENU for playback. 3. CAMERA OPERATION At MAIN MENU, touch on screen and shift to front / rear camera viewing on screen. (Note: Front and/or rear camera should be connected) During camera viewing on screen, touch any portion on screen and shift to activate CAMERA INPUT MENU for Bluetooth streaming operation. Touch to shift to a mobile phone. If no connection made , the icon...
... track for various audio settings. 5. This Bluetooth icon will light up if the unit has connected to MAIN MENU. Touch to shift to activate AUDIO MENU for playback. 3. CAMERA OPERATION At MAIN MENU, touch on screen and shift to front / rear camera viewing on screen. (Note: Front and/or rear camera should be connected) During camera viewing on screen, touch any portion on screen and shift to activate CAMERA INPUT MENU for Bluetooth streaming operation. Touch to shift to a mobile phone. If no connection made , the icon...
User Manual
Page 27
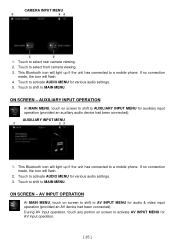
...MENU. AUXILIARY INPUT OPERATION At MAIN MENU, touch on screen to shift to AV INPUT MENU for audio & video input operation (provided an AV device had been connected). If no connection made , the icon will light up if the unit has connected to activate AUDIO MENU for various audio settings. 3. ON SCREEN - Touch to a mobile phone. This Bluetooth icon will flash. 4. AV INPUT OPERATION At MAIN MENU, touch on screen to shift to activate AUDIO MENU for various audio settings. 5. Touch to shift to select front camera viewing. 3. Touch to AUXILIARY INPUT MENU for AV input...
...MENU. AUXILIARY INPUT OPERATION At MAIN MENU, touch on screen to shift to AV INPUT MENU for audio & video input operation (provided an AV device had been connected). If no connection made , the icon will light up if the unit has connected to activate AUDIO MENU for various audio settings. 3. ON SCREEN - Touch to a mobile phone. This Bluetooth icon will flash. 4. AV INPUT OPERATION At MAIN MENU, touch on screen to shift to activate AUDIO MENU for various audio settings. 5. Touch to shift to select front camera viewing. 3. Touch to AUXILIARY INPUT MENU for AV input...
User Manual
Page 28
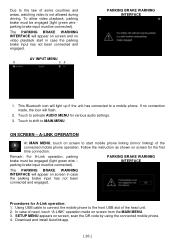
... OPERATION At MAIN MENU, touch on screen to MAIN MENU. parking brake input must be engaged (light green wire - Using USB cable to connect the mobile phone to activate AUDIO MENU for various audio settings. 3. AV INPUT MENU PARKING BRAKE WARNING INTERFACE 1. Remark: For A-Link operation, parking brake must be connected). Download and install Autolink app. [ 26 ] Touch to the front USB slot of need, touch "A-LINK" operation mode on screen in case the parking brake input has not been connected and engaged. Due to a mobile phone. This Bluetooth icon will appear on screen...
... OPERATION At MAIN MENU, touch on screen to MAIN MENU. parking brake input must be engaged (light green wire - Using USB cable to connect the mobile phone to activate AUDIO MENU for various audio settings. 3. AV INPUT MENU PARKING BRAKE WARNING INTERFACE 1. Remark: For A-Link operation, parking brake must be connected). Download and install Autolink app. [ 26 ] Touch to the front USB slot of need, touch "A-LINK" operation mode on screen in case the parking brake input has not been connected and engaged. Due to a mobile phone. This Bluetooth icon will appear on screen...
User Manual
Page 29
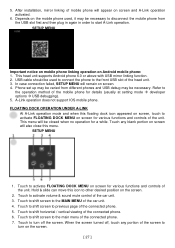
... setting mode developer options USB debugging). 5. In case connection failed, SETUP MENU will appear on screen. 4. A-Link operation does not support IOS mobile phone. FLOATING DOCK OPERATION UNDER A-LINK At A-Link operation mode and when this floating dock icon appeared on screen, touch to activate volume & sound mute control of mobile phone will remain on screen and A-Link operation activated. 6. Touch to activate FLOATING DOCK MENU on Android mobile phone: 1. Touch to shift screen to shift horizontal / vertical viewing of the car unit. 4. Touch to the MAIN MENU...
... setting mode developer options USB debugging). 5. In case connection failed, SETUP MENU will appear on screen. 4. A-Link operation does not support IOS mobile phone. FLOATING DOCK OPERATION UNDER A-LINK At A-Link operation mode and when this floating dock icon appeared on screen, touch to activate volume & sound mute control of mobile phone will remain on screen and A-Link operation activated. 6. Touch to activate FLOATING DOCK MENU on Android mobile phone: 1. Touch to shift screen to shift horizontal / vertical viewing of the car unit. 4. Touch to the MAIN MENU...
User Manual
Page 31
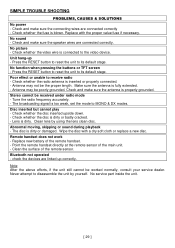
... MONO & DX modes. Make sure the antenna is connected to its default stage. Clean lens by yourself. The disc is dirty or badly cracked. - Press the RESET button to reset the unit to the video device. No function when pressing the buttons or TFT screen - Check whether the disc is dirty or damaged. Bluetooth not operated - Check whether the fuse is blown. Press the RESET button to reset the unit to receive radio - Note...
... MONO & DX modes. Make sure the antenna is connected to its default stage. Clean lens by yourself. The disc is dirty or badly cracked. - Press the RESET button to reset the unit to the video device. No function when pressing the buttons or TFT screen - Check whether the disc is dirty or damaged. Bluetooth not operated - Check whether the fuse is blown. Press the RESET button to reset the unit to receive radio - Note...


