User Manual
Page 2
Content Accessories ...02 Unit Installation...03 Wire Connection...03 Parking Brake Connection ...04 Speaker connection...05 Button Description...06 Remote Control...07 Main Menu...10 Radio Operation...10 DVD Operation...11 USB /SD Operation...12 Settings Operation ...12 Aux in Operation ...15 Notes of Disc...16 Troubleshooting ...17 General Specification...19 To ensure safety while driving and to comply with laws, drivers should not watch video or operate the video device while driving. 01
Content Accessories ...02 Unit Installation...03 Wire Connection...03 Parking Brake Connection ...04 Speaker connection...05 Button Description...06 Remote Control...07 Main Menu...10 Radio Operation...10 DVD Operation...11 USB /SD Operation...12 Settings Operation ...12 Aux in Operation ...15 Notes of Disc...16 Troubleshooting ...17 General Specification...19 To ensure safety while driving and to comply with laws, drivers should not watch video or operate the video device while driving. 01
User Manual
Page 3
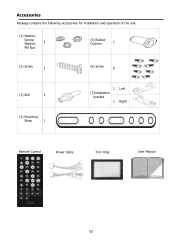
Accessories Package contains the following accessories for installation and operation of the unit. (1) Washer, Spring Washer, 1 M5 Nut (5) Rubber Cushion 1 (2) Screw 1 (6) Screw 8 (3) Bolt 1 (4) Mounting Strap 1 1 (7)installation bracket 1 Left Right Remote Control Power Cable Trim Ring User Manual 02
Accessories Package contains the following accessories for installation and operation of the unit. (1) Washer, Spring Washer, 1 M5 Nut (5) Rubber Cushion 1 (2) Screw 1 (6) Screw 8 (3) Bolt 1 (4) Mounting Strap 1 1 (7)installation bracket 1 Left Right Remote Control Power Cable Trim Ring User Manual 02
User Manual
Page 4
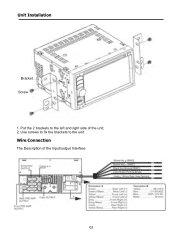
Use screws to fix the brackets to the left and right side of the Input/output Interface 2 1 03 Put the 2 brackets to the unit. Wire Connection The Description of the unit; 2. Unit Installation Bracket Screw 1.
Use screws to fix the brackets to the left and right side of the Input/output Interface 2 1 03 Put the 2 brackets to the unit. Wire Connection The Description of the unit; 2. Unit Installation Bracket Screw 1.
User Manual
Page 5
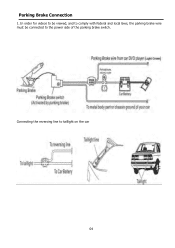
Connecting the reversing line to the power side of the parking brake switch. Parking Brake Connection 1. In order for videos to be viewed, and to comply with federal and local laws, the parking brake wire must be connected to taillight on the car 04
Connecting the reversing line to the power side of the parking brake switch. Parking Brake Connection 1. In order for videos to be viewed, and to comply with federal and local laws, the parking brake wire must be connected to taillight on the car 04
User Manual
Page 6
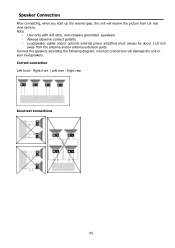
Loudspeaker cables and/or optional external power amplifiers must always be about 11.8 inch away from car rear view camera. Right front | Left rear - Speaker Connection After connecting, when you start up the reverse gear, the unit will damage the unit or your loudspeakers. Right rear Incorrect connections 05 Connect the speakers according the following diagram, incorrect connections will receive the picture from the antenna and/or antenna extension parts. Use only with 4-8 ohm, non-chassis grounded speakers - Always...
Loudspeaker cables and/or optional external power amplifiers must always be about 11.8 inch away from car rear view camera. Right front | Left rear - Speaker Connection After connecting, when you start up the reverse gear, the unit will damage the unit or your loudspeakers. Right rear Incorrect connections 05 Connect the speakers according the following diagram, incorrect connections will receive the picture from the antenna and/or antenna extension parts. Use only with 4-8 ohm, non-chassis grounded speakers - Always...
User Manual
Page 7
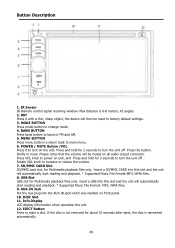
... power on all audio output connector. insert a USB into this slot and the unit will be reset to turn on front panel. 10. IR Sensor IR Remote control signal receiving window. BAND BUTTON Press band button to change mode. 4. briefly to mute .Please notes that the volume will automatically start reading and playback. * Supported Music File Format: MP3, WMA files. 9. DISC Slot 11. MODE BUTTON Press mode button to band of FM and AM. 5. AUX-IN Jack Put the Aux plug...
... power on all audio output connector. insert a USB into this slot and the unit will be reset to turn on front panel. 10. IR Sensor IR Remote control signal receiving window. BAND BUTTON Press band button to change mode. 4. briefly to mute .Please notes that the volume will automatically start reading and playback. * Supported Music File Format: MP3, WMA files. 9. DISC Slot 11. MODE BUTTON Press mode button to band of FM and AM. 5. AUX-IN Jack Put the Aux plug...
User Manual
Page 8
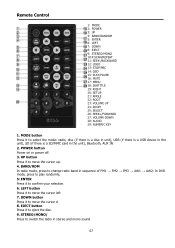
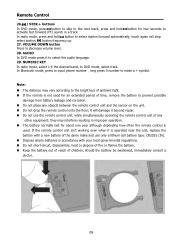
... a disc in unit), USB (if there is a USB device in the unit), SD (if there is a SD/MMC card in the unit), Bluetooth, AUX IN 2. LEFT button Press it to eject the disc. 9. Remote Control 1: MODE 2: POWER 3: UP 4: BAND/RANDOM 5: ENTER 6: LEFT 7: DOWN 8: EJECT 9: STEREO/MONO 10:P.SCAN/REPEAT 11: SEEK-/BACKWARD 12: LOUD 13: STOP/PBC 14: OSD 15: PLAY/PAUSE 16: MUTE 17: MENU 18: SUBTITLE 19: RIGHT 20: SETUP...
... a disc in unit), USB (if there is a USB device in the unit), SD (if there is a SD/MMC card in the unit), Bluetooth, AUX IN 2. LEFT button Press it to eject the disc. 9. Remote Control 1: MODE 2: POWER 3: UP 4: BAND/RANDOM 5: ENTER 6: LEFT 7: DOWN 8: EJECT 9: STEREO/MONO 10:P.SCAN/REPEAT 11: SEEK-/BACKWARD 12: LOUD 13: STOP/PBC 14: OSD 15: PLAY/PAUSE 16: MUTE 17: MENU 18: SUBTITLE 19: RIGHT 20: SETUP...

User Manual
Page 9
... menu, in a track. SUBTITLE button Press it to activate fast reverse (REW) search in DVD mode, long press it repeatedly to save the stations with a recorded DVD file or DVD disc has this function). 22. LOUD Press to select loudness on each memory stations for two seconds to select the subtitle language (Available only if the disc with title menu). 18. Remote Control 10. AS (Auto Save), long press to change the viewing...
... menu, in a track. SUBTITLE button Press it to activate fast reverse (REW) search in DVD mode, long press it repeatedly to save the stations with a recorded DVD file or DVD disc has this function). 22. LOUD Press to select loudness on each memory stations for two seconds to select the subtitle language (Available only if the disc with title menu). 18. Remote Control 10. AS (Auto Save), long press to change the viewing...
User Manual
Page 10
... Bluetooth mode, press to input phone number,long press 0 number to make and use the remote control unit, while simultaneously operating the remote control unit of any objects between the remote control unit and the sensor on the unit. Do not drop the remote control onto the floor; they may vary according to the brightness of ambient light. If the remote is not used . In radio mode, press and hold button for two seconds to activate...
... Bluetooth mode, press to input phone number,long press 0 number to make and use the remote control unit, while simultaneously operating the remote control unit of any objects between the remote control unit and the sensor on the unit. Do not drop the remote control onto the floor; they may vary according to the brightness of ambient light. If the remote is not used . In radio mode, press and hold button for two seconds to activate...
User Manual
Page 11
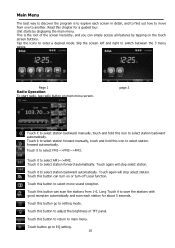
Page 1 Radio Operation To start radio, tap radio button on the touch screen buttons. Touch it to select station forward manually, touch and hold this icon to enter a desired mode. Touch again will stop select station. Touch this button can simply access all features by displaying the main menu. Touch it to setting mode. Touch this button to select station. Touch this button to return to switch between the 3 menu pages. Touch this button to select FM1->FM2->FM3. Slip the screen left...
Page 1 Radio Operation To start radio, tap radio button on the touch screen buttons. Touch it to select station forward manually, touch and hold this icon to enter a desired mode. Touch again will stop select station. Touch this button can simply access all features by displaying the main menu. Touch it to setting mode. Touch this button to select station. Touch this button to return to switch between the 3 menu pages. Touch this button to select FM1->FM2->FM3. Slip the screen left...
User Manual
Page 12
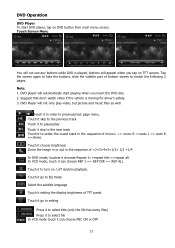
... to setting Press it to select title (only the file has many files) Press it to enter to turn on / off random playback. DVD Operation DVD Player To start playing when you tap on DVD button from main menu screen. DVD Player will automatically start DVD player, tap on TFT screen. Touch it skip to the previous track Touch it to pause/play video, but picture and music files as well. Touch it go to switch the...
... to setting Press it to select title (only the file has many files) Press it to enter to turn on / off random playback. DVD Operation DVD Player To start playing when you tap on DVD button from main menu screen. DVD Player will automatically start DVD player, tap on TFT screen. Touch it skip to the previous track Touch it to pause/play video, but picture and music files as well. Touch it go to switch the...
User Manual
Page 13
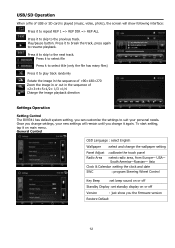
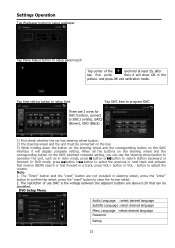
... to the previous track. Once you change settings, your personal needs. USB/SD Operation When a file of ×2×3×4×5×1/2× 1/3 ×1/4 Change the image playback direction Settings Operation Setting Control The BV9341 has default system setting, you the firmware version Restore Default 12 Play/pause button. Press it to break the track, press again to play track randomly Rotate the image in the sequence of ×...
... to the previous track. Once you change settings, your personal needs. USB/SD Operation When a file of ×2×3×4×5×1/2× 1/3 ×1/4 Change the image playback direction Settings Operation Setting Control The BV9341 has default system setting, you the firmware version Restore Default 12 Play/pause button. Press it to break the track, press again to play track randomly Rotate the image in the sequence of ×...
User Manual
Page 14
... the "reset" button to clear the former select. 2. DVD Setup Menu Audio Language : select desired language Subtitle Language :select desired language Menu Language :select desired language Password Rating 13 Tap time setting button to setup time Tap SWC item to program SWC There are above 0.2V that can use SWC is the voltage between the adjacent buttons are 3 wires for SWC function, connect to SWC1 (white), SWC2 (Brown), GND (Black) 1) First...
... the "reset" button to clear the former select. 2. DVD Setup Menu Audio Language : select desired language Subtitle Language :select desired language Menu Language :select desired language Password Rating 13 Tap time setting button to setup time Tap SWC item to program SWC There are above 0.2V that can use SWC is the voltage between the adjacent buttons are 3 wires for SWC function, connect to SWC1 (white), SWC2 (Brown), GND (Black) 1) First...
User Manual
Page 15
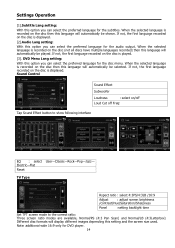
... language will display different images depending this setting and the screen size used. When the selected language is recorded on the disc is recorded on /off Loud Cut off Freq: Tap Sound Effect button to the correct ratio: Three screen ratio modes are available, Normal/PS (4:3 Pan Scan) and Normal/LB (4:3Letterbox) Different disc formats will automatically be shown. Electric-Flat Reset TV...
... language will display different images depending this setting and the screen size used. When the selected language is recorded on the disc is recorded on /off Loud Cut off Freq: Tap Sound Effect button to the correct ratio: Three screen ratio modes are available, Normal/PS (4:3 Pan Scan) and Normal/LB (4:3Letterbox) Different disc formats will automatically be shown. Electric-Flat Reset TV...
User Manual
Page 16
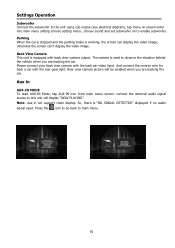
... view camera with back view camera output. connect the external audio signal source to this unit will be back to be enabled when you are backing the car. Settings Operation Subwoofer Connect the subwoofer to the unit using sub output (see electrical diagram), tap menu on screen enter into main menu setting choose setting menu., choose sound and set subwoofer on to observe the situation behind the vehicle when you are backing the car. Aux in not support video display. Note: Aux-in AUX-IN MODE To start AUX-IN Mode...
... view camera with back view camera output. connect the external audio signal source to this unit will be back to be enabled when you are backing the car. Settings Operation Subwoofer Connect the subwoofer to the unit using sub output (see electrical diagram), tap menu on screen enter into main menu setting choose setting menu., choose sound and set subwoofer on to observe the situation behind the vehicle when you are backing the car. Aux in not support video display. Note: Aux-in AUX-IN MODE To start AUX-IN Mode...
User Manual
Page 17
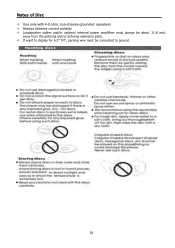
Notes of Disc Use only with 4-8 ohm, non-chassis grounded speakers Always observe correct polarity Loudspeaker cables and/or optional external power amplifiers must be about 11.8 inch. away from the antenna and/or antenna extension parts. If want to display for 6.2" TFT, parking wire must always be connected to ground. 16
Notes of Disc Use only with 4-8 ohm, non-chassis grounded speakers Always observe correct polarity Loudspeaker cables and/or optional external power amplifiers must be about 11.8 inch. away from the antenna and/or antenna extension parts. If want to display for 6.2" TFT, parking wire must always be connected to ground. 16
User Manual
Page 18
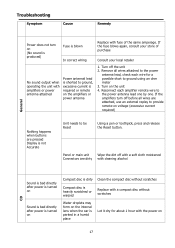
... moistened Connectors are pressed Display is not Accurate Unit needs to ground, excessive current is required or remote on the amplifiers or power antenna Replace with the power on the unit 4. If the amplifiers turn on (No sound is produced) Fuse is blown In correct wiring No sound output when operating the unit with amplifiers or power antenna attached Power antennal lead is parked in a humid place Replace with a compact disc without scratches Compact disc is...
... moistened Connectors are pressed Display is not Accurate Unit needs to ground, excessive current is required or remote on the amplifiers or power antenna Replace with the power on the unit 4. If the amplifiers turn on (No sound is produced) Fuse is blown In correct wiring No sound output when operating the unit with amplifiers or power antenna attached Power antennal lead is parked in a humid place Replace with a compact disc without scratches Compact disc is...

User Manual
Page 19
... Press the power button for about 10 seconds to reset the unit Sound skips The installation angle is more than 30 degrees Adjust the installation angle to less than 30 degrees The disc is extremely dirty Clean the compact disc/try to play a new or defective one The radio does not work, the radio station automatic selection does not work The antenna cable is not connected the signals are too...
... Press the power button for about 10 seconds to reset the unit Sound skips The installation angle is more than 30 degrees Adjust the installation angle to less than 30 degrees The disc is extremely dirty Clean the compact disc/try to play a new or defective one The radio does not work, the radio station automatic selection does not work The antenna cable is not connected the signals are too...
User Manual
Page 20
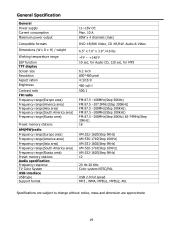
.... 19 for Audio CD, 120 sec. General Specification General Power supply Current consumption Maximum power output Compatible formats Dimensions (W x D x H) / weight Working temperature range ESP function TFT display Screen size Resolution Aspect ration Brightness Contrast ratio FM radio Frequency range(Europe area) Frequency range(America area) Frequency range(Asia area) Frequency range(South America area) Frequency range(Russia area) Preset memory stations AM(MW)radio Frequency range(Europe...
.... 19 for Audio CD, 120 sec. General Specification General Power supply Current consumption Maximum power output Compatible formats Dimensions (W x D x H) / weight Working temperature range ESP function TFT display Screen size Resolution Aspect ration Brightness Contrast ratio FM radio Frequency range(Europe area) Frequency range(America area) Frequency range(Asia area) Frequency range(South America area) Frequency range(Russia area) Preset memory stations AM(MW)radio Frequency range(Europe...


