
User Manual
Page 3
... Safety Information 3 Disc Note 4 Installation 5 Electric Connection 9 Remote Control 10 Basic Operation 13 Main Menu Operation 13 Setting animation 13 Setting disc 13 Setting radio 14 Setting wallpaper 14 Version about 14 Setting time 15 Setting audio mode 15 Setting video mode 15 Setting...21 Selecting Play Mode 21 On-Screen Display Function 22 Digital Video Special Function........24 Multi-Subtitle Language function....... 24 Multi-audio language Function.......... 24 Multi-angle Function 24 Title menu function 24 A-B Repeat function 25 Program function 25 Step function ...
... Safety Information 3 Disc Note 4 Installation 5 Electric Connection 9 Remote Control 10 Basic Operation 13 Main Menu Operation 13 Setting animation 13 Setting disc 13 Setting radio 14 Setting wallpaper 14 Version about 14 Setting time 15 Setting audio mode 15 Setting video mode 15 Setting...21 Selecting Play Mode 21 On-Screen Display Function 22 Digital Video Special Function........24 Multi-Subtitle Language function....... 24 Multi-audio language Function.......... 24 Multi-angle Function 24 Title menu function 24 A-B Repeat function 25 Program function 25 Step function ...

User Manual
Page 4
ON INSTALLATION DO NOT install any receiver while manipulating the steering wheel, as this may result in locations where; - The picture...on the unit as this may be clear . The driver must not watch the monitor while driving. Precaution THANK YOU FOR PURCHASING A BOSS AUDIO MULTIMEDIA PLAYER . To avoid injury or accident , read this manual thoroughly and keep it may obstruct the steering wheel and gearshift lever ... in a traffic accident. - The monitor is not engaged." Before operating the unit, read the following precautions before installing and operating the unit .
ON INSTALLATION DO NOT install any receiver while manipulating the steering wheel, as this may result in locations where; - The picture...on the unit as this may be clear . The driver must not watch the monitor while driving. Precaution THANK YOU FOR PURCHASING A BOSS AUDIO MULTIMEDIA PLAYER . To avoid injury or accident , read this manual thoroughly and keep it may obstruct the steering wheel and gearshift lever ... in a traffic accident. - The monitor is not engaged." Before operating the unit, read the following precautions before installing and operating the unit .

User Manual
Page 7
... panel . -5- Use only the parts included with the normal driving function of the driver. 2. For details, refer to release the front panel . 2. Installation NOTES: 1. Choose the mounting location where the unit will not interfere with the unit to dust, dirt or excessive vibration. 7. The use of unauthorized parts...cannot injure the passenger if there is all connected up properly and the unit and the system work properly. 3. Removing the unit 1. Avoid installing the unit where it would be subject to high temperature, such as from direct sunlight, or from hot air, from the heater, or ...
... panel . -5- Use only the parts included with the normal driving function of the driver. 2. For details, refer to release the front panel . 2. Installation NOTES: 1. Choose the mounting location where the unit will not interfere with the unit to dust, dirt or excessive vibration. 7. The use of unauthorized parts...cannot injure the passenger if there is all connected up properly and the unit and the system work properly. 3. Removing the unit 1. Avoid installing the unit where it would be subject to high temperature, such as from direct sunlight, or from hot air, from the heater, or ...

User Manual
Page 8
Installation 3. Remove the PLASTIC COVER of the unit as shown in figure until they click . Insert the two KEY PLAT into the grooves at both sides of the both sides away PLASTIC COVER 4. Installation the unit HEX NUT SPRING WASHER PLAIN WASHER TAPPING SCREW DASH BOARD METAL MOUNTING STRAP CONSOLE SLIDE BRACKET HOUSING HEX BOLT -6- KEY PLATE 5. Pulling the levers makes it possible to remove the unit from the dashboard .
Installation 3. Remove the PLASTIC COVER of the unit as shown in figure until they click . Insert the two KEY PLAT into the grooves at both sides of the both sides away PLASTIC COVER 4. Installation the unit HEX NUT SPRING WASHER PLAIN WASHER TAPPING SCREW DASH BOARD METAL MOUNTING STRAP CONSOLE SLIDE BRACKET HOUSING HEX BOLT -6- KEY PLATE 5. Pulling the levers makes it possible to remove the unit from the dashboard .
User Manual
Page 9
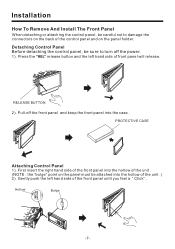
... Remove And Install The Front Panel When detaching or attaching the control panel, be careful not to turn off the front panel and keep the front panel into ...
... Remove And Install The Front Panel When detaching or attaching the control panel, be careful not to turn off the front panel and keep the front panel into ...
User Manual
Page 10
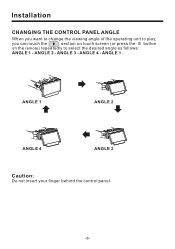
ANGLE 4 - ANGLE 1 . ANGLE 1 ANGLE 2 ANGLE 4 ANGLE 3 Caution: Do not insert your finger behind the control panel. -8- Installation CHANGING THE CONTROL PANEL ANGLE When you want to change the viewing angle of the operating unit to play, you can touch the section on touch screen (or press the button on the remote) repeatedly to select the desired angle as follows: ANGLE 1 - ANGLE 2 - ANGLE 3 -
ANGLE 4 - ANGLE 1 . ANGLE 1 ANGLE 2 ANGLE 4 ANGLE 3 Caution: Do not insert your finger behind the control panel. -8- Installation CHANGING THE CONTROL PANEL ANGLE When you want to change the viewing angle of the operating unit to play, you can touch the section on touch screen (or press the button on the remote) repeatedly to select the desired angle as follows: ANGLE 1 - ANGLE 2 - ANGLE 3 -

User Manual
Page 17
...when all wiring is to 20 when you change automatically. Basic Operation TREBLE: -7 to select OSD language. VIDEO SETUP RESET button is auto- Initial installation of the rear view is placed on the housing and must be activated for "NTSC/PAL " . -15- B. LANGUAGE Touch to +7 Adjust treble... level . CALIBRATION EQ: touch to select audio mode as follow: Touch the arrow as :OFF -> LOW -> MID -> HIGH Reset Factory Settings FADER/BALANCE: BALANCE: R 0-10 to 20 Adjust the ...
...when all wiring is to 20 when you change automatically. Basic Operation TREBLE: -7 to select OSD language. VIDEO SETUP RESET button is auto- Initial installation of the rear view is placed on the housing and must be activated for "NTSC/PAL " . -15- B. LANGUAGE Touch to +7 Adjust treble... level . CALIBRATION EQ: touch to select audio mode as follow: Touch the arrow as :OFF -> LOW -> MID -> HIGH Reset Factory Settings FADER/BALANCE: BALANCE: R 0-10 to 20 Adjust the ...


