

User Manual in English
Page 3
BV7280 OWNER'S MANUAL Mobile Audio/Video System y PLL Synthesizer Stereo Radio y Automatic Memory Storing y RBDS Operation y Full Detachable Panel y Preset Equalization y Memory Card Interface y USB Interface y AV IN interface on the front panel y Remote Control 1
BV7280 OWNER'S MANUAL Mobile Audio/Video System y PLL Synthesizer Stereo Radio y Automatic Memory Storing y RBDS Operation y Full Detachable Panel y Preset Equalization y Memory Card Interface y USB Interface y AV IN interface on the front panel y Remote Control 1
User Manual in English
Page 4
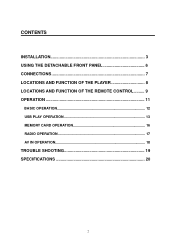
CONTENTS INSTALLATION 3 USING THE DETACHABLE FRONT PANEL 6 CONNECTIONS 7 LOCATIONS AND FUNCTION OF THE PLAYER 8 LOCATIONS AND FUNCTION OF THE REMOTE CONTROL ......... 9 OPERATION 11 BASIC OPERATION 12 USB PLAY OPERATION 13 MEMORY CARD OPERATION 16 RADIO OPERATION 17 AV IN OPERATION 18 TROUBLE SHOOTING 19 SPECIFICATIONS 20 2
CONTENTS INSTALLATION 3 USING THE DETACHABLE FRONT PANEL 6 CONNECTIONS 7 LOCATIONS AND FUNCTION OF THE PLAYER 8 LOCATIONS AND FUNCTION OF THE REMOTE CONTROL ......... 9 OPERATION 11 BASIC OPERATION 12 USB PLAY OPERATION 13 MEMORY CARD OPERATION 16 RADIO OPERATION 17 AV IN OPERATION 18 TROUBLE SHOOTING 19 SPECIFICATIONS 20 2

User Manual in English
Page 6
... unit in place. INSTALLATION (1) Dashboard (2) Tabs 7. Make sure the ignition is a Nissan, T oyota, follow these mounting instructions. Press the release but ton to the factory radio mounting brackets supplied with your vehicle is turned of the unit.
... unit in place. INSTALLATION (1) Dashboard (2) Tabs 7. Make sure the ignition is a Nissan, T oyota, follow these mounting instructions. Press the release but ton to the factory radio mounting brackets supplied with your vehicle is turned of the unit.

User Manual in English
Page 7
Align the screw holes on the bracket with the screw holes on the unit, and then tighten the screws (5x5mm) on each side. INSTALLATION Factory Radio Mounting Bracket Screw Side View showing Screw Holes marked T, N or S Screw Dashboard or Console To fasten the unit to the factory radio mounting brackets. Note: The outer trim ring, sleev e and the metal strap are not used for method B installation. 5
Align the screw holes on the bracket with the screw holes on the unit, and then tighten the screws (5x5mm) on each side. INSTALLATION Factory Radio Mounting Bracket Screw Side View showing Screw Holes marked T, N or S Screw Dashboard or Console To fasten the unit to the factory radio mounting brackets. Note: The outer trim ring, sleev e and the metal strap are not used for method B installation. 5
User Manual in English
Page 12
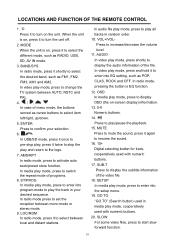
ENTER Press to confirm your desired sequence. In radio mode press to set the reception between AUTO, NSTC and PAL. 4. / , / In case of menu mode, the buttons served as POP, CLAS, ROCK and OFF. In audio file play mode, press to play mode, press shortly to select item left/right, up/down. 5. ...In radio mode, pressing the button is on, press it again to the logo. 7. SUB-T Press to increase/decrease...
ENTER Press to confirm your desired sequence. In radio mode press to set the reception between AUTO, NSTC and PAL. 4. / , / In case of menu mode, the buttons served as POP, CLAS, ROCK and OFF. In audio file play mode, press to play mode, press shortly to select item left/right, up/down. 5. ...In radio mode, pressing the button is on, press it again to the logo. 7. SUB-T Press to increase/decrease...
User Manual in English
Page 13
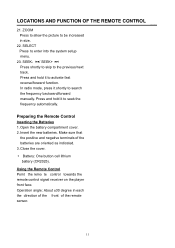
... button cell lithium battery (CR2025). Operation angle: About ±30 degree in size. 22. Press and hold it to activate fast reverse/forward function. In radio mode, press it shortly to the previous/next track. Open the battery compartment cover. 2. Using the Remote Control Point the remo te control towards the...
... button cell lithium battery (CR2025). Operation angle: About ±30 degree in size. 22. Press and hold it to activate fast reverse/forward function. In radio mode, press it shortly to the previous/next track. Open the battery compartment cover. 2. Using the Remote Control Point the remo te control towards the...
User Manual in English
Page 15
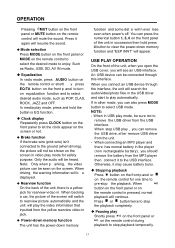
.... NOTE: - When connecting an MP3 player and there has normal battery in other mode, you connect an USB device through this interface. Only the audio will mute the sound. Press or button twice to pre-stop the playback completely. ◆ Pausing play automatically. Otherwise, it again will n ever... anel or on the remote control for safety purpose. You can also press MODE button to select desired audio mode, such as Radio, USB, SD, AV IN mode. ◆ Equalization In radio mode, press AUDIO button on the remote control or shortl y press EQ/TA button on the front p anel to turn...
.... NOTE: - When connecting an MP3 player and there has normal battery in other mode, you connect an USB device through this interface. Only the audio will mute the sound. Press or button twice to pre-stop the playback completely. ◆ Pausing play automatically. Otherwise, it again will n ever... anel or on the remote control for safety purpose. You can also press MODE button to select desired audio mode, such as Radio, USB, SD, AV IN mode. ◆ Equalization In radio mode, press AUDIO button on the remote control or shortl y press EQ/TA button on the front p anel to turn...
User Manual in English
Page 19
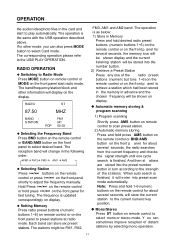
...the audio/video/photo files in the card and start radio mode. Each band can sometimes improve reception of distant stations by selecting mono operation. 17 The band/frequency/station/clock and other mode, you can also press MODE button to adjust the frequency manually. RADIO ... automatically. The corresponding operation please refer to select desired band. The operation is updated correspondingly on display. ◆ Setting Memory Press radio preset buttons (numeric buttons 1~6) on remote control or on the display. The stations might be stored into the number button. 2) ...
...the audio/video/photo files in the card and start radio mode. Each band can sometimes improve reception of distant stations by selecting mono operation. 17 The band/frequency/station/clock and other mode, you can also press MODE button to adjust the frequency manually. RADIO ... automatically. The corresponding operation please refer to select desired band. The operation is updated correspondingly on display. ◆ Setting Memory Press radio preset buttons (numeric buttons 1~6) on remote control or on the display. The stations might be stored into the number button. 2) ...
User Manual in English
Page 20
... station, the unit will s earch Traffic Announcement automatically. Use VOL+/- If corresponding PTY information is not existed any more, PTY engaging is selected, the radio st arts to start the station search. AV IN OPERATION On the front panel of the unit or SELECT button on the remote control, then... for reception of strong station, and a distant setting for reception of f. When TA on, the unit will change the items, when you connected the audio/video device from the jack, press MODE button on the remote control or MODE on the front panel to select between local and distant stations...
... station, the unit will s earch Traffic Announcement automatically. Use VOL+/- If corresponding PTY information is not existed any more, PTY engaging is selected, the radio st arts to start the station search. AV IN OPERATION On the front panel of the unit or SELECT button on the remote control, then... for reception of strong station, and a distant setting for reception of f. When TA on, the unit will change the items, when you connected the audio/video device from the jack, press MODE button on the remote control or MODE on the front panel to select between local and distant stations...
User Manual in English
Page 21
... is not pressed yet although the optional unit has been connected to factory defaults. TROUBLE SHOOTING If it appears that something simple has been overlooked. Radio reception is poor. ¾ The car antenna is not extended. „ Pull the antenna out all the way. ¾ The antenna control wire is faulty...
... is not pressed yet although the optional unit has been connected to factory defaults. TROUBLE SHOOTING If it appears that something simple has been overlooked. Radio reception is poor. ¾ The car antenna is not extended. „ Pull the antenna out all the way. ¾ The antenna control wire is faulty...
User Manual in English
Page 22
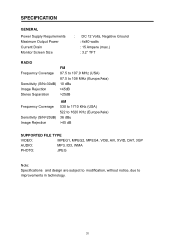
...GENERAL Power Supply Requirements Maximum Output Power Current Drain Monitor Screen Size : DC 12 Volts, Negative Ground : 4x80 watts : 15 Ampere (max.) : 3.2" TFT RADIO Frequency Coverage Sensitivity (S/N=30dB) Image Rejection Stereo Separation FM 87.5 to 107.9 MHz (USA) 87.5 to 108 MHz (Europe/Asia) 10 dBu >45dB >...USA) 522 to 1620 KHz (Europe/Asia) 36 dBu >45 dB SUPPORTED FILE TYPE VIDEO: MPEG1, MPEG2, MPEG4, VOB, AVI, XVID, DAT, 3GP AUDIO: MP3, ID3, WMA PHOTO: JPEG Note: Specifications and design are subject to modification, without notice, due to improvements in technology. 20
...GENERAL Power Supply Requirements Maximum Output Power Current Drain Monitor Screen Size : DC 12 Volts, Negative Ground : 4x80 watts : 15 Ampere (max.) : 3.2" TFT RADIO Frequency Coverage Sensitivity (S/N=30dB) Image Rejection Stereo Separation FM 87.5 to 107.9 MHz (USA) 87.5 to 108 MHz (Europe/Asia) 10 dBu >45dB >...USA) 522 to 1620 KHz (Europe/Asia) 36 dBu >45 dB SUPPORTED FILE TYPE VIDEO: MPEG1, MPEG2, MPEG4, VOB, AVI, XVID, DAT, 3GP AUDIO: MP3, ID3, WMA PHOTO: JPEG Note: Specifications and design are subject to modification, without notice, due to improvements in technology. 20


