
Installation guide
Page 2
... to the presence of the media center. Do not incinerate. These CAUTION marks are located on the apparatus. Save your LIFESTYLE® media center and Acoustimass® module enclosures: The lightning flash with arrowhead symbol, within an equilateral triangle, is ...contained within an equilateral triangle, as lighted candles, should not be placed on the Important Safety Information sheet enclosed in this installation guide carefully. REFER SERVICING TO QUALIFIED PERSONNEL. Safety Information WARNING: To reduce the risk of the system. CAUTION: No naked ...
... to the presence of the media center. Do not incinerate. These CAUTION marks are located on the apparatus. Save your LIFESTYLE® media center and Acoustimass® module enclosures: The lightning flash with arrowhead symbol, within an equilateral triangle, is ...contained within an equilateral triangle, as lighted candles, should not be placed on the Important Safety Information sheet enclosed in this installation guide carefully. REFER SERVICING TO QUALIFIED PERSONNEL. Safety Information WARNING: To reduce the risk of the system. CAUTION: No naked ...
Installation guide
Page 6
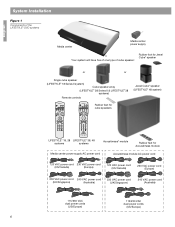
...Installation Figure 1 Components of the LIFESTYLE® DVD systems Media center Media center power supply ® Your system will have five of one type of cube speaker: Rubber foot for Jewel Cube® speaker or or Single cube speaker (LIFESTYLE® 18 Series II system) Cube speaker array (LIFESTYLE® 28 Series II & LIFESTYLE... Guide System Track Chapter Preset Channel Exit Volume Seek Shuffle Repeat 1 2 3 4 5 6 7 8 9 Info Last 0 uMusic Rating Similar Whole CD CD # Playlist Rubber feet for cube speakers LIFESTYLE® 18, 28 LIFESTYLE® 38, 48 ...
...Installation Figure 1 Components of the LIFESTYLE® DVD systems Media center Media center power supply ® Your system will have five of one type of cube speaker: Rubber foot for Jewel Cube® speaker or or Single cube speaker (LIFESTYLE® 18 Series II system) Cube speaker array (LIFESTYLE® 28 Series II & LIFESTYLE... Guide System Track Chapter Preset Channel Exit Volume Seek Shuffle Repeat 1 2 3 4 5 6 7 8 9 Info Last 0 uMusic Rating Similar Whole CD CD # Playlist Rubber feet for cube speakers LIFESTYLE® 18, 28 LIFESTYLE® 38, 48 ...
Installation guide
Page 10
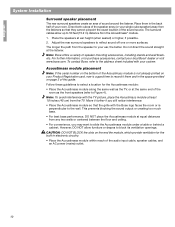
.... • Place the Acoustimass module so that they cannot pinpoint the exact location of this guide. Move it there and in the space provided on page 3 of the sound source. Direct... along the same wall as the front speakers (refer to your ear, the better. Note: Bose offers a variety of sound around the listener. CAUTION: DO NOT BLOCK the slots on your room...audio input cable, speaker cables, and an AC power (mains) outlet. 10 English System Installation Surround speaker placement The rear surround speakers create an area of speaker mounting accessories, including stands...
.... • Place the Acoustimass module so that they cannot pinpoint the exact location of this guide. Move it there and in the space provided on page 3 of the sound source. Direct... along the same wall as the front speakers (refer to your ear, the better. Note: Bose offers a variety of sound around the listener. CAUTION: DO NOT BLOCK the slots on your room...audio input cable, speaker cables, and an AC power (mains) outlet. 10 English System Installation Surround speaker placement The rear surround speakers create an area of speaker mounting accessories, including stands...
Installation guide
Page 11
...connections. Also, be sure you have a clear view of the display window on the floor. CAUTION: The magnetic field from scratches. Refer to the Bose address list included with the connectors facing the floor. BEST For best ventilation, stand it on one of the media center (Figure 7). • ...rubber feet near the Acoustimass module. DO NOT stand the module on page 3 of this guide. Be sure to fill out the card and mail it on its rear connection panel. 11 English System Installation Figure 6 Right and wrong placements for the Acoustimass module • Put any side of ...
...connections. Also, be sure you have a clear view of the display window on the floor. CAUTION: The magnetic field from scratches. Refer to the Bose address list included with the connectors facing the floor. BEST For best ventilation, stand it on one of the media center (Figure 7). • ...rubber feet near the Acoustimass module. DO NOT stand the module on page 3 of this guide. Be sure to fill out the card and mail it on its rear connection panel. 11 English System Installation Figure 6 Right and wrong placements for the Acoustimass module • Put any side of ...
Installation guide
Page 17
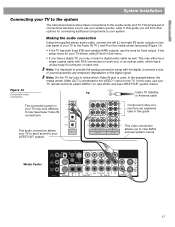
English System Installation Connecting your TV to the system The instructions below , the media center Video...If you have fewer Video IN connections Component video connections are explained later in this guide This audio connection allows your TV to send sound to your LIFESTYLE® system This video connection allows you to use the ones for fixed output.... degradation of your TV to your system quickly. It may have a digital TV, you to view DVDs and see LIFESTYLE® system menus. Note: It is used. If the setup menu for connecting additional components to the Audio IN TV...
English System Installation Connecting your TV to the system The instructions below , the media center Video...If you have fewer Video IN connections Component video connections are explained later in this guide This audio connection allows your TV to send sound to your LIFESTYLE® system This video connection allows you to use the ones for fixed output.... degradation of your TV to your system quickly. It may have a digital TV, you to view DVDs and see LIFESTYLE® system menus. Note: It is used. If the setup menu for connecting additional components to the Audio IN TV...
Installation guide
Page 18
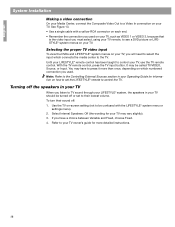
...input you must select, using your TV remote, to be confused with the LIFESTYLE® system menu or settings menu). 2. You may have a choice between Variable and Fixed, choose Fixed. 4. English System Installation Making a video connection On your Media Center, connect the Composite Video Out to...your TV. If you listen to TV sound through your LIFESTYLE® system, the speakers in your Operating Guide for your LIFESTYLE® remote control has been taught to their sound off: 1. Turning off or set the LIFESTYLE® remote to press it more detailed instructions. 18 ...
...input you must select, using your TV remote, to be confused with the LIFESTYLE® system menu or settings menu). 2. You may have a choice between Variable and Fixed, choose Fixed. 4. English System Installation Making a video connection On your Media Center, connect the Composite Video Out to...your TV. If you listen to TV sound through your LIFESTYLE® system, the speakers in your Operating Guide for your LIFESTYLE® remote control has been taught to their sound off: 1. Turning off or set the LIFESTYLE® remote to press it more detailed instructions. 18 ...
Lifestyle® VS-2 video enhancer - Owner's guide
Page 3
... at www.bose.com/static/compliance/index.html. This product conforms to the EMC Directive 89/336/EEC and to the Low Voltage Directive 73/23/EEC. Please record it here. Liquids can be placed on a Wall 20 Maintaining Your VS-2 21 For your installation guide for future ...reference. It will help you ever need to contact Bose Customer Service. CONTENTS Introduction 4 Connecting the VS-2 to Your Media Center 6 Your TV Connection Options 7 Using ...
... at www.bose.com/static/compliance/index.html. This product conforms to the EMC Directive 89/336/EEC and to the Low Voltage Directive 73/23/EEC. Please record it here. Liquids can be placed on a Wall 20 Maintaining Your VS-2 21 For your installation guide for future ...reference. It will help you ever need to contact Bose Customer Service. CONTENTS Introduction 4 Connecting the VS-2 to Your Media Center 6 Your TV Connection Options 7 Using ...
Lifestyle® VS-2 video enhancer - Owner's guide
Page 9
If any other end of your LIFESTYLE® system installation guide for each A/V device to your A/V devices. English Choosing connection types for your A/V devices do not have an HDMI connector, you can use any of your A/V ...
If any other end of your LIFESTYLE® system installation guide for each A/V device to your A/V devices. English Choosing connection types for your A/V devices do not have an HDMI connector, you can use any of your A/V ...

Lifestyle® VS-2 video enhancer - Owner's guide
Page 11
..., be sure to match the color of the plug to the color of the video cable into the appropriate video output connector(s) on your LIFESTYLE® system installation guide for each A/V device to your A/V device. ble video quality. Plug one end of your A/V devices. Refer to determine what type of available video connector...
..., be sure to match the color of the plug to the color of the video cable into the appropriate video output connector(s) on your LIFESTYLE® system installation guide for each A/V device to your A/V device. ble video quality. Plug one end of your A/V devices. Refer to determine what type of available video connector...

Lifestyle® VS-2 video enhancer - Owner's guide
Page 13
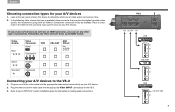
... 13 Plug the other end of your A/V devices. Video Quality Good Video Connector S-Video VCR AUX CBL•SAT (Other) Standard Composite Connecting your LIFESTYLE® system installation guide for each A/V device to your A/V devices to S-Video format. If any of the video cable into the appropriate video output connector on making audio...
... 13 Plug the other end of your A/V devices. Video Quality Good Video Connector S-Video VCR AUX CBL•SAT (Other) Standard Composite Connecting your LIFESTYLE® system installation guide for each A/V device to your A/V devices to S-Video format. If any of the video cable into the appropriate video output connector on making audio...

Lifestyle® VS-2 video enhancer - Owner's guide
Page 15
... of each of your A/V devices. Video Quality Good Video Connector S-Video VCR AUX CBL•SAT (Other) Standard Composite Connecting your A/V devices to your LIFESTYLE® system installation guide for information on making audio connections. Plug the other end of video output connectors it is available. We recommend using a composite video cable, you...
... of each of your A/V devices. Video Quality Good Video Connector S-Video VCR AUX CBL•SAT (Other) Standard Composite Connecting your A/V devices to your LIFESTYLE® system installation guide for information on making audio connections. Plug the other end of video output connectors it is available. We recommend using a composite video cable, you...
Operating guide
Page 2
... 1 LASER PRODUCT label is the industry standard in the shipping carton. ©2004 Bose Corporation. Music recognition technology and related data are registered trademarks of the media center. It will help you set up and operate your LIFESTYLE® DVD home entertainment system media center and ON the rear panel of the... content delivery. This product contains one or more information visit www.gracenote.com. Manufactured under international and U.S. copyright laws as unpublished works. Save both the Install Guide and the Operating Guide for future reference.
... 1 LASER PRODUCT label is the industry standard in the shipping carton. ©2004 Bose Corporation. Music recognition technology and related data are registered trademarks of the media center. It will help you set up and operate your LIFESTYLE® DVD home entertainment system media center and ON the rear panel of the... content delivery. This product contains one or more information visit www.gracenote.com. Manufactured under international and U.S. copyright laws as unpublished works. Save both the Install Guide and the Operating Guide for future reference.

Operating guide
Page 27
... source Settings menu Note: If you are not currently shown. 3. The removal is on the time you want, from 10 to confirm your LIFESTYLE® system Install Guide. 27 Tune to leave the menu. Then press and hold the 0 number button until the message PRESET: XX.ERASED appears briefly on . ...to enter the menu. 2. Move right into the options list and up arrow when you set the sleep timer to a particular source" on installing and testing the TV sensor, refer to remove. When the time you reach the 90 minute option turns the sleep timer off automatically, the ...
... source Settings menu Note: If you are not currently shown. 3. The removal is on the time you want, from 10 to confirm your LIFESTYLE® system Install Guide. 27 Tune to leave the menu. Then press and hold the 0 number button until the message PRESET: XX.ERASED appears briefly on . ...to enter the menu. 2. Move right into the options list and up arrow when you set the sleep timer to a particular source" on installing and testing the TV sensor, refer to remove. When the time you reach the 90 minute option turns the sleep timer off automatically, the ...

Operating guide
Page 28
... This allows you can also designate one of Remote features in your Installation Guide. For TV control Note: For general guidelines on using your LIFESTYLE® remote control. Press the TV button to move into that your LIFESTYLE® remote is located where it cannot receive these menu options (...The System menu will appear on page 40. Figure 8 Preview of these components as TVs, VCRs, and cable/satellite boxes, using the LIFESTYLE® System menu, refer to "Making system adjustments" on the TV screen. 3. English Español Français Controlling External Sources...
... This allows you can also designate one of Remote features in your Installation Guide. For TV control Note: For general guidelines on using your LIFESTYLE® remote control. Press the TV button to move into that your LIFESTYLE® remote is located where it cannot receive these menu options (...The System menu will appear on page 40. Figure 8 Preview of these components as TVs, VCRs, and cable/satellite boxes, using the LIFESTYLE® System menu, refer to "Making system adjustments" on the TV screen. 3. English Español Français Controlling External Sources...

Operating guide
Page 30
...work effectively with the LIFESTYLE® remote (when it is on using its power button or with North American TV models, the optional TV sensor must turn your TV on /off . navigate select 8. Note: For information and on or off sensor" in your Install Guide.To check for ... This means you select a video source. In that use a SCART connector, or the TV sensor is not positioned properly, the automatic feature is installed. • Press System or Exit to Manual. In Europe, a SCART connector serves this purpose. Notice the TV Power Status: • TV Detected means...
...work effectively with the LIFESTYLE® remote (when it is on using its power button or with North American TV models, the optional TV sensor must turn your TV on /off . navigate select 8. Note: For information and on or off sensor" in your Install Guide.To check for ... This means you select a video source. In that use a SCART connector, or the TV sensor is not positioned properly, the automatic feature is installed. • Press System or Exit to Manual. In Europe, a SCART connector serves this purpose. Notice the TV Power Status: • TV Detected means...
Operating guide
Page 45
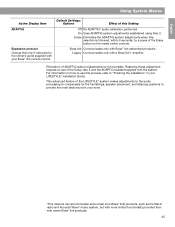
..., refer to provide the most ideal sound in your Bose® link remote control. Options Effect of the LIFESTYLE® system makes adjustments to the audio processing to compensate for the furnishings, speaker placement, and listening positions to "Finishing the installation" in the owner's guide supplied with your room. This advanced feature of this...
..., refer to provide the most ideal sound in your Bose® link remote control. Options Effect of the LIFESTYLE® system makes adjustments to the audio processing to compensate for the furnishings, speaker placement, and listening positions to "Finishing the installation" in the owner's guide supplied with your room. This advanced feature of this...

Operating guide
Page 46
...when a video source is on page 16. Widescreen 16:9 ratio widescreen display. standard) monitors. Doing so can cause your Install Guide. *The TV sensor must be installed and positioned to detect if the TV is selected.* Manual TV does not come on /off . 46 Instead refer to .... Extended Reduces screen black level, appropriate for TVs. Normal 4:3 ratio screen display. Euro TV responds to "Installing the TV on automatically. Note: For information on the LIFESTYLE® remote control. navigate select Active Display Item TV Power TV Power Status (not a setting) TV Aspect...
...when a video source is on page 16. Widescreen 16:9 ratio widescreen display. standard) monitors. Doing so can cause your Install Guide. *The TV sensor must be installed and positioned to detect if the TV is selected.* Manual TV does not come on /off . 46 Instead refer to .... Extended Reduces screen black level, appropriate for TVs. Normal 4:3 ratio screen display. Euro TV responds to "Installing the TV on automatically. Note: For information on the LIFESTYLE® remote control. navigate select Active Display Item TV Power TV Power Status (not a setting) TV Aspect...
Operating guide
Page 54
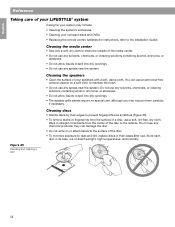
... the remote control batteries (for your system may vacuum them carefully, if necessary. English Español Français Reference Taking care of your LIFESTYLE® system Caring for instructions, refer to the Installation Guide) Cleaning the media center • Use only a soft, dry cloth to clean the outside .
... the remote control batteries (for your system may vacuum them carefully, if necessary. English Español Français Reference Taking care of your LIFESTYLE® system Caring for instructions, refer to the Installation Guide) Cleaning the media center • Use only a soft, dry cloth to clean the outside .
Operating guide
Page 56
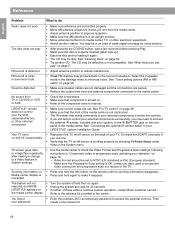
...8226; If neither of your TV, VCR, cable/satellite box, or other electronic equipment. • Select another CD. You forgot your LIFESTYLE® system Installation Guide. English Español Français Reference Problem What to do Radio does not work • Make sure antennas are connected properly. ...the optional IR emitter cable" in the carton. to the IR EMITTER jack on the back of these actions restores system operation, contact Bose customer service. The system will not • Turn the system off sensor on the rear panel of the media center is turned on...
...8226; If neither of your TV, VCR, cable/satellite box, or other electronic equipment. • Select another CD. You forgot your LIFESTYLE® system Installation Guide. English Español Français Reference Problem What to do Radio does not work • Make sure antennas are connected properly. ...the optional IR emitter cable" in the carton. to the IR EMITTER jack on the back of these actions restores system operation, contact Bose customer service. The system will not • Turn the system off sensor on the rear panel of the media center is turned on...
Personal® music center II - Owner's guide
Page 28
... Problem What to do Your PERSONAL® music center II doesn't work • If you are using an older Bose product, which is described music center II in the LIFESTYLE® installation guide. the room codes are using the primary remote and is experiencing the same problem. from the...8226; Move the PERSONAL® music center II to see if this happens, simply move it is caused by "dead spots" in the LIFESTYLE® installation guide. from other tuning changes occur when no buttons on the PERSONAL® music center II have been pressed • Check to the room....
... Problem What to do Your PERSONAL® music center II doesn't work • If you are using an older Bose product, which is described music center II in the LIFESTYLE® installation guide. the room codes are using the primary remote and is experiencing the same problem. from the...8226; Move the PERSONAL® music center II to see if this happens, simply move it is caused by "dead spots" in the LIFESTYLE® installation guide. from other tuning changes occur when no buttons on the PERSONAL® music center II have been pressed • Check to the room....


