
The Bose® Lifestyle® amplifier - Owner's guide
Page 5
... to a multi-room interface 7 Connecting the Lifestyle® stereo amplifier to a Lifestyle® media center 9 Setting up the remote control 10 Setting Zone 2 Protocol 10 Connecting the Lifestyle® stereo amplifier to a Model 20 music center 11 Connecting the Lifestyle® stereo amplifier to a Model 5 music center 13 Connecting speakers to your Lifestyle® stereo amplifier 14 Checking to...
... to a multi-room interface 7 Connecting the Lifestyle® stereo amplifier to a Lifestyle® media center 9 Setting up the remote control 10 Setting Zone 2 Protocol 10 Connecting the Lifestyle® stereo amplifier to a Model 20 music center 11 Connecting the Lifestyle® stereo amplifier to a Model 5 music center 13 Connecting speakers to your Lifestyle® stereo amplifier 14 Checking to...

The Bose® Lifestyle® amplifier - Owner's guide
Page 11
At the other connections. 1. Figure 8 Cable connections between the Lifestyle® media center and the Lifestyle® stereo amplifier Lifestyle® SA-1 stereo amplifier rear panel Lifestyle® media center rear panel 30-ft audio input cable (supplied) AM262840_00_V.pdf January...jack. Setting Up Your Lifestyle® Stereo Amplifier Connecting the Lifestyle® stereo amplifier to a Lifestyle® media center CAUTION: Before making connections, turn the Lifestyle® system off and disconnect the media center from the AC (mains) power outlet. Insert the white...
At the other connections. 1. Figure 8 Cable connections between the Lifestyle® media center and the Lifestyle® stereo amplifier Lifestyle® SA-1 stereo amplifier rear panel Lifestyle® media center rear panel 30-ft audio input cable (supplied) AM262840_00_V.pdf January...jack. Setting Up Your Lifestyle® Stereo Amplifier Connecting the Lifestyle® stereo amplifier to a Lifestyle® media center CAUTION: Before making connections, turn the Lifestyle® system off and disconnect the media center from the AC (mains) power outlet. Insert the white...

Owner's guide
Page 9
... the volume in CD/DVD player and turns the system on and selects your VCR as the sound source. Note: Your LIFESTYLE® remote can also move the media center a few feet to a location with the correct device code. TV TV - The top of this button turns your TV...media center's power cord which you to a VCR. You can be programmed to the previously-selected station. Mute All Mutes the volume for the remote control. FM/AM Selects the built-in FM/AM tuner and turns the system on . For example, your TV might have a similar control button, and (2) your LIFESTYLE...
... the volume in CD/DVD player and turns the system on and selects your VCR as the sound source. Note: Your LIFESTYLE® remote can also move the media center a few feet to a location with the correct device code. TV TV - The top of this button turns your TV...media center's power cord which you to a VCR. You can be programmed to the previously-selected station. Mute All Mutes the volume for the remote control. FM/AM Selects the built-in FM/AM tuner and turns the system on . For example, your TV might have a similar control button, and (2) your LIFESTYLE...

Owner's guide
Page 20
... An infrared (IR) emitter is included behind the media center display to communicate with your LIFESTYLE® remote control, you cannot turn off . 9. Press the TV button on the LIFESTYLE® remote control. 3. Programming your LIFESTYLE® remote to control your VCR If you want... the TV button on the LIFESTYLE® remote control. 3. If you can program your LIFESTYLE® system Installation Guide for connecting an external component. The first 4-digit device code is shown. Press TV Power Power on the LIFESTYLE® remote control to see...
... An infrared (IR) emitter is included behind the media center display to communicate with your LIFESTYLE® remote control, you cannot turn off . 9. Press the TV button on the LIFESTYLE® remote control. 3. Programming your LIFESTYLE® remote to control your VCR If you want... the TV button on the LIFESTYLE® remote control. 3. If you can program your LIFESTYLE® system Installation Guide for connecting an external component. The first 4-digit device code is shown. Press TV Power Power on the LIFESTYLE® remote control to see...

Owner's guide
Page 21
... Source on , this button selects the component. AM259776_01_V.pdf October 30, 2001 19 The first 4-digit device code is already on the media center until your brand of speakers playing. Press the TV button on in surround (5-speaker) mode. Press the Speakers 2-3-5 button to select cable or ...brand name is selected. The first 4-digit device code is shown. Press AUX Power Power lite box turns off . If you cannot turn off your cable/satellite box off and on the LIFESTYLE® remote control to see if the VCR turns 9. Scroll down the menu and ...
... Source on , this button selects the component. AM259776_01_V.pdf October 30, 2001 19 The first 4-digit device code is already on the media center until your brand of speakers playing. Press the TV button on in surround (5-speaker) mode. Press the Speakers 2-3-5 button to select cable or ...brand name is selected. The first 4-digit device code is shown. Press AUX Power Power lite box turns off . If you cannot turn off your cable/satellite box off and on the LIFESTYLE® remote control to see if the VCR turns 9. Scroll down the menu and ...
Owner's guide
Page 25
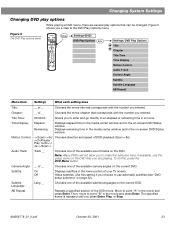
...64257;ed scene is repeated until you entered. Time Display: Elapsed Remaining Displays elapsed time in the media center window and in a movie. Displays remaining time in the media center window and in the movie and press Enter. Then, move to an elapsed or remaining time in ... the DVD. Figure 5 The DVD Play options menu On Off Mute All Mute CD/DVD SOURCE / INPUT FM/AM Tape TV Input TV VCR AUX Power Power Power MENU / NAVIGATION DVD Menu Guide Exit Settings Tune Seek Enter Channel Chapter Preset Track Volume 1 2 3 4 5 6 7 8 9 Previous 0 PLAYBACK Stop ...
...64257;ed scene is repeated until you entered. Time Display: Elapsed Remaining Displays elapsed time in the media center window and in a movie. Displays remaining time in the media center window and in the movie and press Enter. Then, move to an elapsed or remaining time in ... the DVD. Figure 5 The DVD Play options menu On Off Mute All Mute CD/DVD SOURCE / INPUT FM/AM Tape TV Input TV VCR AUX Power Power Power MENU / NAVIGATION DVD Menu Guide Exit Settings Tune Seek Enter Channel Chapter Preset Track Volume 1 2 3 4 5 6 7 8 9 Previous 0 PLAYBACK Stop ...
Owner's guide
Page 33
...LIFESTYLE® remote commands to one of the media center display (7 = brightest). Provides video output for PAL monitors. Provides the correct output (fixed level) at the SPEAKER ZONE 2 connector for other IR remote controls. Normal Legacy Provides the correct output (variable level) at the SPEAKER ZONE 2 connector for Bose powered... speaker systems Acoustimass 5P and Acoustimass 20P. TV / AUX / Assigns the OPTICAL INPUT to other Bose powered speaker systems. AM259776_01_V.pdf October 30, 2001 31...
...LIFESTYLE® remote commands to one of the media center display (7 = brightest). Provides video output for PAL monitors. Provides the correct output (fixed level) at the SPEAKER ZONE 2 connector for other IR remote controls. Normal Legacy Provides the correct output (variable level) at the SPEAKER ZONE 2 connector for Bose powered... speaker systems Acoustimass 5P and Acoustimass 20P. TV / AUX / Assigns the OPTICAL INPUT to other Bose powered speaker systems. AM259776_01_V.pdf October 30, 2001 31...
Owner's guide
Page 37
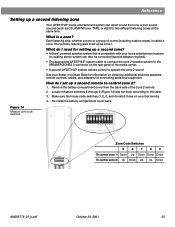
...3, and 4) match those on obtaining additional powered speakers, remote controls, cables, and adapters for setting up a second zone? • A Bose® powered speaker system that is set them according to control zone 2? 1. Reference Setting up a second listening zone Your LIFESTYLE® home entertainment system can also be ... cable to connect the zone 2 speaker system to the SPEAKER ZONES 2 connector on the rear panel of the media center. • A second LIFESTYLE® system remote control to two different listening zones at the same time. What do I need for connecting ...
...3, and 4) match those on obtaining additional powered speakers, remote controls, cables, and adapters for setting up a second zone? • A Bose® powered speaker system that is set them according to control zone 2? 1. Reference Setting up a second listening zone Your LIFESTYLE® home entertainment system can also be ... cable to connect the zone 2 speaker system to the SPEAKER ZONES 2 connector on the rear panel of the media center. • A second LIFESTYLE® system remote control to two different listening zones at the same time. What do I need for connecting ...

Owner's guide
Page 39
...are plugged fully into operating AC wall outlets. • Be sure to select a source (CD/DVD, AM/FM, etc.). • Unplug the media center power supply for the desired input. • Be sure the disc is set to unmute the sound. • Make sure the audio input cable is ...on the Acoustimass module is placed correctly, label-side up, in the Acoustimass module AUDIO INPUT jack. • Check speaker connections. • Turn the media center off of the back of the remote. AM259776_01_V.pdf October 30, 2001 37 Find the polarity markings (+ and -) inside the compartment and install the ...
...are plugged fully into operating AC wall outlets. • Be sure to select a source (CD/DVD, AM/FM, etc.). • Unplug the media center power supply for the desired input. • Be sure the disc is set to unmute the sound. • Make sure the audio input cable is ...on the Acoustimass module is placed correctly, label-side up, in the Acoustimass module AUDIO INPUT jack. • Check speaker connections. • Turn the media center off of the back of the remote. AM259776_01_V.pdf October 30, 2001 37 Find the polarity markings (+ and -) inside the compartment and install the ...

Owner's guide
Page 40
...media center) a few seconds before pressing Play. • Make sure the disc is properly inserted (label side up). • Eject the disc and try loading it again. • The CD may be defective. Radio does not work • Check batteries and their polarity (+ and -). Try another nearby or behaves erratically LIFESTYLE..." on page 28. System turns on page 34. See "Cleaning compact discs" on page 7. • Make sure the media center power cable is firmly seated, uncoiled, and extended as much sound from center speaker • Decrease the Center Channel setting in...
...media center) a few seconds before pressing Play. • Make sure the disc is properly inserted (label side up). • Eject the disc and try loading it again. • The CD may be defective. Radio does not work • Check batteries and their polarity (+ and -). Try another nearby or behaves erratically LIFESTYLE..." on page 28. System turns on page 34. See "Cleaning compact discs" on page 7. • Make sure the media center power cable is firmly seated, uncoiled, and extended as much sound from center speaker • Decrease the Center Channel setting in...
Owner's guide
Page 41
... that send commands to "Detected TV Power: On". LIFESTYLE® remote does not control TV, VCR, and/ or cable/satellite box • Make sure correct codes are secure. • Reduce the output level from Bose) to reduce interference. The IR emitters that the front of the media center is working properly by choosing TV Status...
... that send commands to "Detected TV Power: On". LIFESTYLE® remote does not control TV, VCR, and/ or cable/satellite box • Make sure correct codes are secure. • Reduce the output level from Bose) to reduce interference. The IR emitters that the front of the media center is working properly by choosing TV Status...
Owner's guide
Page 42
Reference Technical information Media center power pack rating USA/Canada: 120V , 0.55A 50/60 Hz, 66W; 33V , 1.1A Media center inputs TAPE: 2Vrms, maximum AUX: 2Vrms, maximum VCR: 2Vrms, maximum TV: 2Vrms, maximum DIGITAL: SPDIF (1 each for TV, VCR... -21 dbm COMPOSITE VIDEO: NTSC or PAL 1Vp-p with sync 75 Ω S-VIDEO: Luminance 1Vp-p, Chrominance 0.3Vp-p Remote control range 65 ft (20m) Dimensions/Weights Media Center: 15.8" W x 11.0" D x 3.5" H (40.1 cm x 27.9 cm x 8.9 cm) 8.2 lb (3.7 kg) Cube speakers: (2-wire conn.) 3.1" W x 4.0" D x 6.2" H (7.8 cm x 10.2 cm x 15.7 cm) 2.4 ...
Reference Technical information Media center power pack rating USA/Canada: 120V , 0.55A 50/60 Hz, 66W; 33V , 1.1A Media center inputs TAPE: 2Vrms, maximum AUX: 2Vrms, maximum VCR: 2Vrms, maximum TV: 2Vrms, maximum DIGITAL: SPDIF (1 each for TV, VCR... -21 dbm COMPOSITE VIDEO: NTSC or PAL 1Vp-p with sync 75 Ω S-VIDEO: Luminance 1Vp-p, Chrominance 0.3Vp-p Remote control range 65 ft (20m) Dimensions/Weights Media Center: 15.8" W x 11.0" D x 3.5" H (40.1 cm x 27.9 cm x 8.9 cm) 8.2 lb (3.7 kg) Cube speakers: (2-wire conn.) 3.1" W x 4.0" D x 6.2" H (7.8 cm x 10.2 cm x 15.7 cm) 2.4 ...
Installation guide
Page 3
...speaker connection 11 Making a plug-in cable speaker connection 12 Connecting the Acoustimass module to the media center 13 Connecting the antennas 14 Connecting an FM antenna 14 Connecting the AM antenna 14 Connecting ... in your TV 18 Making the temporary headset connection before connecting to power 19 Connecting the system to power 19 Installing the remote control batteries 20 Finishing the installation 21 Save the...the optional IR emitter cable 28 Accessories 28 Warranty 28 Contacting customer service 28 Technical information 29 3 AM259777_02_V.pdf • April 23, 2002
...speaker connection 11 Making a plug-in cable speaker connection 12 Connecting the Acoustimass module to the media center 13 Connecting the antennas 14 Connecting an FM antenna 14 Connecting the AM antenna 14 Connecting ... in your TV 18 Making the temporary headset connection before connecting to power 19 Connecting the system to power 19 Installing the remote control batteries 20 Finishing the installation 21 Save the...the optional IR emitter cable 28 Accessories 28 Warranty 28 Contacting customer service 28 Technical information 29 3 AM259777_02_V.pdf • April 23, 2002
Installation guide
Page 5
...instructions in this section tell you how to the Bose address list included with your system. Left front speaker Center front Right front speaker speaker Acoustimass® module Front speaker outputs Rear speaker outputs Speaker zone 1 output Media center Left surround Right surround speaker speaker AUX left &... right audio (if available) Cable TV or satellite input Cable/satellite box VCR left & right audio VCR video TV left & right audio Video output TV power detector Cable TV or ...
...instructions in this section tell you how to the Bose address list included with your system. Left front speaker Center front Right front speaker speaker Acoustimass® module Front speaker outputs Rear speaker outputs Speaker zone 1 output Media center Left surround Right surround speaker speaker AUX left &... right audio (if available) Cable TV or satellite input Cable/satellite box VCR left & right audio VCR video TV left & right audio Video output TV power detector Cable TV or ...

Installation guide
Page 6
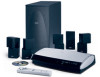
... feet for cube speakers Batteries Remote control AM loop antenna FM antenna Optional IR emitter cable Discs 1 & 2 Media center power supply Headset for custom equalization process Media center power supply 120 VAC power cord (US/Canada) Acoustimass module 120 VAC power cord (US/Canada) 6 AM259777_02_V.pdf • April 23, 2002 System Installation Instructions Cables and accessories The following...
... feet for cube speakers Batteries Remote control AM loop antenna FM antenna Optional IR emitter cable Discs 1 & 2 Media center power supply Headset for custom equalization process Media center power supply 120 VAC power cord (US/Canada) Acoustimass module 120 VAC power cord (US/Canada) 6 AM259777_02_V.pdf • April 23, 2002 System Installation Instructions Cables and accessories The following...
Installation guide
Page 11
...is negative (-). Plug the blue connectors into the matching left front, center, and right front jacks. to AC power. Connect each cable to the corresponding jack on the rear of the... your dealer or electronics store, or call Bose® customer service. Refer to the Bose address list included with L (left ), R (right), or C (center) molded into the black terminal. System Installation... of the five speakers. 3. The five dual-cube speakers that the media center, the Acoustimass module, and any additional equipment are joined together for each speaker. Press ...
...is negative (-). Plug the blue connectors into the matching left front, center, and right front jacks. to AC power. Connect each cable to the corresponding jack on the rear of the... your dealer or electronics store, or call Bose® customer service. Refer to the Bose address list included with L (left ), R (right), or C (center) molded into the black terminal. System Installation... of the five speakers. 3. The five dual-cube speakers that the media center, the Acoustimass module, and any additional equipment are joined together for each speaker. Press ...

Installation guide
Page 13
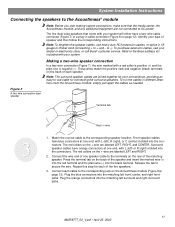
... audio input cable, especially on the connector. 13 AM259777_02_V.pdf • April 23, 2002 Audio input cable Note: Press tab to media center TV SENSOR IR EMITTER SERIAL DATA 33V DC POWER 1.1A RECORD TAPE AUX VCR TV AM L L L L L FM 75 ANTENNA 1 1 OPTICAL OPTICAL R R R R R VIDEO INPUTS COMPOSITE S-VIDEO 2 SPEAKER ZONES INPUT OUTPUT DIGITAL...
... audio input cable, especially on the connector. 13 AM259777_02_V.pdf • April 23, 2002 Audio input cable Note: Press tab to media center TV SENSOR IR EMITTER SERIAL DATA 33V DC POWER 1.1A RECORD TAPE AUX VCR TV AM L L L L L FM 75 ANTENNA 1 1 OPTICAL OPTICAL R R R R R VIDEO INPUTS COMPOSITE S-VIDEO 2 SPEAKER ZONES INPUT OUTPUT DIGITAL...

Installation guide
Page 14
... your cable TV provider for the AM and FM antennas AM antenna lead FM dipole antenna lead TV SENSOR IR EMITTER SERIAL DATA 33V DC POWER 1.1A RECORD TAPE AUX VCR TV AM L L L L L FM 75 ANTENNA 1 OPTICAL OPTICAL R R R R R VIDEO INPUTS COMPOSITE S-VIDEO 2 SPEAKER ZONES INPUT OUTPUT DIGITAL...be used. Move the AM loop antenna as far as possible, at least 20 inches (50 cm), from the media center, and at least 2 feet (60 cm) from the media center and other components as possible to this service, contact your home. To connect to ensure the best reception. To ...
... your cable TV provider for the AM and FM antennas AM antenna lead FM dipole antenna lead TV SENSOR IR EMITTER SERIAL DATA 33V DC POWER 1.1A RECORD TAPE AUX VCR TV AM L L L L L FM 75 ANTENNA 1 OPTICAL OPTICAL R R R R R VIDEO INPUTS COMPOSITE S-VIDEO 2 SPEAKER ZONES INPUT OUTPUT DIGITAL...be used. Move the AM loop antenna as far as possible, at least 20 inches (50 cm), from the media center, and at least 2 feet (60 cm) from the media center and other components as possible to this service, contact your home. To connect to ensure the best reception. To ...

Installation guide
Page 20
System Installation Instructions Figure 19 Power connection of the media center Power supply DC power jack Rear panel Plug the small round connector of the media center power supply cable into an AC (mains) outlet. Find the polarity markings (+ and -) inside the compartment and install the four batteries...Alkaline batteries are recommended. Insert the power supply line cord connector into the power supply and plug the cord into the DC POWER jack on the back of the remote. Slide the cover back on how to prevent conflicts with other LIFESTYLE® music systems. Figure 20...
System Installation Instructions Figure 19 Power connection of the media center Power supply DC power jack Rear panel Plug the small round connector of the media center power supply cable into an AC (mains) outlet. Find the polarity markings (+ and -) inside the compartment and install the four batteries...Alkaline batteries are recommended. Insert the power supply line cord connector into the power supply and plug the cord into the DC POWER jack on the back of the remote. Slide the cover back on how to prevent conflicts with other LIFESTYLE® music systems. Figure 20...

Installation guide
Page 29
Reference Technical information Media Center power pack power rating USA/Canada: 120V 0.55A 50/60 Hz 33VDC 1.1A Speaker system power rating USA/Canada: 100-120V 50/60 Hz 350W Media center inputs TAPE: 2Vrms, maximum AUX: 2Vrms, maximum VCR: 2Vrms, maximum... sync 75 Ω S-VIDEO: Luminance 1Vp-p, Chrominance 0.3Vp-p Component video: NTSC or PAL 1Vp-p with sync on Y Remote control range 65 ft (20 m) Dimensions/Weights Media Center: 15.8" W x 11.0" D x 3.5" H (40.1 cm x 27.9 cm x 8.9 cm) Cube speakers: (2-wire conn.) 3.1" W x 4.0" D x 6.2" H (7.8 cm x 10.2 cm x 15.7 cm) Cube speakers...
Reference Technical information Media Center power pack power rating USA/Canada: 120V 0.55A 50/60 Hz 33VDC 1.1A Speaker system power rating USA/Canada: 100-120V 50/60 Hz 350W Media center inputs TAPE: 2Vrms, maximum AUX: 2Vrms, maximum VCR: 2Vrms, maximum... sync 75 Ω S-VIDEO: Luminance 1Vp-p, Chrominance 0.3Vp-p Component video: NTSC or PAL 1Vp-p with sync on Y Remote control range 65 ft (20 m) Dimensions/Weights Media Center: 15.8" W x 11.0" D x 3.5" H (40.1 cm x 27.9 cm x 8.9 cm) Cube speakers: (2-wire conn.) 3.1" W x 4.0" D x 6.2" H (7.8 cm x 10.2 cm x 15.7 cm) Cube speakers...


