Owners Guide
Page 5
... and power the system 10 Additional Connections 10 Operation 11 Operating the Companion 3 multimedia speaker system 11 Troubleshooting 12 Troubleshooting 12 Reference 13 Maintaining the Companion® 3 Multimedia Speaker System 13 Cleaning the system 13 Limited Warranty period 13 Technical Information... 13 Features 13 Driver complement 13 Power rating 13 Dimensions (approximate 13 Weight (approximate 13 Finish 13 For your product online at www.bose.com/...
... and power the system 10 Additional Connections 10 Operation 11 Operating the Companion 3 multimedia speaker system 11 Troubleshooting 12 Troubleshooting 12 Reference 13 Maintaining the Companion® 3 Multimedia Speaker System 13 Cleaning the system 13 Limited Warranty period 13 Technical Information... 13 Features 13 Driver complement 13 Power rating 13 Dimensions (approximate 13 Weight (approximate 13 Finish 13 For your product online at www.bose.com/...
Owners Guide
Page 6
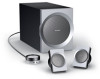
... to your monitor or television. • TrueSpace® stereo signal processing provides a wide soundstage even when the speakers are close together. • Control pod allows you to control system volume and connect headphones or portable audio players...external source such as a CD player, MP3 player, or other desktop sources. Bose designed this system a superior choice for purchasing the Bose® Companion 3 multimedia speaker system. English Introduction Your Companion® 3 Multimedia Speaker System Thank you expand your system to provide high-fidelity stereo sound for your ...
... to your monitor or television. • TrueSpace® stereo signal processing provides a wide soundstage even when the speakers are close together. • Control pod allows you to control system volume and connect headphones or portable audio players...external source such as a CD player, MP3 player, or other desktop sources. Bose designed this system a superior choice for purchasing the Bose® Companion 3 multimedia speaker system. English Introduction Your Companion® 3 Multimedia Speaker System Thank you expand your system to provide high-fidelity stereo sound for your ...
Owners Guide
Page 7
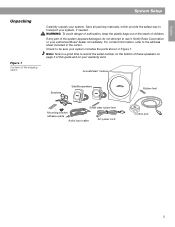
Save all packing materials, which provide the safest way to transport your authorized Bose® dealer immediately. Notify Bose Corporation or your system, if needed. WARNING: To avoid danger of suffocation, keep the plastic bags out of the reach of ...to use it. English Unpacking Figure 1 Contents of the shipping carton System Setup Carefully unpack your warranty card. Acoustimass® module Brackets Satellite speakers Rubber feet Small clear rubber feet Mounting bracket adhesive pads Audio input cable AC power cord Control pod 5 Check to record the serial number...
Save all packing materials, which provide the safest way to transport your authorized Bose® dealer immediately. Notify Bose Corporation or your system, if needed. WARNING: To avoid danger of suffocation, keep the plastic bags out of the reach of ...to use it. English Unpacking Figure 1 Contents of the shipping carton System Setup Carefully unpack your warranty card. Acoustimass® module Brackets Satellite speakers Rubber feet Small clear rubber feet Mounting bracket adhesive pads Audio input cable AC power cord Control pod 5 Check to record the serial number...
Owners Guide
Page 8
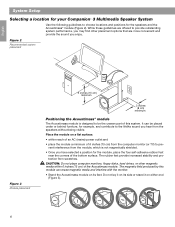
... the sound you hear from the computer monitor (or TV) to choose locations and positions for the speakers and the Acoustimass® module (Figure 2). English System Setup Selecting a location for your Companion® 3 Multimedia Speaker System Use the following guidelines to pre- While these guidelines are offered to be placed under or behind... an AC (mains) power outlet and • place the module a minimum of this module can be the unseen part of 6 inches (15 cm) from the speakers without being visible.
... the sound you hear from the computer monitor (or TV) to choose locations and positions for the speakers and the Acoustimass® module (Figure 2). English System Setup Selecting a location for your Companion® 3 Multimedia Speaker System Use the following guidelines to pre- While these guidelines are offered to be placed under or behind... an AC (mains) power outlet and • place the module a minimum of this module can be the unseen part of 6 inches (15 cm) from the speakers without being visible.
Owners Guide
Page 9
... sheet included in either side of the monitor (Figure 2 on your monitor. If you may obtain additional rubber feet from Bose® Customer Service. Positioning the satellite speakers These speakers are designed to sit upright on the back of the module, which provide ventilation for the...toward the wall to 6 feet (2 m) away from the module. If needed, you put the module farther away, use . Using the supplied speaker cables, you can cause the speakers to 6 feet (2 m) away from any retail electronics store. CAUTION: Choose a stable, level surface for the built-in circuitry. • ...
... sheet included in either side of the monitor (Figure 2 on your monitor. If you may obtain additional rubber feet from Bose® Customer Service. Positioning the satellite speakers These speakers are designed to sit upright on the back of the module, which provide ventilation for the...toward the wall to 6 feet (2 m) away from the module. If needed, you put the module farther away, use . Using the supplied speaker cables, you can cause the speakers to 6 feet (2 m) away from any retail electronics store. CAUTION: Choose a stable, level surface for the built-in circuitry. • ...
Owners Guide
Page 10
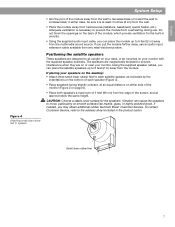
Insert the speaker wire into the center of the mounting adhesive pad and attach it to the bracket. English System Setup Figure 5 Mounting the bracket If mounting speakers on your monitor (Figure 5): 1. Peel off one side of the open bracket. Move the bracket along the cord toward the speaker. Pad Small clear rubber foot 3. Mounting bracket adhesive pads 4. Note: Be sure to the right speaker bracket (marked R). 2. Attach a small clear rubber foot to wipe the monitor clean before affixing speaker brackets. 8
Insert the speaker wire into the center of the mounting adhesive pad and attach it to the bracket. English System Setup Figure 5 Mounting the bracket If mounting speakers on your monitor (Figure 5): 1. Peel off one side of the open bracket. Move the bracket along the cord toward the speaker. Pad Small clear rubber foot 3. Mounting bracket adhesive pads 4. Note: Be sure to the right speaker bracket (marked R). 2. Attach a small clear rubber foot to wipe the monitor clean before affixing speaker brackets. 8
Owners Guide
Page 11
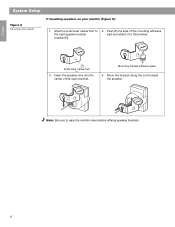
Install the supplied screw. 6. Note: The speakers mounted on the mounting adhesive, and attach the bracket to the appropriate side of the monitor. Peel off the remaining tape on the monitor are ... perform at their best when they are designed to secure. Center the bracket opening over the screw hole and press the bracket snugly into the speaker cutouts. Repeat steps 1-6 for other listeners in the room. 9 English System Setup 5.
Install the supplied screw. 6. Note: The speakers mounted on the mounting adhesive, and attach the bracket to the appropriate side of the monitor. Peel off the remaining tape on the monitor are ... perform at their best when they are designed to secure. Center the bracket opening over the screw hole and press the bracket snugly into the speaker cutouts. Repeat steps 1-6 for other listeners in the room. 9 English System Setup 5.
Owners Guide
Page 12
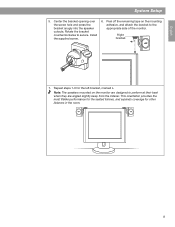
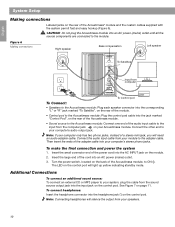
... pod. To connect headphones: Insert the headphone connector into the corresponding "L" or "R" jack marked "To Satellite", on your module to your speakers. 10 Note: Connecting headphones will need an audio adapter cable. Connect one end of a stereo mini jack, you will silence the output ...Insert the large end of the module. • Control pod to your computer's stereo phono jacks. Figure 6 Making connections Right speaker Bass compensation Left speaker To Satellites ı ı Input from the computer jack on the rear of the cord into an AC power (mains) outlet...
... pod. To connect headphones: Insert the headphone connector into the corresponding "L" or "R" jack marked "To Satellite", on your module to your speakers. 10 Note: Connecting headphones will need an audio adapter cable. Connect one end of a stereo mini jack, you will silence the output ...Insert the large end of the module. • Control pod to your computer's stereo phono jacks. Figure 6 Making connections Right speaker Bass compensation Left speaker To Satellites ı ı Input from the computer jack on the rear of the cord into an AC power (mains) outlet...

Owners Guide
Page 13
...mute/unmute switch Volume control Headphone jack Sound source input Note: Using the volume controls in their maximum position may reduce the speaker system's maximum volume, by the yellow light. Turn the control clockwise to increase, or counterclockwise to decrease the volume (...sound quality of the Acoustimass® module to unmute. English Operation Operating the Companion® 3 multimedia speaker system Turning your speaker system on the control pod. Upholstered furniture, wall-to your speaker system, you may be put into standby mode. To mute the system, gently...
...mute/unmute switch Volume control Headphone jack Sound source input Note: Using the volume controls in their maximum position may reduce the speaker system's maximum volume, by the yellow light. Turn the control clockwise to increase, or counterclockwise to decrease the volume (...sound quality of the Acoustimass® module to unmute. English Operation Operating the Companion® 3 multimedia speaker system Turning your speaker system on the control pod. Upholstered furniture, wall-to your speaker system, you may be put into standby mode. To mute the system, gently...
Owners Guide
Page 14
... to the right satellite. English Troubleshooting Troubleshooting If you still have a problem with your speaker wires for service by an authorized Bose service center. If the Companion 3 speaker system operates properly, the problem is in the Acoustimass module. • Check balance levels...the system is on your authorized Bose® dealer or local Bose customer service center. Check your system, turn off the multimedia sound source and disconnect the speaker system. If you have trouble with your Companion® 3 multimedia speaker system, try the following solutions...
... to the right satellite. English Troubleshooting Troubleshooting If you still have a problem with your speaker wires for service by an authorized Bose service center. If the Companion 3 speaker system operates properly, the problem is in the Acoustimass module. • Check balance levels...the system is on your authorized Bose® dealer or local Bose customer service center. Check your system, turn off the multimedia sound source and disconnect the speaker system. If you have trouble with your Companion® 3 multimedia speaker system, try the following solutions...
Owners Guide
Page 15
... Reference Maintaining the Companion® 3 Multimedia Speaker System Cleaning the system • Wipe with your system. Please fill out the information section on your product registration card and mail it to do so will not affect your product at www.bose.com/register. Technical... Do not use solvents or chemicals. • Do not put liquids or objects on the Acoustimass® module, speaker grilles or control pod. Failure to Bose or register your limited warranty rights. Limited Warranty period The Companion 3 multimedia speaker system is covered by a limited transferable warranty.
... Reference Maintaining the Companion® 3 Multimedia Speaker System Cleaning the system • Wipe with your system. Please fill out the information section on your product registration card and mail it to do so will not affect your product at www.bose.com/register. Technical... Do not use solvents or chemicals. • Do not put liquids or objects on the Acoustimass® module, speaker grilles or control pod. Failure to Bose or register your limited warranty rights. Limited Warranty period The Companion 3 multimedia speaker system is covered by a limited transferable warranty.


