
Owner's guide
Page 3
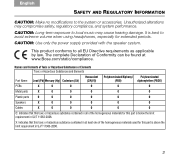
... Hexavalent (CR(VI)) Polybrominated Biphenyl Polybrominated (PBB) diphenylether (PBDE) PCBs X 0 0 0 0 0 Metal parts X 0 0 0 0 0 Plastic parts 0 0 0 0 0 0 Speakers X 0 0 0 0 0 Cables X 0 0 0 0 0 O: Indicates that this toxic or hazardous substance contained in SJ/T 11363-2006. 3 CAUTION: Long-term exposure to avoid extreme...compromise safety, regulatory compliance, and system performance. CAUTION: Use only the power supply provided with the speaker system. X: Indicates that this part is below the limit requirement in SJ/T 11363-2006. Unauthorized...
... Hexavalent (CR(VI)) Polybrominated Biphenyl Polybrominated (PBB) diphenylether (PBDE) PCBs X 0 0 0 0 0 Metal parts X 0 0 0 0 0 Plastic parts 0 0 0 0 0 0 Speakers X 0 0 0 0 0 Cables X 0 0 0 0 0 O: Indicates that this toxic or hazardous substance contained in SJ/T 11363-2006. 3 CAUTION: Long-term exposure to avoid extreme...compromise safety, regulatory compliance, and system performance. CAUTION: Use only the power supply provided with the speaker system. X: Indicates that this part is below the limit requirement in SJ/T 11363-2006. Unauthorized...
Owner's guide
Page 5
... and found to comply with the limits for help. For future reference For convenience, enter the serial number (S/N located on the bottom of the right speaker) below and on a different circuit than the one or more of the FCC rules. Connect the equipment to which can radiate radio frequency energy and...
... and found to comply with the limits for help. For future reference For convenience, enter the serial number (S/N located on the bottom of the right speaker) below and on a different circuit than the one or more of the FCC rules. Connect the equipment to which can radiate radio frequency energy and...
Owner's guide
Page 7
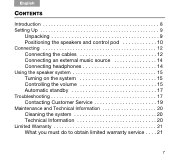
English CONTENTS Introduction 8 Setting Up 9 Unpacking 9 Positioning the speakers and control pod 10 Connecting 12 Connecting the cables 12 Connecting an external music source 14 Connecting headphones 14 Using the speaker system 15 Turning on the system 15 Controlling the volume 15 Automatic standby 17 Troubleshooting 17 Contacting Customer Service 19 Maintenance and Technical Information 20 Cleaning the system 20 Technical Information 20 Limited Warranty 21 What you must do to obtain limited warranty service . . . . 21 7
English CONTENTS Introduction 8 Setting Up 9 Unpacking 9 Positioning the speakers and control pod 10 Connecting 12 Connecting the cables 12 Connecting an external music source 14 Connecting headphones 14 Using the speaker system 15 Turning on the system 15 Controlling the volume 15 Automatic standby 17 Troubleshooting 17 Contacting Customer Service 19 Maintenance and Technical Information 20 Cleaning the system 20 Technical Information 20 Limited Warranty 21 What you must do to obtain limited warranty service . . . . 21 7

Owner's guide
Page 8
... directly in front of your computer or across the room. • Sleek, space-saving design that complements the look of your purchase of the Bose® Companion® 20 multimedia speaker system. English INTRODUCTION Congratulations on your computer. • A unique control pod that makes it easy to adjust or mute the volume and connect...
... directly in front of your computer or across the room. • Sleek, space-saving design that complements the look of your purchase of the Bose® Companion® 20 multimedia speaker system. English INTRODUCTION Congratulations on your computer. • A unique control pod that makes it easy to adjust or mute the volume and connect...

Owner's guide
Page 9
Left speaker Right speaker Speaker cable Audio cable Power pack and cable *Correct for possible future use. AC power Control pod cord* and cable 9 English SETTING UP Unpacking During unpacking, make sure that all packing materials for your Bose dealer. Save the carton and all parts shown are in the carton. If any part is missing or damaged, contact your region.
Left speaker Right speaker Speaker cable Audio cable Power pack and cable *Correct for possible future use. AC power Control pod cord* and cable 9 English SETTING UP Unpacking During unpacking, make sure that all packing materials for your Bose dealer. Save the carton and all parts shown are in the carton. If any part is missing or damaged, contact your region.
Owner's guide
Page 10
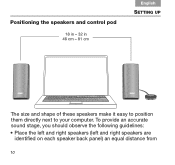
To provide an accurate sound stage, you should observe the following guidelines: • Place the left and right speakers (left and right speakers are identified on each speaker back panel) an equal distance from 10 Positioning the speakers and control pod 18 in - 32 in 46 cm - 81 cm English SETTING UP The size and shape of these speakers make it easy to position them directly next to your computer.
To provide an accurate sound stage, you should observe the following guidelines: • Place the left and right speakers (left and right speakers are identified on each speaker back panel) an equal distance from 10 Positioning the speakers and control pod 18 in - 32 in 46 cm - 81 cm English SETTING UP The size and shape of these speakers make it easy to position them directly next to your computer.
Owner's guide
Page 11
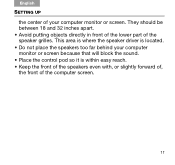
English SETTING UP the center of your computer monitor or screen because that will block the sound. • Place the control pod so it is located. • Do not place the speakers too far behind your computer monitor or screen. They should be between 18 and 32 inches apart. • Avoid putting objects directly in front of the lower part of the computer screen. 11 This area is where the speaker driver is within easy reach. • Keep the front of the speakers even with, or slightly forward of, the front of the speaker grilles.
English SETTING UP the center of your computer monitor or screen because that will block the sound. • Place the control pod so it is located. • Do not place the speakers too far behind your computer monitor or screen. They should be between 18 and 32 inches apart. • Avoid putting objects directly in front of the lower part of the computer screen. 11 This area is where the speaker driver is within easy reach. • Keep the front of the speakers even with, or slightly forward of, the front of the speaker grilles.
Owner's guide
Page 12
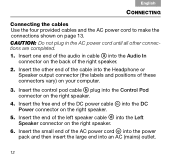
... AC power cord until all other end of the AC power cord e into the power pack and then insert the large end into the Left Speaker connector on page 13. Insert the small end of the cable into the Control Pod connector on the right... connector (the labels and positions of these connectors vary) on the back of the left speaker cable d into an AC (mains) outlet. 12 Insert the other connections are completed. 1. Insert the end of the right speaker. 2. English CONNECTING Connecting the cables Use the four provided cables and the AC power cord to...
... AC power cord until all other end of the AC power cord e into the power pack and then insert the large end into the Left Speaker connector on page 13. Insert the small end of the cable into the Control Pod connector on the right... connector (the labels and positions of these connectors vary) on the back of the left speaker cable d into an AC (mains) outlet. 12 Insert the other connections are completed. 1. Insert the end of the right speaker. 2. English CONNECTING Connecting the cables Use the four provided cables and the AC power cord to...
Owner's guide
Page 14
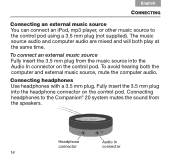
... an iPod, mp3 player, or other music source to the Companion® 20 system mutes the sound from the music source into the headphone connector on the control pod. To connect an external music source Fully insert the 3.5 mm plug from the speakers. The music source audio and computer audio are mixed and...
... an iPod, mp3 player, or other music source to the Companion® 20 system mutes the sound from the music source into the headphone connector on the control pod. To connect an external music source Fully insert the 3.5 mm plug from the speakers. The music source audio and computer audio are mixed and...
Owner's guide
Page 15
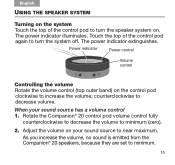
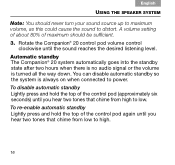
... your sound source to near maximum. As you increase the volume, no sound is emitted from the Companion® 20 speakers, because they are set to decrease volume. counterclockwise to minimum. 15 Rotate the Companion® 20 control pod volume control fully counterclockwise to decrease the volume to minimum (zero). 2. The power indicator illuminates... Volume control Controlling the volume Rotate the volume control (top outer band) on your sound source has a volume control 1. English USING THE SPEAKER SYSTEM Turning on the system Touch the top of the control pod again to turn the...
... your sound source to near maximum. As you increase the volume, no sound is emitted from the Companion® 20 speakers, because they are set to decrease volume. counterclockwise to minimum. 15 Rotate the Companion® 20 control pod volume control fully counterclockwise to decrease the volume to minimum (zero). 2. The power indicator illuminates... Volume control Controlling the volume Rotate the volume control (top outer band) on your sound source has a volume control 1. English USING THE SPEAKER SYSTEM Turning on the system Touch the top of the control pod again to turn the...
Owner's guide
Page 16
Rotate the Companion® 20 control pod volume control clockwise until you hear two tones that chime from low to low. You can disable automatic standby so the system is .... 16 A volume setting of about 80% of the control pod (approximately six seconds) until the sound reaches the desired listening level. Automatic standby The Companion® 20 system automatically goes into the standby state after two hours when there is no audio signal or the volume is always on when connected to...
Rotate the Companion® 20 control pod volume control clockwise until you hear two tones that chime from low to low. You can disable automatic standby so the system is .... 16 A volume setting of about 80% of the control pod (approximately six seconds) until the sound reaches the desired listening level. Automatic standby The Companion® 20 system automatically goes into the standby state after two hours when there is no audio signal or the volume is always on when connected to...
Owner's guide
Page 18
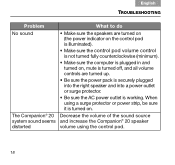
... the volume of the sound source system sound seems and increase the Companion® 20 speaker distorted volume using a surge protector or power strip, be sure it is turned on , mute is turned off, and all volume controls are turned on (...; Make sure the computer is working. English TROUBLESHOOTING Problem What to do No sound • Make sure the speakers are turned up. • Be sure the power pack is securely plugged into the right speaker and into a power outlet or surge protector. • Be sure the AC power outlet is plugged in...
... the volume of the sound source system sound seems and increase the Companion® 20 speaker distorted volume using a surge protector or power strip, be sure it is turned on , mute is turned off, and all volume controls are turned on (...; Make sure the computer is working. English TROUBLESHOOTING Problem What to do No sound • Make sure the speakers are turned up. • Be sure the power pack is securely plugged into the right speaker and into a power outlet or surge protector. • Be sure the AC power outlet is plugged in...
Owner's guide
Page 19
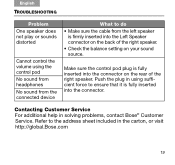
... What to do • Make sure the cable from the left speaker is firmly inserted into the Left Speaker connector on the back of the right speaker. • Check the balance setting on the rear of the right speaker. English TROUBLESHOOTING Problem One speaker does not play or sounds distorted Cannot control the volume using.... Make sure the control pod plug is fully inserted into the connector. Contacting Customer Service For additional help in the carton, or visit http://global.Bose.com 19 Refer to the address sheet included in solving problems, contact...
... What to do • Make sure the cable from the left speaker is firmly inserted into the Left Speaker connector on the back of the right speaker. • Check the balance setting on the rear of the right speaker. English TROUBLESHOOTING Problem One speaker does not play or sounds distorted Cannot control the volume using.... Make sure the control pod plug is fully inserted into the connector. Contacting Customer Service For additional help in the carton, or visit http://global.Bose.com 19 Refer to the address sheet included in solving problems, contact...
Owner's guide
Page 20
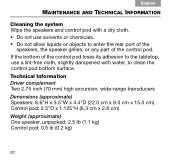
...control pod with a dry cloth. • Do not use a lint-free cloth, slightly dampened with water, to enter the rear port of the speakers, the speaker grilles, or any part of the control pod loses its adhesion to the tabletop, use solvents or chemicals. • Do not allow liquids or objects...surface. If the bottom of the control pod. Technical Information Driver complement Two 2.75 inch (70 mm) high excursion, wide-range transducers Dimensions (approximate) Speakers: 8.6"H x 3.5"W x 4.4"D (22.0 cm x 9.0 cm x 15.0 cm) Control pod: 2.5"D x 1.125"H (6.3 cm x 2.8 cm) Weight (approximate) One...
...control pod with a dry cloth. • Do not use a lint-free cloth, slightly dampened with water, to enter the rear port of the speakers, the speaker grilles, or any part of the control pod loses its adhesion to the tabletop, use solvents or chemicals. • Do not allow liquids or objects...surface. If the bottom of the control pod. Technical Information Driver complement Two 2.75 inch (70 mm) high excursion, wide-range transducers Dimensions (approximate) Speakers: 8.6"H x 3.5"W x 4.4"D (22.0 cm x 9.0 cm x 15.0 cm) Control pod: 2.5"D x 1.125"H (6.3 cm x 2.8 cm) Weight (approximate) One...


