
Owner's guide
Page 2
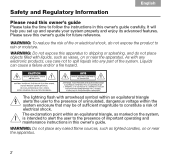
...part of fire or electrical shock, do not place objects filled with liquids, such as lighted candles, on or near the apparatus. WARNING: To reduce the risk of the system. As with arrowhead symbol within an equilateral triangle alerts the user to the presence of uninsulated, dangerous voltage... alert the user to the presence of electrical shock. It will help you set up and operate your system properly and enjoy its advanced features. Safety and Regulatory Information English Please read this owner's guide Please take the time to follow the instructions in this apparatus...
...part of fire or electrical shock, do not place objects filled with liquids, such as lighted candles, on or near the apparatus. WARNING: To reduce the risk of the system. As with arrowhead symbol within an equilateral triangle alerts the user to the presence of uninsulated, dangerous voltage... alert the user to the presence of electrical shock. It will help you set up and operate your system properly and enjoy its advanced features. Safety and Regulatory Information English Please read this owner's guide Please take the time to follow the instructions in this apparatus...
Owner's guide
Page 3
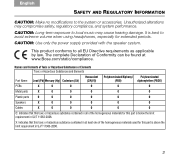
... substance contained in all EU Directive requirements as applicable by law. This product conforms to avoid extreme volume when using headphones, especially for extended periods. CAUTION: Use only the power supply provided with the speaker system. Unauthorized alterations may cause hearing damage. It is best to all of the homogeneous materials for this part is above the limit...
... substance contained in all EU Directive requirements as applicable by law. This product conforms to avoid extreme volume when using headphones, especially for extended periods. CAUTION: Use only the power supply provided with the speaker system. Unauthorized alterations may cause hearing damage. It is best to all of the homogeneous materials for this part is above the limit...
Owner's guide
Page 4
... product is intended to be used only with the power supply provided. • The product must be reproduced, modified, distributed, or otherwise used without prior written permission. 4 iPod is a trademark of this work may be used as the disconnect device, such disconnect device shall remain readily operable. and other countries. ©2011 Bose Corporation. No part of Apple Inc., registered...
... product is intended to be used only with the power supply provided. • The product must be reproduced, modified, distributed, or otherwise used without prior written permission. 4 iPod is a trademark of this work may be used as the disconnect device, such disconnect device shall remain readily operable. and other countries. ©2011 Bose Corporation. No part of Apple Inc., registered...
Owner's guide
Page 5
If this is connected. • Consult the dealer or an experienced technician for a Class B digital device, pursuant to which can radiate radio frequency energy and, if not installed and used in accordance with the instructions, may void the warranty. NOTE: Unauthorized modification of the system could void the user's authority to correct the interference by turning the equipment off and...
If this is connected. • Consult the dealer or an experienced technician for a Class B digital device, pursuant to which can radiate radio frequency energy and, if not installed and used in accordance with the instructions, may void the warranty. NOTE: Unauthorized modification of the system could void the user's authority to correct the interference by turning the equipment off and...
Owner's guide
Page 7
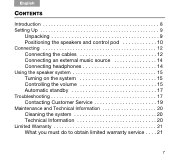
English CONTENTS Introduction 8 Setting Up 9 Unpacking 9 Positioning the speakers and control pod 10 Connecting 12 Connecting the cables 12 Connecting an external music source 14 Connecting headphones 14 Using the speaker system 15 Turning on the system 15 Controlling the volume 15 Automatic standby 17 Troubleshooting 17 Contacting Customer Service 19 Maintenance and Technical Information 20 Cleaning the system 20 Technical Information 20 Limited Warranty 21 What you must do to obtain limited warranty service . . . . 21 7
English CONTENTS Introduction 8 Setting Up 9 Unpacking 9 Positioning the speakers and control pod 10 Connecting 12 Connecting the cables 12 Connecting an external music source 14 Connecting headphones 14 Using the speaker system 15 Turning on the system 15 Controlling the volume 15 Automatic standby 17 Troubleshooting 17 Contacting Customer Service 19 Maintenance and Technical Information 20 Cleaning the system 20 Technical Information 20 Limited Warranty 21 What you must do to obtain limited warranty service . . . . 21 7
Owner's guide
Page 8
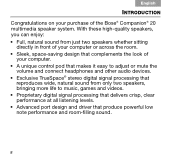
... design that produce powerful low note performance and room-filling sound. 8 English INTRODUCTION Congratulations on your computer. • A unique control pod that makes it easy to adjust or mute the volume and connect headphones and other audio devices. • Exclusive TrueSpace® stereo digital signal processing that reproduces wide, natural sound from only two speakers, bringing more life to music, games and videos...
... design that produce powerful low note performance and room-filling sound. 8 English INTRODUCTION Congratulations on your computer. • A unique control pod that makes it easy to adjust or mute the volume and connect headphones and other audio devices. • Exclusive TrueSpace® stereo digital signal processing that reproduces wide, natural sound from only two speakers, bringing more life to music, games and videos...

Owner's guide
Page 9
Save the carton and all parts shown are in the carton. AC power Control pod cord* and cable 9 Left speaker Right speaker Speaker cable Audio cable Power pack and cable *Correct for possible future use. If any part is missing or damaged, contact your region. English SETTING UP Unpacking During unpacking, make sure that all packing materials for your Bose dealer.
Save the carton and all parts shown are in the carton. AC power Control pod cord* and cable 9 Left speaker Right speaker Speaker cable Audio cable Power pack and cable *Correct for possible future use. If any part is missing or damaged, contact your region. English SETTING UP Unpacking During unpacking, make sure that all packing materials for your Bose dealer.
Owner's guide
Page 10
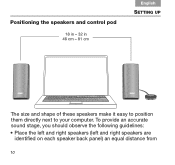
Positioning the speakers and control pod 18 in - 32 in 46 cm - 81 cm English SETTING UP The size and shape of these speakers make it easy to position them directly next to your computer. To provide an accurate sound stage, you should observe the following guidelines: • Place the left and right speakers (left and right speakers are identified on each speaker back panel) an equal distance from 10
Positioning the speakers and control pod 18 in - 32 in 46 cm - 81 cm English SETTING UP The size and shape of these speakers make it easy to position them directly next to your computer. To provide an accurate sound stage, you should observe the following guidelines: • Place the left and right speakers (left and right speakers are identified on each speaker back panel) an equal distance from 10
Owner's guide
Page 11
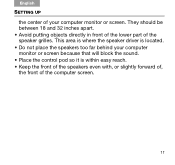
They should be between 18 and 32 inches apart. • Avoid putting objects directly in front of the lower part of the computer screen. 11 This area is where the speaker driver is within easy reach. • Keep the front of the speakers even with, or slightly forward of, the front of the speaker grilles. English SETTING UP the center of your computer monitor or screen because that will block the sound. • Place the control pod so it is located. • Do not place the speakers too far behind your computer monitor or screen.
They should be between 18 and 32 inches apart. • Avoid putting objects directly in front of the lower part of the computer screen. 11 This area is where the speaker driver is within easy reach. • Keep the front of the speakers even with, or slightly forward of, the front of the speaker grilles. English SETTING UP the center of your computer monitor or screen because that will block the sound. • Place the control pod so it is located. • Do not place the speakers too far behind your computer monitor or screen.
Owner's guide
Page 12
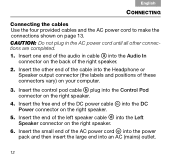
... speaker. 2. Insert the control pod cable b plug into the Headphone or Speaker output connector (the labels and positions of the DC power cable c into the Left Speaker connector on the right speaker. 5. Insert the free end of these connectors vary) on page 13. Insert the end of the AC power cord e into the power pack and then insert the large end into the Audio In connector on the right speaker. 4. English CONNECTING Connecting the cables Use...
... speaker. 2. Insert the control pod cable b plug into the Headphone or Speaker output connector (the labels and positions of the DC power cable c into the Left Speaker connector on the right speaker. 5. Insert the free end of these connectors vary) on page 13. Insert the end of the AC power cord e into the power pack and then insert the large end into the Audio In connector on the right speaker. 4. English CONNECTING Connecting the cables Use...
Owner's guide
Page 14
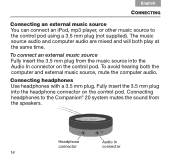
... computer audio. Connecting headphones to the control pod using a 3.5 mm plug (not supplied). To connect an external music source Fully insert the 3.5 mm plug from the speakers. English CONNECTING Connecting an external music source You can connect an iPod, mp3 player, or other music source to the Companion® 20 system mutes the sound from the music source into the headphone connector on the control pod. Headphone connector Audio In connector 14 Fully insert the 3.5 mm plug into the Audio In connector on the control pod.
... computer audio. Connecting headphones to the control pod using a 3.5 mm plug (not supplied). To connect an external music source Fully insert the 3.5 mm plug from the speakers. English CONNECTING Connecting an external music source You can connect an iPod, mp3 player, or other music source to the Companion® 20 system mutes the sound from the music source into the headphone connector on the control pod. Headphone connector Audio In connector 14 Fully insert the 3.5 mm plug into the Audio In connector on the control pod.
Owner's guide
Page 15
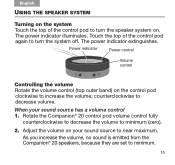
... the control pod to turn the system off. Power indicator Power control Volume control Controlling the volume Rotate the volume control (top outer band) on your sound source has a volume control 1. Rotate the Companion® 20 control pod volume control fully counterclockwise to decrease the volume to minimum. 15 As you increase the volume, no sound is emitted from the Companion® 20 speakers, because they are set to minimum (zero). 2. counterclockwise to decrease volume. English USING THE SPEAKER SYSTEM Turning on...
... the control pod to turn the system off. Power indicator Power control Volume control Controlling the volume Rotate the volume control (top outer band) on your sound source has a volume control 1. Rotate the Companion® 20 control pod volume control fully counterclockwise to decrease the volume to minimum. 15 As you increase the volume, no sound is emitted from the Companion® 20 speakers, because they are set to minimum (zero). 2. counterclockwise to decrease volume. English USING THE SPEAKER SYSTEM Turning on...
Owner's guide
Page 16
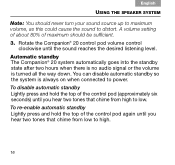
Rotate the Companion® 20 control pod volume control clockwise until you hear two tones that chime from high to high. 16 English USING THE SPEAKER SYSTEM Note: You should be sufficient. 3. To re-enable automatic standby Lightly press and hold the top of the control pod (approximately six ... Lightly press and hold the top of maximum should never turn your sound source up to maximum volume, as this could cause the sound to power. A volume setting of about 80% of the control pod again until the sound reaches the desired listening level. Automatic standby The Companion® 20 ...
Rotate the Companion® 20 control pod volume control clockwise until you hear two tones that chime from high to high. 16 English USING THE SPEAKER SYSTEM Note: You should be sufficient. 3. To re-enable automatic standby Lightly press and hold the top of the control pod (approximately six ... Lightly press and hold the top of maximum should never turn your sound source up to maximum volume, as this could cause the sound to power. A volume setting of about 80% of the control pod again until the sound reaches the desired listening level. Automatic standby The Companion® 20 ...
Owner's guide
Page 17
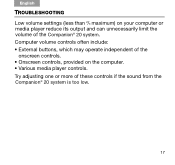
Computer volume controls often include: • External buttons, which may operate independent of these controls if the sound from the Companion® 20 system is too low. 17 Try adjusting one or more of the onscreen controls. • Onscreen controls, provided on your computer or media player reduce its output and can unnecessarily limit the volume of the Companion® 20 system. English TROUBLESHOOTING Low volume settings (less than 2/3 maximum) on the computer. • Various media player controls.
Computer volume controls often include: • External buttons, which may operate independent of these controls if the sound from the Companion® 20 system is too low. 17 Try adjusting one or more of the onscreen controls. • Onscreen controls, provided on your computer or media player reduce its output and can unnecessarily limit the volume of the Companion® 20 system. English TROUBLESHOOTING Low volume settings (less than 2/3 maximum) on the computer. • Various media player controls.
Owner's guide
Page 18
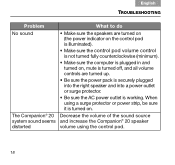
The Companion® 20 Decrease the volume of the sound source system sound seems and increase the Companion® 20 speaker distorted volume using a surge protector or power strip, be sure it is working. When using the control pod. 18 English TROUBLESHOOTING Problem What to do No sound • Make sure the speakers are turned on (the power indicator on the control pod is illuminated). • Make sure the control pod volume control is not turned fully counterclockwise (minimum). • Make sure...
The Companion® 20 Decrease the volume of the sound source system sound seems and increase the Companion® 20 speaker distorted volume using a surge protector or power strip, be sure it is working. When using the control pod. 18 English TROUBLESHOOTING Problem What to do No sound • Make sure the speakers are turned on (the power indicator on the control pod is illuminated). • Make sure the control pod volume control is not turned fully counterclockwise (minimum). • Make sure...
Owner's guide
Page 19
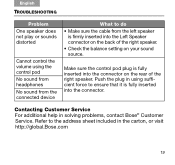
... into the Left Speaker connector on the back of the right speaker. • Check the balance setting on the rear of the right speaker. Contacting Customer Service For additional help in the carton, or visit http://global.Bose.com 19 Refer to the address sheet included in solving problems, contact Bose® Customer Service. English TROUBLESHOOTING Problem One speaker does not play or sounds distorted Cannot control the volume using sufficient...
... into the Left Speaker connector on the back of the right speaker. • Check the balance setting on the rear of the right speaker. Contacting Customer Service For additional help in the carton, or visit http://global.Bose.com 19 Refer to the address sheet included in solving problems, contact Bose® Customer Service. English TROUBLESHOOTING Problem One speaker does not play or sounds distorted Cannot control the volume using sufficient...
Owner's guide
Page 20
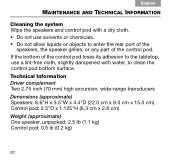
... allow liquids or objects to enter the rear port of the speakers, the speaker grilles, or any part of the control pod loses its adhesion to the tabletop, use a lint-free cloth, slightly dampened with water, to clean the control pod bottom surface. If the bottom of the control pod. Technical Information Driver complement Two 2.75 inch (70 mm) high excursion, wide-range transducers Dimensions...
... allow liquids or objects to enter the rear port of the speakers, the speaker grilles, or any part of the control pod loses its adhesion to the tabletop, use a lint-free cloth, slightly dampened with water, to clean the control pod bottom surface. If the bottom of the control pod. Technical Information Driver complement Two 2.75 inch (70 mm) high excursion, wide-range transducers Dimensions...

Owner's guide
Page 21
... country. 3. Label and ship the product, freight prepaid, to obtain limited warranty service Return the product, with your system. English LIMITED WARRANTY This system is covered by the Bose organization in your country or region) for specific return and shipping instructions. 2. Details of the limited warranty are provided on the Product Registration Card that came with proof...
... country. 3. Label and ship the product, freight prepaid, to obtain limited warranty service Return the product, with your system. English LIMITED WARRANTY This system is covered by the Bose organization in your country or region) for specific return and shipping instructions. 2. Details of the limited warranty are provided on the Product Registration Card that came with proof...

Owner's guide
Page 22
©2011 Bose Corporation, The Mountain, Framingham, MA 01701-9168 USA AM344837 Rev.02
©2011 Bose Corporation, The Mountain, Framingham, MA 01701-9168 USA AM344837 Rev.02


