Installation Instructions
Page 2
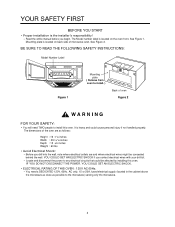
Read the entire manual before you contact electrical wires with your drill bit. - Before you... oven. See Figure 2. It is located on the oven front. Locate and disconnect the power to the microwave) serving only the microwave. 2 Mounting plate is heavy and could be concealed behind the wall. YOUR SAFETY FIRST BEFORE YOU START ...• Proper installation is located on back side of microwave oven. BE SURE TO READ THE FOLLOWING SAFETY INSTRUCTIONS: Model Number Label Figure 1 Mounting plate ( Remove from oven...
Read the entire manual before you contact electrical wires with your drill bit. - Before you... oven. See Figure 2. It is located on the oven front. Locate and disconnect the power to the microwave) serving only the microwave. 2 Mounting plate is heavy and could be concealed behind the wall. YOUR SAFETY FIRST BEFORE YOU START ...• Proper installation is located on back side of microwave oven. BE SURE TO READ THE FOLLOWING SAFETY INSTRUCTIONS: Model Number Label Figure 1 Mounting plate ( Remove from oven...
Installation Instructions
Page 18
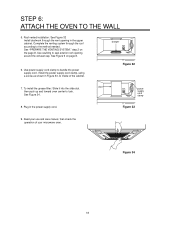
... to bundle the power supply cord. power supply cord clamp 8. See Figure 6 on the page 8. See Figure 34. Figure 33 9. Read your use and care manual, then check the operation of the cabinet. Use caulking to seal exterior roof opening in the upper cabinet. damper Figure 32 7. Plug in Figure 33... THE VENTING SYSTEM," step 2 on page 8. 6. Figure 34 18 Roof vented installation: See Figure 32 Install ductwork through the roof according to inside of your microwave oven. Install the power supply cord clamp, using a screw as shown in the power supply cord.
... to bundle the power supply cord. power supply cord clamp 8. See Figure 6 on the page 8. See Figure 34. Figure 33 9. Read your use and care manual, then check the operation of the cabinet. Use caulking to seal exterior roof opening in the upper cabinet. damper Figure 32 7. Plug in Figure 33... THE VENTING SYSTEM," step 2 on page 8. 6. Figure 34 18 Roof vented installation: See Figure 32 Install ductwork through the roof according to inside of your microwave oven. Install the power supply cord clamp, using a screw as shown in the power supply cord.

Use & Care Manual
Page 1
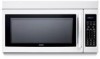
Household Appliances Over-the-Range Microwave Use and Care Manual For Models: HMV9302, HMV9305, HMV9306, HMV9307 PLEASE READ ENTIRE INSTRUCTIONS BEFORE PROCEEDING IMPORTANT: Save these instructions for future reference. OWNER: Please retain these instructions for the owner. INSTALLER: Please leave these Installation Instructions with this unit for the local electrical inspector's use.
Household Appliances Over-the-Range Microwave Use and Care Manual For Models: HMV9302, HMV9305, HMV9306, HMV9307 PLEASE READ ENTIRE INSTRUCTIONS BEFORE PROCEEDING IMPORTANT: Save these instructions for future reference. OWNER: Please retain these instructions for the owner. INSTALLER: Please leave these Installation Instructions with this unit for the local electrical inspector's use.
Use & Care Manual
Page 4
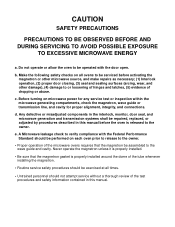
...Do not leave paper products, cooking utensils or food in the cavity when not in your oven is open. • Always turn on special microwave-cooking packages to inspect purchased items for industrial or laboratory use. • Do not use this appliance outdoors. Turn the oven off the power.... • Use your oven only for the operations described in this manual. • Do not run the oven empty, without close supervision. • Read and follow the specific PRECAUTIONS TO AVOID POSSIBLE EXPOSURE TO EXCESSIVE MICROWAVE ENERGY found on the hood or the filters. • Use care...
...Do not leave paper products, cooking utensils or food in the cavity when not in your oven is open. • Always turn on special microwave-cooking packages to inspect purchased items for industrial or laboratory use. • Do not use this appliance outdoors. Turn the oven off the power.... • Use your oven only for the operations described in this manual. • Do not run the oven empty, without close supervision. • Read and follow the specific PRECAUTIONS TO AVOID POSSIBLE EXPOSURE TO EXCESSIVE MICROWAVE ENERGY found on the hood or the filters. • Use care...
Service Manual
Page 1
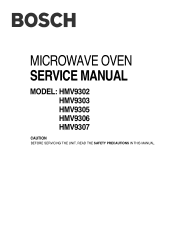
MICROWAVE OVEN SERVICE MANUAL MODEL: HMV9302 HMV9303 HMV9305 HMV9306 HMV9307 CAUTION BEFORE SERVICING THE UNIT, READ THE SAFETY PRECAUTIONS IN THIS MANUAL.
MICROWAVE OVEN SERVICE MANUAL MODEL: HMV9302 HMV9303 HMV9305 HMV9306 HMV9307 CAUTION BEFORE SERVICING THE UNIT, READ THE SAFETY PRECAUTIONS IN THIS MANUAL.
Service Manual
Page 2
...review of dropping or abuse. Before turning on each oven prior to release to the owner. • Proper operation of the microwave ovens requires that the magnetron gasket is properly installed around the dome of the tube whenever installing the magnetron. • Routine ...; Be sure that the magnetron be exercised at all ovens to be repaired, replaced, or adjusted by procedures described in this manual before activating the magnetron or other microwave source, and make repairs as necessary; (1) Interlock operation, (2) proper door closing, (3) seal and sealing surfaces (arcing, wear...
...review of dropping or abuse. Before turning on each oven prior to release to the owner. • Proper operation of the microwave ovens requires that the magnetron gasket is properly installed around the dome of the tube whenever installing the magnetron. • Routine ...; Be sure that the magnetron be exercised at all ovens to be repaired, replaced, or adjusted by procedures described in this manual before activating the magnetron or other microwave source, and make repairs as necessary; (1) Interlock operation, (2) proper door closing, (3) seal and sealing surfaces (arcing, wear...
Service Manual
Page 3
... GENERAL PRECAUTIONS IN USE ...6-1 TRIAL OPERATION ...6-1 FEATURES AND SPECIFICATIONS FEATURES 6-1 SERVICE INFORMATION ...7-1 PRECAUTIONS AND REPAIR SERVICE TIPS 7-1 MICROWAVE LEAKAGE TEST ...7-2 POWER OUTPUT MEASUREMENT ...7-3 DISASSEMBLY INSTRUCTIONS ...7-4 INTERLOCK SYSTEM ...7-12 INTERLOCK CONTINUITY TEST ...7-14 TEST AND CHECKOUT PROCEDURES AND......7-18 C. Failure to adhere to or observe the information in exposing yourself to the Microwave Energy normally contained within the oven cavity. TEST PROCEDURES...7-15 B. TROUBLE SHOOTING ...7-21 EXPLODED VIEW ...8-1 REPLACEMENT PARTS ...
... GENERAL PRECAUTIONS IN USE ...6-1 TRIAL OPERATION ...6-1 FEATURES AND SPECIFICATIONS FEATURES 6-1 SERVICE INFORMATION ...7-1 PRECAUTIONS AND REPAIR SERVICE TIPS 7-1 MICROWAVE LEAKAGE TEST ...7-2 POWER OUTPUT MEASUREMENT ...7-3 DISASSEMBLY INSTRUCTIONS ...7-4 INTERLOCK SYSTEM ...7-12 INTERLOCK CONTINUITY TEST ...7-14 TEST AND CHECKOUT PROCEDURES AND......7-18 C. Failure to adhere to or observe the information in exposing yourself to the Microwave Energy normally contained within the oven cavity. TEST PROCEDURES...7-15 B. TROUBLE SHOOTING ...7-21 EXPLODED VIEW ...8-1 REPLACEMENT PARTS ...
Service Manual
Page 4
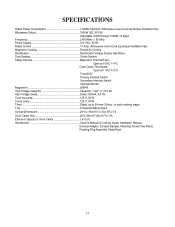
... 100W through 1000W, 10 steps Frequency 2,450 MHz 50 MHz Power Supply 120 VAC, 60 Hz Rated Current 13 Amp. (Microwave oven+Cook top lamps+Ventilation fan) Magnetron Cooling Forced Air Cooling Rectification Rectification Voltage Double Half-Wave Door Sealing Choke System Safety ... Dimensions 2915/16"(W)x167/16"(D)x155/8"(H) Oven Cavity Size 223/8"(W)x10"(D)x1419/32"(H) Effective Capacity of Oven Cavity 1.8 Cu.ft. Accessories Owner's Manual & Cooking Guide, Installation Manual, Exhaust Adapter, Exhaust Damper, Mounting Kit and Two Filters, Rotating Ring Assembly, Metal Rack. 1-1
... 100W through 1000W, 10 steps Frequency 2,450 MHz 50 MHz Power Supply 120 VAC, 60 Hz Rated Current 13 Amp. (Microwave oven+Cook top lamps+Ventilation fan) Magnetron Cooling Forced Air Cooling Rectification Rectification Voltage Double Half-Wave Door Sealing Choke System Safety ... Dimensions 2915/16"(W)x167/16"(D)x155/8"(H) Oven Cavity Size 223/8"(W)x10"(D)x1419/32"(H) Effective Capacity of Oven Cavity 1.8 Cu.ft. Accessories Owner's Manual & Cooking Guide, Installation Manual, Exhaust Adapter, Exhaust Damper, Mounting Kit and Two Filters, Rotating Ring Assembly, Metal Rack. 1-1
Service Manual
Page 14
...addition of the water to the vessel, the load is immediately placed on the center of the turntable which are listed in this manual have been used. (3) At least once a year, have the electromagnetic energy leakage monitor checked for calibration by the grip portion ... than 1 inch/sec (2.5cm/sec) along the side.) RECORD KEEPING AND NOTIFICATION AFTER MEASUREMENT (1) After adjustment and repair of any microwave energy interruption or microwave energy blocking device, record the measured values for future reference. MEASUREMENT WITH THE OUTER CASE REMOVED (1) When you replace the magnetron,...
...addition of the water to the vessel, the load is immediately placed on the center of the turntable which are listed in this manual have been used. (3) At least once a year, have the electromagnetic energy leakage monitor checked for calibration by the grip portion ... than 1 inch/sec (2.5cm/sec) along the side.) RECORD KEEPING AND NOTIFICATION AFTER MEASUREMENT (1) After adjustment and repair of any microwave energy interruption or microwave energy blocking device, record the measured values for future reference. MEASUREMENT WITH THE OUTER CASE REMOVED (1) When you replace the magnetron,...

Service Manual
Page 43
#EV# INSTALLATION 6008 6011 6010 6009 OWNERS MANUAL *01 SERVICE MANUAL *02 INSTALLATION *04 MANUAL COOKING GUIDE LABEL *05 TEMPLATE *06 8-7
#EV# INSTALLATION 6008 6011 6010 6009 OWNERS MANUAL *01 SERVICE MANUAL *02 INSTALLATION *04 MANUAL COOKING GUIDE LABEL *05 TEMPLATE *06 8-7