Installation Instructions
Page 2
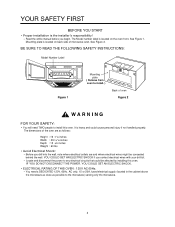
... and disconnect the power to the microwave) serving only the microwave. 2 You need TWO people to install this oven. BE SURE TO READ THE FOLLOWING SAFETY INSTRUCTIONS: Model Number Label Figure 1 Mounting plate ( Remove from oven to install. ) Back of microwave oven. YOU COULD GET AN ELECTRIC SHOCK... if you begin. It is the installer's responsibility! - Mounting plate is located on back side of oven Figure 2 WARNING FOR YOUR SAFETY: • You ...
... and disconnect the power to the microwave) serving only the microwave. 2 You need TWO people to install this oven. BE SURE TO READ THE FOLLOWING SAFETY INSTRUCTIONS: Model Number Label Figure 1 Mounting plate ( Remove from oven to install. ) Back of microwave oven. YOU COULD GET AN ELECTRIC SHOCK... if you begin. It is the installer's responsibility! - Mounting plate is located on back side of oven Figure 2 WARNING FOR YOUR SAFETY: • You ...
Installation Instructions
Page 3
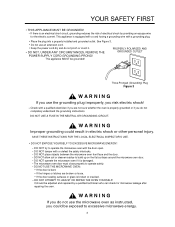
... with the door open. - It should be grounded! This appliance MUST be adjusted and repaired by providing an escape wire for microwave leakage after repairing the oven. DO NOT operate the microwave oven if it . If there is equipped with a cord having a grounding wire with or defeat the safety interlocks. - DO NOT tamper with...
... with the door open. - It should be grounded! This appliance MUST be adjusted and repaired by providing an escape wire for microwave leakage after repairing the oven. DO NOT operate the microwave oven if it . If there is equipped with a cord having a grounding wire with or defeat the safety interlocks. - DO NOT tamper with...
Installation Instructions
Page 4
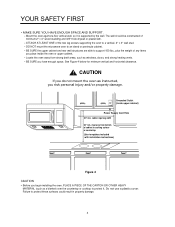
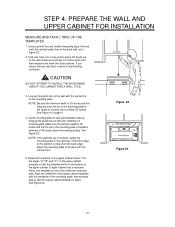
... the upper cabinet and rear wall structures are able to support 150 lbs., plus the weight of the two lag screws supporting the oven to cooking surface or countertop (Use templates included with installation instructions) Figure 4 CAUTION • Before you begin installing the... as windows, doors, and strong heating vents. - CAUTION If you place inside upper cabinet) Power Supply Cord Hole 30" min. DO NOT mount the microwave oven to protect these surfaces could result in property damage. 4 YOUR SAFETY FIRST • MAKE SURE YOU HAVE ENOUGH SPACE AND SUPPORT. - The wall should ...
... the upper cabinet and rear wall structures are able to support 150 lbs., plus the weight of the two lag screws supporting the oven to cooking surface or countertop (Use templates included with installation instructions) Figure 4 CAUTION • Before you begin installing the... as windows, doors, and strong heating vents. - CAUTION If you place inside upper cabinet) Power Supply Cord Hole 30" min. DO NOT mount the microwave oven to protect these surfaces could result in property damage. 4 YOUR SAFETY FIRST • MAKE SURE YOU HAVE ENOUGH SPACE AND SUPPORT. - The wall should ...
Installation Instructions
Page 7
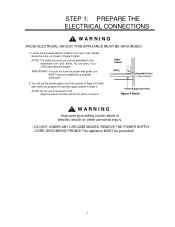
..., UNDER ANY CIRCUMSTANCES, REMOVE THE POWER SUPPLY CORD GROUNDING PRONG! NOTE: The outlet should be grounded! 7 This appliance MUST be on a circuit dedicated to the microwave oven 120V, 60Hz., AC only with a 15 or 20A fused electrical supply. NOTE: Do not use an extension cord. STEP 1: PREPARE THE ELECTRICAL CONNECTIONS WARNING AVOID...
..., UNDER ANY CIRCUMSTANCES, REMOVE THE POWER SUPPLY CORD GROUNDING PRONG! NOTE: The outlet should be grounded! 7 This appliance MUST be on a circuit dedicated to the microwave oven 120V, 60Hz., AC only with a 15 or 20A fused electrical supply. NOTE: Do not use an extension cord. STEP 1: PREPARE THE ELECTRICAL CONNECTIONS WARNING AVOID...
Installation Instructions
Page 10
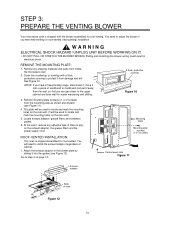
...5. See Figure 10. A thick, protective covering Figure 10 3. STEP 3: PREPARE THE VENTING BLOWER Your microwave oven is shipped with a thick, protective covering to protect it from inside the microwave oven. 2. This plate will be used to locate and mark the mounting holes on the exhaust adaptor, the... grease filters and the power supply cord. ROOF-VENTED INSTALLATION: This oven is any shipping materials and parts from ...
...5. See Figure 10. A thick, protective covering Figure 10 3. STEP 3: PREPARE THE VENTING BLOWER Your microwave oven is shipped with a thick, protective covering to protect it from inside the microwave oven. 2. This plate will be used to locate and mark the mounting holes on the exhaust adaptor, the... grease filters and the power supply cord. ROOF-VENTED INSTALLATION: This oven is any shipping materials and parts from ...
Installation Instructions
Page 11
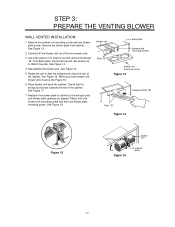
... remove knockouts "B" from cabinet. Reattach the blower plate to distort the plate. See Figure 15. 5. Check that the exhaust ports face the rear of the microwave oven. 3. See Figure 17. 7. See Figure 16. Be careful not to cabinet so the exhaust ports and blower plate opening are aligned. See Figure 18. STEP...
... remove knockouts "B" from cabinet. Reattach the blower plate to distort the plate. See Figure 15. 5. Check that the exhaust ports face the rear of the microwave oven. 3. See Figure 17. 7. See Figure 16. Be careful not to cabinet so the exhaust ports and blower plate opening are aligned. See Figure 18. STEP...
Installation Instructions
Page 12
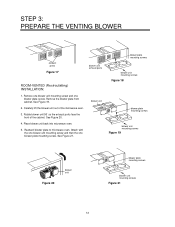
Reattach blower plate to microwave oven. Remove the blower plate from cabinet. Carefully lift the blower unit out of the cabinet. blower unit blower plate mounting screws blower unit mounting screws ... screw and one blower plate mounting screw. Rotate blower unit 90˚ so the exhaust ports face the front of the microwave oven. 3. See Figure 19. 2. Place blower unit back into microwave oven. 5. See Figure 20. 4. Attach with the one blower unit mounting screw and then the one blower plate screw. See Figure 21...
Reattach blower plate to microwave oven. Remove the blower plate from cabinet. Carefully lift the blower unit out of the cabinet. blower unit blower plate mounting screws blower unit mounting screws ... screw and one blower plate mounting screw. Rotate blower unit 90˚ so the exhaust ports face the front of the microwave oven. 3. See Figure 19. 2. Place blower unit back into microwave oven. 5. See Figure 20. 4. Attach with the one blower unit mounting screw and then the one blower plate screw. See Figure 21...
Installation Instructions
Page 13
CAUTION DO NOT ATTEMPT TO INSTALL THE MICROWAVE OVEN IF YOU CANNOT FIND A WALL STUD. 3. NOTE: If the cabinets are normally 16 inches apart) and then measure and mark the stud locations. If upper ...
CAUTION DO NOT ATTEMPT TO INSTALL THE MICROWAVE OVEN IF YOU CANNOT FIND A WALL STUD. 3. NOTE: If the cabinets are normally 16 inches apart) and then measure and mark the stud locations. If upper ...
Installation Instructions
Page 14
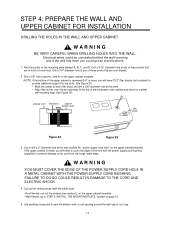
..." diameter hole at any of these points that are over the two openings in front of these points that are in the top of the microwave oven cabinet and attach to cabinet with the saber saw): • Roof-Vented: cut out the shaded area marked L on the upper cabinet template. • Wall...
..." diameter hole at any of these points that are over the two openings in front of these points that are in the top of the microwave oven cabinet and attach to cabinet with the saber saw): • Roof-Vented: cut out the shaded area marked L on the upper cabinet template. • Wall...
Installation Instructions
Page 17
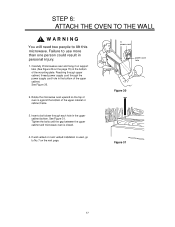
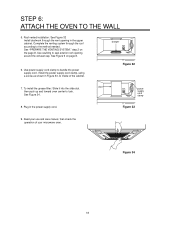
...result in the bottom of the upper cabinet. Rotate the microwave oven upward so the top of oven is used, go to lift this microwave. If wall vented or room vented installation is against the bottom of the mounting plate. Carefully lift microwave oven and hang it on support tabs (See Figure 26 ... supply cord hole in personal injury. 1. See Figure 30. 2. Tighten the bolts until the gap between the upper cabinet and microwave oven is closed. 4. STEP 6: ATTACH THE OVEN TO THE WALL WARNING You will need two people to No.7 on the page 15) at the bottom of the upper cabinet ...
...result in the bottom of the upper cabinet. Rotate the microwave oven upward so the top of oven is used, go to lift this microwave. If wall vented or room vented installation is against the bottom of the mounting plate. Carefully lift microwave oven and hang it on support tabs (See Figure 26 ... supply cord hole in personal injury. 1. See Figure 30. 2. Tighten the bolts until the gap between the upper cabinet and microwave oven is closed. 4. STEP 6: ATTACH THE OVEN TO THE WALL WARNING You will need two people to No.7 on the page 15) at the bottom of the upper cabinet ...
Installation Instructions
Page 18
... THE WALL 5. damper Figure 32 7. To install the grease filter: Slide it into the slide slot, duct then push up and toward oven center to inside of your microwave oven. See "PREPARE THE VENTING SYSTEM," step 2 on page 8. 6. Roof vented installation: See Figure 32 Install ductwork through the roof according to the method...
... THE WALL 5. damper Figure 32 7. To install the grease filter: Slide it into the slide slot, duct then push up and toward oven center to inside of your microwave oven. See "PREPARE THE VENTING SYSTEM," step 2 on page 8. 6. Roof vented installation: See Figure 32 Install ductwork through the roof according to the method...
Use & Care Manual
Page 2
... 3-5 Precautions To Avoid Possible Exposure To Excessive Microwave Energy 3 Important Safety Instructions 4-5 Grounding Instructions 5 UNDERSTANDING YOUR MICROWAVE OVEN 6-9 Cookware Guide 6 Tips For Microwave Cooking 7 Parts And Accessories 8 Control Panel 8-9 USING YOUR MICROWAVE OVEN 10-29 Learn About Your Microwave Oven 10 Help 10 Clock 10 Kitchen Timer 10 Control... 28 Cleaning The Grease Filter 28 Charcoal Filter Replacement 28 Cooktop/Night Light replacement 29 Oven Light replacement 29 TROUBLE SHOOTING 30-31 Before Calling For Service 30 Questions And Answers 31 2
... 3-5 Precautions To Avoid Possible Exposure To Excessive Microwave Energy 3 Important Safety Instructions 4-5 Grounding Instructions 5 UNDERSTANDING YOUR MICROWAVE OVEN 6-9 Cookware Guide 6 Tips For Microwave Cooking 7 Parts And Accessories 8 Control Panel 8-9 USING YOUR MICROWAVE OVEN 10-29 Learn About Your Microwave Oven 10 Help 10 Clock 10 Kitchen Timer 10 Control... 28 Cleaning The Grease Filter 28 Charcoal Filter Replacement 28 Cooktop/Night Light replacement 29 Oven Light replacement 29 TROUBLE SHOOTING 30-31 Before Calling For Service 30 Questions And Answers 31 2
Use & Care Manual
Page 3
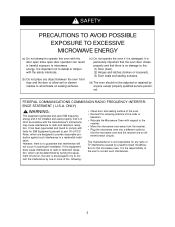
... by turning the equipment off and on, the user is the responsibility of the radio or television. • Relocate the Microwave Oven with the door open since open-door operation can be adjusted or repaired by one or more of the following: •...SAFETY PRECAUTIONS TO AVOID POSSIBLE EXPOSURE TO EXCESSIVE MICROWAVE ENERGY (a) Do not attempt to operate this oven with respect to the receiver. • Move the microwave oven away from the receiver. • Plug the microwave oven into a different outlet so that the microwave oven and the receiver are designed to provide reasonable...
... by turning the equipment off and on, the user is the responsibility of the radio or television. • Relocate the Microwave Oven with the door open since open-door operation can be adjusted or repaired by one or more of the following: •...SAFETY PRECAUTIONS TO AVOID POSSIBLE EXPOSURE TO EXCESSIVE MICROWAVE ENERGY (a) Do not attempt to operate this oven with respect to the receiver. • Move the microwave oven away from the receiver. • Plug the microwave oven into a different outlet so that the microwave oven and the receiver are designed to provide reasonable...
Use & Care Manual
Page 4
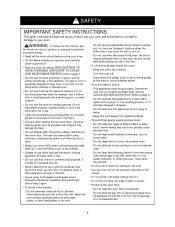
... or fat, sealed containers, or closed . - Do not heat the following items in the microwave oven: whole eggs in the shell, water with the built-in safety switches on the oven door. Turn the oven off the power at the fuse or circuit breaker panel. • To avoid electric shock:...has a damaged cord or plug, if it is not designed for example, near a kitchen sink, in your microwave oven. - To reduce the risk of table or counter. • Preserve the oven floor: - SAFETY IMPORTANT SAFETY INSTRUCTIONS The safety instructions below will tell you have it thoroughly checked by a ...
... or fat, sealed containers, or closed . - Do not heat the following items in the microwave oven: whole eggs in the shell, water with the built-in safety switches on the oven door. Turn the oven off the power at the fuse or circuit breaker panel. • To avoid electric shock:...has a damaged cord or plug, if it is not designed for example, near a kitchen sink, in your microwave oven. - To reduce the risk of table or counter. • Preserve the oven floor: - SAFETY IMPORTANT SAFETY INSTRUCTIONS The safety instructions below will tell you have it thoroughly checked by a ...
Use & Care Manual
Page 5
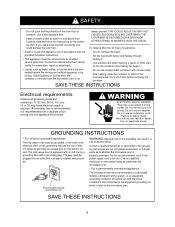
....) It is recommended that is properly installed and grounded. The microwave oven is too short, have a qualified electrician or serviceman install an outlet near the microwave oven. • For a permanently connected appliance: The microwave oven must be connected to follow the instructions for examination, repair or... service facility for the browning dish. SAVE THESE INSTRUCTIONS Electrical requirements Observe all cord connected appliances: The microwave oven must be overheated beyond the boiling point without appearing to stand in accordance with the circuit conductors and ...
....) It is recommended that is properly installed and grounded. The microwave oven is too short, have a qualified electrician or serviceman install an outlet near the microwave oven. • For a permanently connected appliance: The microwave oven must be connected to follow the instructions for examination, repair or... service facility for the browning dish. SAVE THESE INSTRUCTIONS Electrical requirements Observe all cord connected appliances: The microwave oven must be overheated beyond the boiling point without appearing to stand in accordance with the circuit conductors and ...
Use & Care Manual
Page 6
...sheets of aluminum foil because they can cause arcing, which is a discharge of water in a glass measuring cup and place it in the microwave oven. Wood • Wooden bowls, boards, and baskets will allow excess steam to escape. • Use plastic dishes, cups, semi-rigid ...minute. lic trim can be used in high-intensity heat includes util- Place the empty cookware in your microwave oven. Tightly Closed Containers • Tightly closed cookware can damage your microwave oven. However, to shield poultry legs and wings. • Keep all aluminum foil at least 1 inch ...
...sheets of aluminum foil because they can cause arcing, which is a discharge of water in a glass measuring cup and place it in the microwave oven. Wood • Wooden bowls, boards, and baskets will allow excess steam to escape. • Use plastic dishes, cups, semi-rigid ...minute. lic trim can be used in high-intensity heat includes util- Place the empty cookware in your microwave oven. Tightly Closed Containers • Tightly closed cookware can damage your microwave oven. However, to shield poultry legs and wings. • Keep all aluminum foil at least 1 inch ...
Use & Care Manual
Page 7
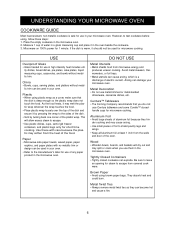
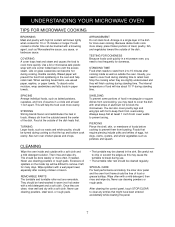
UNDERSTANDING YOUR MICROWAVE OVEN TIPS FOR MICROWAVE COOKING BROWNING Meat and poultry with high fat content will brown lightly when cooked for many days. Foods cooked a shorter time can be turned during ... as well as potatoes and squash. Never use cleaning powders, steel wool, or rough pads. • The turntable may be hand-washed in a microwave oven, you may cause the turntable to break during use cleaning powders or rough pads. Wipe often with a soft cloth. After cleaning the control panel, touch ...
UNDERSTANDING YOUR MICROWAVE OVEN TIPS FOR MICROWAVE COOKING BROWNING Meat and poultry with high fat content will brown lightly when cooked for many days. Foods cooked a shorter time can be turned during ... as well as potatoes and squash. Never use cleaning powders, steel wool, or rough pads. • The turntable may be hand-washed in a microwave oven, you may cause the turntable to break during use cleaning powders or rough pads. Wipe often with a soft cloth. After cleaning the control panel, touch ...
Use & Care Manual
Page 8
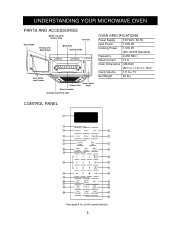
Ft. Net Weight 60 lbs. UNDERSTANDING YOUR MICROWAVE OVEN PARTS AND ACCESSORIES Model and Serial Number Plate Vent Grill Door Handle Window with Metal Shield Metal Rack Cooking Guide Door Safety Lock System Oven Control Grease Filter Panel Glass Turntable Cooktop/Countertop Light OVEN... SPECIFICATIONS Power Supply 120 VAC, 60 Hz Input Power 1,500 W Cooking Power 1,000 W (IEC 60705 Standard) Frequency 2,450 MHz Rated Current 13 A Outer Dimensions (WxHxD) Cavity Volume 2915⁄16" x 167⁄16"x 155⁄8" 1.8 Cu. CONTROL PANEL 1...
Ft. Net Weight 60 lbs. UNDERSTANDING YOUR MICROWAVE OVEN PARTS AND ACCESSORIES Model and Serial Number Plate Vent Grill Door Handle Window with Metal Shield Metal Rack Cooking Guide Door Safety Lock System Oven Control Grease Filter Panel Glass Turntable Cooktop/Countertop Light OVEN... SPECIFICATIONS Power Supply 120 VAC, 60 Hz Input Power 1,500 W Cooking Power 1,000 W (IEC 60705 Standard) Frequency 2,450 MHz Rated Current 13 A Outer Dimensions (WxHxD) Cavity Volume 2915⁄16" x 167⁄16"x 155⁄8" 1.8 Cu. CONTROL PANEL 1...
Use & Care Manual
Page 9
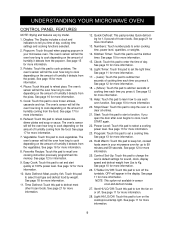
...for more information. 24. Control Set-Up: Touch this pad to set a cooking time. OFF will tell the oven how long to keep hot, cooked foods warm in your microwave oven for more information. 20. See page 11 for sound, clock, display speed and defrost weight from the food.... . Hold Warm: Touch this pad to cook frozen entrees, casserole and rice. NOTE: This option not available in the display. UNDERSTANDING YOUR MICROWAVE OVEN CONTROL PANEL FEATURES NOTE: Styling and features vary by weight. Touch this pad to 99 minutes and 59 seconds. Numbers: Touch number pads to...
...for more information. 24. Control Set-Up: Touch this pad to set a cooking time. OFF will tell the oven how long to keep hot, cooked foods warm in your microwave oven for more information. 20. See page 11 for sound, clock, display speed and defrost weight from the food.... . Hold Warm: Touch this pad to cook frozen entrees, casserole and rice. NOTE: This option not available in the display. UNDERSTANDING YOUR MICROWAVE OVEN CONTROL PANEL FEATURES NOTE: Styling and features vary by weight. Touch this pad to 99 minutes and 59 seconds. Numbers: Touch number pads to...
Use & Care Manual
Page 10
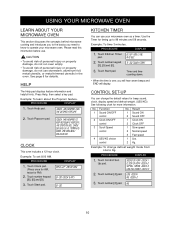
...: To time 3 minutes. Touch Start pad. Timer and time counting down. • When the time is over, you need to know to operate your microwave oven as a timer. Result 1 Sound ON/OFF control 2 Clock ON/OFF control 3 Scroll Speed control 4 LBS/KG choice control 1 Sound ON 2 Sound OFF...off touch 1 clock on/off touch 2 scroll speed touch 3 lbs/kg choice touch 4 2. USING YOUR MICROWAVE OVEN LEARN ABOUT YOUR MICROWAVE OVEN This section discusses the concepts behind microwave cooking and introduces you to the basics you will hear seven beeps and END will show sensing until remaining cook...
...: To time 3 minutes. Touch Start pad. Timer and time counting down. • When the time is over, you need to know to operate your microwave oven as a timer. Result 1 Sound ON/OFF control 2 Clock ON/OFF control 3 Scroll Speed control 4 LBS/KG choice control 1 Sound ON 2 Sound OFF...off touch 1 clock on/off touch 2 scroll speed touch 3 lbs/kg choice touch 4 2. USING YOUR MICROWAVE OVEN LEARN ABOUT YOUR MICROWAVE OVEN This section discusses the concepts behind microwave cooking and introduces you to the basics you will hear seven beeps and END will show sensing until remaining cook...

