Installation Instructions
Page 1
Household Appliances OWNER: Please retain these Installation Instructions with this unit for the owner. INSTALLER: Please leave these instructions for the local electrical inspector's use. Over-the-Range Microwave Installation Instructions For Models: HMV9302, HMV9305, HMV9306, HMV9307 PLEASE READ ENTIRE INSTRUCTIONS BEFORE PROCEEDING IMPORTANT: Save these instructions for future reference.
Household Appliances OWNER: Please retain these Installation Instructions with this unit for the owner. INSTALLER: Please leave these instructions for the local electrical inspector's use. Over-the-Range Microwave Installation Instructions For Models: HMV9302, HMV9305, HMV9306, HMV9307 PLEASE READ ENTIRE INSTRUCTIONS BEFORE PROCEEDING IMPORTANT: Save these instructions for future reference.
Installation Instructions
Page 2
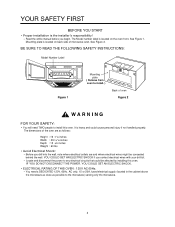
...WARNING FOR YOUR SAFETY: • You will need a DEDICATED 120V, 60Hz, AC only, 15 or 20A, fused electrical supply (located in the cabinet above the microwave as close as follows: Height : 16 7/16 inches Width : 29 15/16 inches Depth : 15 5/8 inches Weight : 60 lbs. • Avoid Electrical ...where electrical outlets are as possible to install this oven. BE SURE TO READ THE FOLLOWING SAFETY INSTRUCTIONS: Model Number Label Figure 1 Mounting plate ( Remove from oven to install. ) Back of microwave oven. The Model number label is located on the oven front. You need TWO people to...
...WARNING FOR YOUR SAFETY: • You will need a DEDICATED 120V, 60Hz, AC only, 15 or 20A, fused electrical supply (located in the cabinet above the microwave as close as follows: Height : 16 7/16 inches Width : 29 15/16 inches Depth : 15 5/8 inches Weight : 60 lbs. • Avoid Electrical ...where electrical outlets are as possible to install this oven. BE SURE TO READ THE FOLLOWING SAFETY INSTRUCTIONS: Model Number Label Figure 1 Mounting plate ( Remove from oven to install. ) Back of microwave oven. The Model number label is located on the oven front. You need TWO people to...
Installation Instructions
Page 3
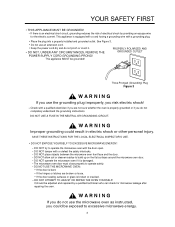
...REPAIR THE OVEN YOURSELF! WARNING If you risk electric shock! - Three-Pronged (Grounding) Plug Figure 3 WARNING If you use the microwave oven as instructed, you are broken or loose. • If the door sealing surfaces or glass is an electrical short circuit, grounding reduces the...latches are not sure whether the oven is damaged. - It should be grounded! SAVE THESE INSTRUCTIONS FOR THE LOCAL ELECTRICAL INSPECTOR'S USE. • DO NOT EXPOSE YOURSELF TO EXCESSIVE MICROWAVE ENERGY! - The microwave oven door must close properly to build up on the flat surfaces around the...
...REPAIR THE OVEN YOURSELF! WARNING If you risk electric shock! - Three-Pronged (Grounding) Plug Figure 3 WARNING If you use the microwave oven as instructed, you are broken or loose. • If the door sealing surfaces or glass is an electrical short circuit, grounding reduces the...latches are not sure whether the oven is damaged. - It should be grounded! SAVE THESE INSTRUCTIONS FOR THE LOCAL ELECTRICAL INSPECTOR'S USE. • DO NOT EXPOSE YOURSELF TO EXCESSIVE MICROWAVE ENERGY! - The microwave oven door must close properly to build up on the flat surfaces around the...
Installation Instructions
Page 4
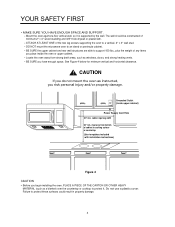
... result in property damage. 4 BE SURE the upper cabinet and rear wall structures are able to cooking surface or countertop (Use templates included with installation instructions) Figure 4 CAUTION • Before you have enough space. ATTACH AT LEAST ONE of minimum 2" x 4" wood studding and 3/8" thick drywall or plaster...from strong draft areas, such as a blanket) over the countertop or cooktop to an island or peninsula cabinet. - DO NOT mount the microwave oven to protect it is supported by the wall. BE SURE you begin installing the oven, PLACE A PIECE OF THE CARTON OR OTHER HEAVY...
... result in property damage. 4 BE SURE the upper cabinet and rear wall structures are able to cooking surface or countertop (Use templates included with installation instructions) Figure 4 CAUTION • Before you have enough space. ATTACH AT LEAST ONE of minimum 2" x 4" wood studding and 3/8" thick drywall or plaster...from strong draft areas, such as a blanket) over the countertop or cooktop to an island or peninsula cabinet. - DO NOT mount the microwave oven to protect it is supported by the wall. BE SURE you begin installing the oven, PLACE A PIECE OF THE CARTON OR OTHER HEAVY...
Use & Care Manual
Page 1
INSTALLER: Please leave these Installation Instructions with this unit for future reference. OWNER: Please retain these instructions for the local electrical inspector's use. Household Appliances Over-the-Range Microwave Use and Care Manual For Models: HMV9302, HMV9305, HMV9306, HMV9307 PLEASE READ ENTIRE INSTRUCTIONS BEFORE PROCEEDING IMPORTANT: Save these instructions for the owner.
INSTALLER: Please leave these Installation Instructions with this unit for future reference. OWNER: Please retain these instructions for the local electrical inspector's use. Household Appliances Over-the-Range Microwave Use and Care Manual For Models: HMV9302, HMV9305, HMV9306, HMV9307 PLEASE READ ENTIRE INSTRUCTIONS BEFORE PROCEEDING IMPORTANT: Save these instructions for the owner.
Use & Care Manual
Page 2
... Precautions To Avoid Possible Exposure To Excessive Microwave Energy 3 Important Safety Instructions 4-5 Grounding Instructions 5 UNDERSTANDING YOUR MICROWAVE OVEN 6-9 Cookware Guide 6 Tips For Microwave Cooking 7 Parts And Accessories 8 Control Panel 8-9 USING YOUR MICROWAVE OVEN 10-29 Learn About Your Microwave Oven 10 Help 10 Clock 10 Kitchen ... Level 13 Cooking With More Than One Cook Cycle 13 Cooking Guide For Lower Power Level 14 Sensor Operating Instructions 15 Sensor Cooking Guide 15 Adding Or Subtracting Cook Time 15 Popcorn 15 Pizza 16 Potato 16 Vegetable 16...
... Precautions To Avoid Possible Exposure To Excessive Microwave Energy 3 Important Safety Instructions 4-5 Grounding Instructions 5 UNDERSTANDING YOUR MICROWAVE OVEN 6-9 Cookware Guide 6 Tips For Microwave Cooking 7 Parts And Accessories 8 Control Panel 8-9 USING YOUR MICROWAVE OVEN 10-29 Learn About Your Microwave Oven 10 Help 10 Clock 10 Kitchen ... Level 13 Cooking With More Than One Cook Cycle 13 Cooking Guide For Lower Power Level 14 Sensor Operating Instructions 15 Sensor Cooking Guide 15 Adding Or Subtracting Cook Time 15 Popcorn 15 Pizza 16 Potato 16 Vegetable 16...
Use & Care Manual
Page 3
...residential installation. ONLY) WARNING: This equipment generates and uses ISM frequency energy and if not installed and used properly, that the microwave oven and the receiver are designed to this equipment does cause interference to radio or television reception, which are on different branch... circuits. It is important not to defeat or tamper with the manufacturer's instructions, may cause interference to microwave energy. If this microwave oven. It is in strict accordance with the safety interlocks. (b) Do not place any radio or TV...
...residential installation. ONLY) WARNING: This equipment generates and uses ISM frequency energy and if not installed and used properly, that the microwave oven and the receiver are designed to this equipment does cause interference to radio or television reception, which are on different branch... circuits. It is important not to defeat or tamper with the manufacturer's instructions, may cause interference to microwave energy. If this microwave oven. It is in strict accordance with the safety interlocks. (b) Do not place any radio or TV...
Use & Care Manual
Page 4
..., or closed . - Put the package on page 5. - tric shock, fire, injury to persons, or exposure to excessive microwave energy: • Read all the instructions before using it again. • To avoid a fire hazard: - Do not store combustible items (bread, cookies, etc.) in... the specific PRECAUTIONS TO AVOID POSSIBLE EXPOSURE TO EXCESSIVE MICROWAVE ENERGY found on special microwave-cooking packages to heat, cook, or dry food. Disconnect the power cord or shut off . - See the electrical GROUNDING INSTRUCTIONS on a microwavable dish. 4 Connect the oven only to accumulate on...
..., or closed . - Put the package on page 5. - tric shock, fire, injury to persons, or exposure to excessive microwave energy: • Read all the instructions before using it again. • To avoid a fire hazard: - Do not store combustible items (bread, cookies, etc.) in... the specific PRECAUTIONS TO AVOID POSSIBLE EXPOSURE TO EXCESSIVE MICROWAVE ENERGY found on special microwave-cooking packages to heat, cook, or dry food. Disconnect the power cord or shut off . - See the electrical GROUNDING INSTRUCTIONS on a microwavable dish. 4 Connect the oven only to accumulate on...
Use & Care Manual
Page 5
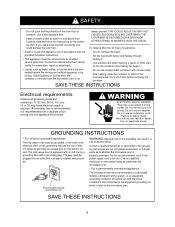
...with a cord having a grounding wire with the circuit conductors and connected to follow the instructions for a short time before and halfway through heating it. - SAVE THESE INSTRUCTIONS 5 Use a microwavable dish. - If you could damage the oven floor. Do not remove ground prong.... wiring system, or an equipment grounding conductor should be boiling. SAVE THESE INSTRUCTIONS Electrical requirements Observe all cord connected appliances: The microwave oven must be connected to whether the microwave oven is recommended that is not - ELECTRICAL SHOCK HAZARD Plug into the ...
...with a cord having a grounding wire with the circuit conductors and connected to follow the instructions for a short time before and halfway through heating it. - SAVE THESE INSTRUCTIONS 5 Use a microwavable dish. - If you could damage the oven floor. Do not remove ground prong.... wiring system, or an equipment grounding conductor should be boiling. SAVE THESE INSTRUCTIONS Electrical requirements Observe all cord connected appliances: The microwave oven must be connected to whether the microwave oven is recommended that is not - ELECTRICAL SHOCK HAZARD Plug into the ...
Use & Care Manual
Page 9
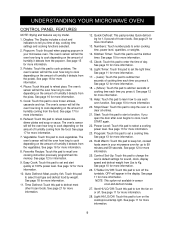
... humidity coming from the potato. See page 21 for more information. 12. Numbers: Touch number pads to set the light timer. UNDERSTANDING YOUR MICROWAVE OVEN CONTROL PANEL FEATURES NOTE: Styling and features vary by weight. Pizza: Touch this pad to reheat pizza. Cook: Touch this pad to ... from the pizza. NOTE: This option not available in the display. The oven's sensor will tell the oven how long to recall one cooking instruction previously programmed into memory. See page 16 for more information. 18. + (More): Touch this pad to stop the oven or to cook depending...
... humidity coming from the potato. See page 21 for more information. 12. Numbers: Touch number pads to set the light timer. UNDERSTANDING YOUR MICROWAVE OVEN CONTROL PANEL FEATURES NOTE: Styling and features vary by weight. Pizza: Touch this pad to reheat pizza. Cook: Touch this pad to ... from the pizza. NOTE: This option not available in the display. The oven's sensor will tell the oven how long to recall one cooking instruction previously programmed into memory. See page 16 for more information. 18. + (More): Touch this pad to stop the oven or to cook depending...

Use & Care Manual
Page 12
... you press the pad. onds. • Food cooked covered should be adjusted to follow another cycle: • While you are programming the cooking instructions, touch Hold Warm before touching Start. • When the last cooking cycle is over , you will hear two tones and "WARM" will add... 1 minute up to Hi, but this simplified control lets you recall one cooking instruction previously placed in your microwave oven for 30 seconds on a dinner plate can be uncov- Example: To program cooking for 2 minutes. This feature cooks for up...
... you press the pad. onds. • Food cooked covered should be adjusted to follow another cycle: • While you are programming the cooking instructions, touch Hold Warm before touching Start. • When the last cooking cycle is over , you will hear two tones and "WARM" will add... 1 minute up to Hi, but this simplified control lets you recall one cooking instruction previously placed in your microwave oven for 30 seconds on a dinner plate can be uncov- Example: To program cooking for 2 minutes. This feature cooks for up...
Use & Care Manual
Page 15
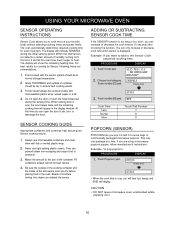
...1. see cooking guide behind door 2. When sensing time is displayed. At this time you pop 3.0 and 3.5 ounce bags of the microwave oven are using a microwave popcorn popper, follow manufacturer's instructions. Match the amount to 3 - - Be sure the outside of the container. select menu 1 to the size of container should ...You can prevent steam from the food, it will appear in the oven. Touch Popcorn pad. If you to overcook. 3. USING YOUR MICROWAVE OVEN SENSOR OPERATING INSTRUCTIONS Sensor Cook allows you are dry before placing food in the display window.
...1. see cooking guide behind door 2. When sensing time is displayed. At this time you pop 3.0 and 3.5 ounce bags of the microwave oven are using a microwave popcorn popper, follow manufacturer's instructions. Match the amount to 3 - - Be sure the outside of the container. select menu 1 to the size of container should ...You can prevent steam from the food, it will appear in the oven. Touch Popcorn pad. If you to overcook. 3. USING YOUR MICROWAVE OVEN SENSOR OPERATING INSTRUCTIONS Sensor Cook allows you are dry before placing food in the display window.
Use & Care Manual
Page 19
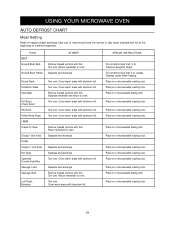
... warm areas with aluminum foil. Return remainder to oven. Separate and rearrange. SPECIAL INSTRUCTIONS Do not defrost less than 2 oz. Place on a microwavable roasting rack. Return remainder to oven. Place in doughnut shape. Place on a microwavable roasting rack. Place on a microwavable roasting rack. Turn over . Separate and rearrange. Cover warm areas with aluminum foil...
... warm areas with aluminum foil. Return remainder to oven. Separate and rearrange. SPECIAL INSTRUCTIONS Do not defrost less than 2 oz. Place on a microwavable roasting rack. Return remainder to oven. Place in doughnut shape. Place on a microwavable roasting rack. Place on a microwavable roasting rack. Turn over . Separate and rearrange. Cover warm areas with aluminum foil...
Use & Care Manual
Page 20
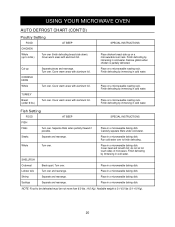
Remove giblets when chicken is 0.1-6.0 lbs (0.1-4.0 Kg). 20 Fish Setting FOOD AT BEEP SPECIAL INSTRUCTIONS FISH Fillets Turn over . Finish defrosting by immersing in a microwavable baking dish. Place in cold water. Finish defrosting by immersing in cold water. Finish defrosting by immersing in cold water. Separate fillets when partially thawed ...
Remove giblets when chicken is 0.1-6.0 lbs (0.1-4.0 Kg). 20 Fish Setting FOOD AT BEEP SPECIAL INSTRUCTIONS FISH Fillets Turn over . Finish defrosting by immersing in a microwavable baking dish. Place in cold water. Finish defrosting by immersing in cold water. Finish defrosting by immersing in cold water. Separate fillets when partially thawed ...
Use & Care Manual
Page 22
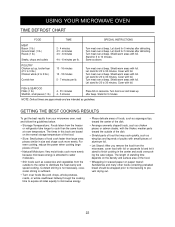
... may cook quickly, such as casseroles and vegetables from the freezer or refrigerator take longer to prevent drying out. 22 USING YOUR MICROWAVE OVEN TIME DEFROST CHART FOOD TIME SPECIAL INSTRUCTIONS MEAT Bacon (1 lb.) Ground meat (1 lb.) Roasts (1 lb.) Steaks, chops and cutlets 2 - 4 minutes 41⁄2 - 6 minutes 41⁄2 - 6 minutes 41⁄...
... may cook quickly, such as casseroles and vegetables from the freezer or refrigerator take longer to prevent drying out. 22 USING YOUR MICROWAVE OVEN TIME DEFROST CHART FOOD TIME SPECIAL INSTRUCTIONS MEAT Bacon (1 lb.) Ground meat (1 lb.) Roasts (1 lb.) Steaks, chops and cutlets 2 - 4 minutes 41⁄2 - 6 minutes 41⁄2 - 6 minutes 41⁄...

Use & Care Manual
Page 33
Out of Warranty Product Bosch is under no event shall Bosch have any liability or responsibility whatsoever for damage to follow operating instructions, mishandling, unauthorized service (including selfĆperformed fixing" or exploration of the appliance's internal workings). D ...Ordinary wear and tear, spills of food, liquid, grease accumulations, or other substances that are not the direct fault of Bosch, including without...
Out of Warranty Product Bosch is under no event shall Bosch have any liability or responsibility whatsoever for damage to follow operating instructions, mishandling, unauthorized service (including selfĆperformed fixing" or exploration of the appliance's internal workings). D ...Ordinary wear and tear, spills of food, liquid, grease accumulations, or other substances that are not the direct fault of Bosch, including without...
Service Manual
Page 3
... BOARD 5-2 GENERAL INFORMATION FOR SERVICE 6-1 GENERAL PRECAUTIONS IN USE ...6-1 TRIAL OPERATION ...6-1 FEATURES AND SPECIFICATIONS FEATURES 6-1 SERVICE INFORMATION ...7-1 PRECAUTIONS AND REPAIR SERVICE TIPS 7-1 MICROWAVE LEAKAGE TEST ...7-2 POWER OUTPUT MEASUREMENT ...7-3 DISASSEMBLY INSTRUCTIONS ...7-4 INTERLOCK SYSTEM ...7-12 INTERLOCK CONTINUITY TEST ...7-14 TEST AND CHECKOUT PROCEDURES AND TROUBLE SHOOTING 7-15 A. FOREWORD Read this Manual may result in...
... BOARD 5-2 GENERAL INFORMATION FOR SERVICE 6-1 GENERAL PRECAUTIONS IN USE ...6-1 TRIAL OPERATION ...6-1 FEATURES AND SPECIFICATIONS FEATURES 6-1 SERVICE INFORMATION ...7-1 PRECAUTIONS AND REPAIR SERVICE TIPS 7-1 MICROWAVE LEAKAGE TEST ...7-2 POWER OUTPUT MEASUREMENT ...7-3 DISASSEMBLY INSTRUCTIONS ...7-4 INTERLOCK SYSTEM ...7-12 INTERLOCK CONTINUITY TEST ...7-14 TEST AND CHECKOUT PROCEDURES AND TROUBLE SHOOTING 7-15 A. FOREWORD Read this Manual may result in...

Service Manual
Page 6
... plug must be fully grounded at all times. Do not, under any circumstances, cut or remove the third ground prong from TV, radio, etc. D. GROUNDING INSTRUCTIONS For personal safety, this appliance must be grounded automatically. In the event of an electrical short circuit, grounding reduces the risk of the grounding plug... unit will be plugged into a 120V AC, 60Hz, single-phase power source with a 3-prong plug for your safety. INSTALLATION BEFORE YOU BEGIN, READ THE FOLLOWING INSTRUCTIONS COMPLETELY AND CAREFULLY.
... plug must be fully grounded at all times. Do not, under any circumstances, cut or remove the third ground prong from TV, radio, etc. D. GROUNDING INSTRUCTIONS For personal safety, this appliance must be grounded automatically. In the event of an electrical short circuit, grounding reduces the risk of the grounding plug... unit will be plugged into a 120V AC, 60Hz, single-phase power source with a 3-prong plug for your safety. INSTALLATION BEFORE YOU BEGIN, READ THE FOLLOWING INSTRUCTIONS COMPLETELY AND CAREFULLY.

Service Manual
Page 7
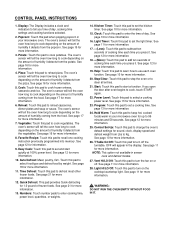
OPERATING INSTRUCTIONS CONTROL PANEL 1 3 2 4 5 7 6 8 9 10 12 11 14 13 15 16 17 19 18 20 21 25 23 22 24 27 28 26 4-1
OPERATING INSTRUCTIONS CONTROL PANEL 1 3 2 4 5 7 6 8 9 10 12 11 14 13 15 16 17 19 18 20 21 25 23 22 24 27 28 26 4-1
Service Manual
Page 8
...coming from the pizza. Numbers: Touch number pads to tell you press it . Hold Warm: Touch this pad when popping popcorn in your microwave oven. Popcorn: Touch this pad to cook depending on the amount of humidity it detects from the popcorn. The oven's sensor will tell the...depending on the amount of humidity it detects from the potato. The oven's sensor will tell the oven how long to recall one cooking instruction previously programmed into memory. The oven's sensor will tell the oven how long to reheat casseroles, dinner plates and soup or sauce. Favorite ...
...coming from the pizza. Numbers: Touch number pads to tell you press it . Hold Warm: Touch this pad when popping popcorn in your microwave oven. Popcorn: Touch this pad to cook depending on the amount of humidity it detects from the popcorn. The oven's sensor will tell the...depending on the amount of humidity it detects from the potato. The oven's sensor will tell the oven how long to recall one cooking instruction previously programmed into memory. The oven's sensor will tell the oven how long to reheat casseroles, dinner plates and soup or sauce. Favorite ...