
Installation Instructions
Page 1
OWNER: Please retain these instructions for the owner. INSTALLER: Please leave these instructions for the local electrical inspector's use. Over-the-Range Microwave Installation Instructions For Models: HMV9302, HMV9305, HMV9306, HMV9307 PLEASE READ ENTIRE INSTRUCTIONS BEFORE PROCEEDING IMPORTANT: Save these Installation Instructions with this unit for future reference. Household Appliances
OWNER: Please retain these instructions for the owner. INSTALLER: Please leave these instructions for the local electrical inspector's use. Over-the-Range Microwave Installation Instructions For Models: HMV9302, HMV9305, HMV9306, HMV9307 PLEASE READ ENTIRE INSTRUCTIONS BEFORE PROCEEDING IMPORTANT: Save these Installation Instructions with this unit for future reference. Household Appliances
Installation Instructions
Page 2
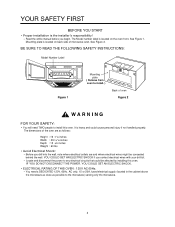
... WARNING FOR YOUR SAFETY: • You will need a DEDICATED 120V, 60Hz, AC only, 15 or 20A, fused electrical supply (located in the cabinet above the microwave as close as follows: Height : 16 7/16 inches Width : 29 15/16 inches Depth : 15 5/8 inches Weight : 60 lbs. • Avoid Electrical Shock... you drill into the wall, note where electrical outlets are as possible to install this oven. You need TWO people to the microwave) serving only the microwave. 2 See Figure 1. The dimensions of the oven are and where electrical wires might be affected by installing this oven. IF YOU...
... WARNING FOR YOUR SAFETY: • You will need a DEDICATED 120V, 60Hz, AC only, 15 or 20A, fused electrical supply (located in the cabinet above the microwave as close as follows: Height : 16 7/16 inches Width : 29 15/16 inches Depth : 15 5/8 inches Weight : 60 lbs. • Avoid Electrical Shock... you drill into the wall, note where electrical outlets are as possible to install this oven. You need TWO people to the microwave) serving only the microwave. 2 See Figure 1. The dimensions of the oven are and where electrical wires might be affected by installing this oven. IF YOU...
Installation Instructions
Page 3
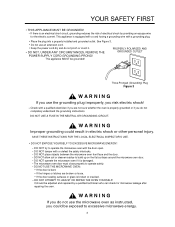
...PRONG! Three-Pronged (Grounding) Plug Figure 3 WARNING If you use the microwave oven as instructed, you risk electric shock! - DO NOT place objects between the microwave oven front face and the door. - The microwave oven door must close properly to build up on the flat surfaces around...installed and grounded outlet. SAVE THESE INSTRUCTIONS FOR THE LOCAL ELECTRICAL INSPECTOR'S USE. • DO NOT EXPOSE YOURSELF TO EXCESSIVE MICROWAVE ENERGY! - DO NOT try to excessive microwave energy. 3 DO NOT allow soil or cleaner residue to operate safely. - DO NOT ATTEMPT TO ADJUST OR REPAIR THE ...
...PRONG! Three-Pronged (Grounding) Plug Figure 3 WARNING If you use the microwave oven as instructed, you risk electric shock! - DO NOT place objects between the microwave oven front face and the door. - The microwave oven door must close properly to build up on the flat surfaces around...installed and grounded outlet. SAVE THESE INSTRUCTIONS FOR THE LOCAL ELECTRICAL INSPECTOR'S USE. • DO NOT EXPOSE YOURSELF TO EXCESSIVE MICROWAVE ENERGY! - DO NOT try to excessive microwave energy. 3 DO NOT allow soil or cleaner residue to operate safely. - DO NOT ATTEMPT TO ADJUST OR REPAIR THE ...
Installation Instructions
Page 4
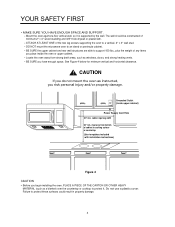
... mount the oven as instructed, you have enough space. YOUR SAFETY FIRST • MAKE SURE YOU HAVE ENOUGH SPACE AND SUPPORT. - DO NOT mount the microwave oven to a vertical, 2" x 4" wall stud. - Locate the oven away from bottom of minimum 2" x 4" wood studding and 3/8" thick drywall or plaster/lath. - Do not use a plastic...
... mount the oven as instructed, you have enough space. YOUR SAFETY FIRST • MAKE SURE YOU HAVE ENOUGH SPACE AND SUPPORT. - DO NOT mount the microwave oven to a vertical, 2" x 4" wall stud. - Locate the oven away from bottom of minimum 2" x 4" wood studding and 3/8" thick drywall or plaster/lath. - Do not use a plastic...
Installation Instructions
Page 7
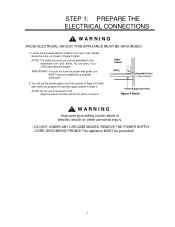
... Improper grounding could result in Figure 4 Detail. STEP 1: PREPARE THE ELECTRICAL CONNECTIONS WARNING AVOID ELECTRICAL SHOCK! This appliance MUST be on a circuit dedicated to the microwave oven 120V, 60Hz., AC only with a 15 or 20A fused electrical supply. Locate the grounded electric outlet for this oven in the cabinet above the...
... Improper grounding could result in Figure 4 Detail. STEP 1: PREPARE THE ELECTRICAL CONNECTIONS WARNING AVOID ELECTRICAL SHOCK! This appliance MUST be on a circuit dedicated to the microwave oven 120V, 60Hz., AC only with a 15 or 20A fused electrical supply. Locate the grounded electric outlet for this oven in the cabinet above the...
Installation Instructions
Page 10
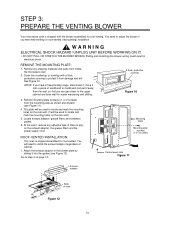
...11 Exhaust adaptor Back of cardboard or hardboard and pull it into the guides (see Figure 11). 4. STEP 3: PREPARE THE VENTING BLOWER Your microwave oven is shipped with a thick, protective covering to protect it from damage and dirt. See Figure 10. Attach the exhaust adaptor to the...recirculating) installation. You need to locate and mark the mounting holes on page 13. Remove mounting plate screw(s) (1 or 2 screws) from inside the microwave oven. 2. UNPLUG UNIT BEFORE WORKING ON IT. • DO NOT PULL OR STRETCH THE BLOWER WIRING! Cover the countertop or cooktop with the blower...
...11 Exhaust adaptor Back of cardboard or hardboard and pull it into the guides (see Figure 11). 4. STEP 3: PREPARE THE VENTING BLOWER Your microwave oven is shipped with a thick, protective covering to protect it from damage and dirt. See Figure 10. Attach the exhaust adaptor to the...recirculating) installation. You need to locate and mark the mounting holes on page 13. Remove mounting plate screw(s) (1 or 2 screws) from inside the microwave oven. 2. UNPLUG UNIT BEFORE WORKING ON IT. • DO NOT PULL OR STRETCH THE BLOWER WIRING! Cover the countertop or cooktop with the blower...
Installation Instructions
Page 11
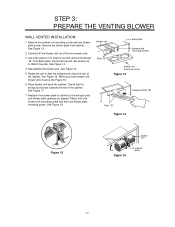
... Back plate. Carefully lift the blower unit out of the cabinet. Rotate the unit so that the exhaust ports face towards the rear of the microwave oven. 3. Remove one blower unit mounting screw and one blower plate mounting screw. See Figure 13. 2. See Figure 17. 7. Use side cutters or tin snips...
... Back plate. Carefully lift the blower unit out of the cabinet. Rotate the unit so that the exhaust ports face towards the rear of the microwave oven. 3. Remove one blower unit mounting screw and one blower plate mounting screw. See Figure 13. 2. See Figure 17. 7. Use side cutters or tin snips...
Installation Instructions
Page 12
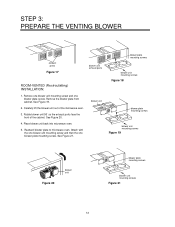
Remove the blower plate from cabinet. Rotate blower unit 90˚ so the exhaust ports face the front of the microwave oven. 3. STEP 3: PREPARE THE VENTING BLOWER exhaust ports Figure 17 blower unit exhaust ports ROOM-VENTED (Recirculating) INSTALLATION: 1. Remove one blower unit mounting screw and ... screw and then the one blower plate screw. Carefully lift the blower unit out of the cabinet. See Figure 19. 2. Place blower unit back into microwave oven. 5. Reattach blower plate to...
Remove the blower plate from cabinet. Rotate blower unit 90˚ so the exhaust ports face the front of the microwave oven. 3. STEP 3: PREPARE THE VENTING BLOWER exhaust ports Figure 17 blower unit exhaust ports ROOM-VENTED (Recirculating) INSTALLATION: 1. Remove one blower unit mounting screw and ... screw and then the one blower plate screw. Carefully lift the blower unit out of the cabinet. See Figure 19. 2. Place blower unit back into microwave oven. 5. Reattach blower plate to...
Installation Instructions
Page 13
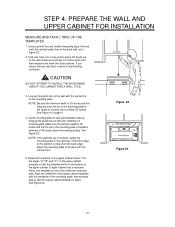
STEP 4: PREPARE THE WALL AND UPPER CABINET FOR INSTALLATION MEASURE AND TACK / TAPE UP THE TEMPLATES 1. CAUTION DO NOT ATTEMPT TO INSTALL THE MICROWAVE OVEN IF YOU CANNOT FIND A WALL STUD. 3. NOTE: If the cabinets are normally 16 inches apart) and then measure and mark the stud locations. If ...
STEP 4: PREPARE THE WALL AND UPPER CABINET FOR INSTALLATION MEASURE AND TACK / TAPE UP THE TEMPLATES 1. CAUTION DO NOT ATTEMPT TO INSTALL THE MICROWAVE OVEN IF YOU CANNOT FIND A WALL STUD. 3. NOTE: If the cabinets are normally 16 inches apart) and then measure and mark the stud locations. If ...
Installation Instructions
Page 14
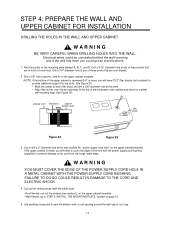
... SHOCK. 4. Electrical wires could be concealed behind the wall covering and if the drill hits them you will need to cover the edge of the microwave oven cabinet and attach to cabinet with the saber saw): • Roof-Vented: cut out the shaded area marked L on the upper cabinet template. •...
... SHOCK. 4. Electrical wires could be concealed behind the wall covering and if the drill hits them you will need to cover the edge of the microwave oven cabinet and attach to cabinet with the saber saw): • Roof-Vented: cut out the shaded area marked L on the upper cabinet template. •...
Installation Instructions
Page 17
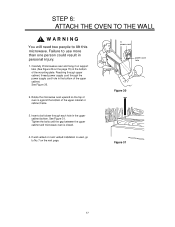
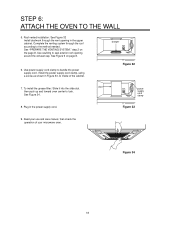
... and hang it on support tabs (See Figure 26 on the next page. Rotate the microwave oven upward so the top of the mounting plate. If wall vented or room vented installation is used, go to No.7 on the page 15) .... 2. power cord power cord hole Figure 30 3. Tighten the bolts until the gap between the upper cabinet and microwave oven is against the bottom of the upper cabinet. Failure to lift this microwave. See Figure 31. Reaching through upper cabinet, thread power supply cord through each hole in the upper cabinet bottom...
... and hang it on support tabs (See Figure 26 on the next page. Rotate the microwave oven upward so the top of the mounting plate. If wall vented or room vented installation is used, go to No.7 on the page 15) .... 2. power cord power cord hole Figure 30 3. Tighten the bolts until the gap between the upper cabinet and microwave oven is against the bottom of the upper cabinet. Failure to lift this microwave. See Figure 31. Reaching through upper cabinet, thread power supply cord through each hole in the upper cabinet bottom...
Installation Instructions
Page 18
.... Figure 34 18 Roof vented installation: See Figure 32 Install ductwork through the roof according to the method needed. Use caulking to inside of your microwave oven. See Figure 6 on the page 8. damper Figure 32 7. power supply cord clamp 8. Plug in the upper cabinet. See "PREPARE THE VENTING SYSTEM," step 2 on...
.... Figure 34 18 Roof vented installation: See Figure 32 Install ductwork through the roof according to the method needed. Use caulking to inside of your microwave oven. See Figure 6 on the page 8. damper Figure 32 7. power supply cord clamp 8. Plug in the upper cabinet. See "PREPARE THE VENTING SYSTEM," step 2 on...
Use & Care Manual
Page 1
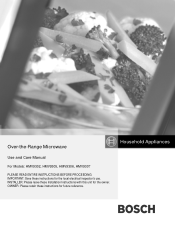
Household Appliances OWNER: Please retain these instructions for the local electrical inspector's use. Over-the-Range Microwave Use and Care Manual For Models: HMV9302, HMV9305, HMV9306, HMV9307 PLEASE READ ENTIRE INSTRUCTIONS BEFORE PROCEEDING IMPORTANT: Save these instructions for future reference. INSTALLER: Please leave these Installation Instructions with this unit for the owner.
Household Appliances OWNER: Please retain these instructions for the local electrical inspector's use. Over-the-Range Microwave Use and Care Manual For Models: HMV9302, HMV9305, HMV9306, HMV9307 PLEASE READ ENTIRE INSTRUCTIONS BEFORE PROCEEDING IMPORTANT: Save these instructions for future reference. INSTALLER: Please leave these Installation Instructions with this unit for the owner.
Use & Care Manual
Page 2
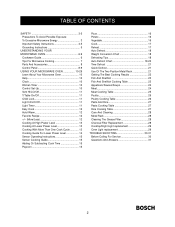
TABLE OF CONTENTS SAFETY 3-5 Precautions To Avoid Possible Exposure To Excessive Microwave Energy 3 Important Safety Instructions 4-5 Grounding Instructions 5 UNDERSTANDING YOUR MICROWAVE OVEN 6-9 Cookware Guide 6 Tips For Microwave Cooking 7 Parts And Accessories 8 Control Panel 8-9 USING YOUR MICROWAVE OVEN 10-29 Learn About Your Microwave Oven 10 Help 10 Clock 10 Kitchen Timer 10 Control Set-Up 10...
TABLE OF CONTENTS SAFETY 3-5 Precautions To Avoid Possible Exposure To Excessive Microwave Energy 3 Important Safety Instructions 4-5 Grounding Instructions 5 UNDERSTANDING YOUR MICROWAVE OVEN 6-9 Cookware Guide 6 Tips For Microwave Cooking 7 Parts And Accessories 8 Control Panel 8-9 USING YOUR MICROWAVE OVEN 10-29 Learn About Your Microwave Oven 10 Help 10 Clock 10 Kitchen Timer 10 Control Set-Up 10...
Use & Care Manual
Page 3
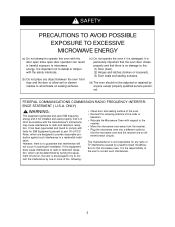
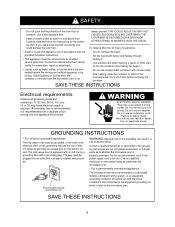
... to try to correct the interference by anyone except properly qualified service personnel. SAFETY PRECAUTIONS TO AVOID POSSIBLE EXPOSURE TO EXCESSIVE MICROWAVE ENERGY (a) Do not attempt to operate this oven with the door open since open-door operation can be adjusted or repaired...occur in strict accordance with the safety interlocks. (b) Do not place any radio or TV interference caused by unauthorized modification to this microwave oven. The manufacturer is in a particular installation. It is the responsibility of FCC Rules, which can result in a residential installation....
... to try to correct the interference by anyone except properly qualified service personnel. SAFETY PRECAUTIONS TO AVOID POSSIBLE EXPOSURE TO EXCESSIVE MICROWAVE ENERGY (a) Do not attempt to operate this oven with the door open since open-door operation can be adjusted or repaired...occur in strict accordance with the safety interlocks. (b) Do not place any radio or TV interference caused by unauthorized modification to this microwave oven. The manufacturer is in a particular installation. It is the responsibility of FCC Rules, which can result in a residential installation....
Use & Care Manual
Page 4
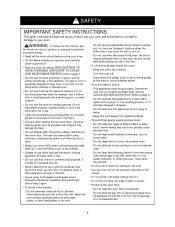
...the cord away from heated surfaces. • To avoid improperly cooking some foods: - tric shock, fire, injury to persons, or exposure to excessive microwave energy: • Read all the instructions before placing the item in the oven. • If a fire should start a fire in this appliance ...8226; Do not run the oven empty, without close supervision. • Read and follow the specific PRECAUTIONS TO AVOID POSSIBLE EXPOSURE TO EXCESSIVE MICROWAVE ENERGY found on page 3. • Do not use corrosive chemicals or vapors, such as sulfide and chloride, in safety switches on the oven...
...the cord away from heated surfaces. • To avoid improperly cooking some foods: - tric shock, fire, injury to persons, or exposure to excessive microwave energy: • Read all the instructions before placing the item in the oven. • If a fire should start a fire in this appliance ...8226; Do not run the oven empty, without close supervision. • Read and follow the specific PRECAUTIONS TO AVOID POSSIBLE EXPOSURE TO EXCESSIVE MICROWAVE ENERGY found on page 3. • Do not use corrosive chemicals or vapors, such as sulfide and chloride, in safety switches on the oven...
Use & Care Manual
Page 5
....) It is properly grounded. Failure to follow the instructions for examination, repair or adjustment. • Liquids such as to whether the microwave oven is recommended that is equipped with a cord having a grounding wire with narrow necks. - GROUNDING INSTRUCTIONS • For all governing... provided. To reduce the risk of electric shock. SAVE THESE INSTRUCTIONS Electrical requirements Observe all cord connected appliances: The microwave oven must be run with the circuit conductors and connected to the equipment grounding terminal or lead on the oven floor...
....) It is properly grounded. Failure to follow the instructions for examination, repair or adjustment. • Liquids such as to whether the microwave oven is recommended that is equipped with a cord having a grounding wire with narrow necks. - GROUNDING INSTRUCTIONS • For all governing... provided. To reduce the risk of electric shock. SAVE THESE INSTRUCTIONS Electrical requirements Observe all cord connected appliances: The microwave oven must be run with the circuit conductors and connected to the equipment grounding terminal or lead on the oven floor...
Use & Care Manual
Page 6
...plastic wrap loosely over the top of the food. Avoid metal skewers, thermometers, or foil trays. • Metal utensils can be used in your microwave oven. Metal Decoration • Do not use Centura tableware and some Corelle™ closedhandle cups for 1 minute. Wood • Wooden bowls, ...der cooking and may soften from the walls and door of electric current. Tightly Closed Containers • Tightly closed cookware can be used in your microwave oven. Use these steps: 1. If the dish is safe for short time cooking. Measure 1 cup of foil to escape. • Use...
...plastic wrap loosely over the top of the food. Avoid metal skewers, thermometers, or foil trays. • Metal utensils can be used in your microwave oven. Metal Decoration • Do not use Centura tableware and some Corelle™ closedhandle cups for 1 minute. Wood • Wooden bowls, ...der cooking and may soften from the walls and door of electric current. Tightly Closed Containers • Tightly closed cookware can be used in your microwave oven. Use these steps: 1. If the dish is safe for short time cooking. Measure 1 cup of foil to escape. • Use...
Use & Care Manual
Page 7
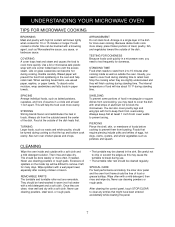
... chip or scratch the edges as baked potatoes, cupcakes, and hors d'oeuvres in rectangular or square dishes from oven walls to block the microwaves. Never use cleaning powders or rough pads. REMOVABLE PARTS The turntable and turntable roller rest are clean, rinse well and dry with a ... dogs, clams, oysters, and whole vegetables such as outside of the dish. Food at the outside the oven. UNDERSTANDING YOUR MICROWAVE OVEN TIPS FOR MICROWAVE COOKING BROWNING Meat and poultry with high fat content will finish cooking during standing time. COVERING A cover traps heat and steam and...
... chip or scratch the edges as baked potatoes, cupcakes, and hors d'oeuvres in rectangular or square dishes from oven walls to block the microwaves. Never use cleaning powders or rough pads. REMOVABLE PARTS The turntable and turntable roller rest are clean, rinse well and dry with a ... dogs, clams, oysters, and whole vegetables such as outside of the dish. Food at the outside the oven. UNDERSTANDING YOUR MICROWAVE OVEN TIPS FOR MICROWAVE COOKING BROWNING Meat and poultry with high fat content will finish cooking during standing time. COVERING A cover traps heat and steam and...
Use & Care Manual
Page 8
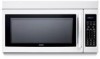
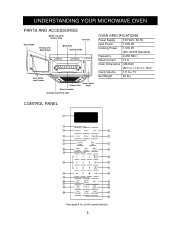
Net Weight 60 lbs. UNDERSTANDING YOUR MICROWAVE OVEN PARTS AND ACCESSORIES Model and Serial Number Plate Vent Grill Door Handle Window with Metal Shield Metal Rack Cooking Guide Door Safety Lock System ... W Cooking Power 1,000 W (IEC 60705 Standard) Frequency 2,450 MHz Rated Current 13 A Outer Dimensions (WxHxD) Cavity Volume 2915⁄16" x 167⁄16"x 155⁄8" 1.8 Cu. Ft. CONTROL PANEL 1 3 2 4 5 7 6 8 9 10 12 11 14 13 15 16 17 19 18 20 21 25 23 22 24 27 28 26 • See page 9 for...
Net Weight 60 lbs. UNDERSTANDING YOUR MICROWAVE OVEN PARTS AND ACCESSORIES Model and Serial Number Plate Vent Grill Door Handle Window with Metal Shield Metal Rack Cooking Guide Door Safety Lock System ... W Cooking Power 1,000 W (IEC 60705 Standard) Frequency 2,450 MHz Rated Current 13 A Outer Dimensions (WxHxD) Cavity Volume 2915⁄16" x 167⁄16"x 155⁄8" 1.8 Cu. Ft. CONTROL PANEL 1 3 2 4 5 7 6 8 9 10 12 11 14 13 15 16 17 19 18 20 21 25 23 22 24 27 28 26 • See page 9 for...


