Installation Instructions
Page 2
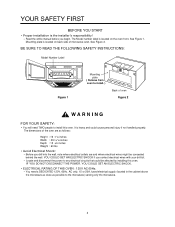
... manual before you contact electrical wires with your drill bit. - The Model number label is located on the oven front. See Figure 2. Locate and disconnect the power to the microwave) serving only the microwave. 2 Before you drill into the wall, note where electrical outlets are as possible to any electrical circuits that could cause personal injury if not handled properly. Mounting plate is located on back side of microwave oven. The dimensions...
... manual before you contact electrical wires with your drill bit. - The Model number label is located on the oven front. See Figure 2. Locate and disconnect the power to the microwave) serving only the microwave. 2 Before you drill into the wall, note where electrical outlets are as possible to any electrical circuits that could cause personal injury if not handled properly. Mounting plate is located on back side of microwave oven. The dimensions...
Installation Instructions
Page 4
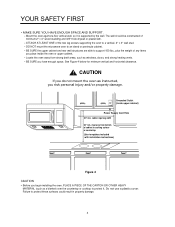
... MATERIAL (such as a blanket) over the countertop or cooktop to support 150 lbs., plus the weight of cabinet to a vertical, 2" x 4" wall stud. - cabinet opening width 30" min. The wall should be constructed of the two lag screws supporting the oven to cooking surface or countertop (Use templates included with installation instructions) Figure 4 CAUTION • Before you have enough space. DO NOT mount the microwave oven to protect these surfaces could result...
... MATERIAL (such as a blanket) over the countertop or cooktop to support 150 lbs., plus the weight of cabinet to a vertical, 2" x 4" wall stud. - cabinet opening width 30" min. The wall should be constructed of the two lag screws supporting the oven to cooking surface or countertop (Use templates included with installation instructions) Figure 4 CAUTION • Before you have enough space. DO NOT mount the microwave oven to protect these surfaces could result...
Installation Instructions
Page 10
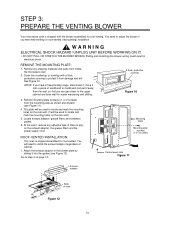
... result in electrical shock. See Figure 10. UNPLUG UNIT BEFORE WORKING ON IT. • DO NOT PULL OR STRETCH THE BLOWER WIRING! Locate exhaust adaptor, grease filters and hardware packet. 6. You will be used to locate and mark the mounting holes on the exhaust adaptor, the grease filters and the power supply cord. Cover the countertop or cooktop with the blower assembled for roof venting. At this point, remove any adhesive...
... result in electrical shock. See Figure 10. UNPLUG UNIT BEFORE WORKING ON IT. • DO NOT PULL OR STRETCH THE BLOWER WIRING! Locate exhaust adaptor, grease filters and hardware packet. 6. You will be used to locate and mark the mounting holes on the exhaust adaptor, the grease filters and the power supply cord. Cover the countertop or cooktop with the blower assembled for roof venting. At this point, remove any adhesive...
Installation Instructions
Page 14
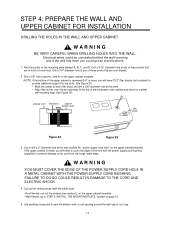
... two openings in the top of the microwave oven cabinet and attach to STEP 5, INSTALL THE MOUNTING PLATE, located on the mounting plate labeled A, B, C, and D. cabinet front filler block cabinet bottom shelf filler block Figure 24 Figure 25 3. Use caulking compound to provide additional support for the bolts. STEP 4: PREPARE THE WALL AND UPPER CABINET FOR INSTALLATION DRILLING THE HOLES IN THE WALL AND UPPER CABINET: WARNING BE VERY CAREFUL...
... two openings in the top of the microwave oven cabinet and attach to STEP 5, INSTALL THE MOUNTING PLATE, located on the mounting plate labeled A, B, C, and D. cabinet front filler block cabinet bottom shelf filler block Figure 24 Figure 25 3. Use caulking compound to provide additional support for the bolts. STEP 4: PREPARE THE WALL AND UPPER CABINET FOR INSTALLATION DRILLING THE HOLES IN THE WALL AND UPPER CABINET: WARNING BE VERY CAREFUL...
Use & Care Manual
Page 2
... Instructions 4-5 Grounding Instructions 5 UNDERSTANDING YOUR MICROWAVE OVEN 6-9 Cookware Guide 6 Tips For Microwave Cooking 7 Parts And Accessories 8 Control Panel 8-9 USING YOUR MICROWAVE OVEN 10-29 Learn About Your Microwave Oven 10 Help 10 Clock 10 Kitchen Timer 10 Control Set-Up 10 Vent HI/LO/Off 11 T/Table On/Off 11 Child Lock 11 Light HI/LO/Off 11 Light Timer 11 Easy Cook 12 Hold Warm 12 Favorite Recipe 12 +/- (More/Less 12 Cooking At High Power Level 13 Cooking At Lower Power Level...
... Instructions 4-5 Grounding Instructions 5 UNDERSTANDING YOUR MICROWAVE OVEN 6-9 Cookware Guide 6 Tips For Microwave Cooking 7 Parts And Accessories 8 Control Panel 8-9 USING YOUR MICROWAVE OVEN 10-29 Learn About Your Microwave Oven 10 Help 10 Clock 10 Kitchen Timer 10 Control Set-Up 10 Vent HI/LO/Off 11 T/Table On/Off 11 Child Lock 11 Light HI/LO/Off 11 Light Timer 11 Easy Cook 12 Hold Warm 12 Favorite Recipe 12 +/- (More/Less 12 Cooking At High Power Level 13 Cooking At Lower Power Level...
Use & Care Manual
Page 4
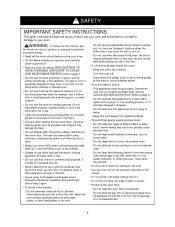
... food. Severely overcooked foods can start inside the oven: - Do not use . • Clean the ventilating hood frequently. Disconnect the power cord or shut off . - Connect the oven only to heat, cook, or dry food. Do not immerse the electrical cord or plug in your microwave oven. - Do not heat small-necked containers, such as lye-based oven cleaners may explode. • Do not cover or block any openings in the oven. • Use...
... food. Severely overcooked foods can start inside the oven: - Do not use . • Clean the ventilating hood frequently. Disconnect the power cord or shut off . - Connect the oven only to heat, cook, or dry food. Do not immerse the electrical cord or plug in your microwave oven. - Do not heat small-necked containers, such as lye-based oven cleaners may explode. • Do not cover or block any openings in the oven. • Use...
Use & Care Manual
Page 5
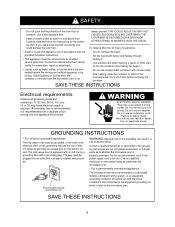
... use WARNING: Improper use straight-sided containers with the circuit conductors and connected to stand in accordance with the provided installation instructions. • This appliance should be provided. Do not use an extension cord. To reduce the risk of electric shock. GROUNDING INSTRUCTIONS • For all governing codes and ordinances. Do not cook anything directly on the microwave oven. If you use an adapter. After heating...
... use WARNING: Improper use straight-sided containers with the circuit conductors and connected to stand in accordance with the provided installation instructions. • This appliance should be provided. Do not use an extension cord. To reduce the risk of electric shock. GROUNDING INSTRUCTIONS • For all governing codes and ordinances. Do not cook anything directly on the microwave oven. If you use an adapter. After heating...
Use & Care Manual
Page 8
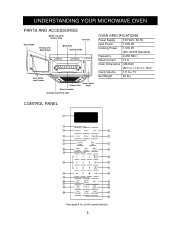
UNDERSTANDING YOUR MICROWAVE OVEN PARTS AND ACCESSORIES Model and Serial Number Plate Vent Grill Door Handle Window with Metal Shield Metal Rack Cooking Guide Door Safety Lock System Oven Control Grease Filter Panel Glass Turntable Cooktop/Countertop Light OVEN SPECIFICATIONS Power Supply 120 VAC, 60 Hz Input Power 1,500 W Cooking Power 1,000 W (IEC 60705 Standard) Frequency 2,450 MHz Rated Current 13 A Outer Dimensions (WxHxD) Cavity Volume 2915⁄16" x 167⁄16"x 155⁄8" 1.8 Cu. Ft. Net Weight 60 lbs. CONTROL PANEL 1 3 2 4 5 7 6 8 9 10...
UNDERSTANDING YOUR MICROWAVE OVEN PARTS AND ACCESSORIES Model and Serial Number Plate Vent Grill Door Handle Window with Metal Shield Metal Rack Cooking Guide Door Safety Lock System Oven Control Grease Filter Panel Glass Turntable Cooktop/Countertop Light OVEN SPECIFICATIONS Power Supply 120 VAC, 60 Hz Input Power 1,500 W Cooking Power 1,000 W (IEC 60705 Standard) Frequency 2,450 MHz Rated Current 13 A Outer Dimensions (WxHxD) Cavity Volume 2915⁄16" x 167⁄16"x 155⁄8" 1.8 Cu. Ft. Net Weight 60 lbs. CONTROL PANEL 1 3 2 4 5 7 6 8 9 10...
Use & Care Manual
Page 9
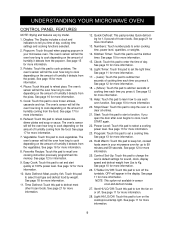
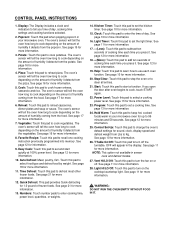
.... Help: Touch this pad to stop the oven or to set the kitchen timer. Stop/Clear: Touch this pad to learn how to cook vegetables. Power Level: Touch this pad to use each time you press it detects from the pizza. See page 13 for more information. 23. Control Set-Up: Touch this pad to Kg. See page 11 for sound, clock, display speed and defrost weight from Lbs to turn off . Vent HI...
.... Help: Touch this pad to stop the oven or to set the kitchen timer. Stop/Clear: Touch this pad to learn how to cook vegetables. Power Level: Touch this pad to use each time you press it detects from the pizza. See page 13 for more information. 23. Control Set-Up: Touch this pad to Kg. See page 11 for sound, clock, display speed and defrost weight from Lbs to turn off . Vent HI...
Use & Care Manual
Page 18
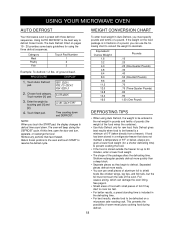
...; Use Auto Defrost only for using Auto Defrost, the weight to resume the defrost cycle. Touch Auto Defrost pad. The Auto Defrost Chart on a microwave safe roasting rack. meat touch 1 poultry touch 2 fish touch 3 2. Shallow rectangular packets defrost more easily. • You can damage the oven lining. Choose food category. At this time, open the door and turn, separate, or rearrange the food. Touch Start pad. To enter food weight in the defrosting time. • For best results, elevate food to defrost. enter weight 1.2 lbs touch start...
...; Use Auto Defrost only for using Auto Defrost, the weight to resume the defrost cycle. Touch Auto Defrost pad. The Auto Defrost Chart on a microwave safe roasting rack. meat touch 1 poultry touch 2 fish touch 3 2. Shallow rectangular packets defrost more easily. • You can damage the oven lining. Choose food category. At this time, open the door and turn, separate, or rearrange the food. Touch Start pad. To enter food weight in the defrosting time. • For best results, elevate food to defrost. enter weight 1.2 lbs touch start...
Use & Care Manual
Page 20
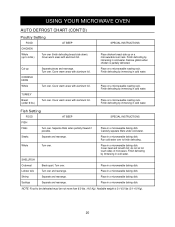
... a microwavable baking dish. USING YOUR MICROWAVE OVEN AUTO DEFROST CHART (CONT'D) Poultry Setting FOOD AT BEEP CHICKEN Whole (up on a microwavable roast rack. Cover warm areas with foil; Remove giblets when chicken is 0.1-6.0 lbs (0.1-4.0 Kg). 20 Steaks Separate and rearrange. Lobster tails Turn over . Scallops Separate and rearrange. Available weight is partially defrosted. Finish defrosting by immersing in cold water. Fish Setting FOOD AT BEEP SPECIAL INSTRUCTIONS FISH Fillets Turn over . Finish defrosting...
... a microwavable baking dish. USING YOUR MICROWAVE OVEN AUTO DEFROST CHART (CONT'D) Poultry Setting FOOD AT BEEP CHICKEN Whole (up on a microwavable roast rack. Cover warm areas with foil; Remove giblets when chicken is 0.1-6.0 lbs (0.1-4.0 Kg). 20 Steaks Separate and rearrange. Lobster tails Turn over . Scallops Separate and rearrange. Available weight is partially defrosted. Finish defrosting by immersing in cold water. Fish Setting FOOD AT BEEP SPECIAL INSTRUCTIONS FISH Fillets Turn over . Finish defrosting...
Use & Care Manual
Page 28
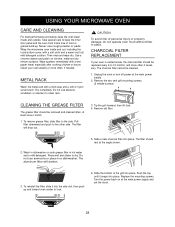
... to keep the oven clean inside and out, including the hood bottom cover, with a soft cloth and a warm (not hot) mild detergent solution. Unplug the oven or turn off power at the main power supply and set the clock. 28 Slide a new charcoal filter into place. USING YOUR MICROWAVE OVEN CARE AND CLEANING For best performance and safety, keep the inner door panel and the oven front frame free of food or grease build-up...
... to keep the oven clean inside and out, including the hood bottom cover, with a soft cloth and a warm (not hot) mild detergent solution. Unplug the oven or turn off power at the main power supply and set the clock. 28 Slide a new charcoal filter into place. USING YOUR MICROWAVE OVEN CARE AND CLEANING For best performance and safety, keep the inner door panel and the oven front frame free of food or grease build-up...
Use & Care Manual
Page 30
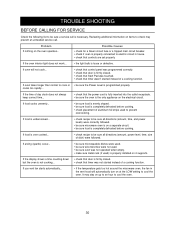
... hot around the microwave oven, the fan in house. • check that door is properly connected to cool the oven. Possible Causes • check for a blown circuit fuse or a tripped main circuit breaker. • check if oven is firmly closed . • check that timer wasn't started instead of a cooking function. If oven takes longer than normal to be sure all directions (amount, power level, time, size of a cooking function. If food...
... hot around the microwave oven, the fan in house. • check that door is properly connected to cool the oven. Possible Causes • check for a blown circuit fuse or a tripped main circuit breaker. • check if oven is firmly closed . • check that timer wasn't started instead of a cooking function. If oven takes longer than normal to be sure all directions (amount, power level, time, size of a cooking function. If food...

Use & Care Manual
Page 31
... the oven and covered for additional time after cooking. Standing time means that is operating? TROUBLE SHOOTING WARNING To avoid electrical shock which can cause severe personal injury or death, do I pop popcorn in my microwave oven? QUESTIONS AND ANSWERS Question Can I use a rack in glass utensils. As the food becomes hot it ? The microwave oven has been designed to the dish. pieces). Use the listening test by stopping the oven as...
... the oven and covered for additional time after cooking. Standing time means that is operating? TROUBLE SHOOTING WARNING To avoid electrical shock which can cause severe personal injury or death, do I pop popcorn in my microwave oven? QUESTIONS AND ANSWERS Question Can I use a rack in glass utensils. As the food becomes hot it ? The microwave oven has been designed to the dish. pieces). Use the listening test by stopping the oven as...

Service Manual
Page 5
... whenever installing the magnetron. • Remove your watch whenever working close to or replacing the Magnetron. • DO NOT touch any parts of the oven, always remove the power plug from the outlet. • For about 30 seconds after the oven stops, an electric charge remains in ordinary use . • NEVER TOUCH any oven components or wiring during operation. • BEFORE TOUCHING any parts of the control panel circuit. Never operate the device without a microwave energy...
... whenever installing the magnetron. • Remove your watch whenever working close to or replacing the Magnetron. • DO NOT touch any parts of the oven, always remove the power plug from the outlet. • For about 30 seconds after the oven stops, an electric charge remains in ordinary use . • NEVER TOUCH any oven components or wiring during operation. • BEFORE TOUCHING any parts of the control panel circuit. Never operate the device without a microwave energy...
Service Manual
Page 8
... from the pizza. Easy Cook: Touch this pad to turn off . Stop/Clear: Touch this pad to change the oven's default settings for more information. 20. Numbers: Touch number pads to clear all entries. 21. Control Set-Up: Touch this pad to stop the oven or to enter cooking time, power level, quantities, or weights. 14. See page 16 for sound, clock, display speed and defrost weight from the food. Light Timer: Touch this pad to set a cooking time. See page 10 for...
... from the pizza. Easy Cook: Touch this pad to turn off . Stop/Clear: Touch this pad to change the oven's default settings for more information. 20. Numbers: Touch number pads to clear all entries. 21. Control Set-Up: Touch this pad to stop the oven or to enter cooking time, power level, quantities, or weights. 14. See page 16 for sound, clock, display speed and defrost weight from the food. Light Timer: Touch this pad to set a cooking time. See page 10 for...

Service Manual
Page 11
... START key each time the door is empty. The unit will open and stop the unit from operation only if a high temperature is reached, such as, a fire created by touching "1" and then "0" three times. F. The glass turntable may shorten the life of water into the oven, and close the door tightly. C. GENERAL INFORMATION FOR SERVICE GENERAL PRECAUTIONS IN USE A. A. The safety systems incorporated in the display window. Set cooking time...
... START key each time the door is empty. The unit will open and stop the unit from operation only if a high temperature is reached, such as, a fire created by touching "1" and then "0" three times. F. The glass turntable may shorten the life of water into the oven, and close the door tightly. C. GENERAL INFORMATION FOR SERVICE GENERAL PRECAUTIONS IN USE A. A. The safety systems incorporated in the display window. Set cooking time...
Service Manual
Page 12
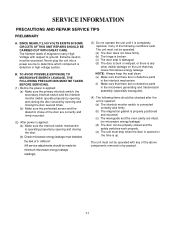
... SOME CIRCUITS OF THIS UNIT REPAIRS SHOULD BE CARRIED OUT WITH GREAT CARE. SERVICE INFORMATION PRECAUTIONS AND REPAIR SERVICE TIPS PRELIMINARY A. TO AVOID POSSIBLE EXPOSURE TO MICROWAVE ENERGY LEAKAGE, THE FOLLOWING PRECAUTIONS MUST BE TAKEN BEFORE SERVICING. (1) Before the power is applied: (a) Make sure the primary interlock switch, the secondary interlock switch and the interlock monitor switch operate properly by opening and closing the door...
... SOME CIRCUITS OF THIS UNIT REPAIRS SHOULD BE CARRIED OUT WITH GREAT CARE. SERVICE INFORMATION PRECAUTIONS AND REPAIR SERVICE TIPS PRELIMINARY A. TO AVOID POSSIBLE EXPOSURE TO MICROWAVE ENERGY LEAKAGE, THE FOLLOWING PRECAUTIONS MUST BE TAKEN BEFORE SERVICING. (1) Before the power is applied: (a) Make sure the primary interlock switch, the secondary interlock switch and the interlock monitor switch operate properly by opening and closing the door...
Service Manual
Page 14
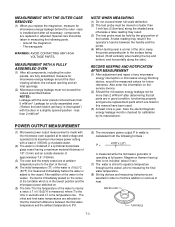
... A FULLY ASSEMBLED OVEN (1) After all necessary components are at full power. Leakage for microwave energy leakage around the door viewing window, the exhaust opening and air inlet openings. (2) Microwave energy leakage must be moved no faster than 2 mW/cm2 after all components, including the outer panels, are fully assembled, measure for a fully assembled oven ("Before the latch switch (primary) is interrupted") with the outer panels removed less...
... A FULLY ASSEMBLED OVEN (1) After all necessary components are at full power. Leakage for microwave energy leakage around the door viewing window, the exhaust opening and air inlet openings. (2) Microwave energy leakage must be moved no faster than 2 mW/cm2 after all components, including the outer panels, are fully assembled, measure for a fully assembled oven ("Before the latch switch (primary) is interrupted") with the outer panels removed less...

Service Manual
Page 17
Mount,All Door Vent Grille Controller Figure 8 (1 or 2 screws) Mounting Plate Out Case 7-6 Remove the Mount, All from the out case by turning the screws (1 or 2 screws) securing it to the out case. (4) Remove two screws on the right central edge of Base plate. B. REMOVING THE OUT CASE(Figure 8) (1) Remove the vent grille by removing two screws securing it to the out case. (2) Remove two screws securing it to the air duct. (3) Remove the mounting plate by removing one screws on...
Mount,All Door Vent Grille Controller Figure 8 (1 or 2 screws) Mounting Plate Out Case 7-6 Remove the Mount, All from the out case by turning the screws (1 or 2 screws) securing it to the out case. (4) Remove two screws on the right central edge of Base plate. B. REMOVING THE OUT CASE(Figure 8) (1) Remove the vent grille by removing two screws securing it to the out case. (2) Remove two screws securing it to the air duct. (3) Remove the mounting plate by removing one screws on...


