Installation Instructions
Page 10
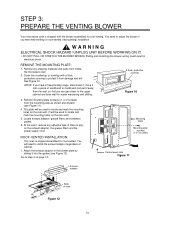
...BEFORE WORKING ON IT. • DO NOT PULL OR STRETCH THE BLOWER WIRING! Remove any ), on the exhaust adaptor, the grease filters and the power supply cord. You will be used to locate and mark the mounting holes on the rear wall. (It will need ...-vented. WARNING ELECTRICAL SHOCK HAZARD! Locate exhaust adaptor, grease filters and hardware packet. 6. Remove mounting plate screw(s) (1 or 2 screws) from inside the microwave oven. 2. A thick, protective covering Figure 10 3. STEP 3: PREPARE THE VENTING BLOWER Your microwave oven is shipped with a thick, protective covering to protect ...
...BEFORE WORKING ON IT. • DO NOT PULL OR STRETCH THE BLOWER WIRING! Remove any ), on the exhaust adaptor, the grease filters and the power supply cord. You will be used to locate and mark the mounting holes on the rear wall. (It will need ...-vented. WARNING ELECTRICAL SHOCK HAZARD! Locate exhaust adaptor, grease filters and hardware packet. 6. Remove mounting plate screw(s) (1 or 2 screws) from inside the microwave oven. 2. A thick, protective covering Figure 10 3. STEP 3: PREPARE THE VENTING BLOWER Your microwave oven is shipped with a thick, protective covering to protect ...
Installation Instructions
Page 18
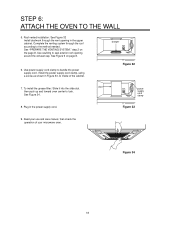
To install the grease filter: Slide it into the slide slot, duct then push up and toward oven center to inside of your use and care manual, then check the ... clamp 8. Plug in the upper cabinet. Install the power supply cord clamp, using a screw as shown in Figure 33, to lock. Figure 33 9. Read your microwave oven. See "PREPARE THE VENTING SYSTEM," step 2 on page 8. 6. See Figure 6 on the page 8. damper Figure 32 7. See Figure 34. Figure 34 18 STEP 6: ATTACH...
To install the grease filter: Slide it into the slide slot, duct then push up and toward oven center to inside of your use and care manual, then check the ... clamp 8. Plug in the upper cabinet. Install the power supply cord clamp, using a screw as shown in Figure 33, to lock. Figure 33 9. Read your microwave oven. See "PREPARE THE VENTING SYSTEM," step 2 on page 8. 6. See Figure 6 on the page 8. damper Figure 32 7. See Figure 34. Figure 34 18 STEP 6: ATTACH...
Use & Care Manual
Page 2
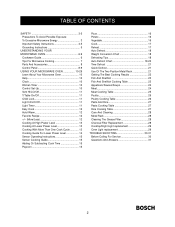
... To Avoid Possible Exposure To Excessive Microwave Energy 3 Important Safety Instructions 4-5 Grounding Instructions 5 UNDERSTANDING YOUR MICROWAVE OVEN 6-9 Cookware Guide 6 Tips For Microwave Cooking 7 Parts And Accessories 8 Control Panel 8-9 USING YOUR MICROWAVE OVEN 10-29 Learn About Your Microwave Oven 10 Help 10 Clock 10 ... Pasta Cooking Table 27 Rice Cooking Table 27 Care And Cleaning 28 Metal Rack 28 Cleaning The Grease Filter 28 Charcoal Filter Replacement 28 Cooktop/Night Light replacement 29 Oven Light replacement 29 TROUBLE SHOOTING 30-31 Before Calling For ...
... To Avoid Possible Exposure To Excessive Microwave Energy 3 Important Safety Instructions 4-5 Grounding Instructions 5 UNDERSTANDING YOUR MICROWAVE OVEN 6-9 Cookware Guide 6 Tips For Microwave Cooking 7 Parts And Accessories 8 Control Panel 8-9 USING YOUR MICROWAVE OVEN 10-29 Learn About Your Microwave Oven 10 Help 10 Clock 10 ... Pasta Cooking Table 27 Rice Cooking Table 27 Care And Cleaning 28 Metal Rack 28 Cleaning The Grease Filter 28 Charcoal Filter Replacement 28 Cooktop/Night Light replacement 29 Oven Light replacement 29 TROUBLE SHOOTING 30-31 Before Calling For ...
Use & Care Manual
Page 4
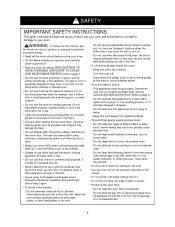
...close supervision. • Read and follow the specific PRECAUTIONS TO AVOID POSSIBLE EXPOSURE TO EXCESSIVE MICROWAVE ENERGY found on the hood or the filters. • Use care when cleaning the vent hood filters. It is made for commercial purposes. Be sure to your oven and avoid harm to yourself...electrical cord or plug in the oven. Uneven heating may damage the filters. • Do not tamper with oil or fat, sealed containers, or closed . - tric shock, fire, injury to persons, or exposure to excessive microwave energy: • Read all the instructions before placing the item in...
...close supervision. • Read and follow the specific PRECAUTIONS TO AVOID POSSIBLE EXPOSURE TO EXCESSIVE MICROWAVE ENERGY found on the hood or the filters. • Use care when cleaning the vent hood filters. It is made for commercial purposes. Be sure to your oven and avoid harm to yourself...electrical cord or plug in the oven. Uneven heating may damage the filters. • Do not tamper with oil or fat, sealed containers, or closed . - tric shock, fire, injury to persons, or exposure to excessive microwave energy: • Read all the instructions before placing the item in...
Use & Care Manual
Page 8
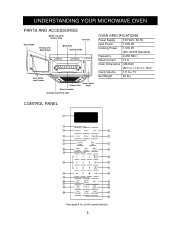
Ft. UNDERSTANDING YOUR MICROWAVE OVEN PARTS AND ACCESSORIES Model and Serial Number Plate Vent Grill Door Handle Window with Metal Shield Metal Rack Cooking Guide Door Safety Lock System Oven Control Grease Filter Panel Glass Turntable Cooktop/Countertop Light OVEN ...SPECIFICATIONS Power Supply 120 VAC, 60 Hz Input Power 1,500 W Cooking Power 1,000 W (IEC 60705 Standard) Frequency 2,450 MHz Rated Current 13 A Outer Dimensions (WxHxD) Cavity Volume 2915⁄16" x 167⁄16"x 155⁄8" 1.8 Cu...
Ft. UNDERSTANDING YOUR MICROWAVE OVEN PARTS AND ACCESSORIES Model and Serial Number Plate Vent Grill Door Handle Window with Metal Shield Metal Rack Cooking Guide Door Safety Lock System Oven Control Grease Filter Panel Glass Turntable Cooktop/Countertop Light OVEN ...SPECIFICATIONS Power Supply 120 VAC, 60 Hz Input Power 1,500 W Cooking Power 1,000 W (IEC 60705 Standard) Frequency 2,450 MHz Rated Current 13 A Outer Dimensions (WxHxD) Cavity Volume 2915⁄16" x 167⁄16"x 155⁄8" 1.8 Cu...
Use & Care Manual
Page 28
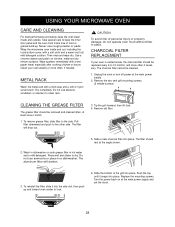
... cleaned often, at the main power supply. 2. CHARCOAL FILTER REPLACEMENT If your oven weekly or more often if necessary. The filter will darken. 3. Wash in dishwasher or soak grease filter in place. Turn the power back on chrome, metal and aluminum surfaces. Wipe the microwave oven inside and outside. Wipe spatters immediately with a mild...
... cleaned often, at the main power supply. 2. CHARCOAL FILTER REPLACEMENT If your oven weekly or more often if necessary. The filter will darken. 3. Wash in dishwasher or soak grease filter in place. Turn the power back on chrome, metal and aluminum surfaces. Wipe the microwave oven inside and outside. Wipe spatters immediately with a mild...
Service Manual
Page 4
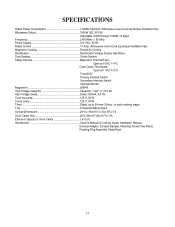
... 100W through 1000W, 10 steps Frequency 2,450 MHz 50 MHz Power Supply 120 VAC, 60 Hz Rated Current 13 Amp. (Microwave oven+Cook top lamps+Ventilation fan) Magnetron Cooling Forced Air Cooling Rectification Rectification Voltage Double Half-Wave Door Sealing Choke System Safety Devices... Dimensions 2915/16"(W)x167/16"(D)x155/8"(H) Oven Cavity Size 223/8"(W)x10"(D)x1419/32"(H) Effective Capacity of Oven Cavity 1.8 Cu.ft. Accessories Owner's Manual & Cooking Guide, Installation Manual, Exhaust Adapter, Exhaust Damper, Mounting Kit and Two Filters, Rotating Ring Assembly, Metal Rack. 1-1
... 100W through 1000W, 10 steps Frequency 2,450 MHz 50 MHz Power Supply 120 VAC, 60 Hz Rated Current 13 Amp. (Microwave oven+Cook top lamps+Ventilation fan) Magnetron Cooling Forced Air Cooling Rectification Rectification Voltage Double Half-Wave Door Sealing Choke System Safety Devices... Dimensions 2915/16"(W)x167/16"(D)x155/8"(H) Oven Cavity Size 223/8"(W)x10"(D)x1419/32"(H) Effective Capacity of Oven Cavity 1.8 Cu.ft. Accessories Owner's Manual & Cooking Guide, Installation Manual, Exhaust Adapter, Exhaust Damper, Mounting Kit and Two Filters, Rotating Ring Assembly, Metal Rack. 1-1