Installation Instructions
Page 2
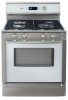
Table of Contents Safety 1 Important Safety Instructions 1 Installation 4 Before You Begin 4 Overview 4 Tools and Parts Needed 4 Parts Included 5 General Information 5 Preparation 5 Installation Procedure 11 Apply Foam Tape 11 Install Backwall Trim 11 Connect Electric 12 Connect Gas Supply 16 Test for Gas Leaks 21 Test the Installation 22 Service 24 Before Calling Service 24 Product Data Plate 24 Questions? 1-800-944-2904 www.boschappliances.com 5551 McFadden Ave. Huntington Beach, CA 92649 We look forward to hearing from you!
Table of Contents Safety 1 Important Safety Instructions 1 Installation 4 Before You Begin 4 Overview 4 Tools and Parts Needed 4 Parts Included 5 General Information 5 Preparation 5 Installation Procedure 11 Apply Foam Tape 11 Install Backwall Trim 11 Connect Electric 12 Connect Gas Supply 16 Test for Gas Leaks 21 Test the Installation 22 Service 24 Before Calling Service 24 Product Data Plate 24 Questions? 1-800-944-2904 www.boschappliances.com 5551 McFadden Ave. Huntington Beach, CA 92649 We look forward to hearing from you!
Installation Instructions
Page 3
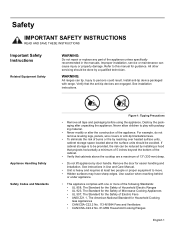
...-C22.2 No. 113-M1984 Fans and Ventilators • CAN/CSA-C22.2 No. 61-M89 Household Cooking Ranges English 1 See instructions in the manuals. Improper installation, service or maintenance can tip. Verify that cabinets above the surface units should be avoided. If cabinet storage...13" (330 mm) deep. • Do not lift appliance by door handle. Install anti-tip device packaged with range. Injury to this manual for easier handling and installation. See installation instructions. All other servicing should be done by reaching over heated surface units, cabinet storage ...
...-C22.2 No. 113-M1984 Fans and Ventilators • CAN/CSA-C22.2 No. 61-M89 Household Cooking Ranges English 1 See instructions in the manuals. Improper installation, service or maintenance can tip. Verify that cabinets above the surface units should be avoided. If cabinet storage...13" (330 mm) deep. • Do not lift appliance by door handle. Install anti-tip device packaged with range. Injury to this manual for easier handling and installation. See installation instructions. All other servicing should be done by reaching over heated surface units, cabinet storage ...
Installation Instructions
Page 4
... in an emergency. • Leak testing must be conducted by the installer according to the instructions in this manual. • The appliance and its individual shutoff valve ...installer to determine if additional requirements and/or standards apply to specific installations. • Installation must conform with local codes or, in the absence of local codes, with the National Fuel...edition. (In Canada, installation must be in accordance with the CAN 1-B149.1 and .2 Installation Codes for the local electrical inspector's use with ranges" shall be used. • Installer - Mark it checked...
... in an emergency. • Leak testing must be conducted by the installer according to the instructions in this manual. • The appliance and its individual shutoff valve ...installer to determine if additional requirements and/or standards apply to specific installations. • Installation must conform with local codes or, in the absence of local codes, with the National Fuel...edition. (In Canada, installation must be in accordance with the CAN 1-B149.1 and .2 Installation Codes for the local electrical inspector's use with ranges" shall be used. • Installer - Mark it checked...
Installation Instructions
Page 5
...tank must be equipped with propane the appliance must be converted per the LP conversion instructions. • For Massachusetts installations: • Installation must also be longer than 36 inches. • Installer - English 3 Installation and service must not be used. • The appliance is not followed exactly,.... • Do not store or use with natural gas. A qualified technician or installer must not exceed 14.0 inches water column (34.9Millibars). Follow the gas supplier's instructions. • If you cannot reach your gas supplier from the factory for use with...
...tank must be equipped with propane the appliance must be converted per the LP conversion instructions. • For Massachusetts installations: • Installation must also be longer than 36 inches. • Installer - English 3 Installation and service must not be used. • The appliance is not followed exactly,.... • Do not store or use with natural gas. A qualified technician or installer must not exceed 14.0 inches water column (34.9Millibars). Follow the gas supplier's instructions. • If you cannot reach your gas supplier from the factory for use with...
Installation Instructions
Page 6
...) • Cloth or Cardboard (Optional - to the sections that follow for Canadian installations; Preparation 2. Connect Gas Supply 6. Connect Electric 5. Canadian units are shipped with the power cord already installed. • Measuring Tape • Phillips Head Screwdriver • 1-1/4" (31.8 mm... Tools and Parts Needed Additional Parts Needed For Hard Wire Installations • Range Power Supply Cord Kit (240V -30 Amp) Note: Not necessary for step-by-step instructions. Apply Foam Tape 3. Test the Installation Proceed to Protect Floor) • Flexible Conduit •...
...) • Cloth or Cardboard (Optional - to the sections that follow for Canadian installations; Preparation 2. Connect Gas Supply 6. Connect Electric 5. Canadian units are shipped with the power cord already installed. • Measuring Tape • Phillips Head Screwdriver • 1-1/4" (31.8 mm... Tools and Parts Needed Additional Parts Needed For Hard Wire Installations • Range Power Supply Cord Kit (240V -30 Amp) Note: Not necessary for step-by-step instructions. Apply Foam Tape 3. Test the Installation Proceed to Protect Floor) • Flexible Conduit •...
Installation Instructions
Page 11
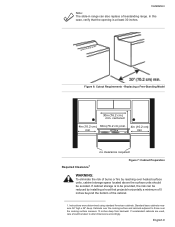
Figure 6: Cutout Requirements - Instructions were determined using standard American cabinets. In this case, verify that projects horizontally a minimum of 5 inches beyond the bottom of burns or fire by installing a hood that the opening is to alter dimensions accordingly. Standard base cabinets measure 36" high ... min no clearance required Required Clearance1 Figure 7: Cabinet Preparation WARNING: To eliminate the risk of the cabinet. 1. Installation Note: The slide-in range can be reduced by reaching over the cooking surface measure 13 inches deep from backwall.
Figure 6: Cutout Requirements - Instructions were determined using standard American cabinets. In this case, verify that projects horizontally a minimum of 5 inches beyond the bottom of burns or fire by installing a hood that the opening is to alter dimensions accordingly. Standard base cabinets measure 36" high ... min no clearance required Required Clearance1 Figure 7: Cabinet Preparation WARNING: To eliminate the risk of the cabinet. 1. Installation Note: The slide-in range can be reduced by reaching over the cooking surface measure 13 inches deep from backwall.

Installation Instructions
Page 12
.... Seal any obstructions (extra electrical or gas connections, etc.) so that range will rest against cabinet wall 1 9/16" (39.7 mm) from unit walls to instructions furnished with (b) not less than 300 CFM is protected by safety standards, particularly self-cleaning ovens; Install Anti-Tip Bracket 1. English 10 Measure to adjacent vertical walls must...
.... Seal any obstructions (extra electrical or gas connections, etc.) so that range will rest against cabinet wall 1 9/16" (39.7 mm) from unit walls to instructions furnished with (b) not less than 300 CFM is protected by safety standards, particularly self-cleaning ovens; Install Anti-Tip Bracket 1. English 10 Measure to adjacent vertical walls must...
Installation Instructions
Page 14
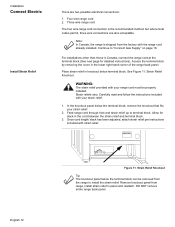
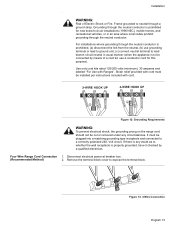
...Relief Knockout Tip: The knockout panel below the terminal block can be properly installed. Allow for detailed instructions). Installation Connect Electric Install Strain Relief There are also acceptable. Note: In Canada, the range is the recommended method, but where local codes permit, three wire connections ... relief up to "Connect Gas Supply" on page 16. Carefully read and follow the instructions included with the range cord already installed. Strain reliefs vary. Four wire range cord 2. Continue to terminal block. Access the terminal block by removing the cover in ...
...Relief Knockout Tip: The knockout panel below the terminal block can be properly installed. Allow for detailed instructions). Installation Connect Electric Install Strain Relief There are also acceptable. Note: In Canada, the range is the recommended method, but where local codes permit, three wire connections ... relief up to "Connect Gas Supply" on page 16. Carefully read and follow the instructions included with the range cord already installed. Strain reliefs vary. Four wire range cord 2. Continue to terminal block. Access the terminal block by removing the cover in ...
Installation Instructions
Page 15
...: Risk of a cord kit, use grounding terminal or lead to ground unit, (c) connect neutral terminal to be installed per instructions included with Ranges". Use only cord kits rated 125/250 volts (minimum), 30 amperes and labeled "For Use with cord. Grounding ...matching grounding type receptacle and connected to neutral through the neutral conductor. It must be connected by a qualified electrician. Four Wire Range Cord Connection 1. Installation . Frame grounded to a correctly polarized 240- Strain relief provided with cord must be cut or removed under any doubt as to...
...: Risk of a cord kit, use grounding terminal or lead to ground unit, (c) connect neutral terminal to be installed per instructions included with Ranges". Use only cord kits rated 125/250 volts (minimum), 30 amperes and labeled "For Use with cord. Grounding ...matching grounding type receptacle and connected to neutral through the neutral conductor. It must be connected by a qualified electrician. Four Wire Range Cord Connection 1. Installation . Frame grounded to a correctly polarized 240- Strain relief provided with cord must be cut or removed under any doubt as to...
Installation Instructions
Page 18
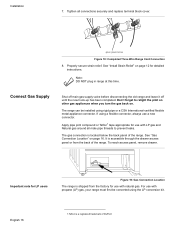
... propane (LP) gas, your range must first be installed using rigid pipe or a CSA International-certified flexible metal appliance connector. The gas connection is shipped from the back of the range. English 16 1.Teflon is accessible through the drawer access panel or from the factory for detailed instructions. The range can be converted using a flexible...
... propane (LP) gas, your range must first be installed using rigid pipe or a CSA International-certified flexible metal appliance connector. The gas connection is shipped from the back of the range. English 16 1.Teflon is accessible through the drawer access panel or from the factory for detailed instructions. The range can be converted using a flexible...

Installation Instructions
Page 23
... the countertop. Use a level to the instructions given in damage to ensure that anti-tip bracket engages and pre- Complete Gas Connection 1. Access the connection through the access panel behind the drawer. Leak testing is to be conducted by the installer according to verify that the range is level and plumb. 4. Include all...
... the countertop. Use a level to the instructions given in damage to ensure that anti-tip bracket engages and pre- Complete Gas Connection 1. Access the connection through the access panel behind the drawer. Leak testing is to be conducted by the installer according to verify that the range is level and plumb. 4. Include all...


