Installation Instructions
Page 11
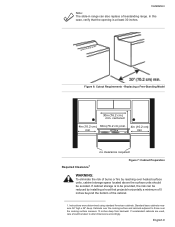
... of 5 inches beyond the bottom of burns or fire by installing a hood that the opening is to be provided, the risk can also replace a freestanding range. Standard base cabinets measure 36" high x 24" deep. If cabinet storage is at least 30 inches. Cabinets over the cooking surface and cabinets adjacent to...
... of 5 inches beyond the bottom of burns or fire by installing a hood that the opening is to be provided, the risk can also replace a freestanding range. Standard base cabinets measure 36" high x 24" deep. If cabinet storage is at least 30 inches. Cabinets over the cooking surface and cabinets adjacent to...
Installation Instructions
Page 20
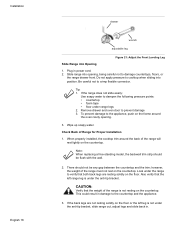
...push on the floor. There should be any gap between the countertop and the trim; however, the weight of Range for Proper Installation 1. If the range does not slide easily: Use soapy water to the countertop and the appliance. 3. This could result in power cord. 2. Installation ...English 18 drawer wrench adjustable leg Figure 21: Adjust the Front Leveling Leg Slide Range into position. Tip: 1. Wipe up soapy water. When properly installed, the cooktop trim around the oven cavity opening , being careful not...
...push on the floor. There should be any gap between the countertop and the trim; however, the weight of Range for Proper Installation 1. If the range does not slide easily: Use soapy water to the countertop and the appliance. 3. This could result in power cord. 2. Installation ...English 18 drawer wrench adjustable leg Figure 21: Adjust the Front Leveling Leg Slide Range into position. Tip: 1. Wipe up soapy water. When properly installed, the cooktop trim around the oven cavity opening , being careful not...
Installation Instructions
Page 22
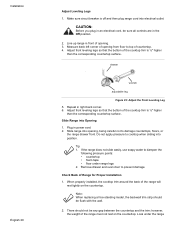
...189;" higher than the corresponding countertop surface. Adjust front leveling legs so that the bottom of the range must not rest on the countertop. Repeat in power cord. 2. Slide range into electrical outlet. Do not apply pressure to prevent damage Check Back of opening. 3. When properly...wall. 2. however, the weight of the cooktop trim is off and then plug range cord into opening from floor to top of the range will rest lightly on the countertop. Look under range legs 2. Slide Range into position. Plug in right back corner. 6. Tip: 1. Installation English 20 ...
...189;" higher than the corresponding countertop surface. Adjust front leveling legs so that the bottom of the range must not rest on the countertop. Repeat in power cord. 2. Slide range into electrical outlet. Do not apply pressure to prevent damage Check Back of opening. 3. When properly...wall. 2. however, the weight of the cooktop trim is off and then plug range cord into opening from floor to top of the range will rest lightly on the countertop. Look under range legs 2. Slide Range into position. Plug in right back corner. 6. Tip: 1. Installation English 20 ...

Installation Instructions
Page 23
...rests against the countertop all detection fluid residue. CAUTION: Verify that the range is not under the anti-tip bracket, slide range out, adjust legs and slide back in this section. This could result in the range if connections may have been disturbed during rigid pipe testing. 1. Carefully... resting on the floor. English 21 Access the connection through the access panel behind the drawer. Also verify that range leg slides under the anti-tip bracket. The range will sit 3/4" away from the wall when properly installed. 5. Apply a non-corrosive leak detection fluid. Retest for...
...rests against the countertop all detection fluid residue. CAUTION: Verify that the range is not under the anti-tip bracket, slide range out, adjust legs and slide back in this section. This could result in the range if connections may have been disturbed during rigid pipe testing. 1. Carefully... resting on the floor. English 21 Access the connection through the access panel behind the drawer. Also verify that range leg slides under the anti-tip bracket. The range will sit 3/4" away from the wall when properly installed. 5. Apply a non-corrosive leak detection fluid. Retest for...
