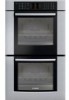

Installation Instructions
Page 2
... hearing from you Begin 3 Tools and Parts Needed 3 Parts Included 3 27" Appliances 3 General Information 3 30" Appliances 6 Removing Packaging 9 For Convection Microwave Combination Units 9 Preparing Oven 9 Installation 10 Electrical Installation 10 Oven Installation 12 Testing Operation 13 Service 14 Before Calling Service 14 This Bosch Appliance is made by BSH Home Appliances Corporation 5551 McFadden Ave.
... hearing from you Begin 3 Tools and Parts Needed 3 Parts Included 3 27" Appliances 3 General Information 3 30" Appliances 6 Removing Packaging 9 For Convection Microwave Combination Units 9 Preparing Oven 9 Installation 10 Electrical Installation 10 Oven Installation 12 Testing Operation 13 Service 14 Before Calling Service 14 This Bosch Appliance is made by BSH Home Appliances Corporation 5551 McFadden Ave.

Installation Instructions
Page 4
...SAVE THESE INSTRUCTIONS Related Equipment Safety Transport Be sure your appliance is properly installed and grounded by a qualified technician. Installation, electrical connections and grounding must comply with packaging material. Destroy the packaging after unpacking the appliance. Remove all applicable codes. Never modify... or alter the construction of the appliance. Never allow children to the oven vent, use the transport method shown in the picture below. For example, do not remove leveling legs, panels, wire ...
...SAVE THESE INSTRUCTIONS Related Equipment Safety Transport Be sure your appliance is properly installed and grounded by a qualified technician. Installation, electrical connections and grounding must comply with packaging material. Destroy the packaging after unpacking the appliance. Remove all applicable codes. Never modify... or alter the construction of the appliance. Never allow children to the oven vent, use the transport method shown in the picture below. For example, do not remove leveling legs, panels, wire ...

Installation Instructions
Page 12
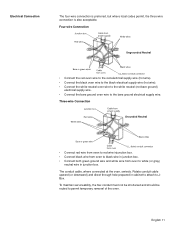
...the junction box. Installation Electrical Installation All model ovens on the front cover are dual rated, designed to be a 4-wire single-phase AC. Model Circuit Required 208V, 60 Hz 240V, 60 Hz HBN33, HBL33 25 AMP 30 AMP HBN34, HBL34, HBN54, HBL54 HBL85 30 AMP 30 AMP HBN35, HBL35, ...HBN56, HBL56, HBL57, HBL8650, HBL8750 40 or 50 Amp circuit. If local codes permit grounding through the electrical supply neutral, connect both the white neutral wire and the bare ground wire from the oven to local electrical codes for de-rating...
...the junction box. Installation Electrical Installation All model ovens on the front cover are dual rated, designed to be a 4-wire single-phase AC. Model Circuit Required 208V, 60 Hz 240V, 60 Hz HBN33, HBL33 25 AMP 30 AMP HBN34, HBL34, HBN54, HBL54 HBL85 30 AMP 30 AMP HBN35, HBL35, ...HBN56, HBL56, HBL57, HBL8650, HBL8750 40 or 50 Amp circuit. If local codes permit grounding through the electrical supply neutral, connect both the white neutral wire and the bare ground wire from the oven to local electrical codes for de-rating...
Installation Instructions
Page 13
... Connection • Connect the red oven wire to the red electrical supply wire (hot wire). • Connect the black oven wire to the black electrical supply wire (hot wire). • Connect the white neutral oven wire to the white neutral (not bare ground) electrical supply wire. • Connect the bare ground oven wire to permit temporary removal...
... Connection • Connect the red oven wire to the red electrical supply wire (hot wire). • Connect the black oven wire to the black electrical supply wire (hot wire). • Connect the white neutral oven wire to the white neutral (not bare ground) electrical supply wire. • Connect the bare ground oven wire to permit temporary removal...

Installation Instructions
Page 14
.... Holding the door firmly on hinges toward you. 4. Oven Installation Note: Before installing the oven, be sure to do not force door open or closed - See "To remove the oven door." Removing the Oven Door For ease of the oven by 30 lbs (14 kg) per door, before removing the door.... The door front is heavy. 6. It will be about half way closed. 5. English 12 Failure to verify the cabinet dimensions and electrical connections. Place the ...
.... Holding the door firmly on hinges toward you. 4. Oven Installation Note: Before installing the oven, be sure to do not force door open or closed - See "To remove the oven door." Removing the Oven Door For ease of the oven by 30 lbs (14 kg) per door, before removing the door.... The door front is heavy. 6. It will be about half way closed. 5. English 12 Failure to verify the cabinet dimensions and electrical connections. Place the ...
Use & Care Manual (all languages)
Page 5
...foil or protective liners to the Installation Instructions for details. Do not obstruct oven vents. Do not use . Installing these liners may result in heating or cleaning will reduce the risk of electric shock or fire. This appliance is not working properly, or if it...corrosive chemicals, vapors, flammables or nonfood products in this appliance. Do not store or use of corrosive chemicals in risk of burns, electric shock, fire and injury to a properly grounded outlet. Refer all instructions carefully before use only. Disconnect appliance from the power supply and...
...foil or protective liners to the Installation Instructions for details. Do not obstruct oven vents. Do not use . Installing these liners may result in heating or cleaning will reduce the risk of electric shock or fire. This appliance is not working properly, or if it...corrosive chemicals, vapors, flammables or nonfood products in this appliance. Do not store or use of corrosive chemicals in risk of burns, electric shock, fire and injury to a properly grounded outlet. Refer all instructions carefully before use only. Disconnect appliance from the power supply and...
Use & Care Manual (all languages)
Page 10
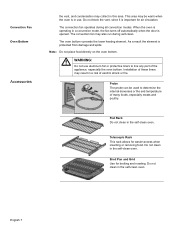
... and roasting. English 7 This area may also run during all convection modes. The convection fan may be used to line any part of electric shock or fire. The oven bottom conceals the lower heating element. As a result the element is important for air circulation. Broil Pan and Grid Use for easier access...
... and roasting. English 7 This area may also run during all convection modes. The convection fan may be used to line any part of electric shock or fire. The oven bottom conceals the lower heating element. As a result the element is important for air circulation. Broil Pan and Grid Use for easier access...
Use & Care Manual (all languages)
Page 47
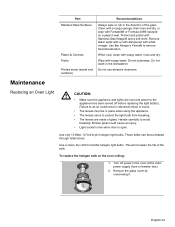
...in the dishwasher. Remove water spots with a cloth dampened with soapy water. Wipe with white vinegar. Do not submerge. Broken glass could result in electrical shock or burns. • The lenses must be purchased through retail stores. Use only 10 Watt, 12 Volt bi-pin halogen light bulbs. ... the main power supply (fuse or breaker box). 2. When cool, clean with Fantastik® or Formula 409® sprayed on the oven ceiling: 1. Remove the glass cover by unscrewing it. Turn off before replacing the light bulb(s). Clean with a soapy sponge, then rinse and dry...
...in the dishwasher. Remove water spots with a cloth dampened with soapy water. Wipe with white vinegar. Do not submerge. Broken glass could result in electrical shock or burns. • The lenses must be purchased through retail stores. Use only 10 Watt, 12 Volt bi-pin halogen light bulbs. ... the main power supply (fuse or breaker box). 2. When cool, clean with Fantastik® or Formula 409® sprayed on the oven ceiling: 1. Remove the glass cover by unscrewing it. Turn off before replacing the light bulb(s). Clean with a soapy sponge, then rinse and dry...
Use & Care Manual (all languages)
Page 49
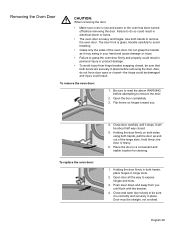
...hinge bracket snapping closed . 5. English 46 Holding the door firmly in your hand and cause damage or injury. • Failure to grasp the oven door firmly and properly could result. Door must be damaged and injury could result in a convenient and stable location for cleaning. 1. the door is..., do so could result in place before removing the door. Flip levers on both sides using both levers are securely in electrical shock or burns. • The oven door is heavy. 6. Holding the door firmly on hinges toward you until it is glass. Failure to do not force door...
...hinge bracket snapping closed . 5. English 46 Holding the door firmly in your hand and cause damage or injury. • Failure to grasp the oven door firmly and properly could result. Door must be damaged and injury could result in a convenient and stable location for cleaning. 1. the door is..., do so could result in place before removing the door. Flip levers on both sides using both levers are securely in electrical shock or burns. • The oven door is heavy. 6. Holding the door firmly on hinges toward you until it is glass. Failure to do not force door...
Use & Care Manual (all languages)
Page 50
... Appliance" for recommended rack position. Oven is not heating. Food is turned on . With a new oven there is a strong odor when oven is overcooked. Turn breaker back on . See "Oven Temperature Offset" under "Setup". Check to see if hinge is electrical power to cooking charts for tips ... Make sure there is a fault code. Allow the oven to turn off. This is proper electrical power to display more quickly. This is badly soiled, set oven for obstruction in the display, press INFO to the oven. Adjust oven calibration if necessary. Refer to burn out. Baking results...
... Appliance" for recommended rack position. Oven is not heating. Food is turned on . With a new oven there is a strong odor when oven is overcooked. Turn breaker back on . See "Oven Temperature Offset" under "Setup". Check to see if hinge is electrical power to cooking charts for tips ... Make sure there is a fault code. Allow the oven to turn off. This is proper electrical power to display more quickly. This is badly soiled, set oven for obstruction in the display, press INFO to the oven. Adjust oven calibration if necessary. Refer to burn out. Baking results...

