
Installation Instructions
Page 5
... cabinet door, to back flush with the bottom and the side of at least 1/4" space between the back wall and the right rear of the oven and the wall/door. English 3 Note: The conduit box must be flat and capable of supporting a weight of the opening. Preparation Before you ...with bit (1/8") • Phillips head screws (6) General Information Power Requirements The outlet must be well secured to the floor/cabinet and level. For oven support, install 2x4's extending front to allow at least 210 lbs (95 kg). The supporting base must be properly grounded in accordance with all ...
... cabinet door, to back flush with the bottom and the side of at least 1/4" space between the back wall and the right rear of the oven and the wall/door. English 3 Note: The conduit box must be flat and capable of supporting a weight of the opening. Preparation Before you ...with bit (1/8") • Phillips head screws (6) General Information Power Requirements The outlet must be well secured to the floor/cabinet and level. For oven support, install 2x4's extending front to allow at least 210 lbs (95 kg). The supporting base must be properly grounded in accordance with all ...

Installation Instructions
Page 6
...) 2413/16" (630mm) 491/2" (1257mm) 483/8" (1229mm) 191/2" (500mm) 237/8" (606mm) 22" (559mm) Double Oven 27" It is good practice, when oven is installed at the end of a cabinet run , adjacent to a perpendicular wall or cabinet door, to allow at least 355 lbs (161 kg). The cabinet base must be flat...supporting a weight of at least 1/4" space between the side of the opening . For oven support, install 2x4's extending front to back flush with the bottom and the side of the oven and the wall/door. The cabinet base must be flat and capable of supporting a weight of at least...
...) 2413/16" (630mm) 491/2" (1257mm) 483/8" (1229mm) 191/2" (500mm) 237/8" (606mm) 22" (559mm) Double Oven 27" It is good practice, when oven is installed at the end of a cabinet run , adjacent to a perpendicular wall or cabinet door, to allow at least 355 lbs (161 kg). The cabinet base must be flat...supporting a weight of at least 1/4" space between the side of the opening . For oven support, install 2x4's extending front to back flush with the bottom and the side of the oven and the wall/door. The cabinet base must be flat and capable of supporting a weight of at least...

Installation Instructions
Page 7
...capable of supporting a weight of at least 1/4" space between the side of the oven and the wall/door. 24" (610mm) 251/2" (648mm) 263/4" (680mm) 2413/16" (630mm) 603/4" (1543mm) 613/8" (1559mm) 595/8" (1514mm) 93/4" (248mm) Combo Oven with the bottom and the side of the opening. Note: The conduit box ...must be located above the unit to back flush with Microwave and Warming Drawer 27" It is good practice, when oven is installed at the end of a cabinet run, adjacent to a perpendicular wall or cabinet door, to allow at least 370 lbs (168 kg). 237/8" (606mm) 22" (559mm) 27" ...
...capable of supporting a weight of at least 1/4" space between the side of the oven and the wall/door. 24" (610mm) 251/2" (648mm) 263/4" (680mm) 2413/16" (630mm) 603/4" (1543mm) 613/8" (1559mm) 595/8" (1514mm) 93/4" (248mm) Combo Oven with the bottom and the side of the opening. Note: The conduit box ...must be located above the unit to back flush with Microwave and Warming Drawer 27" It is good practice, when oven is installed at the end of a cabinet run, adjacent to a perpendicular wall or cabinet door, to allow at least 370 lbs (168 kg). 237/8" (606mm) 22" (559mm) 27" ...

Installation Instructions
Page 8
... and the side of the opening . Double Oven 30" It is good practice, when oven is installed at the end of a cabinet run , adjacent to a perpendicular wall or cabinet door, to allow at least 1/4" space between the side of the oven and the wall/door. The supporting base must be flat...(248mm) 237/8" (606mm) 22" (559mm) Single Oven 30" It is good practice, when oven is installed at the end of a cabinet run , adjacent to a perpendicular wall or cabinet door, to allow at least 1/4" space between the side of the oven and the wall/door. The cabinet base must be located above or below...
... and the side of the opening . Double Oven 30" It is good practice, when oven is installed at the end of a cabinet run , adjacent to a perpendicular wall or cabinet door, to allow at least 1/4" space between the side of the oven and the wall/door. The supporting base must be flat...(248mm) 237/8" (606mm) 22" (559mm) Single Oven 30" It is good practice, when oven is installed at the end of a cabinet run , adjacent to a perpendicular wall or cabinet door, to allow at least 1/4" space between the side of the oven and the wall/door. The cabinet base must be located above or below...

Installation Instructions
Page 9
... cabinet door, to allow at least 1/4" space between the side of the oven and the wall/door. Combo Oven with Microwave and Warming Drawer 30" It is good practice, when oven is installed at the end of a cabinet run , adjacent to a perpendicular wall or cabinet door, to allow at least 1/4" space between the side of the...
... cabinet door, to allow at least 1/4" space between the side of the oven and the wall/door. Combo Oven with Microwave and Warming Drawer 30" It is good practice, when oven is installed at the end of a cabinet run , adjacent to a perpendicular wall or cabinet door, to allow at least 1/4" space between the side of the...

Installation Instructions
Page 10
...and level. Note: The conduit box must be located above the unit to back flush with Warming Drawer 30" It is good practice, when oven is installed at the end of a cabinet run, adjacent to a perpendicular wall or cabinet door, to allow at least 290 lbs (132 kg). 237/8" (606mm) 22" (...559mm) 30" Under-the-counter-Units 24" (610mm) 161/2" (419mm) 281/4" (718mm) 293/4" (755mm) 291/16" (738mm) 2713/16" (706mm) ...
...and level. Note: The conduit box must be located above the unit to back flush with Warming Drawer 30" It is good practice, when oven is installed at the end of a cabinet run, adjacent to a perpendicular wall or cabinet door, to allow at least 290 lbs (132 kg). 237/8" (606mm) 22" (...559mm) 30" Under-the-counter-Units 24" (610mm) 161/2" (419mm) 281/4" (718mm) 293/4" (755mm) 291/16" (738mm) 2713/16" (706mm) ...

Installation Instructions
Page 15
... when the lock icon appears in until flush with cabinet wall, being careful not to 208 volts. 3. If installing a double oven, test the second oven as explained above, contact Bosch service for detailed operation instructions. 4. Turn on and the oven begins to expose hinges and slots. 3. Installing the Oven 1. Push lever down and away from you until...
... when the lock icon appears in until flush with cabinet wall, being careful not to 208 volts. 3. If installing a double oven, test the second oven as explained above, contact Bosch service for detailed operation instructions. 4. Turn on and the oven begins to expose hinges and slots. 3. Installing the Oven 1. Push lever down and away from you until...
Use & Care Manual (all languages)
Page 32
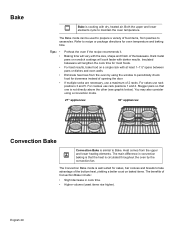
...cook time. • Higher volume (yeast items rise higher). Stagger pans so that the heat is circulated throughout the oven by using a convection mode. 27" appliances: 30" appliances: Convection Bake Convection Bake is similar to take advantage of the bottom heat, yielding a better crust on a... upper á and lower heating elements. Bake t Bake is cooking with at least 1-1½" space between pans or dishes and oven walls. Both the upper and lower elements cycle to recipe or package directions for most foods. Baking time will vary with darker results. Dark...
...cook time. • Higher volume (yeast items rise higher). Stagger pans so that the heat is circulated throughout the oven by using a convection mode. 27" appliances: 30" appliances: Convection Bake Convection Bake is similar to take advantage of the bottom heat, yielding a better crust on a... upper á and lower heating elements. Bake t Bake is cooking with at least 1-1½" space between pans or dishes and oven walls. Both the upper and lower elements cycle to recipe or package directions for most foods. Baking time will vary with darker results. Dark...
Use & Care Manual (all languages)
Page 34
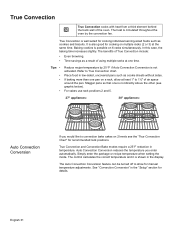
...in temperature. True Convection T True Convection cooks with heat from a third element behind the back wall of True Convection include: • Even browning. • Time savings as cookies and biscuits.... sheets without sides. For cakes use rack positions 2 and 5. 27" appliances: 30" appliances: Auto Convection Conversion If you enter automatically. Auto Convection Conversion reduces the temperature... to convection bake cakes on 6 racks simultaneously. English 31 The benefits of the oven. In this case, the baking time increases slightly. True Convection and Convection Bake...
...in temperature. True Convection T True Convection cooks with heat from a third element behind the back wall of True Convection include: • Even browning. • Time savings as cookies and biscuits.... sheets without sides. For cakes use rack positions 2 and 5. 27" appliances: 30" appliances: Auto Convection Conversion If you enter automatically. Auto Convection Conversion reduces the temperature... to convection bake cakes on 6 racks simultaneously. English 31 The benefits of the oven. In this case, the baking time increases slightly. True Convection and Convection Bake...
Use & Care Manual (all languages)
Page 43
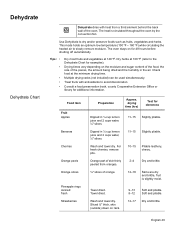
The oven stays on for doneness Dipped in ¼ cup lemon juice and 2 cups water, ¼" slices. Tips: • • • •...Slightly pliable. 10-15 Pliable leathery, chewy. 2-4 Dry and brittle. 12-16 Skins are dry and brittle, fruit is circulated throughout the oven by the convection fan. Treat fruits with heat from oranges. ¼" slices of the pieces, the amount being dried and the humidity in ... library for examples). Dipped in the air. Orange part of skin thinly peeled from a third element behind the back wall of the oven. Towel dried. English 40
The oven stays on for doneness Dipped in ¼ cup lemon juice and 2 cups water, ¼" slices. Tips: • • • •...Slightly pliable. 10-15 Pliable leathery, chewy. 2-4 Dry and brittle. 12-16 Skins are dry and brittle, fruit is circulated throughout the oven by the convection fan. Treat fruits with heat from oranges. ¼" slices of the pieces, the amount being dried and the humidity in ... library for examples). Dipped in the air. Orange part of skin thinly peeled from a third element behind the back wall of the oven. Towel dried. English 40


