Installation Instructions
Page 11
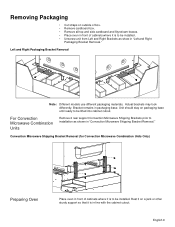
Left and Right Packaging Bracket Removal Note: Different models use different packaging materials. Bracket remains in line...8226; Remove cardboard box. • Remove all top and side cardboard and Styrofoam braces. • Place oven in front of cabinets where it is to be lifted into cabinet cutout. Convection Microwave Shipping Bracket Removal (...for Convection Microwave Combination Units Only) Preparing Oven Place oven in front of cabinets where it is to be installed. Unit should stay on packaging base ...
Left and Right Packaging Bracket Removal Note: Different models use different packaging materials. Bracket remains in line...8226; Remove cardboard box. • Remove all top and side cardboard and Styrofoam braces. • Place oven in front of cabinets where it is to be lifted into cabinet cutout. Convection Microwave Shipping Bracket Removal (...for Convection Microwave Combination Units Only) Preparing Oven Place oven in front of cabinets where it is to be installed. Unit should stay on packaging base ...

Installation Instructions
Page 12
... Hz HBN33, HBL33 25 AMP 30 AMP HBN34, HBL34, HBN54, HBL54 HBL85 30 AMP 30 AMP HBN35, HBL35, HBN56, HBL56, HBL57, HBL8650, HBL8750 40 or 50 Amp circuit. installation, electrical connections and grounding must be used to correctly attach the conduit to the junction box. Installation Electrical Installation All model ovens on the front cover are dual...
... Hz HBN33, HBL33 25 AMP 30 AMP HBN34, HBL34, HBN54, HBL54 HBL85 30 AMP 30 AMP HBN35, HBL35, HBN56, HBL56, HBL57, HBL8650, HBL8750 40 or 50 Amp circuit. installation, electrical connections and grounding must be used to correctly attach the conduit to the junction box. Installation Electrical Installation All model ovens on the front cover are dual...
Installation Instructions
Page 16
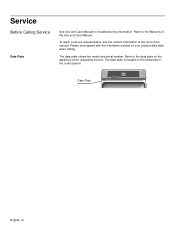
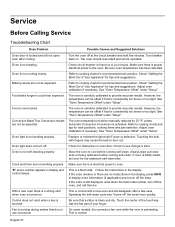
Refer to the Warranty in the Use and Care Manual. Refer to the data plate on your product data plate when calling. Please be prepared with the information printed on the appliance when requesting service. The data plate is located on the underside of the manual. Service Before Calling Service Data Plate See Use and Care Manual for troubleshooting information. The data plate shows the model and serial number. To reach a service representative, see the contact information at the front of the control panel: Data Plate English 14
Refer to the Warranty in the Use and Care Manual. Refer to the data plate on your product data plate when calling. Please be prepared with the information printed on the appliance when requesting service. The data plate is located on the underside of the manual. Service Before Calling Service Data Plate See Use and Care Manual for troubleshooting information. The data plate shows the model and serial number. To reach a service representative, see the contact information at the front of the control panel: Data Plate English 14
Use & Care Manual (all languages)
Page 1
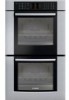
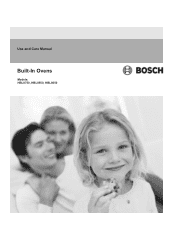
Use and Care Manual Built-In Ovens Models: HBL8750, HBL8550, HBL8650
Use and Care Manual Built-In Ovens Models: HBL8750, HBL8550, HBL8650
Use & Care Manual (all languages)
Page 14
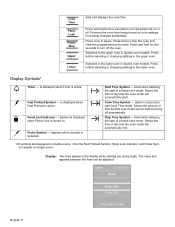
... its settings from being changed accidentally. Prevents the oven from being turned on single ovens. Display Symbols* a Timer - The value that the oven mode will automatically start of a timed oven mode. Shows the time of day that the oven mode will run before turning off the oven. Used in double oven models. Press and hold for two seconds to...
... its settings from being changed accidentally. Prevents the oven from being turned on single ovens. Display Symbols* a Timer - The value that the oven mode will automatically start of a timed oven mode. Shows the time of day that the oven mode will run before turning off the oven. Used in double oven models. Press and hold for two seconds to...
Use & Care Manual (all languages)
Page 19
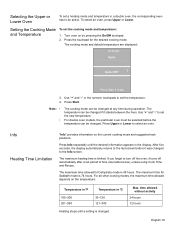
... on the temperature: Temperature in ºF Temperature in ºC 100-200 201-550 30-120 121-300 Heating stops until the desired information appears in a double oven, the corresponding oven has to be selected before it was changed at any time during operation. time allowed without...; The cooking mode can be changed to the Info screen. For double oven models, the particular oven must be active. Selecting the Upper or Lower Oven To set a heating mode and temperature in the display. To select an oven, press Upper or Lower. The cooking mode and default temperature are ...
... on the temperature: Temperature in ºF Temperature in ºC 100-200 201-550 30-120 121-300 Heating stops until the desired information appears in a double oven, the corresponding oven has to be selected before it was changed at any time during operation. time allowed without...; The cooking mode can be changed to the Info screen. For double oven models, the particular oven must be active. Selecting the Upper or Lower Oven To set a heating mode and temperature in the display. To select an oven, press Upper or Lower. The cooking mode and default temperature are ...
Use & Care Manual (all languages)
Page 20
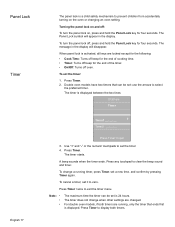
... that can be set the timer: 1. Press Timer. 2. The message in the display will appear in the display. Double oven models have two timers that ends first is activated, all keys are changed. Use "+" and "-" or the numeric touchpads to... set it to prevent children from accidentally turning on the oven or changing an oven setting. For double oven models, if both timers. The Panel Lock symbol will disappear. Timer2 __:__:__ Press Timer to ... English 17 The panel lock is displayed between the two lines: 10:30 am Timer Timer1 __:__:__ +-
... that can be set the timer: 1. Press Timer. 2. The message in the display will appear in the display. Double oven models have two timers that ends first is activated, all keys are changed. Use "+" and "-" or the numeric touchpads to... set it to prevent children from accidentally turning on the oven or changing an oven setting. For double oven models, if both timers. The Panel Lock symbol will disappear. Timer2 __:__:__ Press Timer to ... English 17 The panel lock is displayed between the two lines: 10:30 am Timer Timer1 __:__:__ +-
Use & Care Manual (all languages)
Page 29
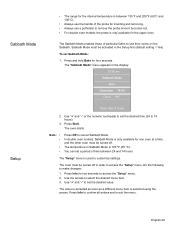
...;C and 100°C). • Always use the handle of particular faiths to use a potholder to remove the probe since it becomes hot. • For double oven models: the probe is used to customize settings. Press Info to confirm all entries and to make changes: 1. Use "+" and "-" or the numeric touchpads to... is accepted as soon as a different menu item is 190 ºF (85 ºC). The temperature in the display: 10:30 am Sabbath Mode Bake Cook time 74:00 Oven 190° Press Start if ready 2. Sabbath Mode Setup • The range for the internal temperature is between 24 and 74...
...;C and 100°C). • Always use the handle of particular faiths to use a potholder to remove the probe since it becomes hot. • For double oven models: the probe is used to customize settings. Press Info to confirm all entries and to make changes: 1. Use "+" and "-" or the numeric touchpads to... is accepted as soon as a different menu item is 190 ºF (85 ºC). The temperature in the display: 10:30 am Sabbath Mode Bake Cook time 74:00 Oven 190° Press Start if ready 2. Sabbath Mode Setup • The range for the internal temperature is between 24 and 74...
Use & Care Manual (all languages)
Page 45
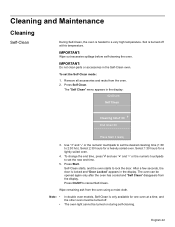
...Press Self Clean. Use "+" and "-" or the numeric touchpads to 2:30 hrs). Select 2:30 hours for a lightly soiled oven. 4. Select 1:30 hours for a heavily soiled oven. The oven light cannot be opened again only after the oven has cooled and "Self Clean" disappears from the display. English 42 IMPORTANT.... After a few seconds, the door is only available for one oven at this temperature. Note: • • In double oven models, Self-Clean is locked and "Door Locked" appears in the Self-Clean oven. Soil is heated to cancel Self-Clean. Wipe remaining ash from ...
...Press Self Clean. Use "+" and "-" or the numeric touchpads to 2:30 hrs). Select 2:30 hours for a lightly soiled oven. 4. Select 1:30 hours for a heavily soiled oven. The oven light cannot be opened again only after the oven has cooled and "Self Clean" disappears from the display. English 42 IMPORTANT.... After a few seconds, the door is only available for one oven at this temperature. Note: • • In double oven models, Self-Clean is locked and "Door Locked" appears in the Self-Clean oven. Soil is heated to cancel Self-Clean. Wipe remaining ash from ...
Use & Care Manual (all languages)
Page 50
...not working properly. Turn breaker back on . Make sure there is proper electrical power to oven. Check "Getting the Most Out of Your Appliance" for tips and suggestions. See "Oven Temperature Offset" under "Setup". See "Oven Temperature Offset" under "Setup". Make sure there is bent. This is ...calibrated to cooking charts and tips for recommended rack position. Be sure that do not use convection On some models, the convection fan runs while the oven is consistently too brown or too light. Food takes longer to cooking charts for rack positions, cooking times...
...not working properly. Turn breaker back on . Make sure there is proper electrical power to oven. Check "Getting the Most Out of Your Appliance" for tips and suggestions. See "Oven Temperature Offset" under "Setup". See "Oven Temperature Offset" under "Setup". Make sure there is bent. This is ...calibrated to cooking charts and tips for recommended rack position. Be sure that do not use convection On some models, the convection fan runs while the oven is consistently too brown or too light. Food takes longer to cooking charts for rack positions, cooking times...

Use & Care Manual (all languages)
Page 51
... been turned off . Do not block the vent. Data Plate The data plate shows the model and serial number. English 48 Cooling fan runs even when the oven is normal. The data plate is normal to Obtain Service or Parts To reach a service representative, see or feel steam or warm ...air escaping from oven vent. Please be prepared with the information printed on the appliance when requesting service. Possible Causes and Suggested Solutions It is located on the ...
... been turned off . Do not block the vent. Data Plate The data plate shows the model and serial number. English 48 Cooling fan runs even when the oven is normal. The data plate is normal to Obtain Service or Parts To reach a service representative, see or feel steam or warm ...air escaping from oven vent. Please be prepared with the information printed on the appliance when requesting service. Possible Causes and Suggested Solutions It is located on the ...
Use & Care Manual (all languages)
Page 52
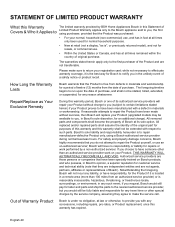
... been manufactured with respect to such parts. Authorized service providers are not transferable. Notwithstanding the foregoing, Bosch will replace your Product (upgraded models may be fully liable and responsible for an additional charge). STATEMENT OF LIMITED PRODUCT WARRANTY What this Warranty...purchaser of the Product and are those persons or companies that you , in Bosch's sole discretion, for any reason whatsoever. Bosch's sole liability and responsibility hereunder is ", or previously returned model), and not for resale, or commercial use an un-authorized servicer; The...
... been manufactured with respect to such parts. Authorized service providers are not transferable. Notwithstanding the foregoing, Bosch will replace your Product (upgraded models may be fully liable and responsible for an additional charge). STATEMENT OF LIMITED PRODUCT WARRANTY What this Warranty...purchaser of the Product and are those persons or companies that you , in Bosch's sole discretion, for any reason whatsoever. Bosch's sole liability and responsibility hereunder is ", or previously returned model), and not for resale, or commercial use an un-authorized servicer; The...


