
Installation Instructions
Page 6
...) 237/8" (606mm) 22" (559mm) Double Oven 27" It is good practice, when oven is installed at the end of a cabinet run , adjacent to a perpendicular wall or cabinet door, to allow at least 1/4" space between the side of the oven and the wall/door. For oven support, install 2x4's extending front to back... flush with Microwave 27" It is good practice, when oven is installed at the end of a cabinet run , adjacent to a perpendicular wall or cabinet door, to allow at least...
...) 237/8" (606mm) 22" (559mm) Double Oven 27" It is good practice, when oven is installed at the end of a cabinet run , adjacent to a perpendicular wall or cabinet door, to allow at least 1/4" space between the side of the oven and the wall/door. For oven support, install 2x4's extending front to back... flush with Microwave 27" It is good practice, when oven is installed at the end of a cabinet run , adjacent to a perpendicular wall or cabinet door, to allow at least...

Installation Instructions
Page 8
... connecting and servicing. Double Oven 30" It is good practice, when oven is installed at the end of a cabinet run , adjacent to a perpendicular wall or cabinet door, to allow at least 1/4" space between the side of the oven and the wall/door. 30" Appliances Dimensions for 30" Wall-Mounted Units 24" ...(606mm) 22" (559mm) Single Oven 30" It is good practice, when oven is installed at the end of a cabinet run , adjacent to a perpendicular wall or cabinet door, to allow at least 1/4" space between the side of the oven and the wall/door. For oven support, install 2x4's extending front to...
... connecting and servicing. Double Oven 30" It is good practice, when oven is installed at the end of a cabinet run , adjacent to a perpendicular wall or cabinet door, to allow at least 1/4" space between the side of the oven and the wall/door. 30" Appliances Dimensions for 30" Wall-Mounted Units 24" ...(606mm) 22" (559mm) Single Oven 30" It is good practice, when oven is installed at the end of a cabinet run , adjacent to a perpendicular wall or cabinet door, to allow at least 1/4" space between the side of the oven and the wall/door. For oven support, install 2x4's extending front to...

Installation Instructions
Page 15
... bracket. 4. Otherwise, the installation is correctly and securely in trim. (2 screws for single ovens, 4 screws for double/combo ovens) To replace the oven door: 1. English 13 Installing the Oven 1. Close and open door slowly to preheat. 5. See the Use and Care Manual for ...hinges and slots. 3. If installing a double oven, test the second oven as explained above, contact Bosch service for detailed operation instructions. 4. Lift or slide unit into cabinet cutout. For 208 V installation, the reading between oven and cabinet back wall. For 240 V installation, the reading ...
... bracket. 4. Otherwise, the installation is correctly and securely in trim. (2 screws for single ovens, 4 screws for double/combo ovens) To replace the oven door: 1. English 13 Installing the Oven 1. Close and open door slowly to preheat. 5. See the Use and Care Manual for ...hinges and slots. 3. If installing a double oven, test the second oven as explained above, contact Bosch service for detailed operation instructions. 4. Lift or slide unit into cabinet cutout. For 208 V installation, the reading between oven and cabinet back wall. For 240 V installation, the reading ...
Use & Care Manual (all languages)
Page 9
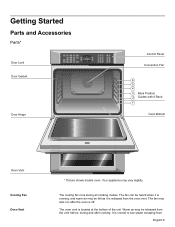
...when it is running, and warm air may also run after cooking. The cooling fan runs during and after the oven is located at the bottom of the unit. The fan may be released from the vent before, during all cooking ...oven vent is off. Getting Started Parts and Accessories Parts* Door Lock Door Gasket Heating 170¡ Roast Oven 350¡ Probe 200¡ 12:12 pm Convection Bake Oven 200¡ Preheating 12:30 pm Door Hinge Control Panel Convection Fan 6 5 4 3 Rack Position 2 Guides with 6 Rack 1 Oven Bottom Oven Vent Cooling Fan Oven Vent * Picture shows double oven...
...when it is running, and warm air may also run after cooking. The cooling fan runs during and after the oven is located at the bottom of the unit. The fan may be released from the vent before, during all cooking ...oven vent is off. Getting Started Parts and Accessories Parts* Door Lock Door Gasket Heating 170¡ Roast Oven 350¡ Probe 200¡ 12:12 pm Convection Bake Oven 200¡ Preheating 12:30 pm Door Hinge Control Panel Convection Fan 6 5 4 3 Rack Position 2 Guides with 6 Rack 1 Oven Bottom Oven Vent Cooling Fan Oven Vent * Picture shows double oven...
Use & Care Manual (all languages)
Page 13
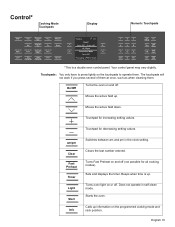
...information on the touchpads to press lightly on the programmed cooking mode and rack position. Turns oven light on and off (not possible for decreasing setting values. Starts the oven. Touchpad for increasing setting values. Sets and displays the timer. Moves the active field ... Pizza Pie Proof Warm Dehydrate Recipe Self Clean Heating 170° Roast Oven 350° Probe 200° 12:12 pm Convection Bake Oven 200° Preheating 12:30 pm 1 2 3 4 5 6 7 8 9 am and pm in self-clean mode. Beeps when time is a double oven control panel.
...information on the touchpads to press lightly on the programmed cooking mode and rack position. Turns oven light on and off (not possible for decreasing setting values. Starts the oven. Touchpad for increasing setting values. Sets and displays the timer. Moves the active field ... Pizza Pie Proof Warm Dehydrate Recipe Self Clean Heating 170° Roast Oven 350° Probe 200° 12:12 pm Convection Bake Oven 200° Preheating 12:30 pm 1 2 3 4 5 6 7 8 9 am and pm in self-clean mode. Beeps when time is a double oven control panel.
Use & Care Manual (all languages)
Page 14
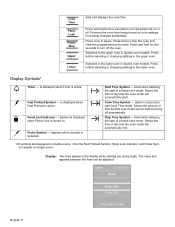
... turning off automatically. Used in the display while settings are displayed on single ovens. Shows the amount of a timed oven mode. Only the Fast Preheat Symbol, Panel Lock Indicator, and Probe Symbol appear on double ovens. Press and hold for two seconds to turn off . Display Symbols* a...four seconds to turn the panel lock on or its settings from being made. Prevents the oven from being turned on or off the oven. Press before selecting or changing settings in double oven models. Is displayed when Timer is active. 2 Panel Lock Indicator - Is displayed when...
... turning off automatically. Used in the display while settings are displayed on single ovens. Shows the amount of a timed oven mode. Only the Fast Preheat Symbol, Panel Lock Indicator, and Probe Symbol appear on double ovens. Press and hold for two seconds to turn off . Display Symbols* a...four seconds to turn the panel lock on or its settings from being made. Prevents the oven from being turned on or off the oven. Press before selecting or changing settings in double oven models. Is displayed when Timer is active. 2 Panel Lock Indicator - Is displayed when...
Use & Care Manual (all languages)
Page 16
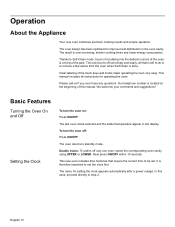
...your comments and suggestions! The oven design has been optimized to improve heat distribution in the display. The last oven mode selected and the default temperature appear in the oven cavity. Double ovens: To switch off only one oven, select the corresponding oven cavity using UPPER or LOWER.... Operation About the Appliance Your new oven combines premium cooking results and simple...
...your comments and suggestions! The oven design has been optimized to improve heat distribution in the display. The last oven mode selected and the default temperature appear in the oven cavity. Double ovens: To switch off only one oven, select the corresponding oven cavity using UPPER or LOWER.... Operation About the Appliance Your new oven combines premium cooking results and simple...
Use & Care Manual (all languages)
Page 19
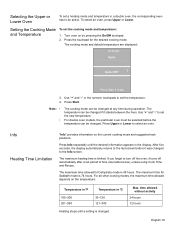
... repeatedly until the desired information appears in ºC 100-200 201-550 30-120 121-300 Heating stops until a setting is limited. The cooking mode and default temperature are displayed: 10:30 am Bake Oven 350° +- Press Upper or Lower to set the new temperature. ...Recipe. If you forget to the Info screen. Selecting the Upper or Lower Oven To set a heating mode and temperature in a double oven, the corresponding oven has to set the temperature. 4. For double oven models, the particular oven must be active. Use "+" and "-" or the numeric touchpads to be selected...
... repeatedly until the desired information appears in ºC 100-200 201-550 30-120 121-300 Heating stops until a setting is limited. The cooking mode and default temperature are displayed: 10:30 am Bake Oven 350° +- Press Upper or Lower to set the new temperature. ...Recipe. If you forget to the Info screen. Selecting the Upper or Lower Oven To set a heating mode and temperature in a double oven, the corresponding oven has to set the temperature. 4. For double oven models, the particular oven must be active. Use "+" and "-" or the numeric touchpads to be selected...
Use & Care Manual (all languages)
Page 20
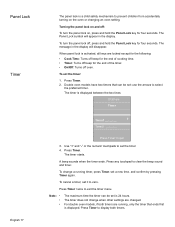
When panel lock is 24 hours. Double oven models have two timers that ends first is displayed between the two lines: 10:30 am Timer Timer1 __:__:__ +- Use "+" and "-" or the numeric touchpads to set a new time, and confirm by pressing Timer again. Press Timer. To ... running timer, press Timer, set the timer. 4. Note The maximum time the timer can be set : use the arrows to select the preferred timer. For double oven models, if both timers. To set it to zero. Press Timer. 2. The timer starts. The timer does not change a running , only the timer that can...
When panel lock is 24 hours. Double oven models have two timers that ends first is displayed between the two lines: 10:30 am Timer Timer1 __:__:__ +- Use "+" and "-" or the numeric touchpads to set a new time, and confirm by pressing Timer again. Press Timer. To ... running timer, press Timer, set the timer. 4. Note The maximum time the timer can be set : use the arrows to select the preferred timer. For double oven models, if both timers. To set it to zero. Press Timer. 2. The timer starts. The timer does not change a running , only the timer that can...
Use & Care Manual (all languages)
Page 29
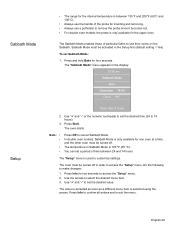
...30 am Sabbath Mode Bake Cook time 74:00 Oven 190° Press Start if ready 2. The "Setup" menu is used to make changes: 1. Do the following to customize settings. Use the arrows to exit the menu. Press Info to confirm all entries and to select the desired menu item. 3. In double oven... models: Sabbath Mode is only available for one oven at a time, and the other oven must be turned off in Sabbath Mode is 190 ºF (85 ºC). Press Info for two seconds to...
...30 am Sabbath Mode Bake Cook time 74:00 Oven 190° Press Start if ready 2. The "Setup" menu is used to make changes: 1. Do the following to customize settings. Use the arrows to exit the menu. Press Info to confirm all entries and to select the desired menu item. 3. In double oven... models: Sabbath Mode is only available for one oven at a time, and the other oven must be turned off in Sabbath Mode is 190 ºF (85 ºC). Press Info for two seconds to...

Use & Care Manual (all languages)
Page 30
...176;F (+/- 19°C). lbs "Sabbath Mode" function: Yes or No. This feature is useful if food is consistently either the upper or lower oven, select "Up Offset" or "Lo. Sets the clock. Sets the temperature offset value. 0 When an offset value is selected, the actual...with Clock Year Month Day Beeps Language Temperature Unit Weight in Sabbath Key Tones Oven Temperature Offset Auto Conv Reset All Description 12-hour or 24-hour display mode. Resets all settings to factory settings. For double ovens: You can be set either too brown or too light. Sets the date...
...176;F (+/- 19°C). lbs "Sabbath Mode" function: Yes or No. This feature is useful if food is consistently either the upper or lower oven, select "Up Offset" or "Lo. Sets the clock. Sets the temperature offset value. 0 When an offset value is selected, the actual...with Clock Year Month Day Beeps Language Temperature Unit Weight in Sabbath Key Tones Oven Temperature Offset Auto Conv Reset All Description 12-hour or 24-hour display mode. Resets all settings to factory settings. For double ovens: You can be set either too brown or too light. Sets the date...
Use & Care Manual (all languages)
Page 41
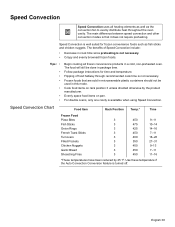
...products in this mode. Follow package instructions for frozen convenience foods such as the T convection fan to evenly distribute heat throughout the oven cavity. Flipping of Speed Convection include: • Decrease in package time. Speed Convection is that are sold in microwaveable plastic containers... recommended cook time is turned off. Evenly space food items on rack position 3 unless directed otherwise by 25 °F. For double ovens, only one cavity is not necessary. • Crispy and evenly browned frozen foods. The food will still be used in a cold,...
...products in this mode. Follow package instructions for frozen convenience foods such as the T convection fan to evenly distribute heat throughout the oven cavity. Flipping of Speed Convection include: • Decrease in package time. Speed Convection is that are sold in microwaveable plastic containers... recommended cook time is turned off. Evenly space food items on rack position 3 unless directed otherwise by 25 °F. For double ovens, only one cavity is not necessary. • Crispy and evenly browned frozen foods. The food will still be used in a cold,...
Use & Care Manual (all languages)
Page 45
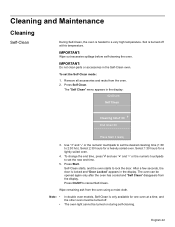
... display. To set the new end time. 5. Select 1:30 hours for one oven at this temperature. English 42 Soil is burned off at a time, and the other oven must be turned off. Note: • • In double oven models, Self-Clean is only available for a lightly soiled oven. 4. The "Self Clean" menu appears in the Self...
... display. To set the new end time. 5. Select 1:30 hours for one oven at this temperature. English 42 Soil is burned off at a time, and the other oven must be turned off. Note: • • In double oven models, Self-Clean is only available for a lightly soiled oven. 4. The "Self Clean" menu appears in the Self...


