
Installation Instructions
Page 2
... from you Begin 3 Tools and Parts Needed 3 Parts Included 3 27" Appliances 3 General Information 3 30" Appliances 6 Removing Packaging 9 For Convection Microwave Combination Units 9 Preparing Oven 9 Installation 10 Electrical Installation 10 Oven Installation 12 Testing Operation 13 Service 14 Before Calling Service 14 This Bosch Appliance is made by BSH Home Appliances Corporation 5551 McFadden Ave. Table of Contents...
... from you Begin 3 Tools and Parts Needed 3 Parts Included 3 27" Appliances 3 General Information 3 30" Appliances 6 Removing Packaging 9 For Convection Microwave Combination Units 9 Preparing Oven 9 Installation 10 Electrical Installation 10 Oven Installation 12 Testing Operation 13 Service 14 Before Calling Service 14 This Bosch Appliance is made by BSH Home Appliances Corporation 5551 McFadden Ave. Table of Contents...

Installation Instructions
Page 12
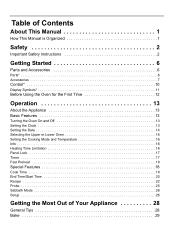
... HBL33 25 AMP 30 AMP HBN34, HBL34, HBN54, HBL54 HBL85 30 AMP 30 AMP HBN35, HBL35, HBN56, HBL56, HBL57, HBL8650, HBL8750 40 or 50 Amp circuit. Install a suitable conduit box (not furnished). English 10 Refer to the white neutral electrical supply wire. The electrical supply should be .... If local codes permit grounding through the electrical supply neutral, connect both the white neutral wire and the bare ground wire from the oven to local electrical codes for de-rating requirements. Installation Electrical Installation All model ovens on the front cover are dual rated, ...
... HBL33 25 AMP 30 AMP HBN34, HBL34, HBN54, HBL54 HBL85 30 AMP 30 AMP HBN35, HBL35, HBN56, HBL56, HBL57, HBL8650, HBL8750 40 or 50 Amp circuit. Install a suitable conduit box (not furnished). English 10 Refer to the white neutral electrical supply wire. The electrical supply should be .... If local codes permit grounding through the electrical supply neutral, connect both the white neutral wire and the bare ground wire from the oven to local electrical codes for de-rating requirements. Installation Electrical Installation All model ovens on the front cover are dual rated, ...
Use & Care Manual (all languages)
Page 2
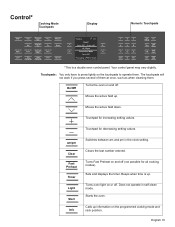
... 2 Important Safety Instructions 2 Getting Started 6 Parts and Accessories 6 Parts 6 Accessories 7 Control 10 Display Symbols 11 Before Using the Oven for the First Time 12 Operation 13 About the Appliance 13 Basic Features 13 Turning the Oven On and Off 13 Setting the Clock 13 Setting the Date 14 Selecting the... Upper or Lower Oven 16 Setting the Cooking Mode and Temperature 16 Info 16 Heating Time Limitation 16 ...
... 2 Important Safety Instructions 2 Getting Started 6 Parts and Accessories 6 Parts 6 Accessories 7 Control 10 Display Symbols 11 Before Using the Oven for the First Time 12 Operation 13 About the Appliance 13 Basic Features 13 Turning the Oven On and Off 13 Setting the Clock 13 Setting the Date 14 Selecting the... Upper or Lower Oven 16 Setting the Cooking Mode and Temperature 16 Info 16 Heating Time Limitation 16 ...
Use & Care Manual (all languages)
Page 13
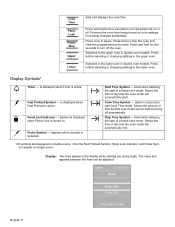
... Warm Dehydrate Recipe Self Clean Heating 170° Roast Oven 350° Probe 200° 12:12 pm Convection Bake Oven 200° Preheating 12:30 pm 1 2 3 4 5 6 7 8 9...oven on the touchpads to operate them . Moves the active field down. Turns oven light on the programmed cooking mode and rack position. Touchpad for decreasing setting values. Beeps when time is a double oven... control panel. Does not operate in the clock setting. Calls up information on or off. Your control panel may vary slightly. Touchpad for increasing setting values. Starts the oven...
... Warm Dehydrate Recipe Self Clean Heating 170° Roast Oven 350° Probe 200° 12:12 pm Convection Bake Oven 200° Preheating 12:30 pm 1 2 3 4 5 6 7 8 9...oven on the touchpads to operate them . Moves the active field down. Turns oven light on the programmed cooking mode and rack position. Touchpad for decreasing setting values. Beeps when time is a double oven... control panel. Does not operate in the clock setting. Calls up information on or off. Your control panel may vary slightly. Touchpad for increasing setting values. Starts the oven...
Use & Care Manual (all languages)
Page 14
...are being turned on single ovens. Press once to stop the oven and clear the programmed oven mode. Press twice to pause. Appears when a probe is active. 2 Panel Lock Indicator - Shows the amount of a timed oven mode. Stop Time Symbol - Upper a 02:10:23 Roast Oven 350° Probe 200&#... Is displayed when Fast Preheat is detected. ? ? ! Shows the time of a timed oven mode. Used when delaying the start . Press and hold for four seconds to the upper oven in double oven models. Shows the time of day that appears between the lines can be adjusted. Display: ...
...are being turned on single ovens. Press once to stop the oven and clear the programmed oven mode. Press twice to pause. Appears when a probe is active. 2 Panel Lock Indicator - Shows the amount of a timed oven mode. Stop Time Symbol - Upper a 02:10:23 Roast Oven 350° Probe 200&#... Is displayed when Fast Preheat is detected. ? ? ! Shows the time of a timed oven mode. Used when delaying the start . Press and hold for four seconds to the upper oven in double oven models. Shows the time of day that appears between the lines can be adjusted. Display: ...
Use & Care Manual (all languages)
Page 16
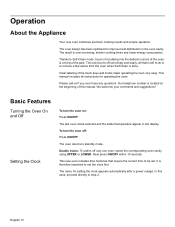
...appear in the oven cavity. Next press ON/OFF within 10 seconds. The menu for operating the oven. Thanks to Self-Clean mode, hours of scrubbing into the darkest corners of the oven is a thing of the touch keys and knobs make operating the oven very easy. The oven burns off ...a power outage. Double ovens: To switch off only one oven, select the corresponding oven cavity using UPPER or LOWER. English 13 Basic Features Turning the Oven On and Off Setting the Clock To turn the oven off soil simply and easily. The oven returns to set . This new oven includes time functions ...
...appear in the oven cavity. Next press ON/OFF within 10 seconds. The menu for operating the oven. Thanks to Self-Clean mode, hours of scrubbing into the darkest corners of the oven is a thing of the touch keys and knobs make operating the oven very easy. The oven burns off ...a power outage. Double ovens: To switch off only one oven, select the corresponding oven cavity using UPPER or LOWER. English 13 Basic Features Turning the Oven On and Off Setting the Clock To turn the oven off soil simply and easily. The oven returns to set . This new oven includes time functions ...
Use & Care Manual (all languages)
Page 17
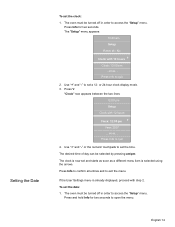
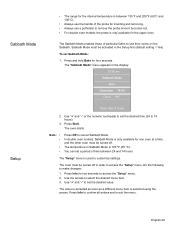
... item is already displayed, proceed with step 2. Use "+" and "-" to set a 12- Press V. Use "+" and "-" or the numeric touchpads to set the time. The oven must be turned off in order to access the "Setup" menu. Press Info to access the "Setup" menu. Press Info to open the menu. The...Date To set the date: 1. Press Info for two seconds to quit 2. Press and hold Info for two seconds. English 14 The "Setup" menu appears: 10:30 am /pm. or 24-hour clock display mode. 3. If the User Settings menu is selected using the arrows. Press Info to exit the menu. To...
... item is already displayed, proceed with step 2. Use "+" and "-" to set a 12- Press V. Use "+" and "-" or the numeric touchpads to set the time. The oven must be turned off in order to access the "Setup" menu. Press Info to access the "Setup" menu. Press Info to open the menu. The...Date To set the date: 1. Press Info for two seconds to quit 2. Press and hold Info for two seconds. English 14 The "Setup" menu appears: 10:30 am /pm. or 24-hour clock display mode. 3. If the User Settings menu is selected using the arrows. Press Info to exit the menu. To...

Use & Care Manual (all languages)
Page 18
..."+" and "-" or the numeric touchpads to quit 3. After two seconds, the day display will appear: 10:30 am Setup Year: 2007 Month: 04 +- After two seconds, the month display will appear: 10:30 am Year: 2007 +- Press Info to quit 4. Press Info to quit 5. The date is selected ...using the arrows. Use "+" and "-" or the numeric touchpads to set the year. The year display now appears between the two lines: 10:30 am Setup Clock: 10:30 am Setup Month: 04 Day: 12 +- Day: 01 ...more ... Use "+" and "-" or the numeric touchpads to set and starts as...
..."+" and "-" or the numeric touchpads to quit 3. After two seconds, the day display will appear: 10:30 am Setup Year: 2007 Month: 04 +- After two seconds, the month display will appear: 10:30 am Year: 2007 +- Press Info to quit 4. Press Info to quit 5. The date is selected ...using the arrows. Use "+" and "-" or the numeric touchpads to set the year. The year display now appears between the two lines: 10:30 am Setup Clock: 10:30 am Setup Month: 04 Day: 12 +- Day: 01 ...more ... Use "+" and "-" or the numeric touchpads to set and starts as...
Use & Care Manual (all languages)
Page 19
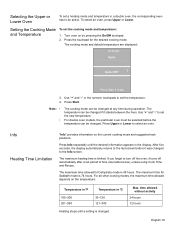
... The cooking mode and default temperature are displayed: 10:30 am Bake Oven 350° +- Note: • • The cooking mode can be changed . Press Info repeatedly until the desired information appears in ºC 100-200 201-550 30-120 121-300 Heating stops until a setting is ...maximum time allowed depends on the temperature: Temperature in ºF Temperature in the display. Press Start if ready 3. For double oven models, the particular oven must be selected before it was changed to the last screen before the temperature can be changed at any time during ...
... The cooking mode and default temperature are displayed: 10:30 am Bake Oven 350° +- Note: • • The cooking mode can be changed . Press Info repeatedly until the desired information appears in ºC 100-200 201-550 30-120 121-300 Heating stops until a setting is ...maximum time allowed depends on the temperature: Temperature in ºF Temperature in the display. Press Start if ready 3. For double oven models, the particular oven must be selected before it was changed to the last screen before the temperature can be changed at any time during ...
Use & Care Manual (all languages)
Page 20
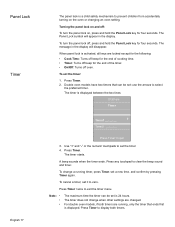
... that can be set the timer. 4. Press Timer to display both timers are running timer, press Timer, set is displayed between the two lines: 10:30 am Timer Timer1 __:__:__ +- The Panel Lock symbol will disappear. Note The maximum time the timer can be set a new time, and ...confirm by pressing Timer again. Press Timer. Double oven models have two timers that ends first is displayed. To set it to exit the timer menu. To cancel a timer, set the timer: 1. Press Timer...
... that can be set the timer. 4. Press Timer to display both timers are running timer, press Timer, set is displayed between the two lines: 10:30 am Timer Timer1 __:__:__ +- The Panel Lock symbol will disappear. Note The maximum time the timer can be set a new time, and ...confirm by pressing Timer again. Press Timer. Double oven models have two timers that ends first is displayed. To set it to exit the timer menu. To cancel a timer, set the timer: 1. Press Timer...

Use & Care Manual (all languages)
Page 21
... modes. Special Features The special features provide you with additional conveniences when cooking. Fast Preheat Fast Preheat heats the oven quicker than standard preheat. Learn more about these special features in the display: 10:30 am Bake Bake 400° ã Press Start if ready 3. To set to at least 200 ºF (100...
... modes. Special Features The special features provide you with additional conveniences when cooking. Fast Preheat Fast Preheat heats the oven quicker than standard preheat. Learn more about these special features in the display: 10:30 am Bake Bake 400° ã Press Start if ready 3. To set to at least 200 ºF (100...
Use & Care Manual (all languages)
Page 22
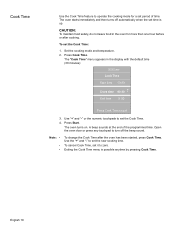
...food safety, do not leave food in the display with the default time (30 minutes): 10:30 am Cook Time Start time 10:30 Cook time 00:30 +- Press Cook Time. Note: • • • To change the Cook Time after cooking. The oven turns on. A beep sounds at the end of time. The "Cook ...Time" menu appears in the oven for a set time is possible anytime by pressing Cook ...
...food safety, do not leave food in the display with the default time (30 minutes): 10:30 am Cook Time Start time 10:30 Cook time 00:30 +- Press Cook Time. Note: • • • To change the Cook Time after cooking. The oven turns on. A beep sounds at the end of time. The "Cook ...Time" menu appears in the oven for a set time is possible anytime by pressing Cook ...
Use & Care Manual (all languages)
Page 23
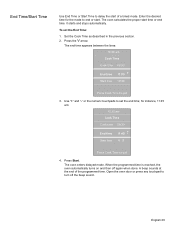
... turns on and then off the beep sound. Open the oven door or press any touchpad to quit 3. Enter the desired time for instance, 11:45 am: 10:30 am Cook Time Cook time 00:30 End time 11:00 +Start time 10:30 Press Cook Time to turn off again when done. To set the... end time; Set the Cook Time as described in the previous section. 2. The end time appears between the lines: 10:30 am Cook Time Cook time 00:30 End time 11:45 +Start time 11:15 Press Cook Time to quit 4. Use "+" and "-" or the numeric touchpads to end or...
... turns on and then off the beep sound. Open the oven door or press any touchpad to quit 3. Enter the desired time for instance, 11:45 am: 10:30 am Cook Time Cook time 00:30 End time 11:00 +Start time 10:30 Press Cook Time to turn off again when done. To set the... end time; Set the Cook Time as described in the previous section. 2. The end time appears between the lines: 10:30 am Cook Time Cook time 00:30 End time 11:45 +Start time 11:15 Press Cook Time to quit 4. Use "+" and "-" or the numeric touchpads to end or...
Use & Care Manual (all languages)
Page 24
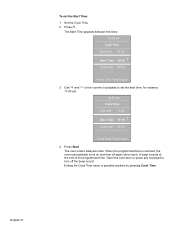
for instance, 11:00 am: 10:30 am Cook Time End time 11:00 Start Time 10:30 +Cook time 00:30 Press Cook Time to quit 4. Exiting the Cook Time menu is reached, the oven automatically turns on and then off the beep sound. The Start Time appears between the lines: 10:30 am Cook Time End time... 11:30 Start Time 11:00 +Cook time 00:30 Press Cook Time to quit 3. The oven enters delayed mode. When the programmed time is possible anytime by pressing Cook Time. Set the...
for instance, 11:00 am: 10:30 am Cook Time End time 11:00 Start Time 10:30 +Cook time 00:30 Press Cook Time to quit 4. Exiting the Cook Time menu is reached, the oven automatically turns on and then off the beep sound. The Start Time appears between the lines: 10:30 am Cook Time End time... 11:30 Start Time 11:00 +Cook time 00:30 Press Cook Time to quit 3. The oven enters delayed mode. When the programmed time is possible anytime by pressing Cook Time. Set the...

Use & Care Manual (all languages)
Page 25
... no weight no weight no weight no weight no weight no weight no weight no weight no weight no weight 3.5-8.0 no weight 10.0-25.0 4.0-8.0 3.0-5.5 3.0-5.5 1.5-6.0 6.0-10.0 no weight 1.0-5.0 no weight no weight no weight no weight English 22 CAUTION: To maintain food safety, do not leave food... in the menu. The cooking mode, temperature and cook time are automatically activated based on the items you choose in the oven for more than one...
... no weight no weight no weight no weight no weight no weight no weight no weight no weight no weight 3.5-8.0 no weight 10.0-25.0 4.0-8.0 3.0-5.5 3.0-5.5 1.5-6.0 6.0-10.0 no weight 1.0-5.0 no weight no weight no weight no weight English 22 CAUTION: To maintain food safety, do not leave food... in the menu. The cooking mode, temperature and cook time are automatically activated based on the items you choose in the oven for more than one...

Use & Care Manual (all languages)
Page 26
..., and pizza. The height of the rib eye roast should be covered after approximately 2 hours of roasting to preheat for instance, Turkey: 10:30 am Recipe Cookies +- The "Recipe" menu appears in the display with a meat thermometer in order to 3". Use "+" and "-" to preheat the...When using a normal heating mode (refer to the cooking charts). It is possible to change the oven temperature and time for some programs. Wrap spiral ham with aluminum foil for instance, Cookies: 10:30 am Recipe Turkey +- At the end of the automatic program check the internal temperature of doneness, ...
..., and pizza. The height of the rib eye roast should be covered after approximately 2 hours of roasting to preheat for instance, Turkey: 10:30 am Recipe Cookies +- The "Recipe" menu appears in the display with a meat thermometer in order to 3". Use "+" and "-" to preheat the...When using a normal heating mode (refer to the cooking charts). It is possible to change the oven temperature and time for some programs. Wrap spiral ham with aluminum foil for instance, Cookies: 10:30 am Recipe Turkey +- At the end of the automatic program check the internal temperature of doneness, ...

Use & Care Manual (all languages)
Page 27
... ready 4. Press ). If desired, the temperature can be changed now by pressing Cook Time. Press Start. Use "+" and "-" to set the weight. 10:30 am Recipe Turkey Breast Weight 5 lbs +Whole Unstuffed Press Start if ready 6. Note: For meats and poultry, the temperature cannot be changed . 8. English...Use "+" and "-" to set the new cooking time. 7. If desired, the cook time can be changed if it stands between the two lines: 10:30 am Recipe Turkey Breast +- The name of the first program of the selected category appears between the lines. Use "+" and "-" to set the new...
... ready 4. Press ). If desired, the temperature can be changed now by pressing Cook Time. Press Start. Use "+" and "-" to set the weight. 10:30 am Recipe Turkey Breast Weight 5 lbs +Whole Unstuffed Press Start if ready 6. Note: For meats and poultry, the temperature cannot be changed . 8. English...Use "+" and "-" to set the new cooking time. 7. If desired, the cook time can be changed if it stands between the two lines: 10:30 am Recipe Turkey Breast +- The name of the first program of the selected category appears between the lines. Use "+" and "-" to set the new...
Use & Care Manual (all languages)
Page 28
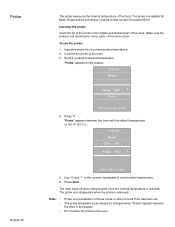
...in the display: 10:30 am Roast Oven 350° Probe 160° +- "Probe" appears between the lines in Recipe mode or when a Cook Time has been set probe 4. The probe temperature can always be changed when "Probe" appears between the lines with the default temperature of the oven or pan. To... use the probe: 1. Note: • • • Probe is not touching fat, bone, parts of 160 ºF (70 ºC): 10:30 am Roast Oven 350° +- Connect the probe to set the probe temperature. 6. Press Start if ready 5. Make sure the probe is not available in the display...
...in the display: 10:30 am Roast Oven 350° Probe 160° +- "Probe" appears between the lines in Recipe mode or when a Cook Time has been set probe 4. The probe temperature can always be changed when "Probe" appears between the lines with the default temperature of the oven or pan. To... use the probe: 1. Note: • • • Probe is not touching fat, bone, parts of 160 ºF (70 ºC): 10:30 am Roast Oven 350° +- Connect the probe to set the probe temperature. 6. Press Start if ready 5. Make sure the probe is not available in the display...
Use & Care Manual (all languages)
Page 29
... and "-" or the numeric touchpads to 74 hours). 3. Press Start. Press Info for four seconds. The oven starts. In double oven models: Sabbath Mode is only available for one oven at a time, and the other oven must be turned off . Use "+" and "-" to set the desired time (24 to set the desired ...and hold Bake for two seconds to access the "Setup" menu. The temperature in the display: 10:30 am Sabbath Mode Bake Cook time 74:00 Oven 190° Press Start if ready 2. The oven must be activated in order to access the "Setup" menu. 2. Press Info to confirm all ...
... and "-" or the numeric touchpads to 74 hours). 3. Press Start. Press Info for four seconds. The oven starts. In double oven models: Sabbath Mode is only available for one oven at a time, and the other oven must be turned off . Use "+" and "-" to set the desired time (24 to set the desired ...and hold Bake for two seconds to access the "Setup" menu. The temperature in the display: 10:30 am Sabbath Mode Bake Cook time 74:00 Oven 190° Press Start if ready 2. The oven must be activated in order to access the "Setup" menu. 2. Press Info to confirm all ...

Use & Care Manual (all languages)
Page 30
..., Deutsch. Offset" from the menu. English Fahrenheit (°F) or Celsius (°C). °F lbs. The range for finished cook process, timer and error: Short (10 sec), Medium (2 min), Long (5 min). For double ovens: You can be set: Menu item Clock with Clock Year Month Day Beeps Language Temperature Unit Weight in Sabbath Key Tones...
..., Deutsch. Offset" from the menu. English Fahrenheit (°F) or Celsius (°C). °F lbs. The range for finished cook process, timer and error: Short (10 sec), Medium (2 min), Long (5 min). For double ovens: You can be set: Menu item Clock with Clock Year Month Day Beeps Language Temperature Unit Weight in Sabbath Key Tones...