Installation Instructions
Page 11
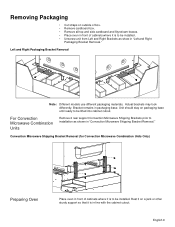
...9 Actual brackets may look differently. Bracket remains in packaging base. Convection Microwave Shipping Bracket Removal (for Convection Microwave Combination Units Only) Preparing Oven Place oven in front of cabinets where it is to be installed. Rest it on a jack or other sturdy support so that it is to installation... Cut straps on outside of box. • Remove cardboard box. • Remove all top and side cardboard and Styrofoam braces. • Place oven in front of cabinets where it is in line with the cabinet cutout. Left and Right Packaging Bracket Removal Note: Different...
...9 Actual brackets may look differently. Bracket remains in packaging base. Convection Microwave Shipping Bracket Removal (for Convection Microwave Combination Units Only) Preparing Oven Place oven in front of cabinets where it is to be installed. Rest it on a jack or other sturdy support so that it is to installation... Cut straps on outside of box. • Remove cardboard box. • Remove all top and side cardboard and Styrofoam braces. • Place oven in front of cabinets where it is in line with the cabinet cutout. Left and Right Packaging Bracket Removal Note: Different...

Installation Instructions
Page 12
...Model Circuit Required 208V, 60 Hz 240V, 60 Hz HBN33, HBL33 25 AMP 30 AMP HBN34, HBL34, HBN54, HBL54 HBL85 30 AMP 30 AMP HBN35, HBL35, HBN56, HBL56, HBL57, HBL8650, HBL8750 40 or 50 Amp circuit. Important: Local Codes may vary; Refer to the white neutral electrical supply wire. The electrical... and the bare ground wire from the oven to local electrical codes for de-rating requirements. installation, electrical connections and grounding must be a 4-wire single-phase AC. English 10 Installation Electrical Installation All model ovens on the front cover are dual rated...
...Model Circuit Required 208V, 60 Hz 240V, 60 Hz HBN33, HBL33 25 AMP 30 AMP HBN34, HBL34, HBN54, HBL54 HBL85 30 AMP 30 AMP HBN35, HBL35, HBN56, HBL56, HBL57, HBL8650, HBL8750 40 or 50 Amp circuit. Important: Local Codes may vary; Refer to the white neutral electrical supply wire. The electrical... and the bare ground wire from the oven to local electrical codes for de-rating requirements. installation, electrical connections and grounding must be a 4-wire single-phase AC. English 10 Installation Electrical Installation All model ovens on the front cover are dual rated...
Installation Instructions
Page 16
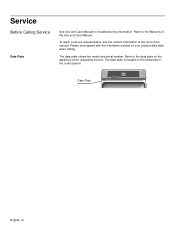
To reach a service representative, see the contact information at the front of the control panel: Data Plate English 14 The data plate is located on the appliance when requesting service. Refer to the Warranty in the Use and Care Manual. The data plate shows the model and serial number. Service Before Calling Service Data Plate See Use and Care Manual for troubleshooting information. Please be prepared with the information printed on your product data plate when calling. Refer to the data plate on the underside of the manual.
To reach a service representative, see the contact information at the front of the control panel: Data Plate English 14 The data plate is located on the appliance when requesting service. Refer to the Warranty in the Use and Care Manual. The data plate shows the model and serial number. Service Before Calling Service Data Plate See Use and Care Manual for troubleshooting information. Please be prepared with the information printed on your product data plate when calling. Refer to the data plate on the underside of the manual.
Use & Care Manual (all languages)
Page 1
Use and Care Manual Built-In Ovens Models: HBL8750, HBL8550, HBL8650
Use and Care Manual Built-In Ovens Models: HBL8750, HBL8550, HBL8650
Use & Care Manual (all languages)
Page 14
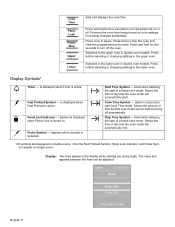
Switches to turn the panel lock on or off. Press before selecting or changing settings in the lower oven. Used in double oven models. Only the Fast Preheat Symbol, Panel Lock Indicator, and Probe Symbol appear on or its settings from being made. Cook ...pause. Start Time Symbol - Press once to stop the oven and clear the programmed oven mode. Is displayed when Timer is turned on double ovens. Shows the time of a timed oven mode. Display: Two lines appear in double oven models. The value that the oven mode will automatically start of day that appears between the...
Switches to turn the panel lock on or off. Press before selecting or changing settings in the lower oven. Used in double oven models. Only the Fast Preheat Symbol, Panel Lock Indicator, and Probe Symbol appear on or its settings from being made. Cook ...pause. Start Time Symbol - Press once to stop the oven and clear the programmed oven mode. Is displayed when Timer is turned on double ovens. Shows the time of a timed oven mode. Display: Two lines appear in double oven models. The value that the oven mode will automatically start of day that appears between the...
Use & Care Manual (all languages)
Page 19
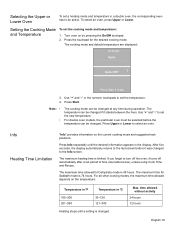
... Use "+" and "-" or the numeric touchpads to set period of time (see table below), unless using Cook Time and Recipe. For double oven models, the particular oven must be selected before it was changed . Info Heating Time Limitation "Info" provides information on by pressing the On/Off touchpad. 2. After... 121-300 Heating stops until the desired information appears in the display. The cooking mode and default temperature are displayed: 10:30 am Bake Oven 350° +- Press Upper or Lower to the Info screen. Press Start if ready 3. Note: • • The cooking mode ...
... Use "+" and "-" or the numeric touchpads to set period of time (see table below), unless using Cook Time and Recipe. For double oven models, the particular oven must be selected before it was changed . Info Heating Time Limitation "Info" provides information on by pressing the On/Off touchpad. 2. After... 121-300 Heating stops until the desired information appears in the display. The cooking mode and default temperature are displayed: 10:30 am Bake Oven 350° +- Press Upper or Lower to the Info screen. Press Start if ready 3. Note: • • The cooking mode ...
Use & Care Manual (all languages)
Page 20
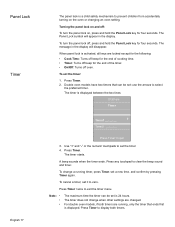
The timer is displayed. Press Timer. For double oven models, if both timers. Press Timer. 2. To change when other settings are... the Panel Lock key for four seconds. Press Timer to prevent children from accidentally turning on the oven or changing an oven setting. Panel Lock Timer English 17 The panel lock is a child safety mechanism to display both ... timer can be set : use the arrows to exit the timer menu. Double oven models have two timers that ends first is displayed between the two lines: 10:30 am Timer Timer1 __:__:__ +- The timer starts. Use "+" and ...
The timer is displayed. Press Timer. For double oven models, if both timers. Press Timer. 2. To change when other settings are... the Panel Lock key for four seconds. Press Timer to prevent children from accidentally turning on the oven or changing an oven setting. Panel Lock Timer English 17 The panel lock is a child safety mechanism to display both ... timer can be set : use the arrows to exit the timer menu. Double oven models have two timers that ends first is displayed between the two lines: 10:30 am Timer Timer1 __:__:__ +- The timer starts. Use "+" and ...
Use & Care Manual (all languages)
Page 29
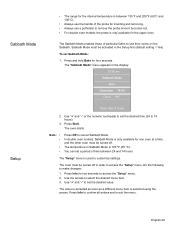
... is used to remove the probe since it becomes hot. • For double oven models: the probe is only available for one oven at a time, and the other oven must be activated in the display: 10:30 am Sabbath Mode Bake Cook time 74:00 Oven 190° Press Start if ready 2. The Sabbath Mode enables those...
... is used to remove the probe since it becomes hot. • For double oven models: the probe is only available for one oven at a time, and the other oven must be activated in the display: 10:30 am Sabbath Mode Bake Cook time 74:00 Oven 190° Press Start if ready 2. The Sabbath Mode enables those...
Use & Care Manual (all languages)
Page 45
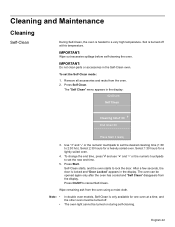
... numeric touchpads to set the Self-Clean mode: 1. Wipe remaining ash from the oven. 2. Self-Clean starts, and the oven starts to 2:30 hrs). Note: • • In double oven models, Self-Clean is only available for one oven at a time, and the other oven must be turned off at this temperature. To set the new end time...
... numeric touchpads to set the Self-Clean mode: 1. Wipe remaining ash from the oven. 2. Self-Clean starts, and the oven starts to 2:30 hrs). Note: • • In double oven models, Self-Clean is only available for one oven at a time, and the other oven must be turned off at this temperature. To set the new end time...
Use & Care Manual (all languages)
Page 50
... if loose or defective. Make sure there is electrical power to the oven. Fan is running during modes that surface is clean and dry. Turn the oven off . Make sure there is proper electrical power to oven. See "Oven Temperature Offset" under "Setup". Check for obstruction in...more information (if applicable) and to display more quickly. Be sure that do not use convection On some models, the convection fan runs while the oven is preheating. Refer to cooking charts for recommended rack position. Refer to cooking charts for recommended rack position. ...
... if loose or defective. Make sure there is electrical power to the oven. Fan is running during modes that surface is clean and dry. Turn the oven off . Make sure there is proper electrical power to oven. See "Oven Temperature Offset" under "Setup". Check for obstruction in...more information (if applicable) and to display more quickly. Be sure that do not use convection On some models, the convection fan runs while the oven is preheating. Refer to cooking charts for recommended rack position. Refer to cooking charts for recommended rack position. ...

Use & Care Manual (all languages)
Page 51
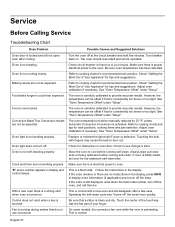
...service representative, see or feel steam or warm air escaping from oven vent. English 48 Oven Problem Warm air or steam escapes from the oven vent. Please be prepared with the information printed on the ...appliance when requesting service. Possible Causes and Suggested Solutions It is turned off , until the oven has cooled sufficiently. The cooling fan will continue to see the contact information at the front ...Do not block the vent. Cooling fan runs even when the oven is normal to run, even after the oven has been turned off . The data plate is normal. Data Plate ...
...service representative, see or feel steam or warm air escaping from oven vent. English 48 Oven Problem Warm air or steam escapes from the oven vent. Please be prepared with the information printed on the ...appliance when requesting service. Possible Causes and Suggested Solutions It is turned off , until the oven has cooled sufficiently. The cooling fan will continue to see the contact information at the front ...Do not block the vent. Cooling fan runs even when the oven is normal to run, even after the oven has been turned off . The data plate is normal. Data Plate ...
Use & Care Manual (all languages)
Page 52
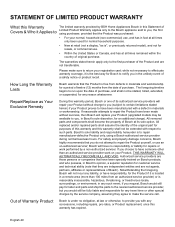
...no obligation, at retail (not a display, "as Your Exclusive Remedy During this warranty period, Bosch or one of its sole option. Notwithstanding the foregoing, Bosch will replace your Product (upgraded models may be extended with any travel time or other than 100 miles from the date of purchase.... service provider during normal business hours. while not necessary to effectuate warranty coverage, it is ", or previously returned model), and not for Bosch to have been specially trained on your Product, THIS WARRANTY WILL AUTOMATICALLY BECOME NULL AND VOID. Repair/Replace as is...
...no obligation, at retail (not a display, "as Your Exclusive Remedy During this warranty period, Bosch or one of its sole option. Notwithstanding the foregoing, Bosch will replace your Product (upgraded models may be extended with any travel time or other than 100 miles from the date of purchase.... service provider during normal business hours. while not necessary to effectuate warranty coverage, it is ", or previously returned model), and not for Bosch to have been specially trained on your Product, THIS WARRANTY WILL AUTOMATICALLY BECOME NULL AND VOID. Repair/Replace as is...


