

User Guide
Page 2
... Headers 8 Memory Module Installation 8 Connectors and Slots 9 Chapter 3: 3.1 3.2 Headers & Jumpers Setup 10 How to Setup Jumpers 10 Detail Settings 10 Chapter 4: 4.1 4.2 4.3 Useful Help 14 Award BIOS Beep Code 14 Extra Information 14 Troubleshooting 16 Chapter 5: 5.1 5.2 5.3 5.4 WarpSpeeder 17 Introduction 17 System Requirement 17 Installation 18 [WarpSpeeder™] includes 1 tray icon and 5 panels...
... Headers 8 Memory Module Installation 8 Connectors and Slots 9 Chapter 3: 3.1 3.2 Headers & Jumpers Setup 10 How to Setup Jumpers 10 Detail Settings 10 Chapter 4: 4.1 4.2 4.3 Useful Help 14 Award BIOS Beep Code 14 Extra Information 14 Troubleshooting 16 Chapter 5: 5.1 5.2 5.3 5.4 WarpSpeeder 17 Introduction 17 System Requirement 17 Installation 18 [WarpSpeeder™] includes 1 tray icon and 5 panels...

User Guide
Page 5
..., and USB functions. BIOS & Software BIOS Award legal BIOS. PS/2 Mouse Parallel PS/2 Keyboard JCOM2 LAN USB x2 USB x2 Line In/ Surround Line Out Mic In 1/ Base/Center B. Offers the highest performance for ATX case x1 USB 2.0 cable x1 (optional) Serial ATA cable x2 (optional) S/PDIF out cable x1 (optional) 3 K8T80-A7 Back Panel...
..., and USB functions. BIOS & Software BIOS Award legal BIOS. PS/2 Mouse Parallel PS/2 Keyboard JCOM2 LAN USB x2 USB x2 Line In/ Surround Line Out Mic In 1/ Base/Center B. Offers the highest performance for ATX case x1 USB 2.0 cable x1 (optional) Serial ATA cable x2 (optional) S/PDIF out cable x1 (optional) 3 K8T80-A7 Back Panel...
User Guide
Page 6
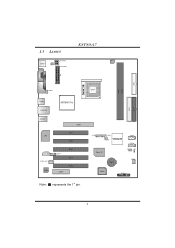
1.3 LAYOUT JKBMS1 JKBV1 1 JATXPWR2 JATXPWR1 K8T80-A7 JCFAN1 1 JCOM2 DIMM1 DIMM2 FDD1 JPRNT1 JUSBV1 1 JUSB1 JUSBLAN1 K8T800 Pro JAUDIO1 AGP1 PCI1 LAN PCI2 JAUDIO2 2 14 1 13 1 JCDIN1 1 JSPDIF_OUT1 Codec CNR1 PCI3 PCI4 PCI5 Note: ■ represents the 1st pin. CPU1 IDE2 IDE1 2 JUSB4 1 10 2 10 JUSB3 1 1 JUSBV2 VT8237R Super I/O JSATA2 7 1 JSATA1 7 1 JCMOS1 JCI1 1 1 BAT1 JSFAN1 1 BIOS JPANEL1 2 24 1 23 4
1.3 LAYOUT JKBMS1 JKBV1 1 JATXPWR2 JATXPWR1 K8T80-A7 JCFAN1 1 JCOM2 DIMM1 DIMM2 FDD1 JPRNT1 JUSBV1 1 JUSB1 JUSBLAN1 K8T800 Pro JAUDIO1 AGP1 PCI1 LAN PCI2 JAUDIO2 2 14 1 13 1 JCDIN1 1 JSPDIF_OUT1 Codec CNR1 PCI3 PCI4 PCI5 Note: ■ represents the 1st pin. CPU1 IDE2 IDE1 2 JUSB4 1 10 2 10 JUSB3 1 1 JUSBV2 VT8237R Super I/O JSATA2 7 1 JSATA1 7 1 JCMOS1 JCI1 1 1 BAT1 JSFAN1 1 BIOS JPANEL1 2 24 1 23 4

User Guide
Page 7
K8T80-A7 1.4 COMPONENTS H I GF ED C B Codec LAN A J K8T800 Pro CPU1 BAT1 BIOS Super I . M. Rear side connectors (back panel). JSATA1/JSATA2: Serial ATA device connectors. PCI1~PCI5: Peripheral Component Q. headers. FDD1: Floppy disk connector. I /O VT8237R K L MN O PQ R S T U A. JSPDIF_OUT1: ...
K8T80-A7 1.4 COMPONENTS H I GF ED C B Codec LAN A J K8T800 Pro CPU1 BAT1 BIOS Super I . M. Rear side connectors (back panel). JSATA1/JSATA2: Serial ATA device connectors. PCI1~PCI5: Peripheral Component Q. headers. FDD1: Floppy disk connector. I /O VT8237R K L MN O PQ R S T U A. JSPDIF_OUT1: ...

User Guide
Page 15
... Pin Assignment 1 Case open status. Set the jumper to "Pin 1-2 close Clear CMOS data. ※ Clear CMOS Procedures: 1. Pin 2-3 close ". 5. K8T80-A7 JCMOS1: Clear CMOS Header By placing the jumper on pin2-3, it will record to the CMOS and show the message on the AC. 6. Set the...2. Reset your desired password or clear the CMOS data. If the signal has been triggered, it allows user to restore the BIOS safe setting and the CMOS data, please carefully follow the procedures to "Pin 2-3 close Normal Operation (Default). JCMOS1 Assignment Pin 1-2 close ". 3....
... Pin Assignment 1 Case open status. Set the jumper to "Pin 1-2 close Clear CMOS data. ※ Clear CMOS Procedures: 1. Pin 2-3 close ". 5. K8T80-A7 JCMOS1: Clear CMOS Header By placing the jumper on pin2-3, it will record to the CMOS and show the message on the AC. 6. Set the...2. Reset your desired password or clear the CMOS data. If the signal has been triggered, it allows user to restore the BIOS safe setting and the CMOS data, please carefully follow the procedures to "Pin 2-3 close Normal Operation (Default). JCMOS1 Assignment Pin 1-2 close ". 3....

User Guide
Page 16
Confirm motherboard model and download the respectively BIOS from the Biostar website: www.biostar.com.tw 3. Insert the bootable disk into floppy disk. 5. The BIOS has been recovered and will update BIOS automatically and restart. 9. Make a bootable floppy disk. 2. System will work properly. 14 K8T80-A7 CHAPTER 4: USEFUL HELP 4.1 AWARD BIOS BEEP CODE Beep Sound One long beep followed...
Confirm motherboard model and download the respectively BIOS from the Biostar website: www.biostar.com.tw 3. Insert the bootable disk into floppy disk. 5. The BIOS has been recovered and will update BIOS automatically and restart. 9. Make a bootable floppy disk. 2. System will work properly. 14 K8T80-A7 CHAPTER 4: USEFUL HELP 4.1 AWARD BIOS BEEP CODE Beep Sound One long beep followed...

User Guide
Page 19
... to power up CPU core voltage and Memory voltage. If you use Windows XP, you can get detail descriptions about BIOS model and chipsets. Moreover, to protect users' computer systems if the setting is either the original system speed or a...2000, Windows XP DirectX: DirectX 8.1 or above. (The Windows XP operating system includes DirectX 8.1. The Overvoltage Manager, on our main panel. K8T80-A7 CHAPTER 5: WARPSPEEDER™ 5.1 INTRODUCTION [WarpSpeeder™], a new powerful control utility, features three user-friendly functions including Overclock Manager, Overvoltage Manager,...
... to power up CPU core voltage and Memory voltage. If you use Windows XP, you can get detail descriptions about BIOS model and chipsets. Moreover, to protect users' computer systems if the setting is either the original system speed or a...2000, Windows XP DirectX: DirectX 8.1 or above. (The Windows XP operating system includes DirectX 8.1. The Overvoltage Manager, on our main panel. K8T80-A7 CHAPTER 5: WARPSPEEDER™ 5.1 INTRODUCTION [WarpSpeeder™], a new powerful control utility, features three user-friendly functions including Overclock Manager, Overvoltage Manager,...

User Guide
Page 26
In this panel, you can also get model name and detail information in Main Panel, the button will be highlighted and the About Panel will slide out to overclocking. You can get the mainboard's BIOS model and the Version number of all the chipset that are related to up as the following figure. K8T80-A7 6. About Panel Click the "about" button in hints of [WarpSpeeder™] utility. 24
In this panel, you can also get model name and detail information in Main Panel, the button will be highlighted and the About Panel will slide out to overclocking. You can get the mainboard's BIOS model and the Version number of all the chipset that are related to up as the following figure. K8T80-A7 6. About Panel Click the "about" button in hints of [WarpSpeeder™] utility. 24

