
iDEQ 210P user's manual
Page 11
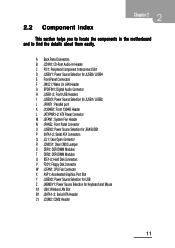
... N JPANEL: Front Panel Connector O JUSBV2: Power Source Selection for JRJ45USB1 P SATA1-2: Serial ATA Connectors Q JCL1: Case Open Connector R JCMOS1: Clear CMOS Jumper S DDR1: DDR DIMM Modules T DDR2: DDR DIMM Modules U IDE1-2: Hard Disk Connectors V FDD1: Floppy Disk Connector W JCFAN1: CPU Fan Connector X AGP1: Accelerated Graphics Port Slot Y JUSBV2: Power Source Selection for...
... N JPANEL: Front Panel Connector O JUSBV2: Power Source Selection for JRJ45USB1 P SATA1-2: Serial ATA Connectors Q JCL1: Case Open Connector R JCMOS1: Clear CMOS Jumper S DDR1: DDR DIMM Modules T DDR2: DDR DIMM Modules U IDE1-2: Hard Disk Connectors V FDD1: Floppy Disk Connector W JCFAN1: CPU Fan Connector X AGP1: Accelerated Graphics Port Slot Y JUSBV2: Power Source Selection for...
iDEQ 210P user's manual
Page 13
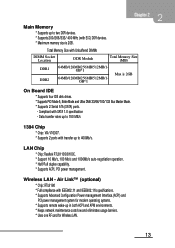
... Wireless LAN. 13 Air LinkTM (optional) * Chip: RTL8180 * Full compliance with SATA 1.0 specification - Data transfer rates up to 400Mb/s. Main Memory * Supports up to two DDR devices. * Supports 200/266/333/ 400 MHz (with transfer up to 150 MB/s 1394 Chip * Chip: VIA VT6307. * Supports 2 ports with ECC...) DDR devices. * Maximum memory size is 2GB On Board IDE * Supports four IDE disk drives. * Supports PIO Mode 5, Bride Mode and Ultra DMA 33/66/100/...
... Wireless LAN. 13 Air LinkTM (optional) * Chip: RTL8180 * Full compliance with SATA 1.0 specification - Data transfer rates up to 400Mb/s. Main Memory * Supports up to two DDR devices. * Supports 200/266/333/ 400 MHz (with transfer up to 150 MB/s 1394 Chip * Chip: VIA VT6307. * Supports 2 ports with ECC...) DDR devices. * Maximum memory size is 2GB On Board IDE * Supports four IDE disk drives. * Supports PIO Mode 5, Bride Mode and Ultra DMA 33/66/100/...

iDEQ 210P user's manual
Page 16
... CPU installation. 2.4 Installation and Setup In this section, you will fit only in the correct orientation. The CPU will learn how to install the CPU, DDR Module, and also how to a 90degree angle. Step4: Put the CPU fan on the motherboard.
... CPU installation. 2.4 Installation and Setup In this section, you will fit only in the correct orientation. The CPU will learn how to install the CPU, DDR Module, and also how to a 90degree angle. Step4: Put the CPU fan on the motherboard.

iDEQ 210P user's manual
Page 17
... the DIMM firmly and vertically into the slot until the retaining chip snap back in place and the Dimm is placed on the slot. 2. Installing DDR Module 1. When the Jumper cap is placed on pins, the jumper is "close " when jumper cap is properly seated. 4. Unlock a DIMM slot by pressing the...
... the DIMM firmly and vertically into the slot until the retaining chip snap back in place and the Dimm is placed on the slot. 2. Installing DDR Module 1. When the Jumper cap is placed on pins, the jumper is "close " when jumper cap is properly seated. 4. Unlock a DIMM slot by pressing the...
