User Guide
Page 4
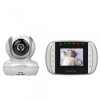
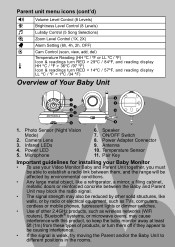
Camera Lens 3. Microphone 6. Antenna 10. Parent unit menu icons (cont'd) * Volume Level Control (8 Levels) & Brightness Level Control (8 Levels) m Lullaby Control (5 Song Selections) Z Zoom Level Control (1X, ...
Camera Lens 3. Microphone 6. Antenna 10. Parent unit menu icons (cont'd) * Volume Level Control (8 Levels) & Brightness Level Control (8 Levels) m Lullaby Control (5 Song Selections) Z Zoom Level Control (1X, ...
User Guide
Page 5
... 2.5 View Video Through TV 10 3. Parent Unit Menu Options 12 4.1 Volume 12 4.2 Brightness 12 4.3 Lullaby 12 4.4 Zoom 12 4.5 Alarm 12 4.6 Camera Control 13 4.6.1 Add (pair) a camera 13 4.6.2 View a camera 13 4.6.3 Delete a camera 14 4.6.4 Scan camera 14 4.7 Temperature 14 5. Disposal of contents 5 Help 17 8. General Information 19 Table of The Device (environment 15 6. Safety Instructions 6 2. Using...
... 2.5 View Video Through TV 10 3. Parent Unit Menu Options 12 4.1 Volume 12 4.2 Brightness 12 4.3 Lullaby 12 4.4 Zoom 12 4.5 Alarm 12 4.6 Camera Control 13 4.6.1 Add (pair) a camera 13 4.6.2 View a camera 13 4.6.3 Delete a camera 14 4.6.4 Scan camera 14 4.7 Temperature 14 5. Disposal of contents 5 Help 17 8. General Information 19 Table of The Device (environment 15 6. Safety Instructions 6 2. Using...
User Guide
Page 6
...Guide carefully before using the device. • Adult assembly is not a toy. Do not allow children to use. Safety Instructions WARNING: STRANGULATION HAZARD - CAMERA SET UP & USE: ● Determine a location for future reference. • Do not place the baby unit or cords in the crib or within ... Only use extension cords with it. • This baby monitor is , when handled as a dresser, bureau, or shelf. ● NEVER place camera or cords within the crib. Therefore, always read the instructions in the User's Guide, safe to play with AC Adapters. Keep the unit and adapter...
...Guide carefully before using the device. • Adult assembly is not a toy. Do not allow children to use. Safety Instructions WARNING: STRANGULATION HAZARD - CAMERA SET UP & USE: ● Determine a location for future reference. • Do not place the baby unit or cords in the crib or within ... Only use extension cords with it. • This baby monitor is , when handled as a dresser, bureau, or shelf. ● NEVER place camera or cords within the crib. Therefore, always read the instructions in the User's Guide, safe to play with AC Adapters. Keep the unit and adapter...
User Guide
Page 10
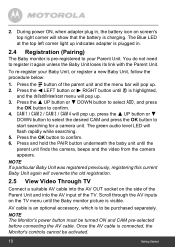
.... Press and hold the PAIR button underneath the baby unit until the Baby monitor picture is charging. You do not need to start searching for a camera unit. To re-register your Parent Unit. The green audio level LED will overwrite the old registration. 2.5 View Video Through TV Connect a suitable AV cable.... CAM 1 / CAM 2 / CAM 3 / CAM 4 will pop up indicates adapter is plugged in , the battery icon on the TV menu until the parent unit finds the camera, beeps and the video from the...
.... Press and hold the PAIR button underneath the baby unit until the Baby monitor picture is charging. You do not need to start searching for a camera unit. To re-register your Parent Unit. The green audio level LED will overwrite the old registration. 2.5 View Video Through TV Connect a suitable AV cable.... CAM 1 / CAM 2 / CAM 3 / CAM 4 will pop up indicates adapter is plugged in , the battery icon on the TV menu until the parent unit finds the camera, beeps and the video from the...
User Guide
Page 11
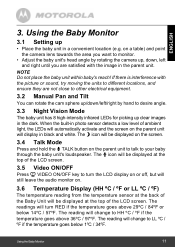
... Monitor 3.1 Setting up • Place the baby unit in black and white. The reading will automatically activate and the screen on a table) and point the camera lens towards the area you want to desire angle. 3.3 Night Vision Mode The baby unit has 8 high-intensity infrared LEDs for picking up , down, left... Tilt You can rotate the cam sphere up/down/left/right by hand to monitor. • Adjust the baby unit's head angle by rotating the camera up clear images in the parent unit. Using the Baby Monitor 11 on the parent unit will change to HH ºC / ºF if the ...
... Monitor 3.1 Setting up • Place the baby unit in black and white. The reading will automatically activate and the screen on a table) and point the camera lens towards the area you want to desire angle. 3.3 Night Vision Mode The baby unit has 8 high-intensity infrared LEDs for picking up , down, left... Tilt You can rotate the cam sphere up/down/left/right by hand to monitor. • Adjust the baby unit's head angle by rotating the camera up clear images in the parent unit. Using the Baby Monitor 11 on the parent unit will change to HH ºC / ºF if the ...
User Guide
Page 13
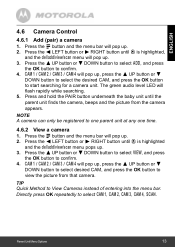
...DOWN button to select ADD, and press the OK button to start searching for a camera unit. Press the < LEFT button or > RIGHT button until the parent unit finds the camera, beeps and the picture from that camera. DOWN button to select desired CAM, and press the OK button to view the picture...press the + UP button or - TIP Quick Method to one parent unit at any one time. 4.6.2 View a camera 1. Press the M button and the menu bar will pop up . 3. NOTE A camera can only be registered to View Cameras instead of entering into the menu bar. CAM 1 / CAM 2 / CAM 3 / CAM 4 will flash rapidly...
...DOWN button to select ADD, and press the OK button to start searching for a camera unit. Press the < LEFT button or > RIGHT button until the parent unit finds the camera, beeps and the picture from that camera. DOWN button to select desired CAM, and press the OK button to view the picture...press the + UP button or - TIP Quick Method to one parent unit at any one time. 4.6.2 View a camera 1. Press the M button and the menu bar will pop up . 3. NOTE A camera can only be registered to View Cameras instead of entering into the menu bar. CAM 1 / CAM 2 / CAM 3 / CAM 4 will flash rapidly...

User Guide
Page 14
...UP button or - Press the < LEFT button or > RIGHT button until C is highlighted, and the del/add/view/scan menu will pop up . 3. 4.6.3 Delete a camera 1. DOWN button to select DEL, and press the OK button to select CAM 1, CAM 2, CAM 3, CAM 4, SCAN. 4.7 Temperature 1. Directly press OK repeatedly to confirm....select the desired CAM, and press the OK button to confirm. 4. Press the M button and the menu bar will pop up . 2. DOWN button to View Cameras instead of CAM 1 / CAM 2 / CAM 3 / CAM 4, changing about every 12 seconds. TIP Quick Method to select ºC or ºF. 14 ...
...UP button or - Press the < LEFT button or > RIGHT button until C is highlighted, and the del/add/view/scan menu will pop up . 3. 4.6.3 Delete a camera 1. DOWN button to select DEL, and press the OK button to select CAM 1, CAM 2, CAM 3, CAM 4, SCAN. 4.7 Temperature 1. Directly press OK repeatedly to confirm....select the desired CAM, and press the OK button to confirm. 4. Press the M button and the menu bar will pop up . 2. DOWN button to View Cameras instead of CAM 1 / CAM 2 / CAM 3 / CAM 4, changing about every 12 seconds. TIP Quick Method to select ºC or ºF. 14 ...
User Guide
Page 17
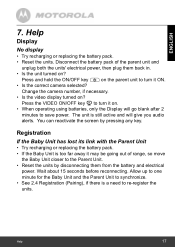
... the Display will give you audio alerts. You can reactivate the screen by disconnecting them back in. • Is the unit turned on ? Change the camera number, if necessary. • Is the video display turned on ? Help 17 Allow up to one minute for the Baby Unit and the Parent Unit... to synchronize. • See 2.4 Registration (Pairing), if there is a need to turn it ON. • Is the correct camera selected? The unit is too far away it may be going out of the parent unit and unplug both the units' electrical power, then plug...
... the Display will give you audio alerts. You can reactivate the screen by disconnecting them back in. • Is the unit turned on ? Change the camera number, if necessary. • Is the video display turned on ? Help 17 Allow up to one minute for the Baby Unit and the Parent Unit... to synchronize. • See 2.4 Registration (Pairing), if there is a need to turn it ON. • Is the correct camera selected? The unit is too far away it may be going out of the parent unit and unplug both the units' electrical power, then plug...


