User Guide
Page 2
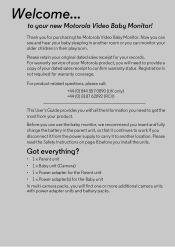
... required for your Motorola product, you install the units. Got everything? • 1 x Parent unit • 1 x Baby unit (Camera) • 1 x Power adapter for the Parent unit • 1 x Power adapter(s) for the Baby unit In multi-camera packs, you for purchasing the Motorola Video Baby Monitor. to get the most from the power supply... you disconnect it from your baby sleeping in their playroom. Please read the Safety Instructions on page 8 before you will find one or more additional camera units with all the information you need to provide a copy of your records.
... required for your Motorola product, you install the units. Got everything? • 1 x Parent unit • 1 x Baby unit (Camera) • 1 x Power adapter for the Parent unit • 1 x Power adapter(s) for the Baby unit In multi-camera packs, you for purchasing the Motorola Video Baby Monitor. to get the most from the power supply... you disconnect it from your baby sleeping in their playroom. Please read the Safety Instructions on page 8 before you will find one or more additional camera units with all the information you need to provide a copy of your records.
User Guide
Page 5
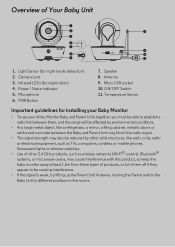
... of Your Baby Unit 1 2 8 3 4 5 9 6 ON OFF 10 7 11 1. Microphone 6. Speaker 8. Infrared LEDs (for night mode detection) 2. Micro USB socket 10. Light Sensor (for night vision) 4. Camera Lens 3. Power / Status indicator 5. Antenna 9.
... of Your Baby Unit 1 2 8 3 4 5 9 6 ON OFF 10 7 11 1. Microphone 6. Speaker 8. Infrared LEDs (for night mode detection) 2. Micro USB socket 10. Light Sensor (for night vision) 4. Camera Lens 3. Power / Status indicator 5. Antenna 9.
User Guide
Page 6
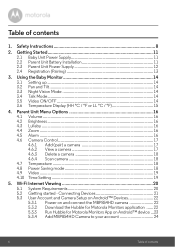
...for Motorola Monitors application ...... 22 5.3.3 Run Hubble for Motorola Monitors App on Android™ device ...23 5.3.4 Add MBP854HD Camera to your account 24 6 Table of contents 1. Getting Started 11 2.1 Baby Unit Power Supply 11 2.2 Parent Unit Battery...Unit Menu Options 16 4.1 Volume ...16 4.2 Brightness 16 4.3 Lullaby ...16 4.4 Zoom ...16 4.5 Alarm ...16 4.6 Camera Control 17 4.6.1 Add (pair) a camera 17 4.6.2 View a camera 17 4.6.3 Delete a camera 18 4.6.4 Scan camera 18 4.7 Temperature 18 4.8 Power Saving mode 18 4.9 Video ...19 4.10 Time Setting 19 5. Using the Baby ...
...for Motorola Monitors application ...... 22 5.3.3 Run Hubble for Motorola Monitors App on Android™ device ...23 5.3.4 Add MBP854HD Camera to your account 24 6 Table of contents 1. Getting Started 11 2.1 Baby Unit Power Supply 11 2.2 Parent Unit Battery...Unit Menu Options 16 4.1 Volume ...16 4.2 Brightness 16 4.3 Lullaby ...16 4.4 Zoom ...16 4.5 Alarm ...16 4.6 Camera Control 17 4.6.1 Add (pair) a camera 17 4.6.2 View a camera 17 4.6.3 Delete a camera 18 4.6.4 Scan camera 18 4.7 Temperature 18 4.8 Power Saving mode 18 4.9 Video ...19 4.10 Time Setting 19 5. Using the Baby ...
User Guide
Page 7
...Features of The Device (environment 55 8. Help...57 10. ENGLISH 5.4 User Account and Camera Setup: Working with iPhone®/iPad 28 5.4.1 Power ON and Connect MBP854HD camera 28 5.4.2 Download Hubble for Motorola Monitors App 28 5.4.3 Run Hubble for Motorola Monitors ...iPad® ... 29 5.4.4 Add MBP854HD Camera to your account 30 5.5 Camera Functions: Working with devices for Android 35 5.5.1 Connecting the Camera to Power 35 5.5.2 Add more cameras 35 5.5.3 Remove a camera 36 5.5.4 Change your Account Information 37 5.5.5 Camera settings 38 5.5.6 General setting 39 5.5.7 Features...
...Features of The Device (environment 55 8. Help...57 10. ENGLISH 5.4 User Account and Camera Setup: Working with iPhone®/iPad 28 5.4.1 Power ON and Connect MBP854HD camera 28 5.4.2 Download Hubble for Motorola Monitors App 28 5.4.3 Run Hubble for Motorola Monitors ...iPad® ... 29 5.4.4 Add MBP854HD Camera to your account 30 5.5 Camera Functions: Working with devices for Android 35 5.5.1 Connecting the Camera to Power 35 5.5.2 Add more cameras 35 5.5.3 Remove a camera 36 5.5.4 Change your Account Information 37 5.5.5 Camera settings 38 5.5.6 General setting 39 5.5.7 Features...
User Guide
Page 11
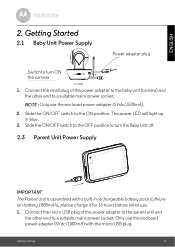
ENGLISH 2. Connect the small plug of the power adapter to the parent unit and the other end to turn ON the camera ON OFF 1. Only use the enclosed power adapter (5Vdc/1500mA) with a built-in blue. 3. Slide the ON/OFF switch to the OFF position to a suitable ... Supply IMPORTANT The Parent Unit is assembled with the micro USB plug. Connect the micro USB plug of the power adapter to the baby unit (camera) and the other end to a suitable mains power socket. Getting Started 2.1 Baby Unit Power Supply Power adapter plug Switch to the ON position. NOTE :Only...
ENGLISH 2. Connect the small plug of the power adapter to the parent unit and the other end to turn ON the camera ON OFF 1. Only use the enclosed power adapter (5Vdc/1500mA) with a built-in blue. 3. Slide the ON/OFF switch to the OFF position to a suitable ... Supply IMPORTANT The Parent Unit is assembled with the micro USB plug. Connect the micro USB plug of the power adapter to the baby unit (camera) and the other end to a suitable mains power socket. Getting Started 2.1 Baby Unit Power Supply Power adapter plug Switch to the ON position. NOTE :Only...
User Guide
Page 13
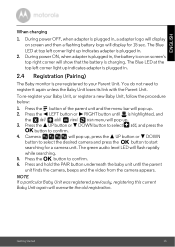
... screen and then a flashing battery logo will show that the battery is highlighted, and the del/ add/ view/ scan menu will pop up . 3. Camera will pop up , press the + UP button or - Press and hold the PAIR button underneath the baby unit until is charging. ENGLISH When charging 1.... the M button of the parent unit and the menu bar will pop up indicates adapter is plugged in . 2. DOWN button to select the desired camera and press the O button to start searching for 15 sec. The green audio level LED will overwrite the old registration. During power OFF, when adapter...
... screen and then a flashing battery logo will show that the battery is highlighted, and the del/ add/ view/ scan menu will pop up . 3. Camera will pop up , press the + UP button or - Press and hold the PAIR button underneath the baby unit until is charging. ENGLISH When charging 1.... the M button of the parent unit and the menu bar will pop up indicates adapter is plugged in . 2. DOWN button to select the desired camera and press the O button to start searching for 15 sec. The green audio level LED will overwrite the old registration. During power OFF, when adapter...
User Guide
Page 14
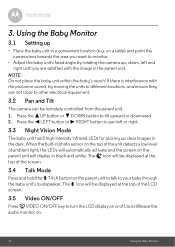
...try moving the units to different locations, and ensure they are not close to monitor. • Adjust the baby unit's head angle by rotating the camera up, down, left or right. 3.3 Night Vision Mode The baby unit has 8 high-intensity infrared LEDs for picking up • Place the baby ... location (e.g. Press the < LEFT button or > RIGHT button to pan left and right until you want to other electrical equipment. 3.2 Pan and Tilt The camera can be remotely controlled from the parent unit. 1. 3. NOTE Do not place the baby unit within the baby's reach! The T icon will be displayed ...
...try moving the units to different locations, and ensure they are not close to monitor. • Adjust the baby unit's head angle by rotating the camera up, down, left or right. 3.3 Night Vision Mode The baby unit has 8 high-intensity infrared LEDs for picking up • Place the baby ... location (e.g. Press the < LEFT button or > RIGHT button to pan left and right until you want to other electrical equipment. 3.2 Pan and Tilt The camera can be remotely controlled from the parent unit. 1. 3. NOTE Do not place the baby unit within the baby's reach! The T icon will be displayed ...
User Guide
Page 17
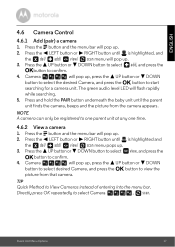
...button and the menu bar will flash rapidly while searching. 5. Press the + UP button or - DOWN button to select Obutton to select Camera , scan. The green audio level LED will pop up . 3. Press and hold the PAIR button underneath the baby unit until is highlighted,... until the parent unit finds the camera, beeps and the picture from that camera. ENGLISH 4.6 Camera Control 4.6.1 Add (pair) a camera 1. DOWN button to select the desired Camera, and press the O button to confirm. 4. NOTE A camera can only be registered to View Cameras instead of entering into the menu ...
...button and the menu bar will flash rapidly while searching. 5. Press the + UP button or - DOWN button to select Obutton to select Camera , scan. The green audio level LED will pop up . 3. Press and hold the PAIR button underneath the baby unit until is highlighted,... until the parent unit finds the camera, beeps and the picture from that camera. ENGLISH 4.6 Camera Control 4.6.1 Add (pair) a camera 1. DOWN button to select the desired Camera, and press the O button to confirm. 4. NOTE A camera can only be registered to View Cameras instead of entering into the menu ...
User Guide
Page 18
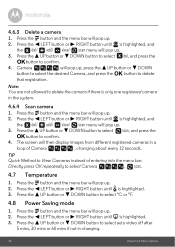
...the < LEFT button or > RIGHT button until is highlighted, and the del/ add/ view/ scan menu will pop up . 3. Camera will pop up . 2. DOWN button to select the desired Camera, and press the O button to confirm. 4. Note: You are not allowed to select °C or °F. 4.8 Power Saving...in charging. 18 Parent Unit Menu Options Press the M button and the menu bar will pop up . 2. Directly press OK repeatedly to View Cameras instead of Camera , changing about every 12 seconds. Press the < LEFT button or > RIGHT button until is highlighted. 3. Press the + UP button or...
...the < LEFT button or > RIGHT button until is highlighted, and the del/ add/ view/ scan menu will pop up . 3. Camera will pop up . 2. DOWN button to select the desired Camera, and press the O button to confirm. 4. Note: You are not allowed to select °C or °F. 4.8 Power Saving...in charging. 18 Parent Unit Menu Options Press the M button and the menu bar will pop up . 2. Directly press OK repeatedly to View Cameras instead of Camera , changing about every 12 seconds. Press the < LEFT button or > RIGHT button until is highlighted. 3. Press the + UP button or...
User Guide
Page 21
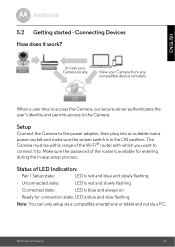
Make sure the password of the router is blue and always on - The Camera must be within range of LED Indication: - Status of the Wi-Fi® router with which you want to the power adapter, then plug into ... and not via a PC. Unconnected state: LED is in -app setup process. Setup Connect the Camera to connect it work? Access your Camera locally View your Camera from any compatible device remotely When a user tries to access the Camera, our secure server authenticates the user's identity and permits access to . ENGLISH 5.2 Getting started - Connecting...
Make sure the password of the router is blue and always on - The Camera must be within range of LED Indication: - Status of the Wi-Fi® router with which you want to the power adapter, then plug into ... and not via a PC. Unconnected state: LED is in -app setup process. Setup Connect the Camera to connect it work? Access your Camera locally View your Camera from any compatible device remotely When a user tries to access the Camera, our secure server authenticates the user's identity and permits access to . ENGLISH 5.2 Getting started - Connecting...
User Guide
Page 22
... • Download Hubble for Motorola Monitors application from Google Play™ Store and install it into micro USB socket at back of MBP854HD camera. • Make sure that ON/OFF button is ready to setup. 5.3.2 Download the Hubble for Motorola Monitors application • Go to ...mains power socket, insert the power adapter plug into your Android™ device. 22 Wi-Fi Internet Viewing When you need • MBP854 camera • MBP854HD camera power adapter • Device with Android™ system version 4.0 or above 5.3.1 Power on Android™ Devices What you hear two 'beeps...
... • Download Hubble for Motorola Monitors application from Google Play™ Store and install it into micro USB socket at back of MBP854HD camera. • Make sure that ON/OFF button is ready to setup. 5.3.2 Download the Hubble for Motorola Monitors application • Go to ...mains power socket, insert the power adapter plug into your Android™ device. 22 Wi-Fi Internet Viewing When you need • MBP854 camera • MBP854HD camera power adapter • Device with Android™ system version 4.0 or above 5.3.1 Power on Android™ Devices What you hear two 'beeps...

User Guide
Page 24
5.3.4 Add MBP854HD Camera to your account • New account created and directly login. • Tap on Add Camera. (Picture A2) • Tap on Continue. (Picture A3) A2 A3 • On the screen, it shows the setup instructions. (Picture A4) A4 24 Wi-Fi Internet Viewing
5.3.4 Add MBP854HD Camera to your account • New account created and directly login. • Tap on Add Camera. (Picture A2) • Tap on Continue. (Picture A3) A2 A3 • On the screen, it shows the setup instructions. (Picture A4) A4 24 Wi-Fi Internet Viewing
User Guide
Page 25
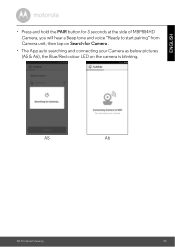
ENGLISH • Press and hold the PAIR button for 3 seconds at the side of MBP854HD Camera, you will hear a Beep tone and voice "Ready to start pairing" from Camera unit, then tap on Search for Camera . • The App auto searching and connecting your Camera as below pictures (A5 & A6), the Blue/Red colour LED on the camera is blinking. A5 A6 Wi-Fi Internet Viewing 25
ENGLISH • Press and hold the PAIR button for 3 seconds at the side of MBP854HD Camera, you will hear a Beep tone and voice "Ready to start pairing" from Camera unit, then tap on Search for Camera . • The App auto searching and connecting your Camera as below pictures (A5 & A6), the Blue/Red colour LED on the camera is blinking. A5 A6 Wi-Fi Internet Viewing 25
User Guide
Page 26
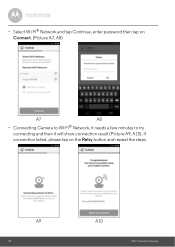
If connection failed, please tap on Connect. (Picture A7, A8) A7 A8 • Connecting Camera to Wi-Fi® Network, it needs a few minutes to try connecting and then it will show connection result (Picture A9, A10). A9 26 A10 Wi-Fi Internet Viewing • Select Wi-Fi® Network and tap Continue, enter password then tap on the Retry button and repeat the steps.
If connection failed, please tap on Connect. (Picture A7, A8) A7 A8 • Connecting Camera to Wi-Fi® Network, it needs a few minutes to try connecting and then it will show connection result (Picture A9, A10). A9 26 A10 Wi-Fi Internet Viewing • Select Wi-Fi® Network and tap Continue, enter password then tap on the Retry button and repeat the steps.
User Guide
Page 27
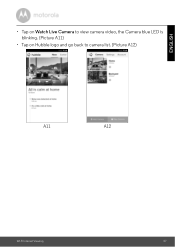
ENGLISH • Tap on Watch Live Camera to view camera video, the Camera blue LED is blinking. (Picture A11) • Tap on Hubble logo and go back to camera list. (Picture A12) A11 A12 Wi-Fi Internet Viewing 27
ENGLISH • Tap on Watch Live Camera to view camera video, the Camera blue LED is blinking. (Picture A11) • Tap on Hubble logo and go back to camera list. (Picture A12) A11 A12 Wi-Fi Internet Viewing 27
User Guide
Page 28
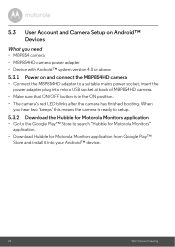
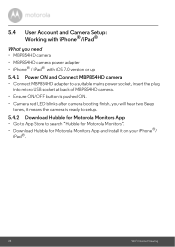
...: Working with iPhone®/iPad® What you need • MBP854HD camera • MBP854HD camera power adapter • iPhone® / iPad® with iOS 7.0 version or up 5.4.1 Power ON and Connect MBP854HD camera • Connect MBP854HD adapter to a suitable mains power socket, insert the plug into micro ...USB socket at back of MBP854HD camera. • Ensure ON/OFF button is pushed ON. • Camera red LED blinks after camera booting finish, you will hear two Beep tones, it means the camera is ready to setup. 5.4.2 Download Hubble for Motorola Monitors App ...
...: Working with iPhone®/iPad® What you need • MBP854HD camera • MBP854HD camera power adapter • iPhone® / iPad® with iOS 7.0 version or up 5.4.1 Power ON and Connect MBP854HD camera • Connect MBP854HD adapter to a suitable mains power socket, insert the plug into micro ...USB socket at back of MBP854HD camera. • Ensure ON/OFF button is pushed ON. • Camera red LED blinks after camera booting finish, you will hear two Beep tones, it means the camera is ready to setup. 5.4.2 Download Hubble for Motorola Monitors App ...
User Guide
Page 30
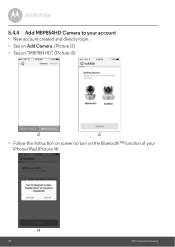
5.4.4 Add MBP854HD Camera to your account • New account created and directly login . • Tap on Add Camera. (Picture i2) • Tap on "MBP854HD". (Picture i3) i2 i3 • Follow the instruction on screen to turn on the Bluetooth™ function of your iPhone/iPad.(Picture i4) i4 30 Wi-Fi Internet Viewing
5.4.4 Add MBP854HD Camera to your account • New account created and directly login . • Tap on Add Camera. (Picture i2) • Tap on "MBP854HD". (Picture i3) i2 i3 • Follow the instruction on screen to turn on the Bluetooth™ function of your iPhone/iPad.(Picture i4) i4 30 Wi-Fi Internet Viewing

User Guide
Page 33
ENGLISH • According to above steps to find current Camera ID "CameraHDxxxxxxxxxx" , then tap on Continue , ensure your iPhone® or iPad® connected it. (Picture i10) i10 • Select Wi-Fi® Network to tap Continue then enter password to tap Next. (Pictures i11, i12) i11 Wi-Fi Internet Viewing i12 33
ENGLISH • According to above steps to find current Camera ID "CameraHDxxxxxxxxxx" , then tap on Continue , ensure your iPhone® or iPad® connected it. (Picture i10) i10 • Select Wi-Fi® Network to tap Continue then enter password to tap Next. (Pictures i11, i12) i11 Wi-Fi Internet Viewing i12 33
User Guide
Page 34
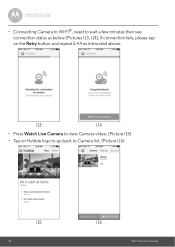
• Connecting Camera to Wi-Fi®, need to wait a few minutes then see connection status as below (Pictures i13, i14), if connection fails, please tap on Hubble logo to go back to view Camera video. (Picture i15) • Tap on the Retry button and repeat 5.4.4 as instructed above. i13 i14 • Press Watch Live Camera to Camera list. (Picture i16) i15 34 i16 Wi-Fi Internet Viewing
• Connecting Camera to Wi-Fi®, need to wait a few minutes then see connection status as below (Pictures i13, i14), if connection fails, please tap on Hubble logo to go back to view Camera video. (Picture i15) • Tap on the Retry button and repeat 5.4.4 as instructed above. i13 i14 • Press Watch Live Camera to Camera list. (Picture i16) i15 34 i16 Wi-Fi Internet Viewing
User Guide
Page 35
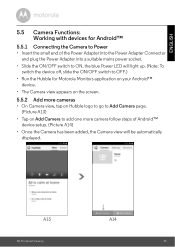
...application on your Android™ device. • The Camera view appears on the screen. 5.5.2 Add more cameras • On Camera view, tap on Hubble logo to go to Add Camera page. (Picture A13) • Tap on Add Camera to add one more camera follow steps of Android™ device setup. (Picture ...A14) • Once the Camera has been added, the Camera view will be automatically...
...application on your Android™ device. • The Camera view appears on the screen. 5.5.2 Add more cameras • On Camera view, tap on Hubble logo to go to Add Camera page. (Picture A13) • Tap on Add Camera to add one more camera follow steps of Android™ device setup. (Picture ...A14) • Once the Camera has been added, the Camera view will be automatically...


