
User Guide
Page 2
... fully charge the battery in the parent unit, so that it to another room or you will need to get the most from the power supply to carry it continues to confirm warranty status. For warranty service of your product. Registration is not required for purchasing the Motorola Video Baby Monitor. Got everything? • 1 x Parent unit • 1 x Baby unit (Camera) • 1 x Power adapter for the Parent unit • 1 x Power adapter...
... fully charge the battery in the parent unit, so that it to another room or you will need to get the most from the power supply to carry it continues to confirm warranty status. For warranty service of your product. Registration is not required for purchasing the Motorola Video Baby Monitor. Got everything? • 1 x Parent unit • 1 x Baby unit (Camera) • 1 x Power adapter for the Parent unit • 1 x Power adapter...
User Guide
Page 3
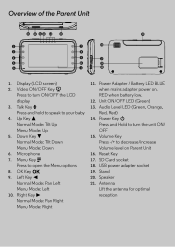
... O 9. RED when battery low. 12. Audio Level LED (Green, Orange, Red, Red) 14. Power Key 0 ... Key Press -/+ to your baby 4. Unit ON/OFF LED (Green) 13. Up Key + Normal Mode: Tilt Up Menu Mode: Up 5. USB power adapter socket 19. Stand 20. Overview of the Parent Unit RESET 16 15 11 12 ...13 14 21 2 7 20 3 8 4 9 17 5 10 19 6 1 18 1. Reset Key 17. Display (LCD screen) 2. Talk Key T Press and hold to speak to decrease/increase Volume level on . Power Adapter / Battery LED BLUE when mains adapter power on Parent Unit 16. Video...
... O 9. RED when battery low. 12. Audio Level LED (Green, Orange, Red, Red) 14. Power Key 0 ... Key Press -/+ to your baby 4. Unit ON/OFF LED (Green) 13. Up Key + Normal Mode: Tilt Up Menu Mode: Up 5. USB power adapter socket 19. Stand 20. Overview of the Parent Unit RESET 16 15 11 12 ...13 14 21 2 7 20 3 8 4 9 17 5 10 19 6 1 18 1. Reset Key 17. Display (LCD screen) 2. Talk Key T Press and hold to speak to decrease/increase Volume level on . Power Adapter / Battery LED BLUE when mains adapter power on Parent Unit 16. Video...
User Guide
Page 5
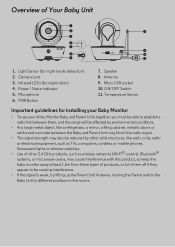
.... Infrared LEDs (for installing your Baby Monitor • To use your Video Monitor Baby and Parent Units together, you must be able to different positions in the rooms. Speaker 8. Temperature Sensor Important guidelines for night vision) 4. Light Sensor (for night mode detection...Parent Unit Antenna, moving the Parent and/or the Baby Unit to establish a radio link between them, and the range will be affected by environmental conditions. • Any large metal object, like a refrigerator, a mirror, a filing cabinet, metallic doors or reinforced concrete between the Baby and Parent Unit...
.... Infrared LEDs (for installing your Baby Monitor • To use your Video Monitor Baby and Parent Units together, you must be able to different positions in the rooms. Speaker 8. Temperature Sensor Important guidelines for night vision) 4. Light Sensor (for night mode detection...Parent Unit Antenna, moving the Parent and/or the Baby Unit to establish a radio link between them, and the range will be affected by environmental conditions. • Any large metal object, like a refrigerator, a mirror, a filing cabinet, metallic doors or reinforced concrete between the Baby and Parent Unit...
User Guide
Page 6
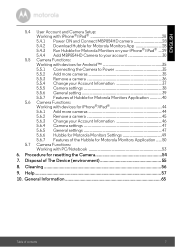
... Time Setting 19 5. Safety Instructions 8 2. Getting Started 11 2.1 Baby Unit Power Supply 11 2.2 Parent Unit Battery Installation 11 2.3 Parent Unit Power Supply 12 2.4 Registration (Pairing 13 3. Wi-Fi Internet Viewing 20 5.1 System Requirements 20 5.2 Getting started - Table of contents Connecting Devices 21 5.3 User Account and Camera Setup on Android™ Devices 22 5.3.1 Power on and connect the MBP854HD camera 22 5.3.2 Download the Hubble for Motorola Monitors application...
... Time Setting 19 5. Safety Instructions 8 2. Getting Started 11 2.1 Baby Unit Power Supply 11 2.2 Parent Unit Battery Installation 11 2.3 Parent Unit Power Supply 12 2.4 Registration (Pairing 13 3. Wi-Fi Internet Viewing 20 5.1 System Requirements 20 5.2 Getting started - Table of contents Connecting Devices 21 5.3 User Account and Camera Setup on Android™ Devices 22 5.3.1 Power on and connect the MBP854HD camera 22 5.3.2 Download the Hubble for Motorola Monitors application...
User Guide
Page 7
... ENGLISH 5.4 User Account and Camera Setup: Working with iPhone®/iPad 28 5.4.1 Power ON and Connect MBP854HD camera 28 5.4.2 Download Hubble for Motorola Monitors App 28 5.4.3 Run Hubble for Motorola Monitors on your ...settings 38 5.5.6 General setting 39 5.5.7 Features of Hubble for Motorola Monitors Application ...........40 5.6 Camera Functions: Working with devices for iPhone®/iPad 44 5.6.1 Add more cameras 44 5.6.2 Remove a camera 45 5.6.3 Change your Account Information 46 5.6.4 Camera settings 47 5.6.5 General settings 47 5.6.6 Hubble for Motorola Monitors Settings...
... ENGLISH 5.4 User Account and Camera Setup: Working with iPhone®/iPad 28 5.4.1 Power ON and Connect MBP854HD camera 28 5.4.2 Download Hubble for Motorola Monitors App 28 5.4.3 Run Hubble for Motorola Monitors on your ...settings 38 5.5.6 General setting 39 5.5.7 Features of Hubble for Motorola Monitors Application ...........40 5.6 Camera Functions: Working with devices for iPhone®/iPad 44 5.6.1 Add more cameras 44 5.6.2 Remove a camera 45 5.6.3 Change your Account Information 46 5.6.4 Camera settings 47 5.6.5 General settings 47 5.6.6 Hubble for Motorola Monitors Settings...
User Guide
Page 9
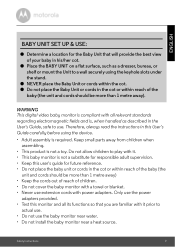
...; Do not install the baby monitor near a heat source. Safety Instructions 9 WARNING This digital video baby monitor is compliant with all its functions so that you are familiar with power adapters. Keep small parts away from children when assembling. • This product is required. ENGLISH BABY UNIT SET UP & USE: ● Determine a location for future reference. • Do not place the baby unit or cords in the...
...; Do not install the baby monitor near a heat source. Safety Instructions 9 WARNING This digital video baby monitor is compliant with all its functions so that you are familiar with power adapters. Keep small parts away from children when assembling. • This product is required. ENGLISH BABY UNIT SET UP & USE: ● Determine a location for future reference. • Do not place the baby unit or cords in the...
User Guide
Page 10
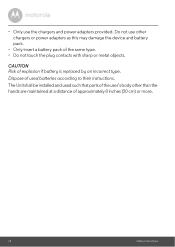
... maintained at a distance of approximately 8 inches (20 cm) or more. 10 Safety Instructions The Unit shall be installed and used batteries according to their instructions. Dispose of used such that parts of the user's body other chargers or power adapters as this may damage the device and battery pack. • Only insert a battery pack of explosion if battery is replaced by an incorrect type.
... maintained at a distance of approximately 8 inches (20 cm) or more. 10 Safety Instructions The Unit shall be installed and used batteries according to their instructions. Dispose of used such that parts of the user's body other chargers or power adapters as this may damage the device and battery pack. • Only insert a battery pack of explosion if battery is replaced by an incorrect type.
User Guide
Page 11
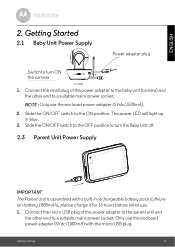
... to turn ON the camera ON OFF 1. Only use the enclosed power adapter (5Vdc/1500mA) with a built-in blue. 3. The power LED will light up in rechargeable battery pack (Lithiumion battery 1880mAh), please charge it for 16 hours before initial use the enclosed power adapter (5Vdc/1500mA). 2. NOTE :Only use . 1. Getting Started 2.1 Baby Unit Power Supply Power adapter plug Switch to the ON position.
... to turn ON the camera ON OFF 1. Only use the enclosed power adapter (5Vdc/1500mA) with a built-in blue. 3. The power LED will light up in rechargeable battery pack (Lithiumion battery 1880mAh), please charge it for 16 hours before initial use the enclosed power adapter (5Vdc/1500mA). 2. NOTE :Only use . 1. Getting Started 2.1 Baby Unit Power Supply Power adapter plug Switch to the ON position.
User Guide
Page 12
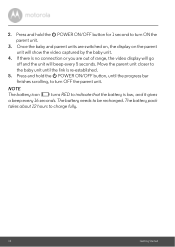
Once the baby and parent units are out of range, the video display will go off and the unit will show the video captured by the baby unit. 4. Move the parent unit closer to charge fully. 12 Getting Started Press and hold the 0 POWER ON/OFF button for 1 second to turn ON the parent unit. 3. The battery pack takes about 12 hours to the baby unit until the progress...
Once the baby and parent units are out of range, the video display will go off and the unit will show the video captured by the baby unit. 4. Move the parent unit closer to charge fully. 12 Getting Started Press and hold the 0 POWER ON/OFF button for 1 second to turn ON the parent unit. 3. The battery pack takes about 12 hours to the baby unit until the progress...
User Guide
Page 13
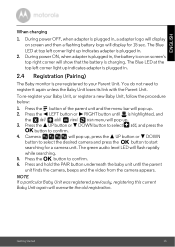
... unless the Baby Unit loses its link with the Parent Unit. During power OFF, when adapter is plugged in . 2.4 Registration (Pairing) The Baby monitor is highlighted, and the del/ add/ view/ scan menu will pop up . 2. You do not need to confirm. 6. Press the < LEFT button or > RIGHT button until the parent unit finds the camera, beeps and the video from the...
... unless the Baby Unit loses its link with the Parent Unit. During power OFF, when adapter is plugged in . 2.4 Registration (Pairing) The Baby monitor is highlighted, and the del/ add/ view/ scan menu will pop up . 2. You do not need to confirm. 6. Press the < LEFT button or > RIGHT button until the parent unit finds the camera, beeps and the video from the...
User Guide
Page 14
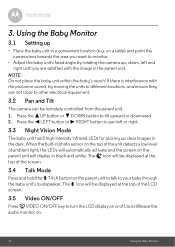
...sensor on the top of the unit detects a low level of ambient light, the LEDs will automatically activate and the screen on the parent unit will be displayed at the top of the LCD screen. 3.5 Video ON/OFF Press V VIDEO ON/OFF key to turn the LCD display on or off, but still leave the audio monitor... parent unit. 1. Using the Baby Monitor 3.1 Setting up , down, left or right. 3.3 Night Vision Mode The baby unit has 8 high-intensity infrared LEDs for picking up clear images in the dark. If there is interference with the picture or sound, try moving the units to your baby through the baby unit...
...sensor on the top of the unit detects a low level of ambient light, the LEDs will automatically activate and the screen on the parent unit will be displayed at the top of the LCD screen. 3.5 Video ON/OFF Press V VIDEO ON/OFF key to turn the LCD display on or off, but still leave the audio monitor... parent unit. 1. Using the Baby Monitor 3.1 Setting up , down, left or right. 3.3 Night Vision Mode The baby unit has 8 high-intensity infrared LEDs for picking up clear images in the dark. If there is interference with the picture or sound, try moving the units to your baby through the baby unit...
User Guide
Page 22
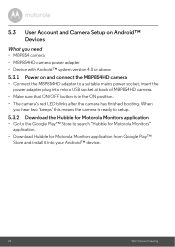
... for Motorola Monitors application • Go to the Google Play™ Store to a suitable mains power socket, insert the power adapter plug into your Android™ device. 22 Wi-Fi Internet Viewing 5.3 User Account and Camera Setup on Android™ Devices What you hear two 'beeps' this means the camera is in the ON position. • The camera's red...
... for Motorola Monitors application • Go to the Google Play™ Store to a suitable mains power socket, insert the power adapter plug into your Android™ device. 22 Wi-Fi Internet Viewing 5.3 User Account and Camera Setup on Android™ Devices What you hear two 'beeps' this means the camera is in the ON position. • The camera's red...
User Guide
Page 28
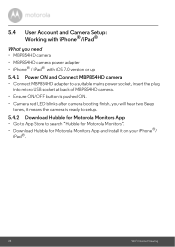
...; Connect MBP854HD adapter to a suitable mains power socket, insert the plug into micro USB socket at back of MBP854HD camera. • Ensure ON/OFF button is pushed ON. • Camera red LED blinks after camera booting finish, you will hear two Beep tones, it means the camera is ready to setup. 5.4.2 Download Hubble for Motorola Monitors App...
...; Connect MBP854HD adapter to a suitable mains power socket, insert the plug into micro USB socket at back of MBP854HD camera. • Ensure ON/OFF button is pushed ON. • Camera red LED blinks after camera booting finish, you will hear two Beep tones, it means the camera is ready to setup. 5.4.2 Download Hubble for Motorola Monitors App...
User Guide
Page 38
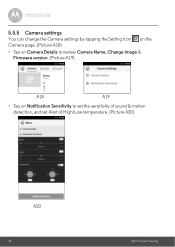
5.5.5 Camera settings You can change the Camera settings by tapping the Setting icon on the Camera page. (Picture A18) • Tap on Camera Details to review Camera Name, Change Image & Firmware version. (Picture A19) A18 A19 • Tap on Notification Sensitivity to set the sensitivity of sound & motion detection, and set Alert of High/Low temperature. (Picture A20) A20 38 Wi-Fi Internet Viewing
5.5.5 Camera settings You can change the Camera settings by tapping the Setting icon on the Camera page. (Picture A18) • Tap on Camera Details to review Camera Name, Change Image & Firmware version. (Picture A19) A18 A19 • Tap on Notification Sensitivity to set the sensitivity of sound & motion detection, and set Alert of High/Low temperature. (Picture A20) A20 38 Wi-Fi Internet Viewing
User Guide
Page 53
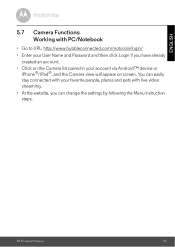
... You can change the settings by following the Menu instruction steps. ENGLISH 5.7 Camera Functions: Working with PC/Notebook • Go to URL: http://www.hubbleconnected.com/motorola/login/ • Enter your User Name and Password and then click Login if... you have already created an account. • Click on the Camera list paired in your favorite people, places and pets with live video...
... You can change the settings by following the Menu instruction steps. ENGLISH 5.7 Camera Functions: Working with PC/Notebook • Go to URL: http://www.hubbleconnected.com/motorola/login/ • Enter your User Name and Password and then click Login if... you have already created an account. • Click on the Camera list paired in your favorite people, places and pets with live video...
User Guide
Page 59
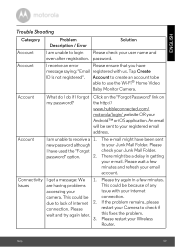
...account tobe able to receive a 1. the http:// www.hubbleconnected.com/ motorola/login/ website OR your Camera to check if this fixes the problem. Please try again later. 3. If the problem remains, please restart your Android™ or iOS application. Please restart ... Trouble Shooting Category Account Account Problem Solution Description / Error I am unable to use the Wi-Fi® Home Video Baby Monitor Camera. An email will be due to lack of any issue with us. Please wait and try again in getting your Junk Mail Folder. new password ...
...account tobe able to receive a 1. the http:// www.hubbleconnected.com/ motorola/login/ website OR your Camera to check if this fixes the problem. Please try again later. 3. If the problem remains, please restart your Android™ or iOS application. Please restart ... Trouble Shooting Category Account Account Problem Solution Description / Error I am unable to use the Wi-Fi® Home Video Baby Monitor Camera. An email will be due to lack of any issue with us. Please wait and try again in getting your Junk Mail Folder. new password ...
User Guide
Page 62
... 8* supported for *Java browser plug-in Buffalo brand routers there is an option called Wireless Isolation. do not hear sound You can only access it for Camera firmware upgrades from the same Wi-Fi® network, I try to view the Please upgrade your wireless router settings. Please check your firmware. Mac ... 4.0 or above iPhone®/iPad® iOS version 7.0 or above. By remote Camera. Connectivity Issues Even though I am accessing a video stream screen to hear audio. default the audio is shown as remote. This Camera, I am accessing my Camera from time to time to...
... 8* supported for *Java browser plug-in Buffalo brand routers there is an option called Wireless Isolation. do not hear sound You can only access it for Camera firmware upgrades from the same Wi-Fi® network, I try to view the Please upgrade your wireless router settings. Please check your firmware. Mac ... 4.0 or above iPhone®/iPad® iOS version 7.0 or above. By remote Camera. Connectivity Issues Even though I am accessing a video stream screen to hear audio. default the audio is shown as remote. This Camera, I am accessing my Camera from time to time to...

User Guide
Page 65
... 0890 (UK only) +44 (0) 8187 62092 (ROI) To order a replacement battery pack, contact customer service. BINATONE or its authorised distributor at no charge repair or replace any Products or Accessories that this Warranty. General Information 65 Read this Warranty Cover? What Does this User's Guide or the Quick Start Guide. 2. Subject to the first consumer purchaser, and is covered? ENGLISH...
... 0890 (UK only) +44 (0) 8187 62092 (ROI) To order a replacement battery pack, contact customer service. BINATONE or its authorised distributor at no charge repair or replace any Products or Accessories that this Warranty. General Information 65 Read this Warranty Cover? What Does this User's Guide or the Quick Start Guide. 2. Subject to the first consumer purchaser, and is covered? ENGLISH...

User Guide
Page 68
... by you, and supersede any agent, employee or staff of BINATONE, that show evidence of the problem; or (d) nonconforming or non-Motorola branded housings, or parts, are excluded from service, testing, adjustment, installation, maintenance, alteration, or modification in your box, a completed warranty card showing the serial number of the Product; (d) a written description of tampering; (c) mismatched board serial...
... by you, and supersede any agent, employee or staff of BINATONE, that show evidence of the problem; or (d) nonconforming or non-Motorola branded housings, or parts, are excluded from service, testing, adjustment, installation, maintenance, alteration, or modification in your box, a completed warranty card showing the serial number of the Product; (d) a written description of tampering; (c) mismatched board serial...
User Guide
Page 71
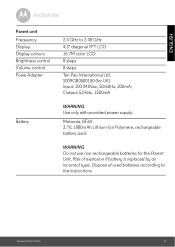
.... Motorola, BF6X 3.7V, 1880mAh Lithium-Ion Polymere, rechargeable battery pack WARNING Do not use non-rechargeable batteries for UK) Input: 100-240Vac, 50/60Hz, 300mA; General Information 71 ENGLISH Parent unit Frequency Display Display colours Brightness control Volume control Powe Adapter Battery 2.4 GHz to the instructions. S009GB0500150 (for the Parent Unit. Output: 5.0Vdc, 1500mA WARNING Use only with provided power supply...
.... Motorola, BF6X 3.7V, 1880mAh Lithium-Ion Polymere, rechargeable battery pack WARNING Do not use non-rechargeable batteries for UK) Input: 100-240Vac, 50/60Hz, 300mA; General Information 71 ENGLISH Parent unit Frequency Display Display colours Brightness control Volume control Powe Adapter Battery 2.4 GHz to the instructions. S009GB0500150 (for the Parent Unit. Output: 5.0Vdc, 1500mA WARNING Use only with provided power supply...


